When mornings get hectic—and honestly, when aren’t they hectic?—I need something fantastic ready to go. I’ve tested a million quick breakfast ideas, but nothing beats the simplicity and heartiness of these Fruit Nut Breakfast Tarts. Seriously, these are my secret weapon against weekday chaos!
I’m talking about a tender, buttery oat crust that holds up beautifully, topped with jammy fruit and a satisfying crunch. You mix them up in one pan, bake them while you’re getting ready, and suddenly, you have 9 perfectly portioned, satisfying meals waiting for you. That’s why I’ve perfected this recipe over the years; it’s an easy breakfast that tastes like you spent way more time on it than you actually did.
Forget fussy pastries! These Fruit Nut Breakfast Tarts are robust, naturally sweet thanks to the preserves, and they keep so well in the pantry. If you’re looking for a make-ahead breakfast that everyone will actually look forward to eating, stick around. My experience tells me this one is going straight into your rotation!
Why You Will Love These Fruit Nut Breakfast Tarts
I know you’re busy, so let me tell you why these Fruit Nut Breakfast Tarts are about to become your new favorite thing to bake. They check every box: quick, satisfying, and they taste amazing straight from the counter the next day. They are truly the perfect easy breakfast solution.
- Speed and Convenience for Busy Mornings: We’re talking 15 minutes of prep and 35 minutes in the oven. That’s less than an hour total for nine servings! You bake them Sunday night, and you’ve got breakfast handled until Wednesday. No fuss, no messy individual muffin tins to clean later!
- Hearty, Naturally Sweet Flavor Profile: That oat crust isn’t just for show; it gives you staying power when you need energy. Plus, using fruit preserves means you get that deep, jammy sweetness without having to fuss with fresh fruit prep. The nuts on top just add that perfect little *snap*!
Equipment Needed for Your Fruit Nut Breakfast Tarts
You don’t need a fancy setup for these Fruit Nut Breakfast Tarts, which is another reason I love them! Keep your baking simple. We are aiming for efficiency here, not complicated steps that require a dozen specialized gadgets. Just grab the basics you probably already have hanging out in your cupboards.
Essential Baking Gear
- An 8 x 8-inch baking pan. This size is crucial for getting the right thickness for the crust and topping layers.
- A large mixing bowl for combining all the dry ingredients and the butter.
- A sturdy spoon or spatula for mixing everything together until it looks like damp crumbs.
Gathering Ingredients for Fruit Nut Breakfast Tarts
When we assemble these Fruit Nut Breakfast Tarts, I always lay everything out first. It’s called *mise en place*, but really, it’s just my way of making sure I don’t accidentally use salt instead of sugar! Because this recipe relies on a specific texture in the crust, being precise with your measurements, especially the wet and dry ratios, is super important. Trust me on this one; slightly off ratios mean a crumbly mess instead of a sturdy tart.
Dry Components for the Oat Crust
For the base and the topping crumble, you need to get these dry ingredients measured perfectly. You’ll want 1\u00bd cups of good old rolled oats—not the instant kind, please! Then grab 1 cup of all-purpose flour, \u00bd cup of packed brown sugar (that molasses flavor is key!), \u00bc teaspoon of baking powder, and just a tiny pinch, \u00bc teaspoon, of salt to balance everything out. Mix these together really well before anything wet touches them.
Filling and Topping Requirements
This is where the flavor really comes in! For the jammy layer, you need \u00be cup of your favorite fruit preserves. I usually go for raspberry or apricot—something thick works best. Then, for the texture contrast, you need about \u2153 cup of chopped dried fruit. Raisins, cranberries, chopped dates—whatever you have! Finally, sprinkle on \u2153 cup of chopped nuts. Walnuts or pecans are my go-to because they toast up beautifully in the oven.
Step-by-Step Instructions for Making Fruit Nut Breakfast Tarts
Okay, now for the fun part! Getting these Fruit Nut Breakfast Tarts assembled is just as easy as gathering the ingredients, I promise. We are building this in layers, and we need to be mindful of that butter temperature, so make sure yours has cooled down a bit before you start combining things. Follow these steps exactly, and you’ll end up with 9 perfect squares.
Preparing the Base Crust Mixture
First things first: get that oven ready to go! Preheat your oven to 350\u00b0F. While it’s warming up, grease that 8 x 8-inch baking pan really well—you don’t want any sticking later, trust me. Now, take all those dry ingredients we measured out—the oats, flour, sugar, baking powder, and salt—and dump them into your large bowl. Whisk them up really thoroughly so everything is evenly distributed. This is important for a consistent bake!
Next, drizzle in your \u00bd cup of melted butter. Remember, it needs to be cooled slightly, not hot! Use a spatula or your hands to stir it all together. You aren’t kneading bread here; you’re just mixing until the whole thing looks like damp, sandy crumbs. It should hold together if you squeeze a handful, but still be crumbly when you let it go.
Assembling the Fruit Nut Breakfast Tarts Layers
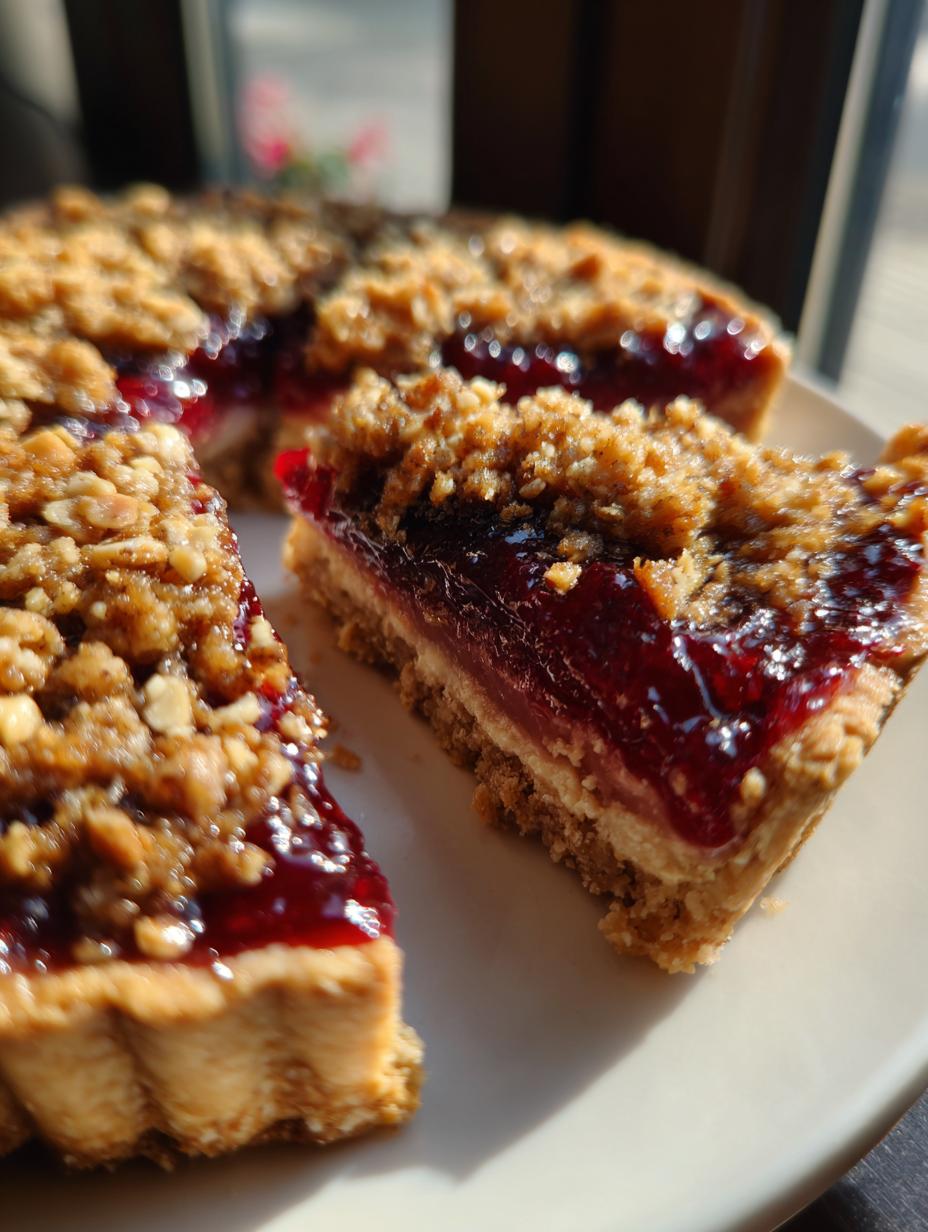
Time to build! Take about two-thirds of that oat crumb mixture we just made and press it firmly into the bottom of your prepared pan. Use the flat bottom of a measuring cup or just your knuckles to really pack it down. This forms the sturdy base for our tarts. Don’t be shy with the pressing!
Once the base is locked in, grab your \u00be cup of fruit preserves. Spread those preserves evenly across the crust. Try to get it right to the edges, but don’t let it ooze up the sides too much. After the jam is smooth, sprinkle your chopped dried fruit and your \u2153 cup of chopped nuts right over the top of the preserves. This is the crunchy, flavorful middle layer!
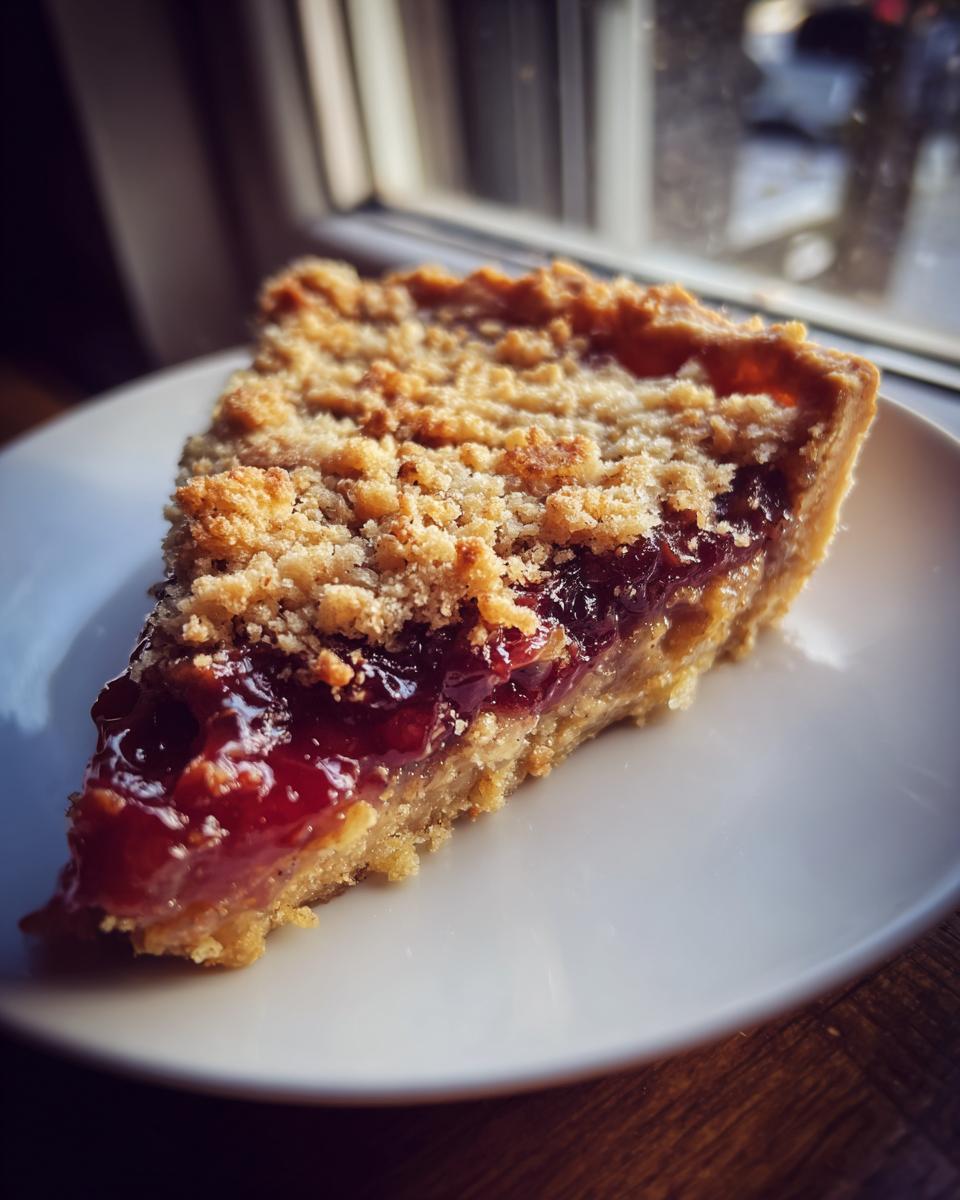
Finally, take the remaining one-third of the oat mixture. You want this to be a loose crumble on top. Gently sprinkle it over the fruit and nuts. Do not press this top layer down at all! Letting it stay loose helps it brown nicely and gives you that signature crumble texture on top of the Fruit Nut Breakfast Tarts.
Baking and Cooling for the Best Texture
Pop that pan into the 350\u00b0F oven and let it bake for 30 to 35 minutes. You’ll know they are done when the top edges start looking just lightly golden brown. Keep an eye on them around the 30-minute mark; ovens vary so much!
This last step is the hardest part, but you absolutely must follow it: Let the tarts cool completely in the pan before you even think about slicing them. If you try to cut them warm, that oat crust will just crumble apart, and you’ll lose that defined tart shape. Cooling lets the butter and sugars firm up, giving you those clean, beautiful squares. Seriously, give them at least an hour on a wire rack until they are totally cool to the touch.
Tips for Success Making Fruit Nut Breakfast Tarts
Even with such an easy recipe, there are a couple of little tricks that really elevate these Fruit Nut Breakfast Tarts from good to absolutely fantastic. I’ve made enough batches to know exactly where things can go slightly sideways if you rush the process. A little attention now saves you from a crumbly mess later!
Butter Temperature Matters
I briefly mentioned this before, but it’s worth repeating because it’s the secret to that perfect oat crust texture. You need the butter melted, yes, but it absolutely must be cooled down before you add it to the dry ingredients. If the butter is too hot, it melts the sugar instantly and steams the flour, resulting in a dense, hard brick instead of that beautiful, crumbly texture we want. We are aiming for damp sand, not cookie dough!
Achieving an Even Bake
Since this is a single-pan bake, hot spots in your oven can sometimes cause one corner to brown much faster than the others. If you notice that after about 20 minutes, the edges are looking dark while the center is still pale, just gently rotate the pan 180 degrees. This ensures all nine of your Fruit Nut Breakfast Tarts get that lovely, even golden finish we are looking for.
Customizing Your Fruit Nut Breakfast Tarts
The beauty of these Fruit Nut Breakfast Tarts is how well they adapt to whatever you have on hand. They are so forgiving, which makes them perfect for using up odds and ends in the pantry. You don’t need a whole new shopping trip to change things up next week!
Swapping Dried Fruit Choices
If you’re tired of the same dried fruit, go wild! I often swap out whatever I used last time. Chopped dried apricots give a lovely tang that cuts through the sweetness of the preserves. Or, if you want to stick closer to a classic flavor profile, plump raisins work just as well. Just make sure whatever you choose is chopped into relatively small pieces so they distribute evenly throughout the filling layer.
Nut Alternatives and Additions
Don’t feel locked into walnuts or pecans! Almonds are fantastic here—they toast up really nicely and give a slightly different crunch. You could even use pepitas (pumpkin seeds) if you want a different seed/nut texture. If you want to add a little extra something, try mixing about a teaspoon of cinnamon right into that top crumble layer before baking. It really enhances the warm flavor of the Fruit Nut Breakfast Tarts!
Storing and Reheating Leftover Fruit Nut Breakfast Tarts
I love that these Fruit Nut Breakfast Tarts are designed for make-ahead mornings. They actually taste better the next day once the flavors have settled into that oat crust! Knowing how to store them properly means you get that fresh-baked flavor all week long without any extra effort.
Optimal Storage Conditions
The best way to keep these tarts fresh is at room temperature. Once they are completely cooled—and I mean totally cool, or they’ll get soggy—store them in an airtight container. You can layer them between sheets of parchment paper if you need to stack them. Because they don’t have a dairy topping, they don’t need the fridge, which is great because refrigeration can sometimes dry out the oat crust too much.
Reheating Instructions for Freshness
If you want that warm, gooey fruit preserves layer back, don’t reach for the microwave! Microwaving makes the crust chewy. Instead, pop an individual tart or a few squares onto a baking sheet and warm them in a toaster oven or a regular oven set to about 300\u00b0F for about 5 to 7 minutes. This brings back the crispness of the topping perfectly!
Answering Common Questions About Your Breakfast Tarts
I get so many great questions about these Fruit Nut Breakfast Tarts once people start baking them! It shows you’re invested in making the perfect easy breakfast, and I love that. Here are the top three things I hear most often about getting this recipe just right.
Can I make the crust gluten-free?
Yes, you absolutely can! The structure of the oat crust relies heavily on the flour, so if you need to go gluten-free, make sure you swap out the all-purpose flour for a good quality 1-to-1 gluten-free baking blend. And here is the super important part: make sure your rolled oats are certified gluten-free. Oats are often cross-contaminated, so check the label if you have sensitivity issues!
What is the best fruit preserve to use?
Honestly, use what you love! But if you want the best result, look for a high-quality preserve that is thick—like one labeled “jam” or “fruit spread.” If you use a very thin jelly, it tends to run everywhere and soak into the oat crust too much before it sets up in the oven. A thick preserve stays put and gives you those nice jammy pockets.
Can these be made in muffin tins instead?
You can totally do that if you want smaller, grab-and-go portions! If you use a standard 12-cup muffin tin, you’ll need to lightly press the base mixture into the bottom of each cup. Remember, since the tarts will be thinner, they won’t need the full 30 to 35 minutes to bake. Start checking them around the 20-minute mark. They are done when the tops look golden, just like the 8×8 pan version!
Nutritional Estimates for One Tart
I always like to give a rough idea of what you’re getting when you sit down with one of these hearty Fruit Nut Breakfast Tarts. Please remember this is just an estimate based on standard ingredient measurements—my kitchen measurements might be slightly different than yours!
Estimated Nutritional Breakdown Table
This table shows the approximate values for one of the nine servings:
| Component | Estimate Per Tart |
|---|---|
| Calories | 290 |
| Total Fat | 14 g |
| Carbohydrates | 38 g |
| Protein | 5 g |
Sharing Your Fruit Nut Breakfast Tarts Experience
I would absolutely love to hear what you thought once you’ve made a batch! Did you use apricot preserves or stick with raspberry? Did the oat crust turn out perfectly crumbly for you? Come back here and leave a rating for these Fruit Nut Breakfast Tarts, or better yet, snap a picture and tag me on social media! Seeing your homemade breakfasts makes my day! You can also check out more of my recipe ideas on Pinterest or read more about my process on Medium.
Print
9 Amazing Fruit Nut Breakfast Tarts
- Total Time: 50 minutes
- Yield: 9 tarts 1x
- Diet: Vegetarian
Description
Easy Fruit and Nut Breakfast Tarts. These tarts are naturally sweet, hearty, and perfect for make-ahead mornings using simple pantry ingredients. A tender oat crust supports a jammy fruit filling and crunchy nuts.
Ingredients
- 1½ cups rolled oats
- 1 cup all-purpose flour
- ½ cup brown sugar
- ¼ teaspoon baking powder
- ¼ teaspoon salt
- ½ cup unsalted butter, melted and cooled
- ¾ cup fruit preserves
- ½ cup chopped dried fruit
- ⅓ cup chopped nuts
Instructions
- Preheat oven to 350°F and grease an 8 x 8-inch baking pan.
- In a large bowl, mix oats, flour, brown sugar, baking powder, and salt.
- Stir in melted butter until the mixture resembles damp crumbs.
- Press about two-thirds of the mixture firmly into the bottom of the prepared pan.
- Spread fruit preserves evenly over the crust.
- Sprinkle dried fruit and chopped nuts evenly over the preserves.
- Crumble the remaining oat mixture over the top without pressing down.
- Bake for 30 to 35 minutes until the top is lightly golden.
- Cool completely in the pan before slicing into tarts.
Notes
- This recipe makes 9 individual tarts.
- Use your favorite fruit preserves for the filling.
- Ensure the butter is cooled before mixing it into the dry ingredients.
- Prep Time: 15 minutes
- Cook Time: 35 minutes
- Category: Breakfast
- Method: Baking
- Cuisine: American
Nutrition
- Serving Size: 1 tart
- Calories: 290
- Sugar: Information not provided
- Sodium: Information not provided
- Fat: 14 g
- Saturated Fat: Information not provided
- Unsaturated Fat: Information not provided
- Trans Fat: Information not provided
- Carbohydrates: 38 g
- Fiber: Information not provided
- Protein: 5 g
- Cholesterol: Information not provided