
Freezer‑friendly chicken enchilada casserole is the answer to every busy weeknight when you want real food flavor without the real-time effort. Hi everyone, I’m Jordan Bell, checking in from Asheville, North Carolina. When I started my journey shedding 80 pounds, I realized I couldn’t give up the hearty, comforting flavors I grew up with. That’s why my whole philosophy on Easy Detox Recipes centers around taking those rich Southern comfort food staples and making them clean and accessible.
I learned quickly that the real secret to staying on track wasn’t restriction; it was preparation. If dinner was ready to go straight from the freezer to the oven, I wasn’t reaching for takeout. This layered chicken enchilada casserole is exactly that—a cozy, cheesy hug in a dish that lets you skip the stress later in the week. Trust me, having a fully assembled, ready-to-bake meal waiting is a game changer!
Assembling Your Freezer‑friendly Chicken Enchilada Casserole
Okay, now that you know why this recipe is my absolute go-to for stress-free meals, let’s talk about what you need to gather. Don’t let the ingredient list scare you; it’s just about layering deliciousness! Having all your components ready makes putting together this freezer‑friendly chicken enchilada casserole a breeze before it heads into the deep freeze.
Essential Ingredients for the Freezer‑friendly Chicken Enchilada Casserole
When you’re making a freezer‑friendly chicken enchilada casserole, quality matters because you want it to taste as good thawed as it does fresh! You’ll need 3 cups of cooked shredded chicken breast—rotisserie is my secret shortcut here. Grab 3 cups of red enchilada sauce, and don’t skip the 1 cup of plain Greek yogurt or sour cream for that creamy tang. We’re adding texture with 1 can of black beans (rinsed!) and 1 cup of corn. Don’t forget the flavor boosters: 1 can of green chiles, plus 1 teaspoon each of cumin, chili powder, garlic powder, and onion powder. Finally, you need 12 to 14 corn tortillas, quartered, and 2 and 1/2 cups of your favorite shredded cheese blend.
Necessary Tools for Making This Casserole
You really don’t need much fancy gear for this one, which is the best part! Make sure you have a large mixing bowl for combining all that gorgeous filling. The main tool is a 9 by 13 inch baking dish—or two smaller ones if you’re splitting your batch. And, of course, you absolutely need plastic wrap and heavy-duty foil to protect your masterpiece for its long nap in the freezer.
Step-by-Step Instructions for Your Freezer‑friendly Chicken Enchilada Casserole
This is where the magic happens! Putting together this freezer‑friendly chicken enchilada casserole is almost as fun as eating it—almost! Since we are layering everything perfectly, take your time here. If you are freezing this, make sure you use freezer-safe dishes from the start. It’s a straightforward process, but attention to detail in the mixing ensures every bite is perfect when you finally bake it.
Mixing the Flavorful Filling
First things first: let’s get that chicken mixture ready. In your big bowl, toss in your 3 cups of shredded chicken. Now, pour in 2 cups of that bright red enchilada sauce—save the rest for layering! Add your 1 cup of Greek yogurt or sour cream—this is key for creaminess, don’t skip it! Throw in the rinsed black beans, the corn, and those little diced green chiles. Now for the spices: the cumin, chili powder, onion powder, garlic powder, salt, and pepper all go in. Use a sturdy spatula or spoon and mix everything until that chicken is completely coated in that creamy, spicy sauce. You want every piece of chicken to taste like a fiesta!
Building the Layers for the Freezer‑friendly Chicken Enchilada Casserole
Time to build! Start by lightly greasing your dish, then spread just a thin layer of the remaining enchilada sauce on the bottom. This stops the tortillas from sticking, which is crucial for a clean slice later. Next, lay down your first layer of quartered corn tortillas, overlapping them just a bit. Spoon about a third of that incredible chicken filling right on top and spread it gently. A little sprinkle of cheese goes on next. Repeat this sequence—tortillas, chicken mix, cheese—two more times. For the very top layer, put down your last tortillas, drizzle any remaining sauce you have, and finish it all off with the last of that shredded cheese. Remember, when you’re pressing down, do it gently; we want the layers to stick but not get squashed into oblivion for this beautiful freezer‑friendly chicken enchilada casserole.
Baking and Serving Your Fresh Casserole
If you decided to bake this right away instead of freezing it, congratulations, you’re about to eat fast! Cover your assembled casserole loosely with foil first. We want to steam it gently before exposing that cheese. Pop it into a preheated oven at 375°F for about 20 minutes. After that initial steam, take the foil off so the top can get golden and bubbly. Bake uncovered for another 10 to 15 minutes.
The most important part here is safety and texture. You absolutely must check the center to make sure it hits an internal temperature of at least 165°F. Nobody wants lukewarm enchiladas! Once it’s piping hot, pull it out and let it rest for a solid 10 minutes. Seriously, don’t skip this resting time, or your layers will turn into a sloppy mess when you try to serve it.
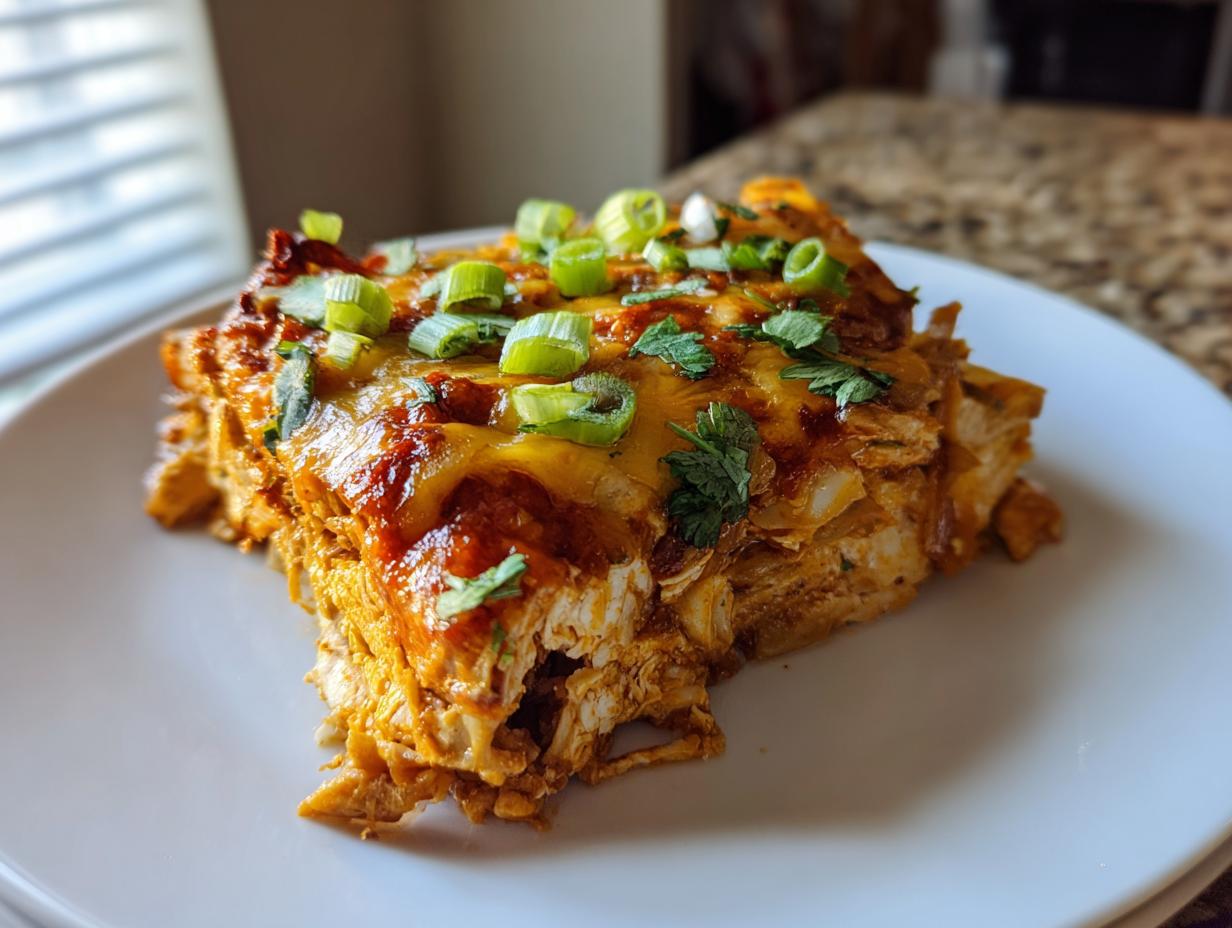
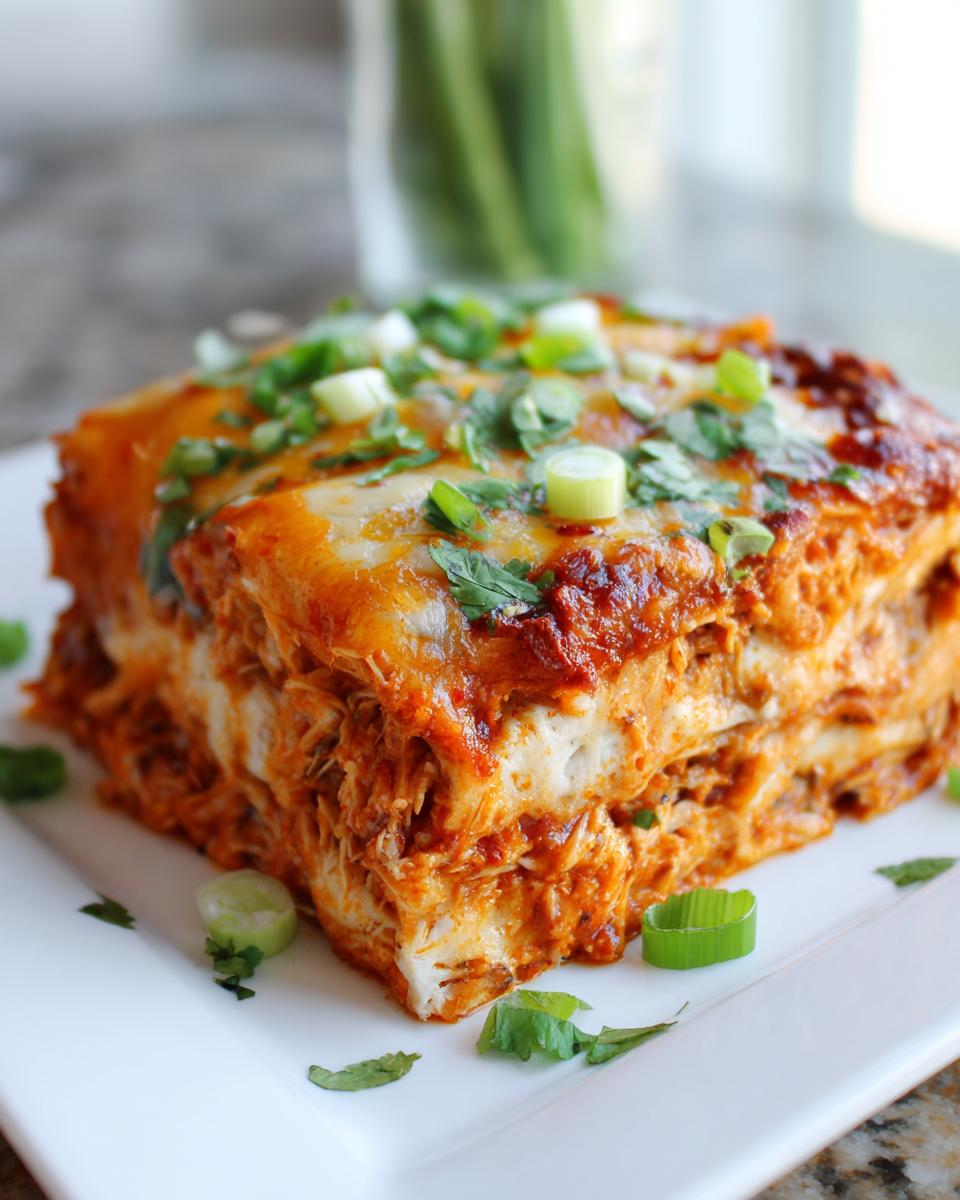
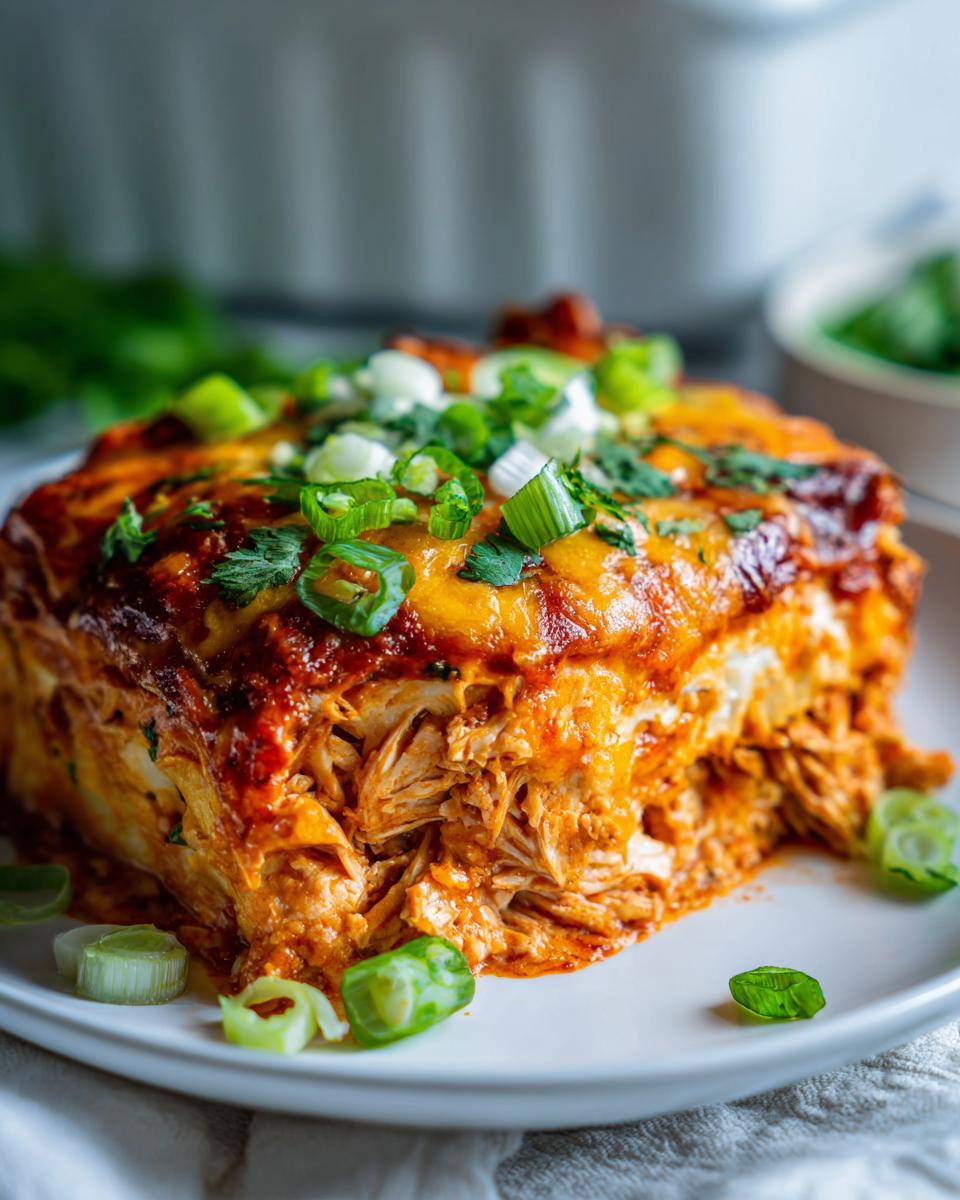
Once it’s settled, it’s time for the fresh finish! This is what elevates the whole dish from comfort food to *amazing* comfort food. Sprinkle generously with chopped fresh cilantro, thinly sliced green onions, and some diced avocado for that cool, creamy contrast. Hand out lime wedges because a good squeeze of fresh lime brightens up all those rich, savory flavors!
Mastering the Freezer Component of This Freezer‑friendly Chicken Enchilada Casserole
This recipe truly shines because it’s designed to be your secret weapon against busy days. Making a freezer‑friendly chicken enchilada casserole ahead of time means you’ve already done the hard work! Once you’ve assembled the entire dish according to the layering instructions, you need to let it cool down just a bit—warm casserole doesn’t wrap well, trust me. Once it’s cooled slightly, cover it super tight. I mean tight! First, use plastic wrap, making sure it touches the surface of the cheese if you can, then cover the whole thing securely with heavy-duty foil. Don’t forget to label it with the date and what it is. You can safely freeze this beauty for up to three months. That’s three months of guaranteed easy dinners!
Baking Instructions After Thawing
If you planned ahead, take the casserole straight from the freezer to the refrigerator for about 24 hours to thaw slowly. This slow thaw helps everything warm up evenly. Once thawed, take off that plastic wrap—it tends to stick terribly if you try to remove it cold—and replace it with fresh foil. Pop it into a 375°F oven for about 30 minutes covered. After that, remove the foil and bake another 10 to 15 minutes until that cheese is bubbly and the middle is completely hot.
Baking Instructions Straight From Frozen
Sometimes life happens, and you need that freezer‑friendly chicken enchilada casserole *now*! You can absolutely bake it straight from frozen, but it takes longer, so adjust your expectations. First, just remove the plastic wrap, but keep the foil covering on tight. You’ll bake it at a slightly lower temperature, around 350°F, for about an hour covered. Then, uncover it and let it bake for another 20 to 30 minutes until the center is piping hot all the way through and the cheese looks beautifully browned.
Tips for Perfect Make Ahead Casserole Results
Even though this is a simple assembly job, a few little tricks can take your freezer‑friendly chicken enchilada casserole from good to absolutely legendary. First, I really want you to ditch the pre-shredded bags of cheese if you can. Seriously! Shredding cheese right off the block melts so much smoother and avoids those anti-caking agents that sometimes make store-bought cheese grainy when it bakes up later.
Another tip that came from my own kitchen experiments is about moisture control. If you’re worried about sogginess, especially when freezing, try swapping half of that red enchilada sauce for salsa verde. It keeps the flavor complex but often results in a slightly less liquid base, which is great for make-ahead meals. Also, remember to press down gently when you are building those layers—not smashing, just a gentle tuck—so that when you finally slice into the finished casserole, you get those clean, beautiful layers.
And hey, if you want a richer flavor profile next time, swap the chicken breast for boneless, skinless chicken thighs. They stay so much more tender after freezing and reheating, making your freezer‑friendly chicken enchilada casserole taste like it was just made!
Common Questions About This Make Ahead Chicken Dish
I get so many messages asking about tweaks for this dish, which is great because it shows how versatile it is! People often ask about making it spicier. If you want more kick, don’t hesitate to toss in some chopped jalapeño with your corn and beans, or just bump up that chili powder measurement next time around.
Another frequent question is about the beans. If you aren’t a fan of black beans, you can definitely swap them out for pinto beans, or if you’re trying to keep the protein way up, you can skip the beans entirely, though you might want to add a little extra chicken to compensate for the volume.
What about the sauce? If you prefer a milder flavor profile, swapping out half of the red enchilada sauce for salsa verde is a fantastic idea. It lightens the color and mellows the heat beautifully. It works great for this make ahead chicken dish! You can see more of my recipe ideas over on my Medium profile.
And storage longevity? When properly wrapped and frozen, this casserole keeps perfectly for up to three months. That’s a long time to have a delicious, ready-to-bake meal hiding in your deep freeze! For more visual inspiration, check out my Pinterest boards.
Storing Leftovers of Your Freezer‑friendly Chicken Enchilada Casserole
Even though this freezer‑friendly chicken enchilada casserole is designed to vanish quickly, if you happen to have any left after dinner, storing them is simple. Keep any leftovers tightly covered in an airtight container in the refrigerator for up to four days. The key to reheating is moisture!
When you’re ready for round two, scoop out a portion and heat it gently in the microwave, or add a tiny splash of extra enchilada sauce to the top if you’re reheating it in the oven. That little bit of liquid prevents the tortillas from getting tough and keeps the casserole tasting fresh! If you are looking for other great chicken recipes, you might enjoy my guide on shredded chicken enchiladas.
Estimated Nutritional Information for This Dish
I always tell folks that since we’re using whole ingredients and making this casserole from scratch, the nutrition can change based on the exact cheese or sauce you use. These numbers are just a general guideline based on the recipe as written, so take them with a grain of salt! If you are interested in other ways to prepare chicken, check out this recipe for creamy oven baked chicken thighs.
| Calories | 430 |
| Protein | 32 grams |
| Total Fat | 17 grams |
| Carbohydrates | 35 grams |
Disclaimer: Nutritional values are estimates and may vary based on specific ingredient choices.
Print
Amazing 1 Freezer‑friendly chicken enchilada casserole
- Total Time: 55 minutes
- Yield: 6 to 8 servings 1x
- Diet: Vegetarian
Description
Freezer friendly chicken enchilada casserole layers tortillas, juicy chicken, and cheese in red sauce for a cozy bake that reheats perfectly on busy nights.
Ingredients
- 3 cups cooked shredded chicken breast, rotisserie or poached
- 3 cups red enchilada sauce, divided
- 1 cup plain Greek yogurt or sour cream
- 1 can black beans, 15 ounces, drained and rinsed
- 1 cup corn kernels, frozen and thawed or canned and drained
- 1 can diced green chiles, 4 to 5 ounces
- 1 teaspoon ground cumin
- 1 teaspoon chili powder
- 1 teaspoon garlic powder
- 1 teaspoon onion powder
- 1 teaspoon fine salt, plus more to taste
- 0.5 teaspoon black pepper
- 12 to 14 corn tortillas, cut into quarters
- 2 and 1/2 cups shredded cheese such as cheddar, Monterey Jack, or Mexican blend, divided
- Fresh cilantro, chopped (for topping)
- Sliced green onions (for topping)
- Diced avocado (for topping)
- Lime wedges (for serving)
Instructions
- Grease a 9 by 13 inch baking dish with oil or cooking spray, or prepare two smaller freezer safe pans.
- In a large bowl stir together the shredded chicken, 2 cups of enchilada sauce, Greek yogurt or sour cream, black beans, corn, diced green chiles, cumin, chili powder, garlic powder, onion powder, salt, and pepper until evenly coated.
- Spread a thin layer of the remaining enchilada sauce over the bottom of the baking dish to prevent sticking.
- Arrange a layer of tortilla quarters over the sauce, overlapping slightly. Spoon a third of the chicken mixture over the tortillas and spread it evenly.
- Sprinkle a handful of shredded cheese over the chicken layer. Repeat the layers of tortillas, chicken mixture, and cheese two more times. Finish with tortillas, a drizzle of the last bit of sauce, and the remaining cheese on top.
- If baking right away, cover the casserole loosely with foil and bake at 375°F for about 20 minutes. Remove the foil and bake 10 to 15 minutes more until the sauce is bubbling and the cheese is melted and lightly golden.
- Check that the center of the casserole mixture reached an internal temperature of at least 165°F (74°C) before serving.
- Let the baked casserole rest for 10 minutes so the layers set. Top with cilantro, green onions, diced avocado, and a squeeze of lime.
- To freeze before baking, assemble the casserole as directed but do not bake. Let the dish cool slightly, cover tightly with plastic wrap then foil, label with name and date, and freeze for up to 3 months.
- To bake after thawing, transfer the frozen casserole to the refrigerator for about 24 hours. Remove plastic wrap, cover again with foil, then bake at 375°F for about 30 minutes. Uncover and bake 10 to 15 minutes more until hot and bubbly.
- To bake from frozen, remove plastic wrap, replace the foil, and bake at 350°F for about 60 minutes covered. Uncover and bake 20 to 30 minutes more until the center is piping hot and the cheese is melted and browned.
Notes
- Use boneless skinless chicken thighs instead of breast for a richer, more tender casserole.
- Swap half of the red enchilada sauce for salsa verde for a milder flavor.
- Add chopped jalapeño or extra chili powder for more heat.
- Replace black beans with pinto beans or omit beans for higher protein.
- Shred your own cheese from a block for smoother melting.
- Press down gently when building layers so the casserole slices neatly.
- Place the baking dish on a rimmed sheet to catch any sauce drips.
- Prep Time: 20 minutes
- Cook Time: 30 to 35 minutes
- Category: Casserole
- Method: Bake
- Cuisine: Tex Mex
Nutrition
- Serving Size: 1 serving
- Calories: 430
- Sugar: N/A
- Sodium: N/A
- Fat: 17 grams
- Saturated Fat: N/A
- Unsaturated Fat: N/A
- Trans Fat: N/A
- Carbohydrates: 35 grams
- Fiber: N/A
- Protein: 32 grams
- Cholesterol: N/A
