Okay, let’s talk pizza. If you’ve ever tried making gluten-free pizza at home, you know the struggle. It’s usually either cardboard dry or a sad, floppy mess that can’t support a single topping. I spent what felt like years trying to nail down a recipe that actually *chews* like real pizza dough, and honestly, I almost gave up!
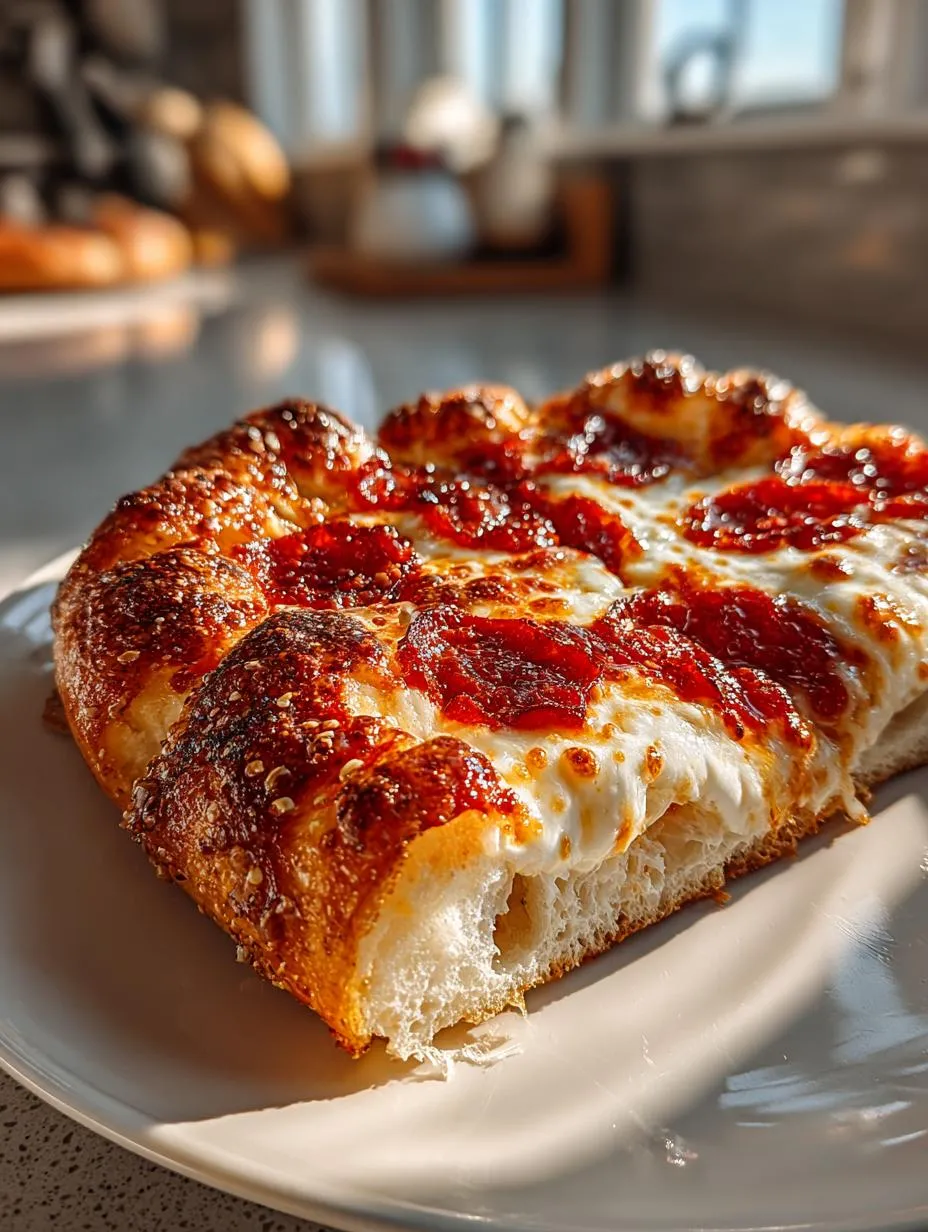
But I cracked the code, I really did! This recipe for easy gluten free pizza dough that’s chewy is the one I finally settled on after testing at least twenty different flour combinations. Forget those crumbly disasters; this dough is sturdy, it stretches beautifully, and it gets those perfect little air bubbles when it bakes. It’s the reliable, homemade gluten free crust you’ve been dreaming about for Friday night.
The secret isn’t just one thing; it’s the balance of that vinegar, the honey to feed the yeast, and making sure you let the dough rest just long enough. Trust me, once you pull this golden, chewy base out of the oven, you’ll never go back to the store-bought stuff again. It just works, every single time!
Essential Ingredients for Your Easy Gluten Free Pizza Dough That’s Chewy
Okay, listen up because this is where we separate the good GF dough from the truly great GF dough. When you’re working without gluten, you can’t just throw things in and hope for the best. Every single measurement matters here because we are fighting gravity and dryness!
You need to be precise with the moisture levels, especially the water temperature, or your yeast won’t wake up, and then we’re starting off on the wrong foot. Also, and this is non-negotiable, you must use a pre-blended gluten free flour blend that already contains xanthan gum. Trying to calculate and add separate xanthan gum to this specific formula just messes up the hydration.
Make sure you grab the good olive oil; we use it both in the dough and on top for flavor and crispness. Don’t skimp here—the fat helps tremendously with that chewy texture we’re chasing. If you want to see more of my kitchen tips, check out my writing on Medium.
Ingredient Specifications for Chewy Gluten Free Pizza Dough
Let’s get specific so you don’t have any surprises later. First, the water needs to be warm, not hot—think bathwater temperature, about 110 degrees Fahrenheit. If it’s too hot, you kill the yeast instantly, and then you’ve just got sweet, warm water.
For the flour, you absolutely must use a quality gluten free all purpose baking flour that already has xanthan gum included. Brands vary wildly, so stick to the one you know works well in your baking projects. We need that gum to mimic gluten’s structure, and it needs to be there from the start!
Finally, the egg needs to be large, and the vinegar should be plain white vinegar. It seems weird, but that little bit of acid helps tenderize the final crust structure. Don’t skip it!
Equipment Needed to Make Your Easy Gluten Free Pizza Dough That’s Chewy
You don’t need a stand mixer for this, which is great news! I usually just use a good sturdy wooden spoon to get things started, since this dough gets sticky fast. You will certainly need a large mixing bowl, obviously.
The most important gear, though, is the baking sheet you plan to use—make sure it’s big enough for a 12-inch round crust. And please, please, please use parchment paper! It saves your sanity when you’re trying to transfer sticky gluten-free dough. It’s the best friend of any homemade gluten free crust.
Step-by-Step Instructions for Easy Gluten Free Pizza Dough That’s Chewy
Okay, here’s where we actually turn ingredients into the best easy gluten free pizza dough that’s chewy you’ve ever made. Don’t rush these steps, especially the rising part. Gluten-free dough behaves differently than wheat dough, but if you follow this sequence, you’ll get a result that truly satisfies that pizza craving.
We start small by waking up the yeast, which is crucial for getting any lift at all in this dough. Then we mix everything until it’s a sticky mess—which is totally normal for GF!). After that, we let it rest and firm up a bit before we even think about rolling it out. The chilling stage is my little trick to make handling this sticky dough so much easier.
Activating the Yeast and Mixing the Easy Gluten Free Pizza Dough That’s Chewy
First things first: get that water warm, around 110 degrees F. Stir in your tablespoon of honey—that’s dinner for the yeast—and sprinkle the packet of instant yeast over the top. Now, walk away for five minutes. You absolutely must see foam! If you don’t see a nice frothy layer on top, your yeast is dead, and you need to start over with fresh yeast. Don’t substitute this step!
While that’s happening, grab your big bowl and whisk together your GF flour blend, the teaspoon of salt, and the baking powder. We want these dry things evenly distributed before we introduce the wet stuff. Once the yeast is foamy, pour it into the dry ingredients. Add the five tablespoons of olive oil, the egg, and that teaspoon of white vinegar. Mix it all together with a sturdy spoon. It’s going to look like a very thick, very sticky batter—it won’t look like traditional dough. That’s perfect!
Handling and Resting the Dough for a Chewy Texture
Once you’ve mixed until just combined—don’t overwork it, even though it’s GF—cover the bowl with plastic wrap or a kitchen towel. Find a warm spot in your kitchen, like near the stove, and let it sit for a full hour. It won’t double in size like regular dough, but it should puff up slightly and look a little airy. This is where the structure starts setting up.
Here’s the pro move that makes handling this so much less frustrating: after the hour rise, stick the whole covered bowl in the refrigerator for about 15 minutes. Seriously, do this! Gluten-free dough is notoriously sticky, and chilling it just slightly firms up the oils and water, making it much less messy when you transfer it to the parchment paper later. It’s a game-changer for getting that nice 12-inch circle.
Shaping and Par-Baking Your Homemade Gluten Free Crust
While the dough is chilling, get your oven preheated to 425 degrees F. Line a baking sheet with parchment paper—don’t try to roll this directly onto a greased pan, you’ll regret it! Once the dough is chilled, transfer it to the parchment.
Now gently knead in maybe one or two more tablespoons of the GF flour just until the surface isn’t sticking horribly to your hands. Then, gently press and roll it out into a 12-inch circle. Don’t worry about perfect edges; rustic looks great on pizza! Brush the entire surface generously with that last tablespoon of olive oil. This oil barrier is key to that chewy exterior.
Bake the crust plain, with no toppings, for exactly 12 minutes. This is the par-bake, and it locks in the structure so your crust doesn’t get soggy under the sauce. After 12 minutes, pull it out, add your sauce and toppings quickly, and pop it back in for another 8 to 12 minutes until everything is bubbly and the edges are golden brown. That combination of par-baking and the final bake is what guarantees a truly chewy result!
Tips for Success with Your Easy Gluten Free Pizza Dough That’s Chewy
Baking gluten-free can feel like walking a tightrope, but once you know these little tricks, you’ll be fine. The biggest challenge people face with any homemade gluten free crust is handling the dough when it’s warm—it just wants to stick everywhere! Remember that chilling step I mentioned? That’s your main defense against a sticky mess. You can find more helpful tips on my Pinterest boards.
Also, temperature consistency is huge. Make sure your oven is fully preheated to 425 degrees F before that crust goes in for its first bake. If the oven isn’t hot enough, the dough won’t set quickly enough, and you’ll end up with that sad, soft center we are trying so hard to avoid. Don’t peek too often during the par-bake either; let the heat do its job undisturbed!
Achieving the Perfect Chew in Your Homemade Gluten Free Crust
When you are forming that 12-inch round, use oiled hands or a rolling pin lightly dusted with flour, but press gently. You aren’t trying to force air out; you’re just trying to shape it. If you press too hard, you deflate the structure we worked so hard to build with the yeast!
For the final bake, once you add your toppings, watch the clock closely. If you load it up with heavy, wet toppings like tons of fresh mozzarella or watery vegetables, you might need that full 12 minutes for the second bake. If you keep your toppings light, you might only need 8 minutes. The goal is to see those edges getting nicely browned and firm before you pull it out. That deep golden color equals chewiness!
Serving Suggestions for Your Easy Gluten Free Pizza Dough That’s Chewy
Since this crust is so beautifully chewy and holds up so well, you can get a little adventurous, but my best advice is to keep it clean so you can really taste that homemade crust!
I find that heavy, wet toppings just weigh down any pizza, gluten-free or not. Stick to lighter sauces or even just a brush of pesto. For toppings, fresh basil, thinly sliced mushrooms, and good quality mozzarella are fantastic. If you are looking for a great sauce base, check out this garlic parmesan sauce.
If you love white pizza, try garlic oil, ricotta cheese, and maybe some thinly sliced prosciutto added after the bake. It lets that golden, chewy base really shine through without getting soggy on you!
Storing and Reheating Your Easy Gluten Free Pizza Dough That’s Chewy
Now, I know you probably won’t have any leftover pizza because this stuff disappears fast, but if you manage to save some baked pizza, or if you made an extra batch of dough and want to save it for later, I have the best tips for you. Storing gluten-free baked goods can be tricky because they sometimes dry out faster than wheat versions.
For the baked pizza, make sure it’s completely cooled before you wrap it up tightly in plastic wrap or put it in an airtight container. If you want to save the raw dough, wrap that ball tightly in plastic wrap and pop it in the fridge. It keeps well for a couple of days, giving you a quick pizza option later!
The key to reheating is bringing back that chewiness. Microwaving is the enemy here—it makes everything rubbery. We want heat that crisps the bottom again.
Storage and Reheating Table
Here’s the quick reference guide for keeping your pizza fresh and how to bring that chew back:
-
Storage Location
- Baked Pizza (Fridge): Up to 3 days
- Baked Pizza (Freezer): Up to 1 month (wrap slices individually)
- Raw Dough: Up to 2 days in the fridge
-
Reheating Method
- Baked Pizza: Oven or Toaster Oven at 350 degrees F for 5-8 minutes. For extra crispness, heat in a dry skillet over medium heat for 3 minutes per side!
- Raw Dough: Let it sit on the counter for about 30 minutes before rolling out.
Frequently Asked Questions About Chewy Gluten Free Pizza Dough
I get so many questions about this dough because I know how frustrating GF baking can be! People worry about substitutions or if their dough is looking “right” during the rise. Don’t stress; I’ve covered the most common issues I ran into when developing this perfect homemade gluten free crust recipe.
The main thing to remember is that gluten-free dough is more like a thick batter than a traditional kneadable dough, so its structure relies heavily on the gums and binders we add. Stick to the recipe as closely as you can, and you’ll be rewarded with that wonderfully chewy texture!
Can I use a different gluten free flour blend for this Easy Gluten Free Pizza Dough That’s Chewy?
This is the million-dollar question, isn’t it? The short answer is maybe, but you have to be careful. This recipe relies on the specific hydration balance created by a blend that already includes xanthan gum. If you swap out the flour brand, you might end up with a dough that’s too wet or too dry.
If your blend *doesn’t* have xanthan gum, you have to add it, or the crust will definitely fall apart. For every 1 cup of flour, you’d usually add about 1 teaspoon of xanthan gum, but since this dough is so different, I really suggest you stick to a blend you know works well for you that already has the gum integrated. It’s the safest bet for the best homemade gluten free crust!
Why is my Easy Gluten Free Pizza Dough That’s Chewy not rising much?
If your dough looks flat after an hour, nine times out of ten it’s the yeast. Did you check that foam after five minutes? If it didn’t froth up, the yeast was dead or the water was too hot or too cold. Always use a thermometer for that initial water warming step!
The other reason is the environment. Gluten-free dough needs a warm, draft-free spot to rise. If your kitchen is chilly, it won’t activate properly. Try putting the covered bowl inside your oven—turned OFF, of course—with the light on. That little bit of warmth usually gets the yeast moving along so you get that slight puff before chilling! If you need more baking inspiration, check out my yogurt cake recipe.
Nutritional Information Disclaimer
Hey, just a quick heads-up about the numbers! Since we’re all using slightly different brands of gluten-free flour, olive oil, and even honey, the exact nutrition facts can change from batch to batch.
These figures are estimates at best. I haven’t sent this off to a lab, so please treat the listed nutrition details as a general guideline. If you have serious dietary needs, you’ll want to plug in the exact brands you use to calculate it precisely!
Share Your Experience Making This Easy Gluten Free Pizza Dough That’s Chewy
Now it’s your turn! I’ve shared all my secrets for getting that perfect, chewy texture, but I want to know how it turned out in your kitchen. Did you manage to get that beautiful, sturdy crust you were hoping for?
Seriously, don’t be shy! Leave me a rating right here on the recipe card—five stars if you loved it, four if you have a small tweak you want to suggest. And if you have a picture or a little story about your pizza night, drop it in the comments below. I absolutely love hearing how this easy gluten free pizza dough that’s chewy worked for you!
Print
Amazing Easy Gluten Free Pizza Dough That’s Chewy 1
- Total Time: 1 hour 45 minutes
- Yield: 1 large pizza 1x
- Diet: Gluten Free
Description
This gluten free pizza dough is chewy, easy to make, and holds toppings well. A reliable homemade crust for any pizza night.
Ingredients
- 3/4 cup warm water
- 1 tablespoon honey
- 1 packet instant yeast
- 2 1/2 cups gluten free all purpose baking flour with xanthan gum
- 1 teaspoon salt
- 1 teaspoon baking powder
- 5 tablespoons olive oil
- 1 large egg
- 1 teaspoon white vinegar
- 1 tablespoon olive oil (for baking)
Instructions
- Warm the water to about 110°F. Stir in honey and yeast. Let sit for 5 minutes until foamy.
- In a large bowl, whisk gluten free flour, salt, and baking powder.
- Add yeast mixture, olive oil, egg, and vinegar to the dry ingredients.
- Mix with a spoon until a sticky dough forms.
- Cover the bowl and let the dough rise in a warm place for 1 hour until slightly puffed.
- Refrigerate the dough for 15 minutes to make handling simpler.
- Preheat oven to 425°F and line a baking sheet with parchment paper.
- Transfer dough to parchment. Gently knead in 1 to 2 tablespoons additional flour until smooth.
- Roll into a 12 inch round and brush the surface with olive oil.
- Bake for 12 minutes. Remove from oven, add toppings, then bake an additional 8 to 12 minutes until golden and cooked through.
Notes
- Par bake the crust fully before adding toppings to prevent a soft center.
- Prep Time: 15 minutes
- Cook Time: 30 minutes
- Category: Main Course
- Method: Baking
- Cuisine: American
Nutrition
- Serving Size: 1 serving
- Calories: 190
- Sugar: N/A
- Sodium: N/A
- Fat: 8 g
- Saturated Fat: N/A
- Unsaturated Fat: N/A
- Trans Fat: N/A
- Carbohydrates: 28 g
- Fiber: N/A
- Protein: 5 g
- Cholesterol: N/A