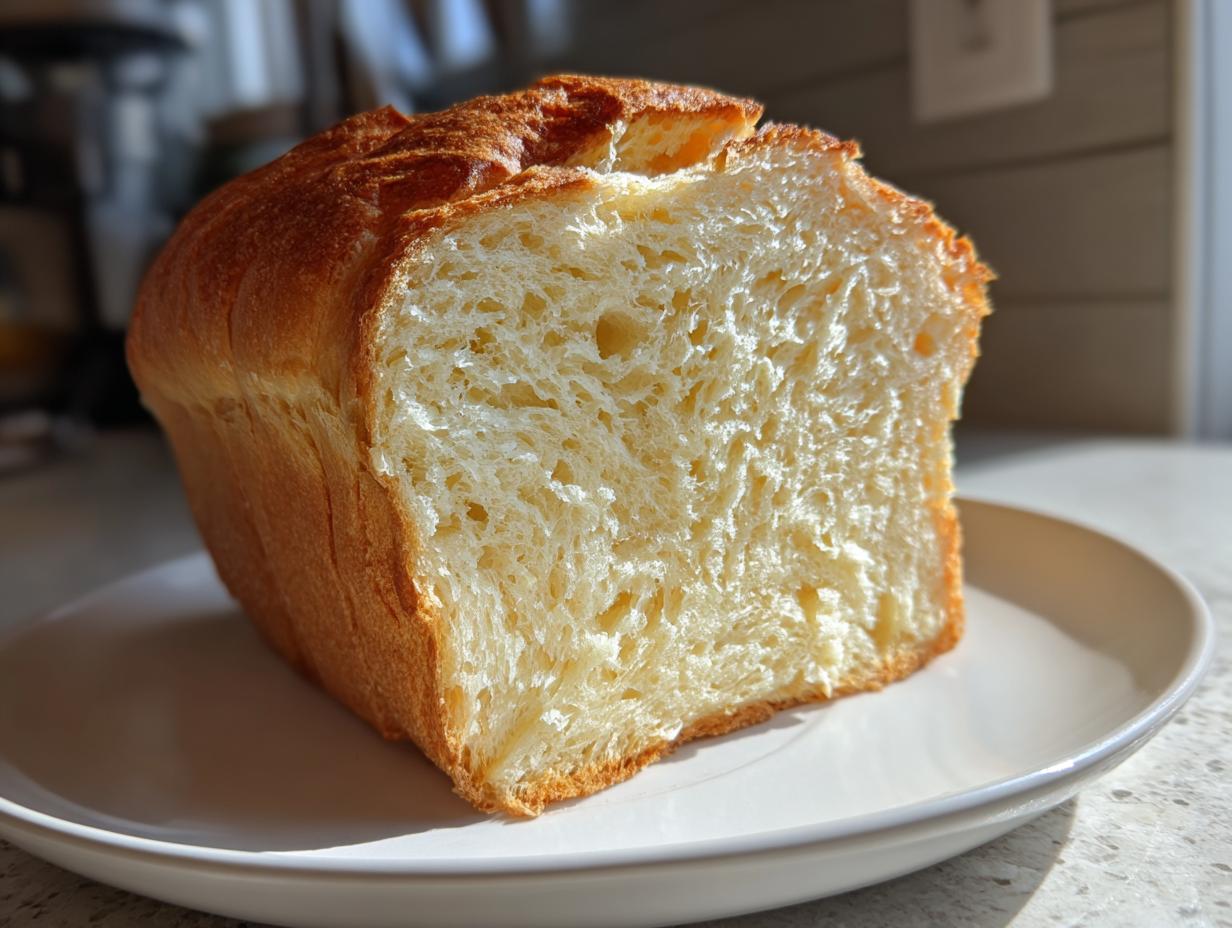
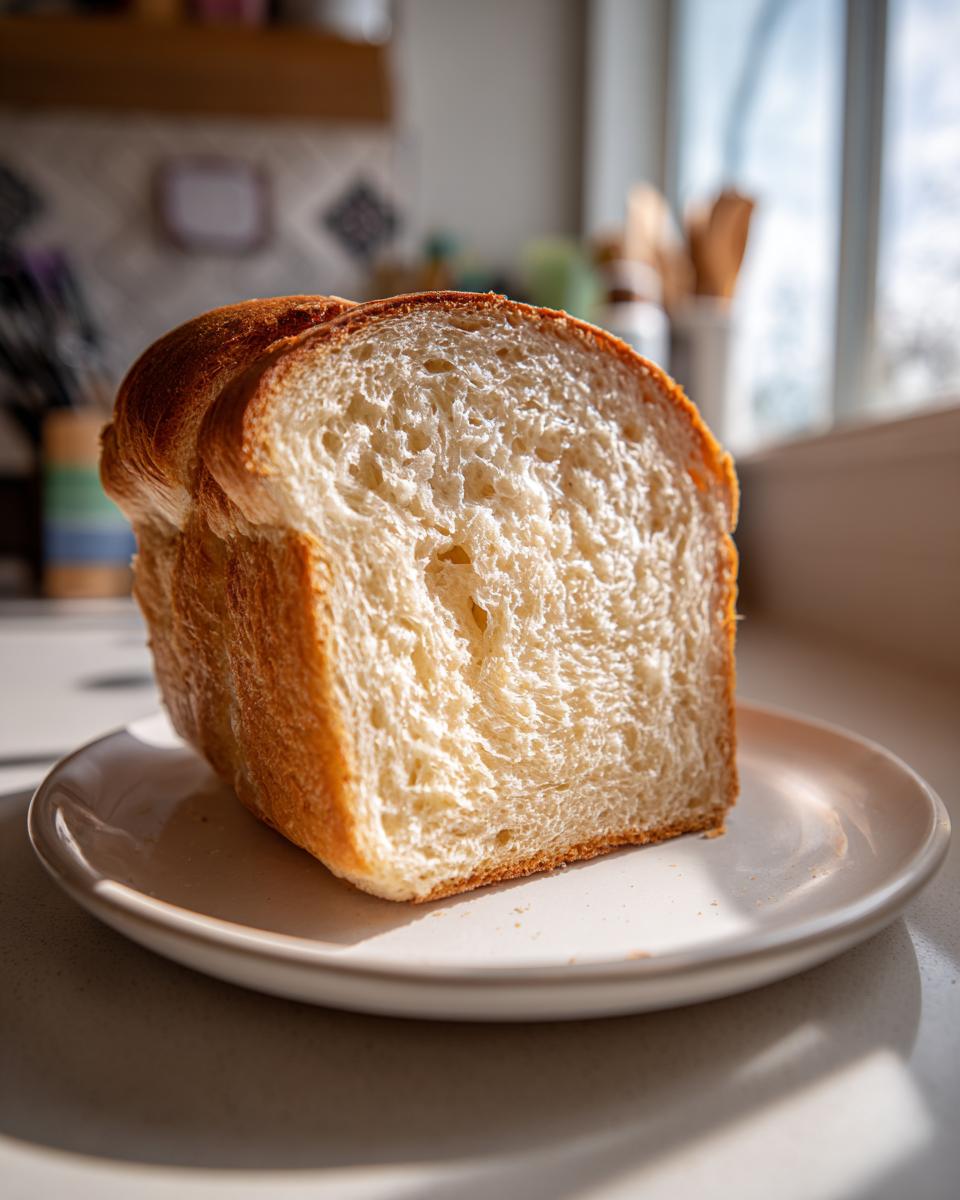
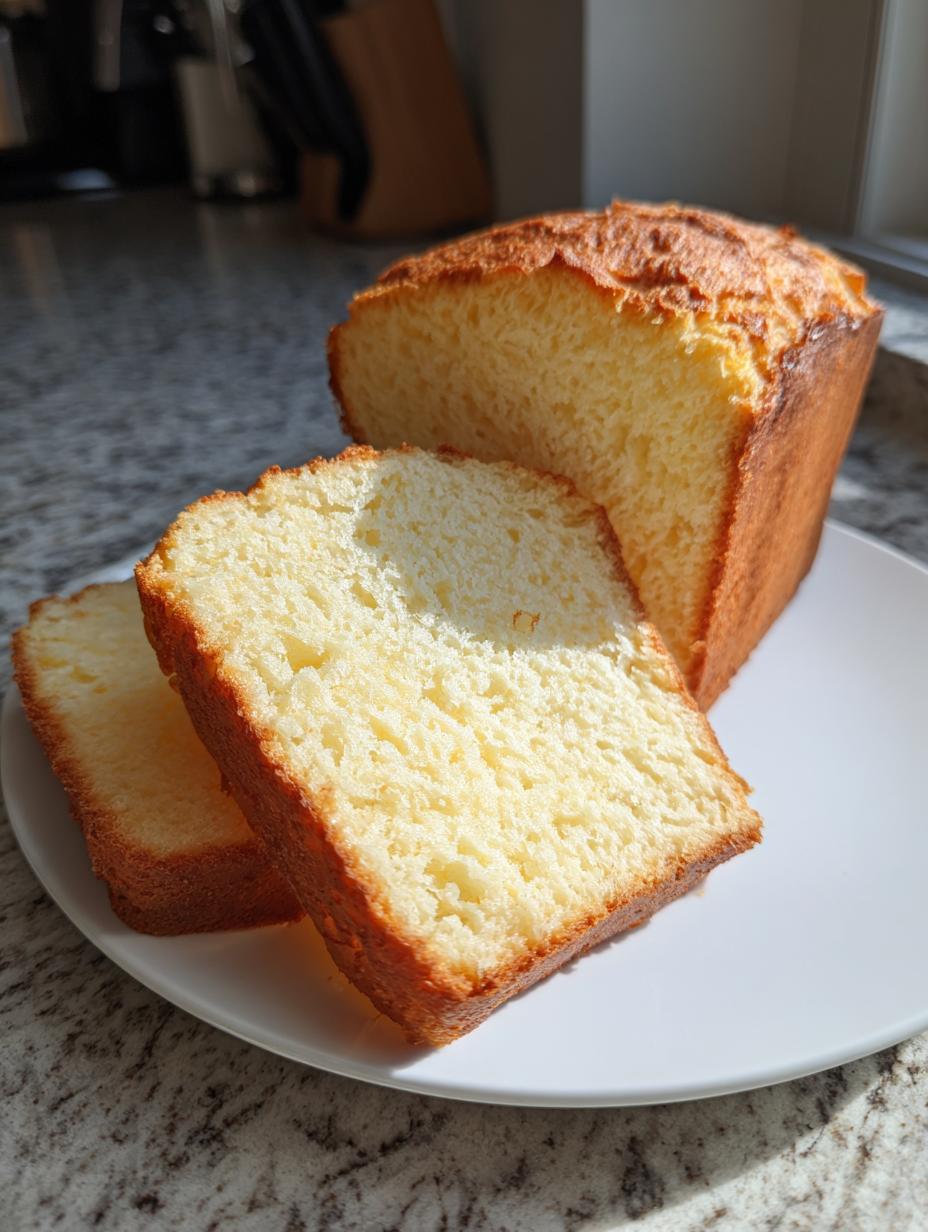
Oh, friends, I know the struggle. I’ve thrown out more sad, crumbly, rock-hard gluten-free loaves than I care to admit. They looked like bread, they smelled like bread, but the moment you tried to make a sandwich, they just shattered into a million dusty pieces! That’s why I’m so excited to share this recipe for Easy Gluten Free Bread That’s Soft and Sliceable. Seriously, this one works almost every time, and the texture is unbelievably close to what you remember.
The secret isn’t some fancy, expensive ingredient; it’s all about the technique, especially how we treat the batter. Most GF doughs are stiff, but this one acts more like a thick cake batter, which is exactly what gives us that tender crumb we crave. When I finally got this right, I actually gasped when I sliced into the cooled loaf without it falling apart. You won’t believe how good this sandwich loaf tastes!
We skip the kneading nonsense because, well, there’s no gluten to develop! We are just mixing until it’s smooth, letting it rise a little, and popping it in the oven. It’s honestly the most stress-free bread baking experience I’ve ever had.
Gathering What You Need for Easy Gluten Free Bread That’s Soft and Sliceable
Okay, time to get our mise en place together! Because this recipe for Easy Gluten Free Bread That’s Soft and Sliceable relies on a slightly different structure than traditional wheat bread, the temperature of your ingredients is surprisingly important. Don’t just toss everything in randomly; we want happy yeast and a smooth mix!
We are aiming for tender results, so make sure your eggs have been sitting out for a bit to come to room temperature. That warmth helps everything emulsify beautifully. I always check my yeast before I even start mixing, because there’s nothing worse than waiting 35 minutes only to find out your yeast decided to take a permanent vacation!
Essential Ingredients for Soft Gluten Free Loaf
These are the building blocks for your loaf. Trust me, using the right GF flour blend (one that already includes xanthan gum) makes this Easy Gluten Free Bread That’s Soft and Sliceable nearly foolproof. Here’s what you’ll need:
- Warm water (not hot!) and sugar to wake up that yeast.
- Your favorite gluten free all-purpose flour blend—make sure it has xanthan gum in it!
- Salt for flavor, olive oil for richness.
- Two room-temperature eggs.
- Just a splash of apple cider vinegar; it helps the rise and texture, I promise!
Equipment Required for Your Bake
You don’t need a stand mixer, though it certainly makes things easier! A good hand mixer will do the trick for getting that cake-like batter smooth. The most important piece of equipment, though, is your 9 by 5 inch loaf pan. Make sure you grease it really well!
Step-by-Step Guide to Easy Gluten Free Bread That’s Soft and Sliceable
This is where the magic really happens, and honestly, it’s so straightforward you’ll wonder why you ever bought store-brand GF bread! Since we aren’t kneading, our focus is on ensuring everything is incorporated smoothly to achieve that perfect texture in your Easy Gluten Free Bread That’s Soft and Sliceable.
First things first: grease that 9×5 pan. Don’t skimp here; we want a clean release later! Then we get the yeast happy. This is the foundation of any good rise, even in gluten-free baking.
Activating the Yeast
Grab a big bowl—the one you’ll mix everything in—and pour in your 1 1/2 cups of warm water. The water needs to be warm, but definitely not hot, or you’ll kill the yeast instantly. Think warm bath water, not hot tea. Stir in the two tablespoons of sugar; this is the yeast’s breakfast!
Now, sprinkle the 2 1/4 teaspoons of active dry yeast right on top of the sugary water. Don’t stir it in too much; just let it sit there quietly for about five minutes. You are looking for foam! If you see a nice layer of bubbles and froth forming on the surface, your yeast is alive and ready to work its magic. If nothing happens, you need to start this step over with fresh yeast. It’s a non-negotiable check!
Mixing the Easy Gluten Free Bread That’s Soft and Sliceable Batter
Once the yeast is frothy, it’s time to add the dry ingredients. Dump in the 3 cups of GF flour (with xanthan gum, remember!) and the teaspoon of salt right on top of the yeast mixture. Give it a quick, gentle whisk just to combine them a little bit.
Next come the wet ingredients: the two tablespoons of olive oil, your room-temperature eggs, and that teaspoon of apple cider vinegar. Now, bring out your hand mixer! You need to beat this mixture on medium speed for a full two minutes. This is crucial! You aren’t kneading dough; you are whipping air into a thick batter. When you stop, it shouldn’t look like sticky dough; it should look exactly like very thick cake batter—smooth, heavy, and slightly sticky. That thick, uniform consistency is what guarantees you’ll get Easy Gluten Free Bread That’s Soft and Sliceable!
Proofing and Baking Your Loaf
Spoon that thick batter into your prepared loaf pan. Use a spatula to smooth the top as best you can, because GF bread doesn’t self-level like wheat dough does. Cover the pan loosely with plastic wrap or a clean kitchen towel. Find a warm spot in your kitchen—maybe near the stove if it’s on, or just on the counter away from drafts—and let it rise for 30 minutes.
You aren’t looking for it to double in size like wheat bread. Just let it sit until the top is slightly domed and looks puffy. While it’s resting, preheat your oven to 375°F. Once preheated, bake the loaf for 35 minutes. You’ll know it’s done when the top is a lovely golden brown and, if you gently tap the center, it sounds hollow. That sound means the internal structure is set, which is key for sliceability!
Tips for Success with Your Sliceable Gluten Free Bread
Gluten-free baking has its own set of rules, and ignoring them is usually why people end up with a brick instead of sandwich bread. If you follow these key tips, you’ll consistently achieve that beautiful, soft texture that makes this Easy Gluten Free Bread That’s Soft and Sliceable a staple in my house. The biggest issues people run into are gumminess or crumbling, but we can easily avoid both!
Remember, GF baking relies heavily on starches and binders like xanthan gum to mimic gluten’s structure. We have to respect the cooling process and the initial mixing to get the structure right before it even hits the heat.
Cooling Time is Non-Negotiable
This is my biggest piece of expert advice: Do not, under any circumstances, try to slice this bread while it’s warm! I know it smells amazing, and you just want to sneak a taste, but resist! When GF bread comes out of the oven, the starches are still gelatinous and wet inside. If you slice it too early, you are basically encouraging a gummy, sticky mess inside the crumb.
Let it cool in the pan for 10 minutes, just to let the initial steam escape and the structure firm up slightly. Then, move it immediately to a wire rack to cool completely—and I mean *completely*—before you even think about using your bread knife. This waiting game is what ensures you get those beautiful, clean slices you expect from a truly sliceable loaf.
Ingredient Temperature Matters
We talked about this briefly, but let me emphasize it again: temperature is everything in this recipe. Your water for the yeast must be warm, around 105 to 115 degrees Fahrenheit, so the yeast wakes up happy and foamy. Lukewarm water won’t activate it, and hot water will kill it dead.
Similarly, your eggs need to be at room temperature. Cold eggs shock the batter when they are added to the creamed oil and sugar, which can cause the batter to tighten up too quickly. Room temperature eggs mix in smoothly, helping create that uniform, thick cake batter texture that is the hallmark of this Easy Gluten Free Bread That’s Soft and Sliceable.
Understanding the Details of This Easy Gluten Free Bread That’s Soft and Sliceable
Sometimes, all you need is the quick facts to know if you have time to bake! This recipe for Easy Gluten Free Bread That’s Soft and Sliceable is fantastic because it’s actually quite fast from start to finish compared to yeast breads that require hours of kneading and rising. It truly is a weeknight wonder once you get the hang of it.
The best part is that even with minimal hands-on time, the results look professional. We aren’t waiting around all day for this beautiful sandwich loaf to come together. You get the payoff quickly, provided you let it cool properly!
Quick Reference Table for Timing and Yield
Here is a quick snapshot of how long this takes and what you get out of one batch. I usually double the recipe if I know we’ll eat a lot of toast during the week!
- Prep Time: 15 minutes
- Cook Time: 35 minutes
- Total Time: 50 minutes (not counting cooling!)
- Yield: 1 loaf (about 12 slices)
Frequently Asked Questions About Soft Gluten Free Bread
I get so many messages after people try this recipe, and most of the questions circle back to texture—which I totally get! We all want that perfect, soft loaf. Here are the most common things people ask me about getting their Easy Gluten Free Bread That’s Soft and Sliceable just right.
Can I use a different gluten free flour blend?
You absolutely can experiment, but you need to pay close attention to the ingredients list! This recipe is specifically formulated to work best with a high-quality, all-purpose gluten-free flour blend that already contains xanthan gum. Xanthan gum is the critical binder here; it’s what gives the structure that wheat flour usually provides.
If your blend does *not* have xanthan gum listed, you must add it! Usually, for a recipe this size, you’d add about 1 to 1 1/2 teaspoons of pure xanthan gum when you add the rest of the dry ingredients. If you skip it, your bread will be a pile of crumbs, and it definitely won’t be as sliceable!
Why is my Easy Gluten Free Bread That’s Soft and Sliceable dense?
Density is usually down to two main culprits, and both relate back to air incorporation. First, check your yeast activation! If the yeast didn’t foam up nicely in the warm, sugary water, it means it was dead or the water was too hot. Dead yeast means no lift, resulting in a heavy brick.
Second, I want you to re-read the mixing instructions. We aren’t kneading, but we *are* whipping! You need to use that hand mixer for the full two minutes on medium speed to whip air into that thick batter. If you stop early, you won’t get the necessary structure needed for a light, soft crumb. It has to look like thick cake batter when you’re done!
Storing and Serving Your Perfect Loaf
We’ve worked hard to get that perfect, soft crumb, so now we have to treat it right! Unlike traditional bread, gluten-free bread can sometimes dry out faster if stored incorrectly, but luckily, this recipe holds up really well if you follow a couple of simple rules. The goal is keeping that amazing texture we worked so hard for in your Easy Gluten Free Bread That’s Soft and Sliceable.
For the best experience, you really want to eat this within the first two days. After that, the texture starts to change slightly, even when stored properly. But trust me, this bread is so good, it rarely lasts that long in my house anyway!
Storage and Reheating Guidelines
The absolute number one rule for storage: wait until it is completely cool before wrapping it up. If you wrap it warm, you trap steam, and that leads straight back to that gummy texture we hate! Once fully cooled, you can store it on the counter. For longer storage, freezing is your best friend.
Here’s how I keep track of mine:
- At Room Temperature (Airtight container): 2 days
- Refrigerated: Up to 5 days (it will firm up slightly)
- Freezing: Up to 3 months (wrap tightly in plastic wrap then foil)
When you pull a slice from the freezer, just pop it straight into the toaster or microwave it for about 15 seconds. It comes back to life beautifully!
Serving Suggestions for Your Sandwich Loaf
Because this loaf is sturdy and soft, it handles almost any topping you throw at it. It’s perfect for a classic grilled cheese or a hearty turkey sandwich because it won’t fall apart when you load it up. I love using it for avocado toast in the morning—the slight sweetness of the bread pairs so well with fresh salt and pepper. For more quick meal ideas, check out my simple healthy orzo weeknight meal!
For a lighter snack, try it toasted with just a smear of good quality nut butter or a light layer of cream cheese and everything bagel seasoning. It’s truly versatile, which is why making an Easy Gluten Free Bread That’s Soft and Sliceable is such a huge win!
Share Your Easy Gluten Free Bread That’s Soft and Sliceable Results
I truly hope this recipe brings you the same joy it brings my family! Baking gluten-free shouldn’t be stressful, and I’m so proud of how reliable this soft loaf is. If you try out this Easy Gluten Free Bread That’s Soft and Sliceable, please come back and tell me how it turned out! You can also see more of my recipe adventures on Medium.
Drop a rating below and leave a comment about your favorite way to eat your first slice. Happy baking, everyone! For more visual inspiration, feel free to browse my Pinterest boards.
Print
Amazing 2-Minute Easy Gluten Free Bread Soft
- Total Time: 50 minutes
- Yield: 1 loaf about 12 slices 1x
- Diet: Gluten Free
Description
This easy gluten free bread bakes into a soft, tender loaf perfect for everyday sandwiches. It uses simple steps for a reliable result.
Ingredients
- 1 1/2 cups warm water
- 2 tablespoons granulated sugar
- 2 1/4 teaspoons active dry yeast
- 3 cups gluten free all-purpose flour with xanthan gum
- 1 teaspoon salt
- 2 tablespoons olive oil
- 2 large eggs room temperature
- 1 teaspoon apple cider vinegar
Instructions
- Grease a 9 by 5 inch loaf pan.
- Combine warm water and sugar in a large bowl. Sprinkle yeast on top and wait 5 minutes until foamy.
- Add gluten free flour and salt to the bowl.
- Add olive oil, eggs, and apple cider vinegar.
- Beat the mixture with a hand mixer on medium speed for 2 minutes until smooth and thick like cake batter.
- Spoon the batter into the prepared loaf pan and smooth the top.
- Cover loosely and let rise in a warm place for 30 minutes until domed slightly.
- Preheat the oven to 375°F.
- Bake for 35 minutes until the top is golden and sounds hollow when tapped.
- Cool in the pan for 10 minutes, then move to a rack to cool completely before slicing.
Notes
- Let the bread cool fully before slicing to keep the crumb from becoming gummy.
- Prep Time: 15 minutes
- Cook Time: 35 minutes
- Category: Bread
- Method: Baking
- Cuisine: American
Nutrition
- Serving Size: 1 slice
- Calories: 150
- Sugar: Not specified
- Sodium: Not specified
- Fat: 4 g
- Saturated Fat: Not specified
- Unsaturated Fat: Not specified
- Trans Fat: Not specified
- Carbohydrates: 24 g
- Fiber: Not specified
- Protein: 4 g
- Cholesterol: Not specified