I don’t know about you, but sometimes I pick up the store-bought stuff and I just think, “Meh.” It’s fine, sure, but it tastes a little flat, you know? That’s why I got so excited when I figured out how to make my own perfect, creamy, high-protein cheese right on my countertop. Seriously, if you’re looking for a fantastic way to boost your protein intake without resorting to chalky shakes, learning the trick to DIY Quark Cheese High Protein is a game-changer.
This isn’t some complicated, ancient cheesemaking ritual. It’s actually shockingly easy! We’re talking about using simple milk and letting nature—and a little bit of friendly bacteria—do the heavy lifting. I remember the first time I pulled that colander out of the fridge after letting it drain overnight. The texture was just incredible; so much richer and cleaner tasting than anything I’d paid good money for. Trust me, once you try this simple home method for DIY Quark Cheese High Protein, you won’t go back to the tubs at the grocery store.
Essential Components for Your DIY Quark Cheese High Protein
Okay, listen up! The secret weapon in making truly fantastic, high-protein quark cheese at home is treating your ingredients right. Since we are relying on live cultures to do the hard work, the quality of what you start with matters a ton. This recipe is so straightforward that every single component gets a chance to shine. Don’t skimp here; it really pays off in the final taste and texture of your DIY Quark Cheese High Protein.
You only need a few things to get started, but they have to be the right things. Forget the fancy kits; we are using things you probably have or can easily grab at the store.
Selecting Quality Milk and Cultures for DIY Quark Cheese High Protein
I always grab whole milk when I make this. Why? Because the extra fat gives you a richer mouthfeel, which I just love in a cultured product. If you’re watching your fat intake, low-fat works just fine, but the texture will be a little lighter. The absolute non-negotiable part of this whole process is the starter—your yogurt or buttermilk. You must use plain yogurt that clearly states it has “live, active cultures.” That’s the magic ingredient that turns milk into cheese! If your yogurt is old or heat-treated after culturing, it won’t have the necessary bacteria, and you’ll just end up with warm, slightly funky milk. We want that beautiful transformation for our DIY Quark Cheese High Protein.
Necessary Equipment for Successful Culturing
You don’t need a specialized cheese cave, thankfully! You will want a large, heavy-bottomed pot—nothing too thin that scorches easily. A good instant-read thermometer is your best friend here; guessing the temperature during the heating phase is how you ruin the party early. You’ll also need a clean bowl and a sturdy lid for covering the pot during the long rest.
And for draining later? Grab a large colander and line it with good quality cheesecloth. If you don’t have cheesecloth (I keep mine handy!), a few layers of very fine-weave, clean cotton fabric works in a pinch. Safety first: make sure everything that touches the milk is super clean so you don’t introduce any bad guys to your good cultures!
Step-by-Step Instructions for DIY Quark Cheese High Protein
This is where the magic really happens, and honestly, it’s mostly waiting! But the hands-on part is quick. Follow these steps precisely, and you’ll have that beautiful, thick, high-protein quark ready to eat. The goal here is setting up the perfect cozy environment for those cultures to get to work turning milk into something amazing.
Gentle Heating and Inoculation
First things first, pour your gallon of milk into that big pot. You need to heat it slowly—and I mean slowly—until your thermometer reads exactly 86 degrees Fahrenheit (that’s 30 Celsius). Stir it gently so you don’t scorch the bottom. If it gets too hot, you’ll kill your cultures before they even get a chance to start! Once you hit that target temp, yank it right off the heat. Now, take your 1/4 cup of yogurt or buttermilk and stir it in really well until it’s totally incorporated. This step is called inoculation. Make sure there are no little lumps of yogurt floating around!
The Fermentation Phase: Patience for Protein Development
This is the hardest part: waiting! Cover your pot tightly with a lid. You need to find a spot in your kitchen that’s warm but not hot, and definitely draft-free. Think inside an oven that is turned OFF, or maybe just on top of the fridge. Let it sit undisturbed for a full 12 to 24 hours. You’re looking for it to thicken up significantly—it should look like very soft, wobbly Jell-O. This long rest allows the bacteria to really eat the lactose and create that lovely lactic acid, which firms up the milk proteins. That acid development is key to getting that high-protein result in your DIY Quark Cheese High Protein.
Optional Step: Using Rennet for Firmer Curds
If you want a really, truly firm curd that drains faster, you can add rennet. If you opt for this, dilute your 1/2 teaspoon of liquid rennet (or crush that tablet) into just a tiny splash of cool water first. Stir that solution into the milk right after you stir in your yogurt starter. Then, cover it and let it set for an extra hour or two. It will firm up much quicker this way, but remember, skipping this step still gives you great quark, just maybe a little softer!
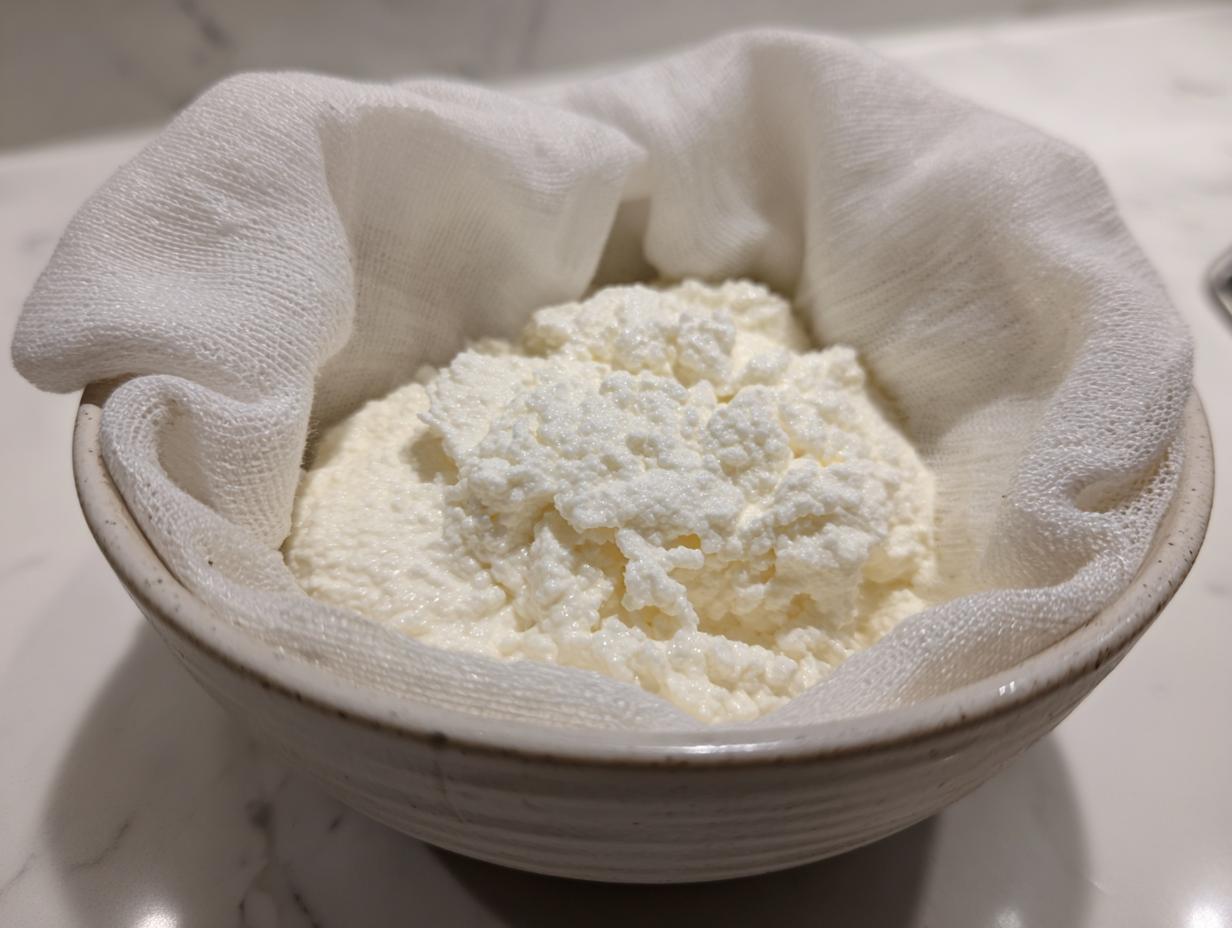
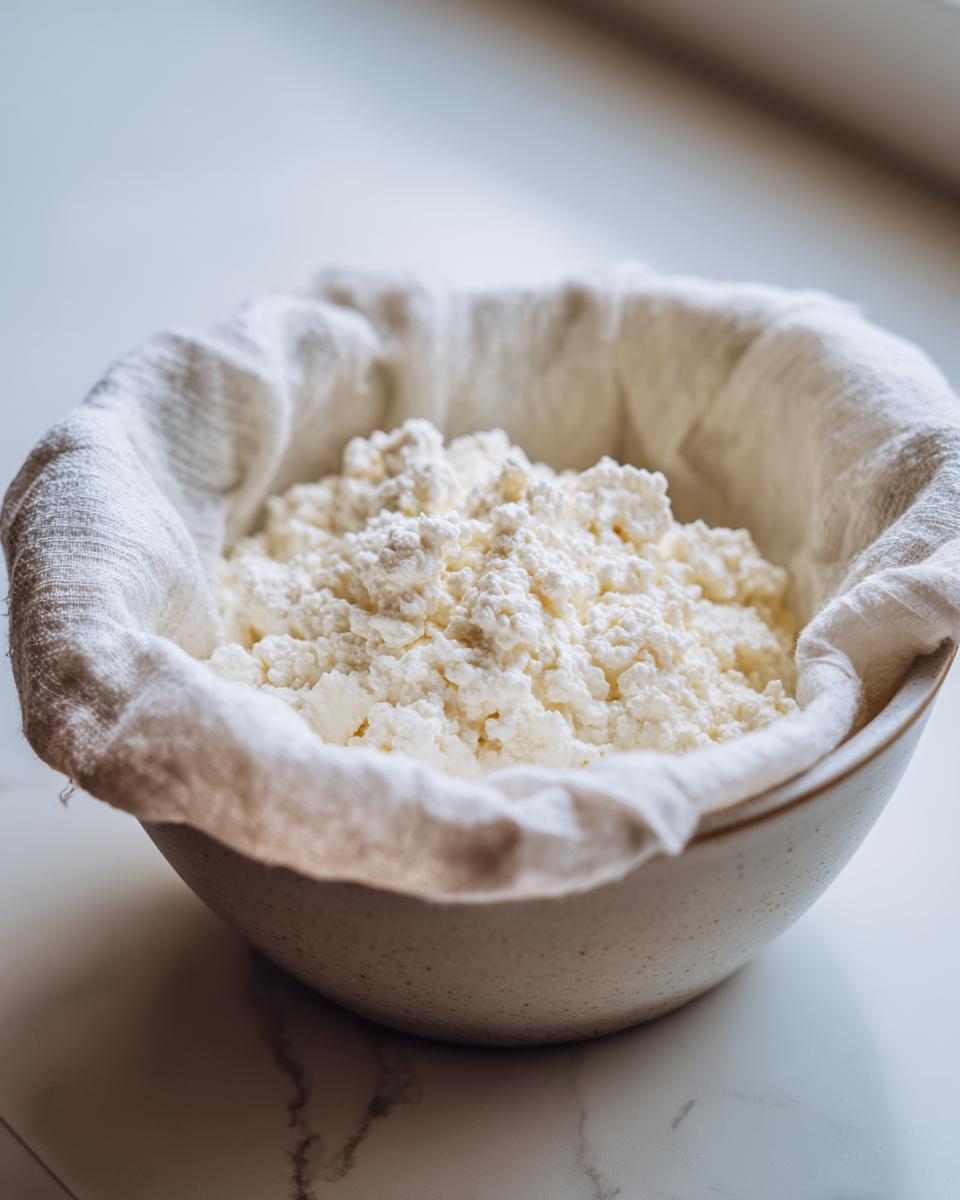
Draining the Whey to Achieve Perfect DIY Quark Cheese High Protein
Once your milk has set beautifully, it’s time to separate the good stuff from the watery stuff—the whey. Line that colander with your cheesecloth and set it over a big bowl to catch all that liquid gold. Gently ladle your thickened milk mixture into the cloth. Be careful not to break up the curds too much; work slowly! Then, cover the whole setup and pop it into the fridge. You need to let it drain for at least 6 hours, but honestly, 10 to 12 hours is where the real texture comes from. That slow, cold draining is essential for the final texture of your DIY Quark Cheese High Protein.
Tips for Success When Making DIY Quark Cheese High Protein
Making your own cultured cheese is rewarding, but there are a few little things that can trip you up if you don’t know them beforehand. I’ve made enough batches of this DIY Quark Cheese High Protein to know exactly what to watch out for. It’s not hard, but paying attention to these details saves you from disappointment later!
Controlling Consistency: How Thick Do You Want Your Quark?
This is all about time in the fridge! If you pull the curds out after just 6 hours of draining, you’ll have something closer to Greek yogurt—still delicious, but it pours a little. If you want that super thick, almost cream cheese-like texture that you can really dollop onto toast, you need to let it drain longer. I often let mine go for a full 14 hours, even though the recipe says 12. Just check it periodically. Remember, you can always drain it longer, but you can’t un-drain it! This control over consistency is what makes this DIY Quark Cheese High Protein so customizable to your needs.
Utilizing Leftover Whey
Don’t you dare throw away that liquid whey! It’s packed with nutrients, and I hate wasting anything. My favorite thing to do is save it up in a jar in the fridge. It tastes a little tart, so it’s perfect for spiking a morning smoothie; it adds protein and a bit of tang without watering down the flavor too much. You can also use it instead of water when you’re kneading bread dough or mixing up pancakes. It keeps your baked goods much softer! It’s a little secret of cultured cooking: use everything! If you are interested in other ways to use healthy ingredients, check out this pink salt trick recipe.
Flavor Variations for Your Homemade High Protein Quark Cheese
Once that beautiful, tangy, high-protein quark is drained and sitting in its container, that’s when the real fun begins! Since the base is so wonderfully mild and slightly acidic, it’s the perfect canvas for whatever flavor mood you’re in. I always recommend adding any flavorings *after* the draining process. If you mix herbs or spices in before draining, they can sometimes interfere with the whey separation or just get lost in the process.
For a savory twist that’s amazing on crackers or mixed into scrambled eggs, try stirring in some finely chopped chives, a pinch of black pepper, and a dash of garlic powder. Wow, that’s good. If you’re leaning sweet—maybe you’re using this as a healthy frosting or dessert base—you can’t go wrong with vanilla extract and a drizzle of maple syrup. A little cinnamon mixed in also reminds me of cheesecake! This is your chance to experiment and make your DIY Quark Cheese High Protein taste exactly how you want it for that week.
Storing and Refreshing Your Cultured Dairy
So you’ve made this amazing batch of fresh, high-protein cheese. Now we need to make sure it stays perfect until you eat it all up! Cultured dairy is pretty robust, but like any fresh food, it needs a little respect. You can’t just leave it sitting on the counter, obviously, but even in the fridge, it has a shelf life.
Proper Storage and Shelf Life Guidelines
Once you’ve drained your quark to that perfect consistency, transfer it immediately into a clean, airtight container. Glass jars work wonderfully because you can see what you’re dealing with! Keep it tucked away in the main part of your refrigerator, not jammed in the door where the temperature fluctuates. If you’ve done everything cleanly, your homemade DIY Quark Cheese High Protein should stay fresh and delicious for about a week. If you notice any fuzzy spots or it starts smelling strongly sour—beyond that pleasant tang—it’s definitely time to toss it. But honestly, if you’re making it right, it will disappear long before day seven! For more tips and visual guides, check out our Medium page.
Frequently Asked Questions About DIY Quark Cheese High Protein
I know you might have a few lingering questions before you dive into your first batch of cultured milk. That’s totally normal! I have been asked these same things a hundred times, so I thought I’d just list out the most common ones right here. Getting these details ironed out ensures you get that perfect, satisfying result from your DIY Quark Cheese High Protein project.
Can I Use Different Types of Milk for DIY Quark Cheese High Protein?
Yes, absolutely! I prefer whole milk because it gives you that luxurious, rich texture that sinks into bread so nicely. But if you are trying to cut fat, low-fat or even skim milk will work just fine. The main difference is that lower-fat milk will result in a thinner final product, even after draining. You might need to drain the skim milk version longer to reach the thickness you want. Just remember, the higher the fat content, the creamier your finished DIY Quark Cheese High Protein will be!
How Do I Know If My Quark Has Fermented Correctly?
You’re looking for two main things after that 12 to 24-hour rest. First, the texture should have changed completely. It shouldn’t be liquid milk anymore; it should look set, like a very soft, fragile custard or gelatin. Second, you should notice some separation already happening—the watery whey starting to pool slightly around the edges of the curds in the pot. If it still looks exactly like milk, it probably didn’t get warm enough or your culture wasn’t active, and you’ll need to try again.
What Is the Difference Between Quark and Yogurt?
This is such a good question! They both use live cultures, but they are different beasts. Yogurt is generally fermented at a slightly higher temperature and uses specific cultures (like *Lactobacillus bulgaricus*) that leave more lactose behind, keeping it a bit tangier and runnier. Quark is cultured at a lower temperature, often resulting in a milder flavor, and most importantly, it’s strained significantly after culturing to remove that liquid whey. That straining process is what concentrates the protein and gives quark its signature thick, smooth body, making it superior for high-protein baking and spreading. If you are looking for other high-protein recipes, check out our cottage cheese pancake bowl.
Share Your Experience with DIY Quark Cheese High Protein
I truly hope this recipe helps you see how easy and rewarding making your own cultured cheese can be! I’m so proud of how much better my homemade DIY Quark Cheese High Protein tastes compared to anything store-bought. Now that you’ve tried it, please come back and let me know how it went! Drop a comment below and tell me how long you let yours drain. Five stars? For more inspiration, follow us on Pinterest.
Print
Amazing 1-Step DIY Quark Cheese High Protein
- Total Time: 1-2 days
- Yield: About 3-4 cups homemade quark 1x
- Diet: Vegetarian
Description
Make your own creamy, high-protein quark cheese at home easily with this simple recipe using milk and live cultures. Quark is versatile, mild, and packed with protein.
Ingredients
- 1 gallon whole milk (or low-fat milk for lower fat)
- 1/4 cup plain yogurt with live active cultures or buttermilk
- 1/2 teaspoon liquid rennet or 1 rennet tablet (optional for firmer curd)
- 1/4 teaspoon salt (optional)
Instructions
- Heat milk gently in a large pot to 86°F (30°C), stirring occasionally.
- Remove from heat and stir in the plain yogurt or buttermilk until fully combined.
- Cover the pot and let sit at room temperature for 12-24 hours to allow the milk to ferment and thicken.
- Optional: If using rennet, dilute it in a small amount of water and stir into the milk after adding yogurt, then let set 1-2 hours longer for firmer curd.
- After fermentation, gently ladle the curd into a cheesecloth-lined colander placed over a bowl to drain whey.
- Allow it to drain for 6-12 hours in the fridge. The longer it drains, the thicker the quark will be.
- Once drained to desired consistency, transfer quark to a container. Stir in salt if desired.
- Store refrigerated and use within 1 week.
Notes
- Use fresh, high-quality milk for best results.
- Keep fermentation area warm and draft-free for proper culturing.
- Avoid stirring curds too much after fermentation to maintain texture.
- Save leftover whey for smoothies or baking.
- Substitute yogurt with kefir for a tangier flavor.
- Add herbs or spices after draining for flavored quark.
- Drain longer for thicker, cream cheese-like texture.
- Prep Time: 10 minutes
- Cook Time: 0 minutes
- Category: Cheese
- Method: Fermentation and Draining
- Cuisine: Global
Nutrition
- Serving Size: 1/2 cup
- Calories: 110
- Sugar: N/A
- Sodium: N/A
- Fat: 4g
- Saturated Fat: N/A
- Unsaturated Fat: N/A
- Trans Fat: N/A
- Carbohydrates: 4g
- Fiber: N/A
- Protein: 12g
- Cholesterol: N/A