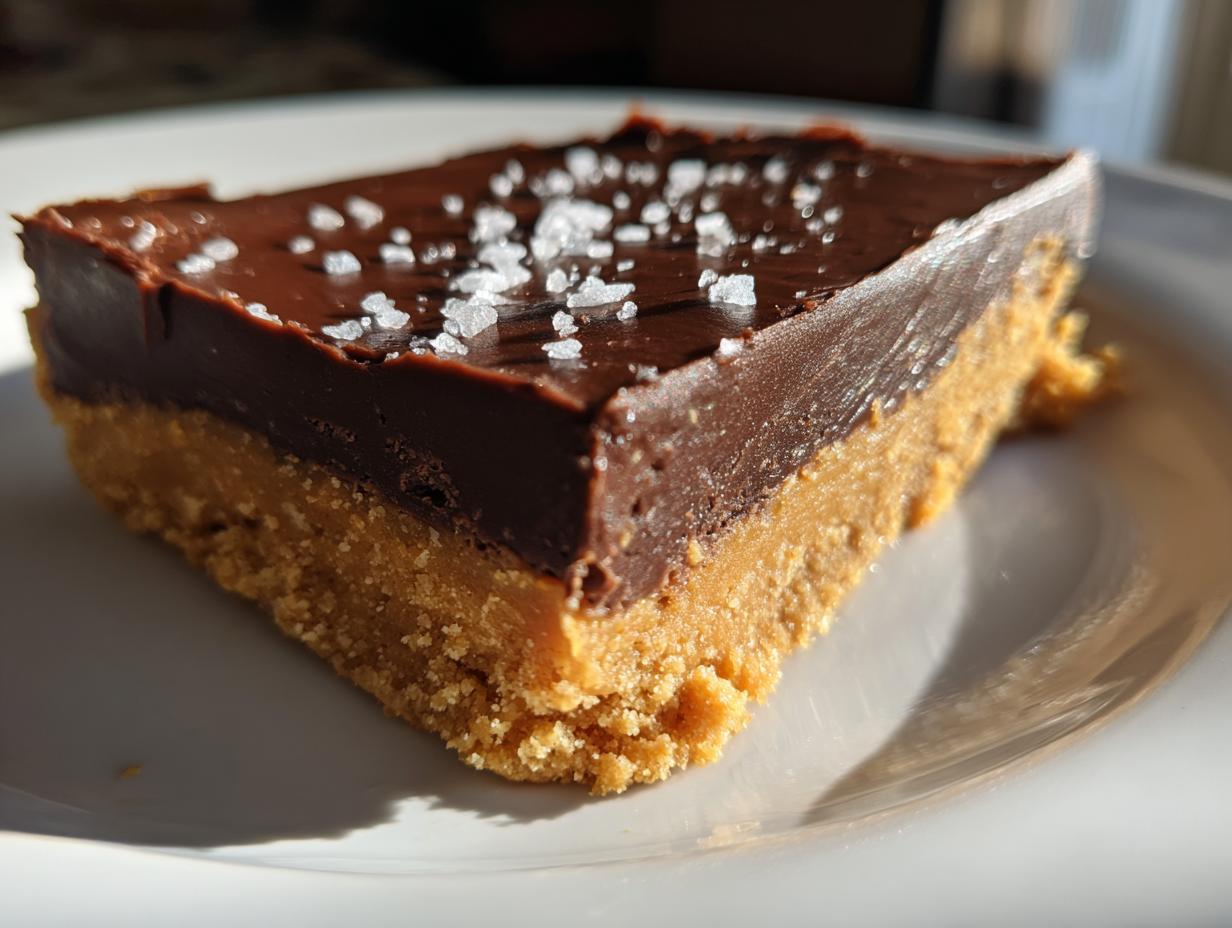
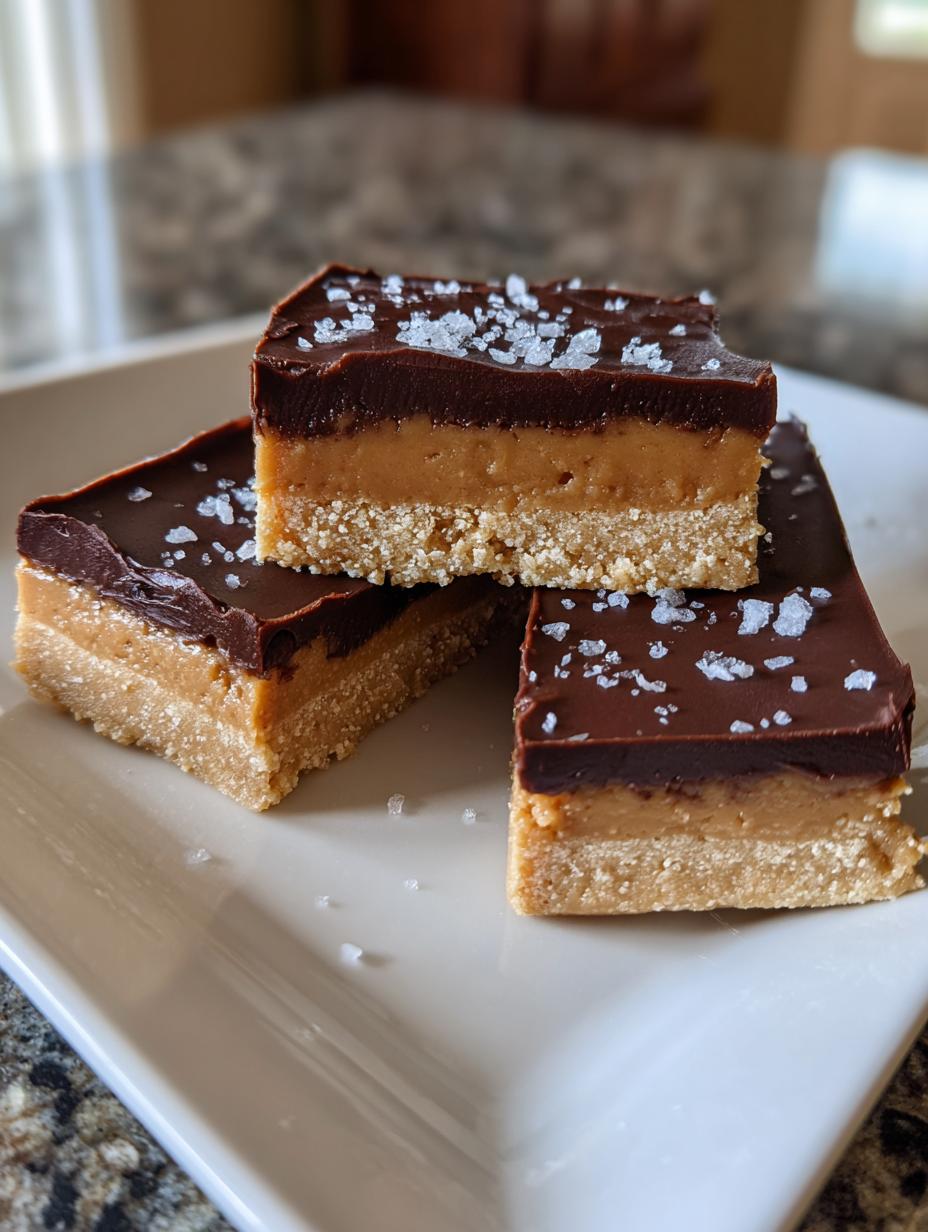
You know those days when you desperately need something sweet, but you absolutely cannot turn on the oven? Me too! That’s why I’m sharing my absolute favorite recipe for dark chocolate peanut butter bars. Forget baking powder and preheating; these are completely no-bake and come together faster than you can decide what movie to watch.
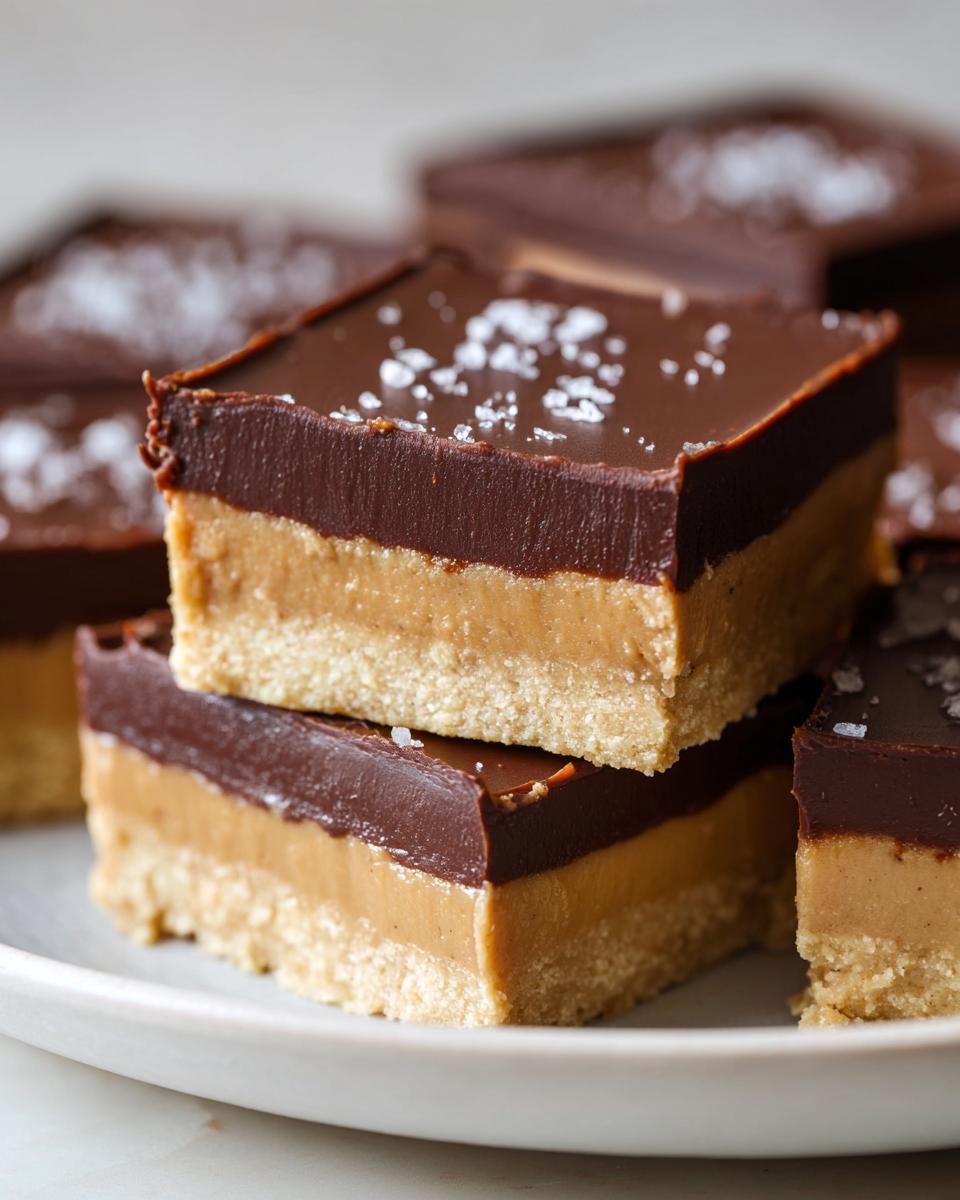
I’ve tweaked countless recipes over the years, trying to find that perfect balance of creamy, fudgy, and just a little bit salty. These bars nail it every single time. The secret weapon here is using dates, which keeps things naturally sweet and gives the base the most incredible smooth texture. Seriously, the whole thing takes about 30 minutes of hands-on time, and then the freezer does the heavy lifting.
If you want that rich, decadent bite without any fuss, you need this recipe in your life. I promise you’ll never look at those store-bought versions the same way again once you taste how fresh these dark chocolate peanut butter bars are! You can see more of my recipe ideas here.
Essential Ingredients for Creamy Dark Chocolate Peanut Butter Bars
Okay, let’s talk ingredients because this is where the magic happens for these dark chocolate peanut butter bars. Since this is a no-bake recipe, the quality of what you put in really shines through. Don’t skimp on the peanut butter—we need creamy, not crunchy, for that smooth base!
Understanding the Base Layer Components
The base is deceptively simple, but every part plays a huge role in texture. You need creamy peanut butter, of course. The Medjool dates are what naturally sweeten and bind everything together; they get super soft in the food processor, which is exactly what we want. Don’t skip soaking them for a few minutes if they feel a little dry! Maple syrup just adds a tiny bit of necessary moisture and richness. And here’s the kicker: coconut flour. It soaks up all that moisture beautifully and gives the base the structure it needs to hold its shape without crumbling apart. If you enjoy similar treats, check out these dark chocolate nut bars.
Selecting the Right Chocolate for Your Dark Chocolate Peanut Butter Bars
For the topping, you absolutely must use dark chocolate chips—I prefer 60% or higher for that intense flavor contrast against the sweet, salty base. Melting them with just a teaspoon of coconut oil is my personal trick. The oil keeps the chocolate from seizing up when it cools, ensuring it stays glossy and perfectly fudgy when you bite into your dark chocolate peanut butter bars.
Preparation Steps for Perfect Dark Chocolate Peanut Butter Bars
Getting these dark chocolate peanut butter bars ready is quick, but you need to move with purpose! We’re lining the pan first, which is non-negotiable if you want an easy removal later. Use an 8-inch square pan and line it with parchment paper, leaving a good overhang on two sides—this becomes your built-in handle!
Creating the No-Bake Peanut Butter Foundation
Time for the food processor. Toss in your peanut butter, pitted dates, water, maple syrup, and that coconut flour. Now, process! You have to let it run until it looks completely uniform. At first, it will look shaggy, but keep going! It needs to turn into one thick, cohesive ball of dough. If it seems too dry—and remember, coconut flour is thirsty—add water just a tiny splash at a time until it truly comes together and is smooth. Then, transfer that glorious mixture to your prepared pan. Press it down firmly and evenly. I like using the bottom of a glass or a small spatula for this; you want a nice, compact layer for your dark chocolate peanut butter bars.
Melting and Topping the Dark Chocolate Peanut Butter Bars
While you’re pressing the base, get your chocolate melting. I usually use the double boiler method—a heatproof bowl sitting snugly over a saucepan of barely simmering water. Stir it gently until it’s completely smooth. If you’re using the microwave, which I do when I’m really rushing, use 30-second bursts and stir well in between. That way, you don’t burn the edges. Once that chocolate is liquid silk, pour it right over your peanut butter layer. Use an offset spatula to spread it right to the edges. This is the fun part: sprinkle on flaky sea salt or crushed peanuts now! If you wait until it cools, nothing will stick.
Setting and Cutting Your Dark Chocolate Peanut Butter Bars
Into the freezer they go! You need these bars to set up hard, so plan for at least one full hour in the freezer. Don’t try to cut them warm, or you’ll just end up with a chocolatey mess. Once they are rock solid, grab those parchment overhangs and lift the entire block out onto a cutting board. Use a large, sharp knife—wiping the blade between cuts helps tremendously—and slice them into 8 even rectangles. That’s it! Your homemade dark chocolate peanut butter bars are ready to eat! If you are looking for other bar recipes, try these banana oatmeal bars.
Tips for Success with Your Dark Chocolate Peanut Butter Bars
Even though these are no-bake, there are a few little things you can do to guarantee your dark chocolate peanut butter bars turn out perfectly fudgy and not crumbly or greasy. Pay attention to temperature and mixing, and you’ll be golden!
Ingredient Temperature and Texture Checks
When you are mixing that base layer, the temperature of your peanut butter really matters. If your peanut butter is straight out of the fridge, it will be too stiff, and you’ll end up having to add way too much liquid to get the food processor to blend. That extra liquid will make your bars soft and greasy later on. Let your peanut butter sit on the counter for about 20 minutes first. It should be easily scoopable but still cool. Also, check your dates! If they are hard, soak them in a tiny bit of hot water for five minutes, drain them well, and then toss them in the processor. This simple step ensures you get that ultra-smooth texture we’re aiming for in the base of these dark chocolate peanut butter bars.
Achieving a Smooth Chocolate Finish on the Dark Chocolate Peanut Butter Bars
The biggest fear with melting chocolate is that it seizes up—that gritty, dry texture—and that ruins the beautiful top layer of your dark chocolate peanut butter bars. If you are using the double boiler, make sure the water isn’t boiling rapidly, and absolutely ensure no steam or water droplets splash into your chocolate bowl. Water is chocolate’s enemy! If you are microwaving, stir every 30 seconds, take it out when there are still a few small lumps left, and let the residual heat melt those last bits. This prevents overheating. Once it’s smooth and glossy, pour it immediately and spread it fast, because it starts setting up quicker than you think!
Frequently Asked Questions About Dark Chocolate Peanut Butter Bars
I get so many questions about these bars because everyone wants mine to turn out exactly like they see in the picture! It’s usually down to one tiny ingredient swap. Here are the most common things people ask when making their own batches of dark chocolate peanut butter bars.
Can I substitute the coconut flour in these dark chocolate peanut butter bars?
This is the big one! Coconut flour is super absorbent, way more so than regular all-purpose flour. If you swap it out for almond flour, you’ll need to play around with the liquid measurements, and honestly, you might need to bake them instead of freezing them because they won’t set up as firmly. If you try to use regular white flour, the texture will be totally different—it gets gummy, not fudgy. I really, really recommend sticking to the coconut flour for this no-bake recipe to get that signature smooth, dense structure.
How long do these no-bake bars stay fresh?
Because these are no-bake and made with dates instead of eggs, they last really well! I keep mine in the fridge in an airtight container, and they stay perfectly good for about a week. They firm up a bit more in the fridge, which I actually love for cutting. If you know you won’t eat them all right away—which is unlikely, trust me—you can totally freeze them. They freeze beautifully, and you can enjoy a cold, chewy treat straight from the freezer! Follow my Pinterest for more quick recipes.
Storing and Serving Your Homemade Dark Chocolate Peanut Butter Bars
Once you’ve managed to cut these glorious dark chocolate peanut butter bars, the next big question is how to keep them tasting as good as they do right now. Since there’s no baking involved, they have a slightly different shelf life than a traditional baked good, but honestly, they are built to last!
Best Practices for Refrigeration and Freezing
The key to keeping your bars perfect is keeping the air out. I always use a sturdy, airtight container. If you stack them, stick a small piece of parchment paper between the layers. This stops that lovely chocolate top from sticking to the layer underneath, especially if the kitchen is warm. For the fridge, they are good for about a week. They firm up nicely in there, which actually makes them easier to handle. If you need them to last longer than a week, freezing is your best friend! If you need a different dessert, try these lemon raspberry eclairs.
Table of Storage Recommendations
Here’s a quick rundown based on what I’ve learned keeping these dark chocolate peanut butter bars around the house. It’s always good to have a backup stash in the freezer for emergencies!
| Storage Location | Maximum Time | Notes |
|---|---|---|
| Refrigerator | Up to 1 Week | Store in an airtight container. They stay firmer here. |
| Freezer | Up to 2 Months | Wrap tightly. Thaw slightly on the counter before eating. |
Estimated Nutritional Breakdown for Dark Chocolate Peanut Butter Bars
Now, I have to be upfront with you—since we are using natural sweeteners like dates and maple syrup, and there’s no official lab testing happening in my kitchen, these numbers are my best estimate based on the ingredients listed. But it’s good to know what you are putting into your body when you grab one of these rich squares!
Calculating Macros Per Serving
This breakdown is based on yielding 8 perfect servings of these incredibly satisfying dark chocolate peanut butter bars. You’ll see the fat content is a bit higher, which is totally expected given the peanut butter and dark chocolate, but the protein and fiber from the coconut flour help balance it out. Enjoy them guilt-free—they taste way more indulgent than they are! For a savory meal idea, check out this broccoli cheddar pasta.
| Nutrient | Estimated Amount |
|---|---|
| Calories | 260 |
| Total Fat | 18g |
| Total Carbohydrates | 20g |
| Protein | 6g |
Remember, these are just estimates, but they give you a great idea of the rich profile of these no-bake treats!
Share Your Experience Making Dark Chocolate Peanut Butter Bars
I honestly can’t wait to hear what you think once you’ve whipped up a batch of these dark chocolate peanut butter bars! They are such a staple in my house for quick afternoon snacks, and I’m always curious how they turn out in different kitchens.
Did you stick with the flaky sea salt on top, or did you try something totally different? Maybe you used almond butter instead of peanut butter, or perhaps you mixed in some cocoa powder with the chocolate layer for an extra deep flavor boost. I love hearing about your little adjustments!
If you made these, drop a rating below so others know what to expect. And please, leave a comment telling me the modification you loved most. Happy snacking!
Print
Guilty dark chocolate peanut butter bars 8 ways
- Total Time: 30 minutes
- Yield: 8 bars 1x
- Diet: Vegetarian
Description
Make creamy, rich dark chocolate peanut butter bars with dates and coconut flour. This is a quick no-bake dessert ready in 30 minutes, offering a smooth, fudgy bite.
Ingredients
- 3/4 cup creamy peanut butter
- 5 pitted Medjool dates
- 3 tablespoons water
- 2 tablespoons pure maple syrup
- 1/2 cup coconut flour
- 1 cup dark chocolate chips (8 ounces)
- 1 teaspoon coconut oil
- Flaky sea salt (optional topping)
- Crushed roasted peanuts (optional topping)
Instructions
- Line an 8-inch square pan with parchment paper, leaving some overhang for easy removal.
- In a food processor, combine peanut butter, dates, water, maple syrup, and coconut flour. Blend until smooth and thick.
- Press the mixture evenly into the prepared pan, smoothing the top with a spatula.
- Melt dark chocolate chips and coconut oil together in a heatproof bowl set over simmering water or in the microwave in 30-second bursts, stirring until smooth.
- Pour the melted chocolate over the peanut butter layer and spread evenly.
- Sprinkle with flaky salt or crushed peanuts if desired.
- Freeze for 1 hour until firm.
- Lift the bars out using the parchment overhang and cut into 8 rectangles with a sharp knife.
Notes
- Store the bars in an airtight container in the refrigerator for up to 1 week.
- You can freeze the bars for up to 2 months.
- Prep Time: 30 minutes
- Cook Time: 0 minutes
- Category: Dessert
- Method: No-Bake
- Cuisine: American
Nutrition
- Serving Size: 1 bar
- Calories: 260
- Sugar: N/A
- Sodium: N/A
- Fat: 18g
- Saturated Fat: N/A
- Unsaturated Fat: N/A
- Trans Fat: N/A
- Carbohydrates: 20g
- Fiber: N/A
- Protein: 6g
- Cholesterol: N/A