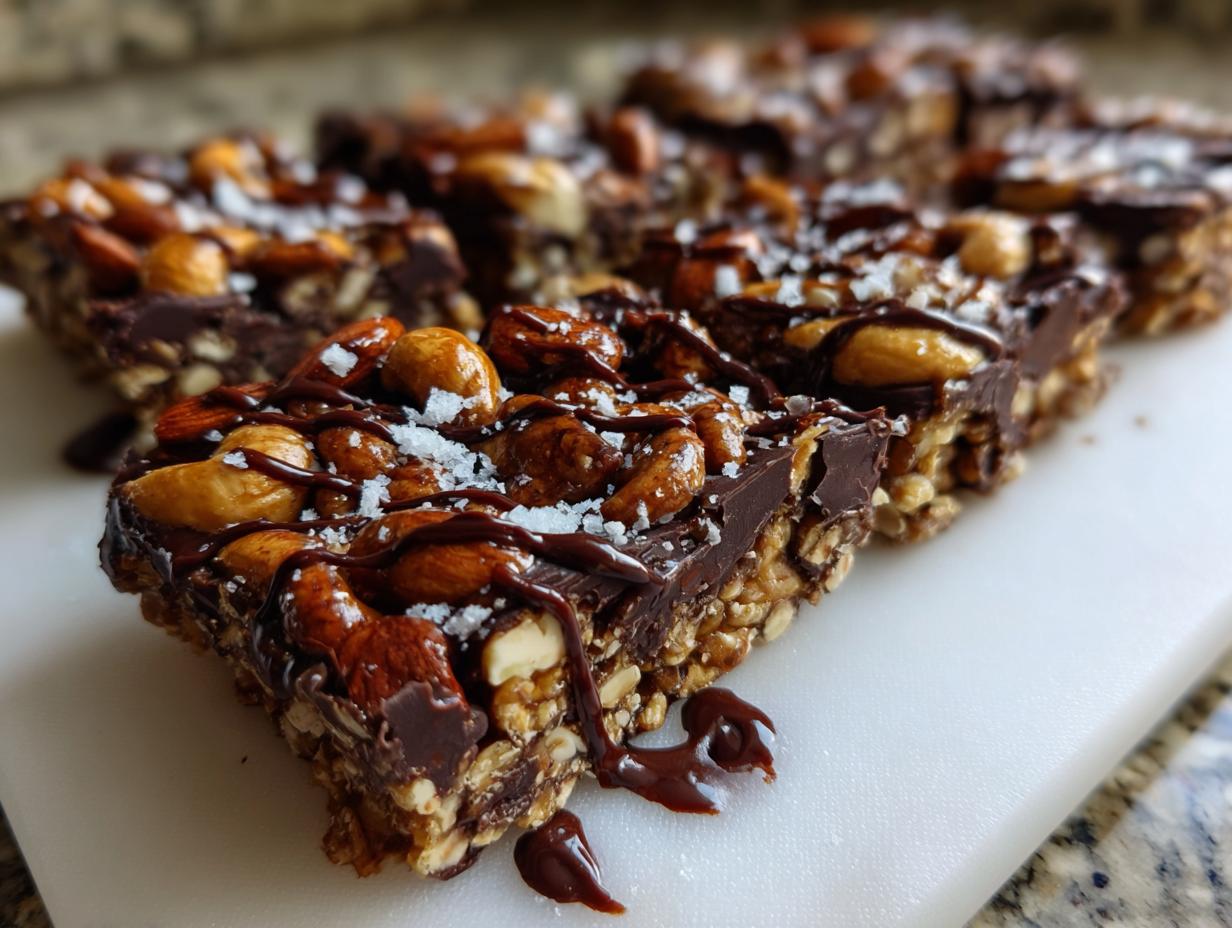
Welcome, friends! If you’ve been following my journey here at Easy Detox Recipes, you know I’m Jordan Bell from Asheville, NC. I’ve been on this incredible ride losing 80 pounds, and I learned quickly that “clean eating” doesn’t mean saying goodbye to Southern comfort food—it just means making smarter swaps! That’s why I’m thrilled to share these dark chocolate nut bars with you today. Forget the chalky, overly sweet stuff you find in the grocery aisle; these homemade snack bars are the perfect marriage of sweet and salty.
These bars are my go-to for meal prep because they come together faster than my morning coffee routine. Seriously, we’re talking about having these ready to chill in under 40 minutes total. Trust me, once you try the rich, slightly bitter dark chocolate coating paired with those crunchy, roasted nuts, you’ll never look back. They are satisfying, packed with good fats, and perfectly portioned for those afternoon slumps!

Why You’ll Love These Dark chocolate nut bars
I get it—you’re busy. We all are! That’s why I developed this recipe to be incredibly fast without tasting like a compromise. These dark chocolate nut bars are total winners because they hit all the right notes for a busy weeknight snack. They are sturdy, satisfying, and taste miles better than anything mass-produced.
- Total time is under 40 minutes, making them perfect for quick meal prep sessions.
- The texture is phenomenal: crunchy nuts held together by just enough binding syrup, finished with snap-worthy chocolate.
- You control exactly what goes in, meaning way better ingredients than those store-bought options!
Quick Assembly and Flavor Balance
The speed here is unbelievable. We roast the nuts while we prep the binder, and then it’s just a quick bake. But the real magic is the flavor. That dark chocolate isn’t just sweet; we hit it with flaky salt right on top. It creates that addictive sweet-salty dance that keeps you coming back for just one more bar.
Quality Ingredients for Homemade Snack Bars
I don’t mess around when it comes to what goes into my body, especially after my health journey. These bars rely on whole roasted almonds, cashews, and peanuts. We use brown rice syrup, which is much cleaner than high-fructose corn syrup found in commercial bars. It’s real food, real flavor, and you can feel good about grabbing one before heading out the door. If you want to see more of my healthy snack ideas, check out my Pinterest board!
Equipment Needed for Dark chocolate nut bars
You don’t need a ton of fancy gadgets for these dark chocolate nut bars, which is another reason I love them! Having the right tools just makes the process smoother, especially when you’re trying to press that sticky mixture down. Make sure you have these basics ready before you even turn the oven on.
Essential Baking Gear
- 8×8-inch baking pan (this size is key for bar thickness!)
- Parchment paper (a lifesaver for clean removal)
- Rimmed baking sheet for roasting the nuts
- Large mixing bowl for combining the base
- Microwave-safe bowl for loosening the syrup and melting chocolate
- Spatula or the back of a sturdy spoon for pressing
Gathering Your Ingredients for Dark chocolate nut bars
Alright, let’s talk about what you need to pull these amazing dark chocolate nut bars together. The ingredient list looks simple, but pay close attention to the amounts, especially for the nuts, because that ratio is what gives you the perfect crunch without being overwhelmingly hard to chew. We are building texture and flavor in layers here, so please measure carefully!
We rely on real ingredients, so having high-quality dark chocolate makes a huge difference in the final flavor. Make sure everything is ready to go before you start roasting, because once those nuts smell good, you’ll want to move quickly! You can read more about my philosophy on clean eating on my Medium page.
Nuts and Cereal Base
You need a good mix here—we’re using 2\u00bd cups total. The recipe calls for a specific blend: \u00be cup of cashews, \u00be cup of peanuts, and 1 full cup of almonds. Remember, these all need to be roasted first until they are fragrant! We mix that roasted goodness with \u00bd cup of puffed brown rice cereal. That cereal is crucial because it lightens up the dense nuts and gives the bar a bit of airy structure.
Sweeteners and Flavor Agents
Our binder is \u00bc cup of brown rice syrup. This stuff can be thick, so you’ll need to loosen it up a bit before mixing. Whisk in 1\u00bd teaspoons of vanilla extract—don’t skip the vanilla, it rounds out the nuttiness! And we need \u00bd teaspoon of sea salt right into this liquid mixture to ensure the saltiness is distributed evenly throughout the base, not just on top.
The Dark Chocolate Topping
For the decadent finish, grab 1 cup of dark chocolate chips. To make them melt into that beautiful, glossy coating, we mix them with 2 teaspoons of coconut oil. This oil helps keep the chocolate smooth and prevents it from cracking too much when you bite into it. Finally, keep your flaky sea salt handy for sprinkling right after the drizzle!
Step-by-Step Instructions for Dark chocolate nut bars
Now for the fun part—putting these amazing dark chocolate nut bars together! Remember, speed is your friend once the nuts are roasted, but patience is key during the cooling stages. Follow these steps exactly, and you’ll have perfectly set, delicious bars ready for the week.
Roasting the Nuts and Pan Preparation
First things first: we need to wake up those nuts! Preheat your oven right to 325\u00b0F. Spread your mixed nuts—all 2\u00bd cups of them—in a single layer on a rimmed baking sheet. Pop them in for about 5 to 8 minutes. You’ll know they are ready because the kitchen will smell nutty and warm. Don’t walk away; they can burn fast! While they are roasting, get your 8×8-inch pan ready. Line it completely with parchment paper, making sure you leave some overhang on the sides—this overhang is what you’ll use as handles later to lift the entire slab out.
Mixing the Base Components
Once the nuts are out, toss them immediately into your large mixing bowl with the \u00bd cup of puffed brown rice cereal. Now, tackle that brown rice syrup. Since it’s thick, microwave it for just 30 seconds to loosen it up. Whisk in the vanilla and the salt quickly. Pour this liquid binder over the nuts and cereal. Stir it well! You need to make sure every single piece is coated before you move on. Don’t leave any dry pockets hiding in the bottom of the bowl. If you are curious about using salt in detox routines, check out this article on does pink salt break a fast.
Baking and Initial Cooling
Transfer that sticky, coated mixture into your prepared, parchment-lined pan. This is important: press it down firmly! Use the back of a spatula or your clean hands to compact it into a solid, even layer. Bake this pressed base for 18 to 20 minutes until you see it getting lightly golden around the edges. Once it’s out, let it cool completely in that pan for a solid 30 minutes. If you try to cut it hot, it will definitely crumble on you.
Cutting and Applying the Chocolate Coating
After 30 minutes, use those parchment paper handles to lift the entire cooled block onto a cutting board. Slice it right down the middle lengthwise, and then cut those two halves into 5 or 6 thin bars each. Now melt your dark chocolate and coconut oil in short bursts in the microwave, stirring until it’s glossy. Dip the bottom of each bar into the melted chocolate, letting the extra drip back into the bowl. Place these dipped bars back onto a fresh parchment-lined sheet. Use a spoon to drizzle the remaining chocolate over the tops however you like, and immediately sprinkle that flaky sea salt on top before it sets!

Setting the Dark chocolate nut bars
This last step requires a little patience, but it’s quick! You need to get these bars into the refrigerator for about 15 to 20 minutes. This chilling time ensures that the coconut oil mixture hardens up nicely, giving you that satisfying snap when you bite into the dark chocolate coating. For more quick recipes like this, see my guide on easy miso salmon under 40 min.
Ingredient Notes and Substitutions
One of the best parts about making your own dark chocolate nut bars is that you can totally customize them based on what you have or what you love! I included a specific mix, but please don’t feel locked into it. The key is keeping the total volume of nuts the same. Just remember, roasting time might change slightly if you mix in softer nuts like pecans versus harder almonds.
When it comes to the binder, brown rice syrup is my top pick because it really helps everything stick together beautifully without being overly sweet. However, I know not everyone stocks it, so I have a couple of easy swaps you can try! If you are looking for other easy swaps, check out my post on the gelatin trick recipe.
Nut Varieties for Your Snack Bars
If you aren’t a fan of the classic combo, go wild! You can absolutely swap out the almonds, cashews, and peanuts for other delicious options. Walnuts, pecans, pistachios, hazelnuts, or even macadamia nuts work wonderfully here. Just make sure you roast whatever you choose until they are nice and fragrant so you get that deep flavor.
Sweetener Alternatives Guidance
If you don’t have brown rice syrup, honey or maple syrup are acceptable replacements, but I need to warn you: they behave a bit differently. Both honey and maple syrup tend to make the final bars a little stickier and they might not bind quite as firmly as the rice syrup does. You might need to chill the bars a tiny bit longer to compensate!
Tips for Perfect Dark chocolate nut bars
Even with a simple recipe like this, a couple of little tricks can take your dark chocolate nut bars from good to absolutely perfect. Most problems come down to not pressing hard enough or rushing the melting process for the chocolate. Don’t let those little hiccups stop you from enjoying these wonderful, homemade snack bars!
Achieving a Firm Bar Structure
The number one reason these bars crumble when you try to cut them is not pressing the base firmly enough into the pan before baking. Seriously, put some muscle into it! When you transfer the coated mixture, use the bottom of a measuring cup or a sturdy spatula to really compact it down. You want it dense and solid. If it’s loose before it bakes, it will be crumbly after it cools. That firm press locks everything in place for a clean cut later on.
Smooth Melting Technique for Chocolate
Scorched chocolate is the worst, and it happens so fast when you’re microwaving it! Remember we added that tiny bit of coconut oil? That helps keep it smooth, but you still have to be careful. Always melt the dark chocolate chips in short bursts—30 seconds max—and stir vigorously between each session. If you see any lumps remaining, don’t blast it again; just keep stirring. The residual heat will melt the last bits, keeping your topping glossy and smooth rather than grainy or seizing up.
Storing Your Homemade Dark chocolate nut bars
Once you’ve managed to resist eating them all immediately, storing these dark chocolate nut bars properly keeps them tasting fresh and prevents the chocolate from getting messy. Since we used coconut oil in our chocolate dip, they hold up pretty well at room temperature, but the fridge is best if you plan on keeping them for more than a few days. Keep them safe from sticky fingers by separating the layers!
Recommended Storage Table
This chart shows you the best way to keep your homemade snack bars tasting great:
| Storage Location | Duration | Layering Requirement |
|---|---|---|
| Room Temperature (Airtight) | Up to 1 week | Use parchment between layers |
| Freezer | Longer term | Separate every bar with parchment |
Frequently Asked Questions About Dark chocolate nut bars
I always get a ton of questions when I post these quick recipes! It’s natural when you’re trying to make a healthier version of a treat. Here are a few things I hear most often about making these dark chocolate nut bars perfectly at home.
Can I make these bars vegan
That’s a great question for clean eating! The syrup is the main thing to check. Brown rice syrup is usually vegan, but always double-check the label. The only other non-vegan item would be the chocolate chips; many dark chocolate chips are accidentally vegan, but you must use a brand that confirms it has no dairy. If you swap the syrup for maple syrup, that’s vegan too!
Why are my dark chocolate nut bars crumbly
If your bars are crumbly, you probably missed one of two critical steps we talked about! Either you didn’t press the nut mixture down hard enough into the pan before baking—you need real pressure there!—or you didn’t use enough of the sticky binder mixture to coat everything evenly. If the nuts aren’t well-coated, they won’t stick together once cooled.
How much protein is in one bar
Since these dark chocolate nut bars are packed with almonds, cashews, and peanuts, they pack a decent protein punch! For an exact breakdown, check out the nutrition table below, but generally, you’re looking at around 7 grams of protein per serving, which is perfect for a satisfying, easy snack bar!
Estimated Nutritional Information for Dark chocolate nut bars
I always want you to know what you’re eating when you make my recipes, especially when we are focusing on clean snacks! Please keep in mind that these figures are estimates based on the ingredients listed, and your actual numbers might shift slightly depending on the brand of dark chocolate or syrup you choose. But this gives you a fantastic baseline for tracking your intake.
Nutritional Data Table
| Nutrient | Amount Per Bar |
|---|---|
| Calories | 248 |
| Total Fat | 18.1g |
| Carbohydrates | 17.3g |
| Protein | 6.9g |
Share Your Experience with These Dark chocolate nut bars
Whew! That’s it—you’ve made incredible homemade snack bars! I truly hope you love this recipe as much as my family does. If you tried these dark chocolate nut bars, please come back and leave me a star rating right below this section. I’m always curious to know what nuts you used or if you tried a different chocolate!
Don’t be shy; drop a comment and tell me how they turned out for your meal prep this week. Happy baking! Pin this recipe for later!
Print
Amazing 40-Min Dark chocolate nut bars
- Total Time: 40 minutes
- Yield: 10 to 12 bars 1x
- Diet: Vegetarian
Description
Dark chocolate sea salt nut bars with roasted almonds, cashews, and peanuts. These easy homemade snack bars are ready in 40 minutes, perfect for busy weeknights and meal prep. They offer a great sweet-salty balance and are more nutritious than store-bought options.
Ingredients
- 2½ cups unsalted nuts (mixture of ¾ cup cashews, ¾ cup peanuts, and 1 cup almonds)
- ½ cup puffed brown rice cereal
- ¼ cup brown rice syrup
- 1½ teaspoons vanilla extract
- ½ teaspoon sea salt
- 1 cup dark chocolate chips
- 2 teaspoons coconut oil
- Flaky sea salt for topping
Instructions
- Preheat your oven to 325°F. Spread the nuts in a single layer on a rimmed baking sheet. Bake for 5 to 8 minutes until fragrant and lightly browned.
- Line an 8×8-inch baking pan with parchment paper. Spray lightly with cooking spray.
- Combine the roasted nuts and puffed rice in a large mixing bowl. Toss until evenly mixed.
- Place the brown rice syrup in a microwave-safe bowl and microwave for 30 seconds to loosen it. Whisk in the vanilla extract and salt until combined.
- Pour the brown rice syrup mixture over the nut mixture. Stir until all nuts and puffed rice are evenly coated.
- Transfer the coated mixture to the prepared pan. Press firmly into an even, compact layer using your hands or the back of a spatula.
- Bake for 18 to 20 minutes until the mixture is set and lightly golden. Remove from the oven and let cool in the pan for 30 minutes.
- Transfer the cooled mixture to a cutting board. Cut in half lengthwise, then slice each half into 5 to 6 thin bars.
- Melt the dark chocolate chips with coconut oil in a microwave-safe bowl in 30-second intervals, stirring between each interval until fully smooth and glossy.
- Dip the bottom of each bar into the melted chocolate, letting excess drip off. Transfer to a parchment-lined baking sheet.
- Drizzle the remaining melted chocolate over the top of each bar using a spoon. Immediately sprinkle with flaky sea salt.
- Refrigerate the bars for 15 to 20 minutes until the chocolate is completely set before serving.
Notes
- You can substitute walnuts, pecans, pistachios, hazelnuts, or macadamia nuts for the almonds, cashews, and peanuts.
- Honey or maple syrup can replace brown rice syrup, but the bars might be stickier and bind less firmly.
- Swap dark chocolate for milk chocolate or semisweet chocolate if you prefer.
- Store bars in an airtight container at room temperature for up to 1 week, using parchment paper between layers.
- Freeze bars for longer storage, separating layers with parchment paper.
- Prep Time: 20 minutes
- Cook Time: 20 minutes
- Category: Snack Bar
- Method: Baking
- Cuisine: American
Nutrition
- Serving Size: 1 bar
- Calories: 248
- Sugar: Varies (from syrup/chocolate)
- Sodium: Varies (from added salt)
- Fat: 18.1g
- Saturated Fat: Varies
- Unsaturated Fat: Varies
- Trans Fat: Varies
- Carbohydrates: 17.3g
- Fiber: Varies
- Protein: 6.9g
- Cholesterol: Varies