Hey there! Jordan Bell here, coming to you from my kitchen in beautiful Asheville, North Carolina. You know, after shedding about 80 pounds myself, I made it my mission with my Easy Detox Recipes blog to show folks that we don’t have to give up the soul-satisfying flavors of Southern comfort food. My passion is taking those beloved classics – the ones that taste like a hug from Grandma – and making them just a little bit lighter, a little bit cleaner, without sacrificing an ounce of that incredible taste. Today, we’re diving headfirst into a dessert that feels utterly decadent but is surprisingly simple to whip up: the classic Creme Brulee. Forget those fancy restaurant versions; this is the real deal, a perfect French vanilla custard with that signature crackly, caramelized sugar top that just sings. Trust me, making this at home is way easier than you think, and it’s going to impress everyone!
Why You’ll Love This Creme Brulee
Seriously, this Creme Brulee is a total winner, and here’s why:
- So Easy, So Elegant: You get that restaurant-fancy vibe with minimal fuss. It looks and tastes incredible, but you can totally nail it in your own kitchen.
- That Rich, Dreamy Flavor: We’re talking pure, creamy French vanilla goodness. The custard is so smooth and luscious, it just melts in your mouth.
- The Perfect Crackle: Oh, that caramelized sugar topping! It’s that satisfying *crack* when you tap into it, giving you that perfect contrast of textures. It’s pure dessert magic.
- Special Occasion Ready: Birthdays, anniversaries, or just a Tuesday night you want to feel special – this dessert is your go-to. It feels so luxurious, but it’s surprisingly straightforward.
Gather Your Ingredients for Creme Brulee
Alright, let’s get down to business! To make this dreamy Creme Brulee, you don’t need a ton of fancy stuff, but using good quality ingredients really makes a difference. It’s all about that rich French vanilla flavor and the perfect, silky custard. Here’s what you’ll need to grab from the store to make this happen:
Essential Ingredients for Creme Brulee
| Ingredient | Quantity | Notes |
| Heavy cream | 2 cups | This is key for that super-rich custard! |
| Vanilla bean or pure vanilla extract | 1 whole bean or 1 tbsp | For that authentic French vanilla flavor. If using a bean, split it and scrape out the seeds! |
| Large egg yolks | 6 | These give the custard its creamy texture and color. |
| Granulated sugar | 1/2 cup, plus more for topping | You’ll use some in the custard and then a nice even layer on top for that crackly finish. |
| Salt | 1/4 tsp | Just a pinch to balance the sweetness. |
| Small ramekins | 6 | These are essential for baking and serving. Make sure they’re oven-safe! |
Mastering the Art of Creme Brulee: Step-by-Step Instructions
Okay, get ready to feel like a total pastry chef! Making this Creme Brulee is really all about a few key steps, and once you get the hang of them, you’ll be whipping these out like a pro. It’s not complicated, but paying attention to a few details makes all the difference between good and *amazing*. Let’s get this custard party started!
Preparing the Custard Base for Creme Brulee
First things first, we need to get our custard base ready. Preheat your oven to 325°F (160°C) and grab a medium saucepan. Pour in your lovely heavy cream. Now, if you’re lucky enough to have a vanilla bean, this is where it shines! Split it right down the middle, scrape out those tiny, fragrant seeds, and toss both the seeds and the pod into the cream. If you’re using vanilla extract, no worries, just save it for a bit later. Gently heat the cream over medium heat. You want it to get nice and warm, just to a simmer – think tiny bubbles around the edges. Please, please, *please* don’t let it boil over, or it can get a weird texture! Let that beautiful vanilla infuse into the cream for about 5 to 10 minutes. If you used the bean, now’s the time to fish out that pod. While the cream is doing its thing, in a separate mixing bowl, whisk together your egg yolks, the granulated sugar, and that pinch of salt. Whisk it like you mean it until the mixture turns a pale yellow and looks nice and thick. This is where we temper the eggs. Slowly, and I mean *slowly*, start pouring that hot cream into the egg mixture while whisking constantly. This is super important so you don’t end up with scrambled eggs in your custard! If you’re using vanilla extract, stir it in right now. Once it’s all combined, give it a good strain through a fine-mesh sieve into a jug. This extra step catches any little bits and ensures you have the smoothest, silkiest custard possible. Pour this gorgeous mixture evenly into your little ramekins.
Baking and Chilling Your Creme Brulee
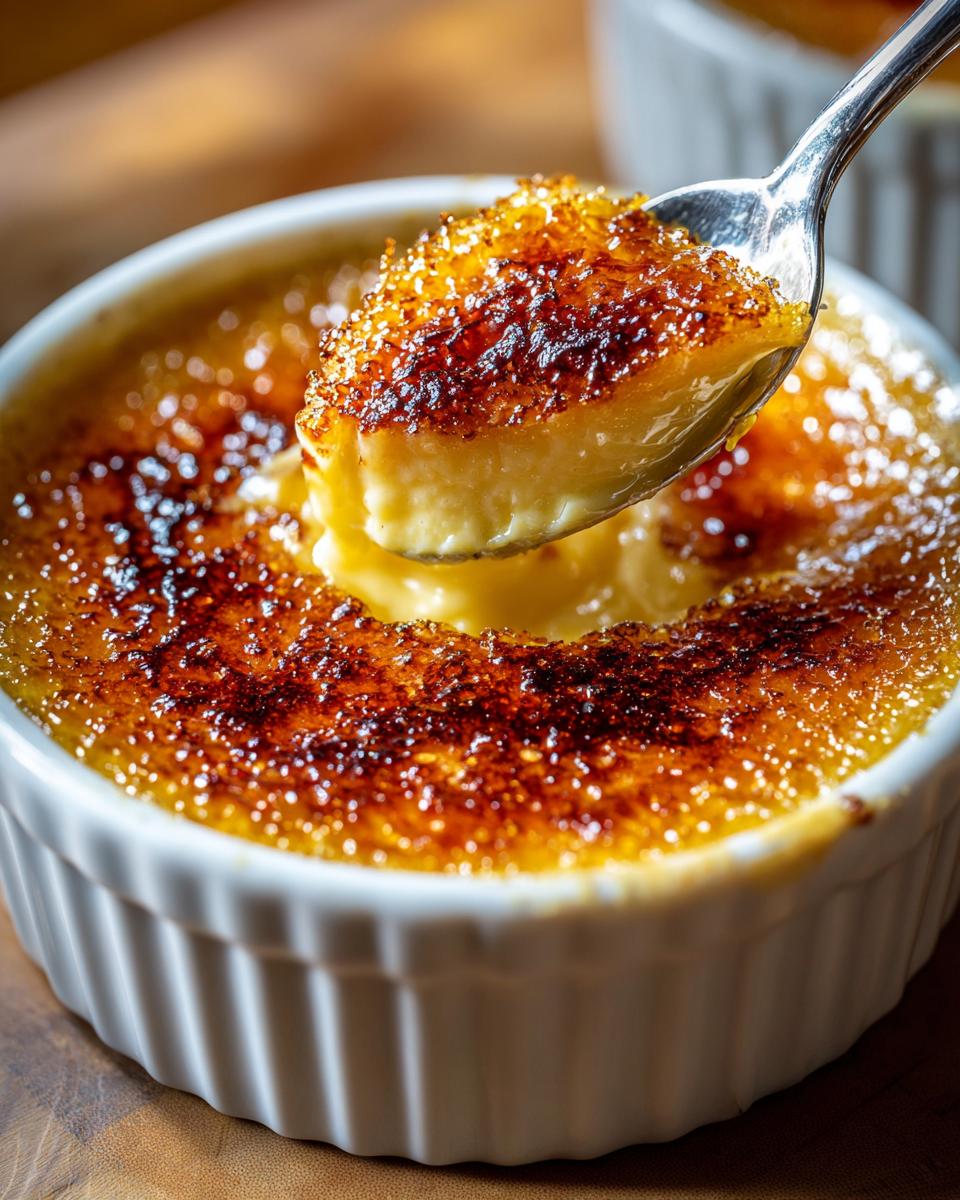
Now for the baking part, and we’re going to use a water bath. It sounds fancy, but it’s just a way to cook the custards gently and evenly, preventing those dreaded cracks or curdled bits. Arrange your ramekins in a deep baking dish. Carefully pour hot water into the baking dish, all around the ramekins, until it comes about halfway up their sides. This water bath is your best friend for a perfect custard! Pop that whole setup into your preheated oven. Bake for about 30 to 35 minutes. You’re looking for the edges of the custards to be set, but the center should still have a little jiggle, like a tiny tremor. Don’t overbake it! Once they’re done, carefully remove the ramekins from the hot water bath. Let them cool down on a wire rack until they reach room temperature. Then, cover them loosely and pop them in the fridge for at least 2 hours, but honestly, overnight is even better. Chilling is crucial for that lovely firm texture.
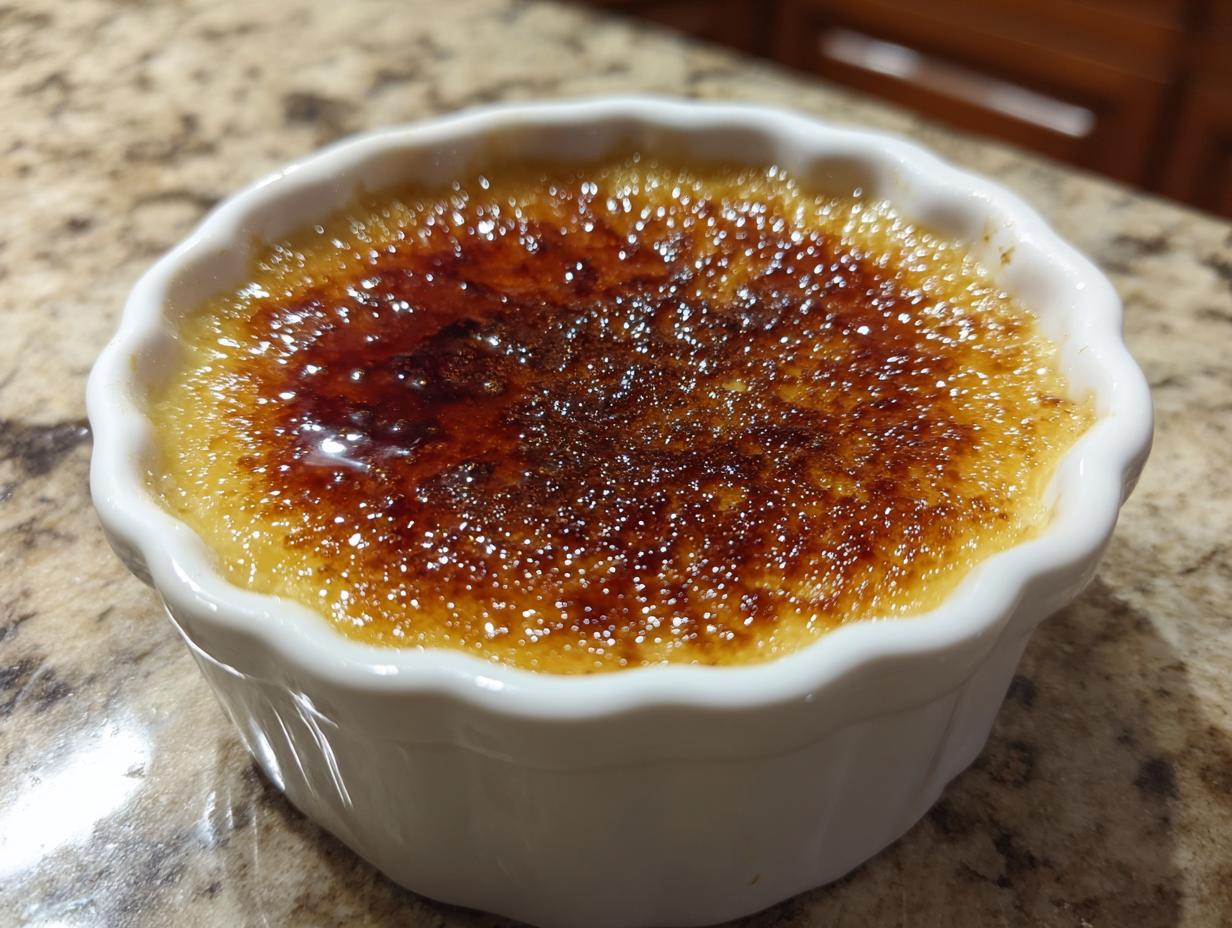
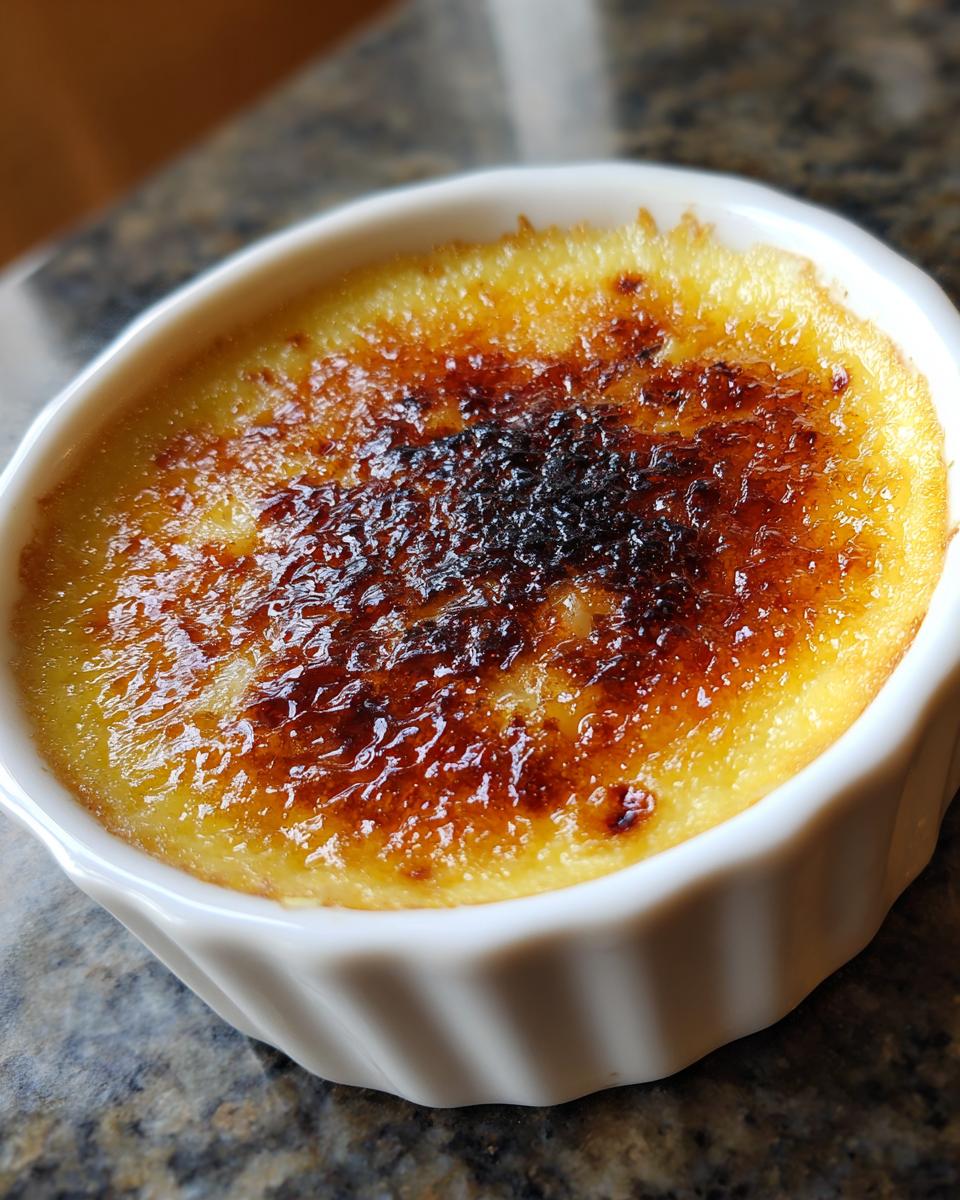
Achieving the Perfect Caramelized Sugar Topping for Creme Brulee
This is the grand finale, the moment of truth! Just before you’re ready to serve your beautiful, chilled custards, it’s time for that signature crackly topping. Sprinkle a thin, even layer of granulated sugar over the top of each custard. You want a nice, consistent coating – not too thick, not too thin. Now, for the caramelization! The easiest way is with a culinary torch. Just hold it a few inches away from the sugar and move it around in circles until the sugar melts, bubbles, and turns a gorgeous amber brown. It happens pretty fast, so keep an eye on it! If you don’t have a torch, you can use your oven’s broiler. Place the sugared ramekins on a baking sheet and put them under a hot broiler for about 2-3 minutes. You HAVE to watch them like a hawk because they can go from perfectly caramelized to burnt in seconds! Once that sugar is beautifully browned and bubbly, let them sit for just a minute or two. This lets the caramelized sugar harden up into that irresistible glassy crust. Then, it’s time to serve and let your guests experience that satisfying *crack*!
Tips for Perfect Creme Brulee Every Time
Making a truly spectacular Creme Brulee isn’t rocket science, but a few little tricks up your sleeve can make all the difference between a good dessert and a *wow* dessert. For that ultra-smooth, melt-in-your-mouth custard, quality ingredients really do matter. Using a real vanilla bean instead of extract gives you this amazing depth of flavor that’s hard to beat. And remember, patience is key, especially with the heating and baking steps. We want a delicate custard, not a rubbery one!
Creamy Custard Secrets for Creme Brulee
The secret to that unbelievably silky smooth custard? It all boils down to gentle heat and a good strain. When you’re warming up that heavy cream, just bring it to a simmer, not a rolling boil. Boiling can actually change the texture of the cream. And after you’ve tempered your egg yolks with the hot cream, don’t skip the straining step! Pouring the mixture through a fine-mesh sieve catches any tiny bits of cooked egg or any little impurities, guaranteeing you a perfectly smooth, luscious base. It’s an extra step, but trust me, it’s totally worth it for that luxurious mouthfeel.
Caramelization Techniques for Your Creme Brulee
Ah, the caramelized sugar! This is the showstopper, right? Using a culinary torch is honestly the easiest and most controlled way to get that perfect, glass-like crust. Just keep the torch moving in a steady circular motion over a thin, even layer of sugar. You’ll see it melt, bubble, and turn a beautiful amber color. If you’re using the broiler, be super vigilant! Sugar burns *fast* under there. Keep the ramekins on a sturdy baking sheet, position them on the oven rack closest to the heat, and stand there watching them like a hawk. They might only need 2-3 minutes. You want that gorgeous golden-brown color, not black and bitter. Either way, let that sugar harden for a minute before you dive in!
Frequently Asked Questions about Creme Brulee
Got questions about whipping up this classic French vanilla dessert? I’ve got you covered! Making a perfect Creme Brulee is totally doable, and understanding a few key things can help you avoid any kitchen mishaps. Let’s tackle some common concerns so you can serve up that delightful custard with confidence!
Can I make Creme Brulee ahead of time?
Absolutely! This is one of my favorite things about Creme Brulee. You can make the custards themselves a day or even two in advance. Just bake them, let them cool, and then cover them tightly with plastic wrap and keep them chilled in the refrigerator. The trick is to wait until *just* before you’re ready to serve them to sprinkle on that sugar and caramelize it. Doing it ahead of time means the sugar will likely melt or get sticky before serving, and you won’t get that lovely crisp crust. So, bake ahead, chill ahead, but torch right before you’re ready to dig in!
What is the best way to caramelize the sugar on Creme Brulee?
Honestly, the best method is usually a culinary torch. It gives you the most control and achieves that perfect, even, glassy crust without heating the custard underneath too much. You just sprinkle the sugar evenly and wave the torch until it melts and browns. If you don’t have a torch, your oven’s broiler can work, but you have to be super careful! Place the sugared ramekins on a baking sheet and put them on the top rack. Watch them like a hawk – they can go from golden to burnt in literally seconds. It’s faster but riskier for the custard. Either way, make sure you get a nice, thin, even layer of sugar for the best crackle.
Why is my Creme Brulee custard lumpy?
Oh, lumps! Nobody wants those in their silky smooth custard. The most common reason for a lumpy Creme Brulee is overcooking the eggs. When you pour the hot cream into the egg yolks, you need to whisk constantly to temper them gently. If the eggs get too hot too quickly, they scramble just a little bit. Another culprit can be not straining the mixture afterward. Straining through a fine-mesh sieve is crucial because it catches any tiny bits of cooked egg or any little bits of cream that might have gotten too hot. So, gentle heating and a good strain are your best friends for a lump-free, glorious custard!
Savoring Your Delicious Creme Brulee
Alright, the moment you’ve been waiting for! Your beautiful Creme Brulee is ready. The best way to enjoy this classic French vanilla delight is when that caramelized sugar crust is still slightly warm and perfectly crisp, contrasting with the cool, creamy custard underneath. It’s that delightful textural play that makes this dessert so special. Serve it right after you’ve torched that sugar so your guests can experience that satisfying *crack* as they break into it with their spoons. While it’s absolutely divine on its own, sometimes a tiny garnish can add a little extra flair. A single fresh raspberry or a tiny mint leaf placed delicately on the side can add a pop of color without overpowering that wonderful vanilla flavor. Honestly though, this dessert is so perfect as is, it truly shines all by itself. Enjoy every single spoonful!
Storing and Reheating Creme Brulee
Got leftovers? Lucky you! You can store your delightful Creme Brulee in the fridge for up to two days. Just make sure they’re covered tightly with plastic wrap. Now, this is super important: the caramelized sugar topping is best done *right* before serving. If you reheat a custard that already has sugar on it, it’ll likely melt or get sticky. So, for the best experience, store the chilled, un-torched custards. When you’re ready to serve again, just add a fresh layer of sugar and torch away! This way, you get that perfect crisp crackle every single time.
Nutritional Estimate for Creme Brulee
Whipping up this classic French vanilla Creme Brulee is a treat for the taste buds, and it’s helpful to have an idea of what you’re enjoying. Please keep in mind that these are just estimates per serving, and the actual numbers can vary a bit depending on the exact ingredients you use and how perfectly you craft that caramelized sugar topping. It’s a rich dessert, but oh-so-worth-it!
Estimated Nutritional Breakdown
| Nutrient | Estimate Per Serving |
| Calories | 350 |
| Fat | 25g |
| Protein | 5g |
| Carbohydrates | 28g |
| Sugar | 25g |
| Sodium | 50mg |

Amazing Creme Brulee: 6 Servings
- Total Time: 2 hours 50 minutes
- Yield: 6 servings 1x
- Diet: Vegetarian
Description
A classic French vanilla crème brûlée with a rich custard base and a perfectly caramelized sugar crust.
Ingredients
- 2 cups heavy cream
- 1 vanilla bean or 1 tbsp pure vanilla extract
- 6 large egg yolks
- 1/2 cup granulated sugar, plus more for topping
- 1/4 tsp salt
- 6 small ramekins
Instructions
- Preheat your oven to 325°F (160°C).
- In a medium saucepan, pour in the heavy cream. If using a vanilla bean, split it down the middle and scrape its seeds into the cream; add the pod as well. If using vanilla extract, wait to add it until the cream is off the heat.
- Gently heat the cream over medium heat, bringing it to a simmer, but do not let it boil. Allow it to infuse with the vanilla for about 5-10 minutes. Remove the vanilla pod if used.
- In a mixing bowl, whisk together the egg yolks, granulated sugar, and salt until the mixture is pale and thick.
- Slowly pour the hot cream into the egg mixture, whisking constantly to prevent the eggs from cooking. If using vanilla extract, add it now.
- Strain the mixture through a fine-mesh sieve into a jug to remove any lumps or cooked egg bits.
- Place the ramekins in a deep baking dish. Pour the custard mixture evenly into each ramekin.
- Carefully pour hot water into the baking dish until it reaches halfway up the sides of the ramekins, creating a water bath.
- Bake in the preheated oven for about 30-35 minutes, or until the custards are set at the edges but still slightly jiggly in the center.
- Remove ramekins from the water bath and let them cool to room temperature, then refrigerate for at least 2 hours or overnight.
- Before serving, sprinkle a thin, even layer of granulated sugar over each custard.
- Use a culinary torch to caramelize the sugar, forming a crisp top. Alternatively, place them under a broiler for about 2-3 minutes, watching closely to prevent burning.
- Allow the caramelized top to harden for a minute before serving.
Notes
- Ensure the water bath reaches halfway up the sides of the ramekins for even cooking.
- Chill the custards thoroughly before caramelizing the sugar for the best texture.
- Watch the sugar carefully when caramelizing to avoid burning.
- Prep Time: 15 minutes
- Cook Time: 35 minutes
- Category: Dessert
- Method: Baking and Torching
- Cuisine: French
Nutrition
- Serving Size: 1 ramekin
- Calories: 350
- Sugar: 25g
- Sodium: 50mg
- Fat: 25g
- Saturated Fat: 15g
- Unsaturated Fat: 10g
- Trans Fat: 1g
- Carbohydrates: 28g
- Fiber: 0g
- Protein: 5g
- Cholesterol: 150mg