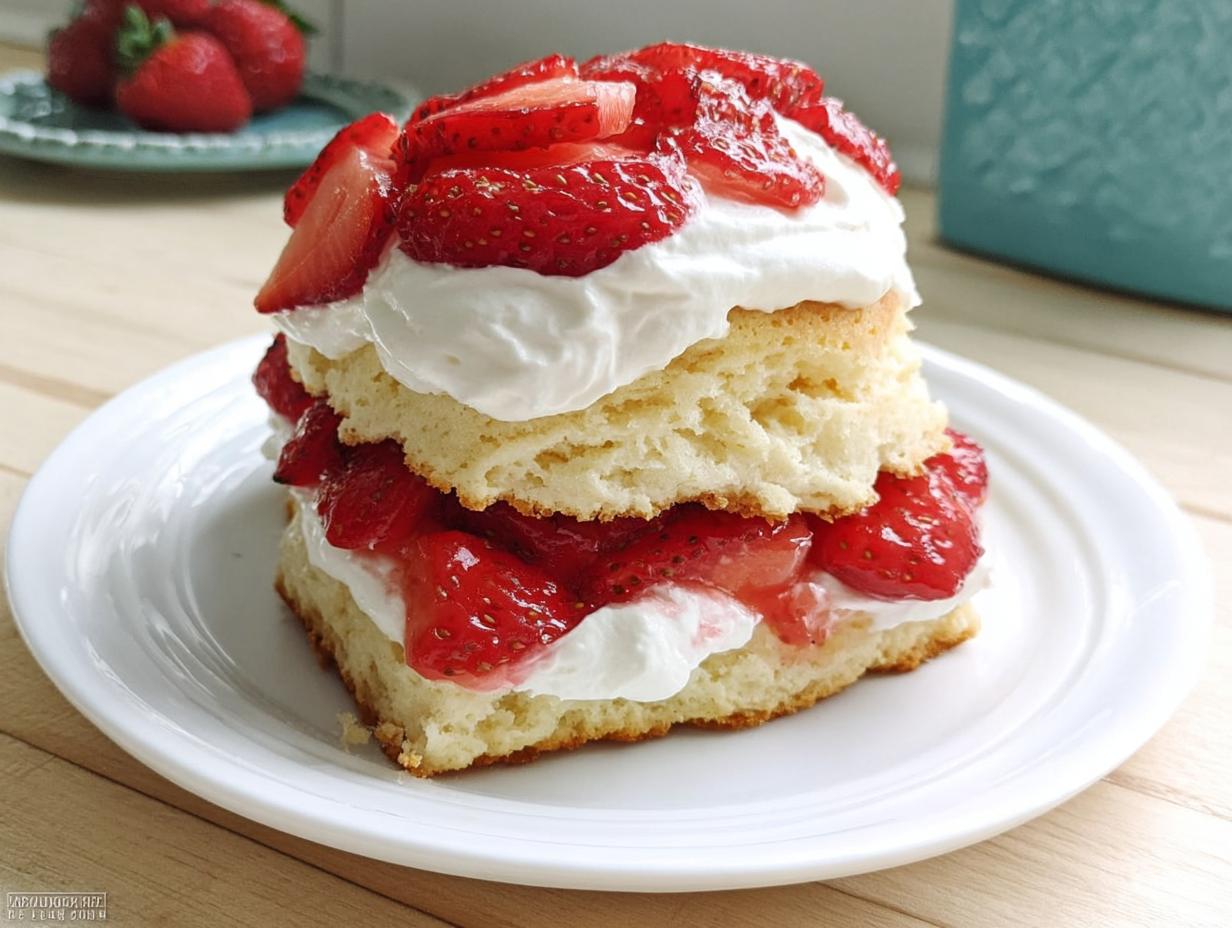
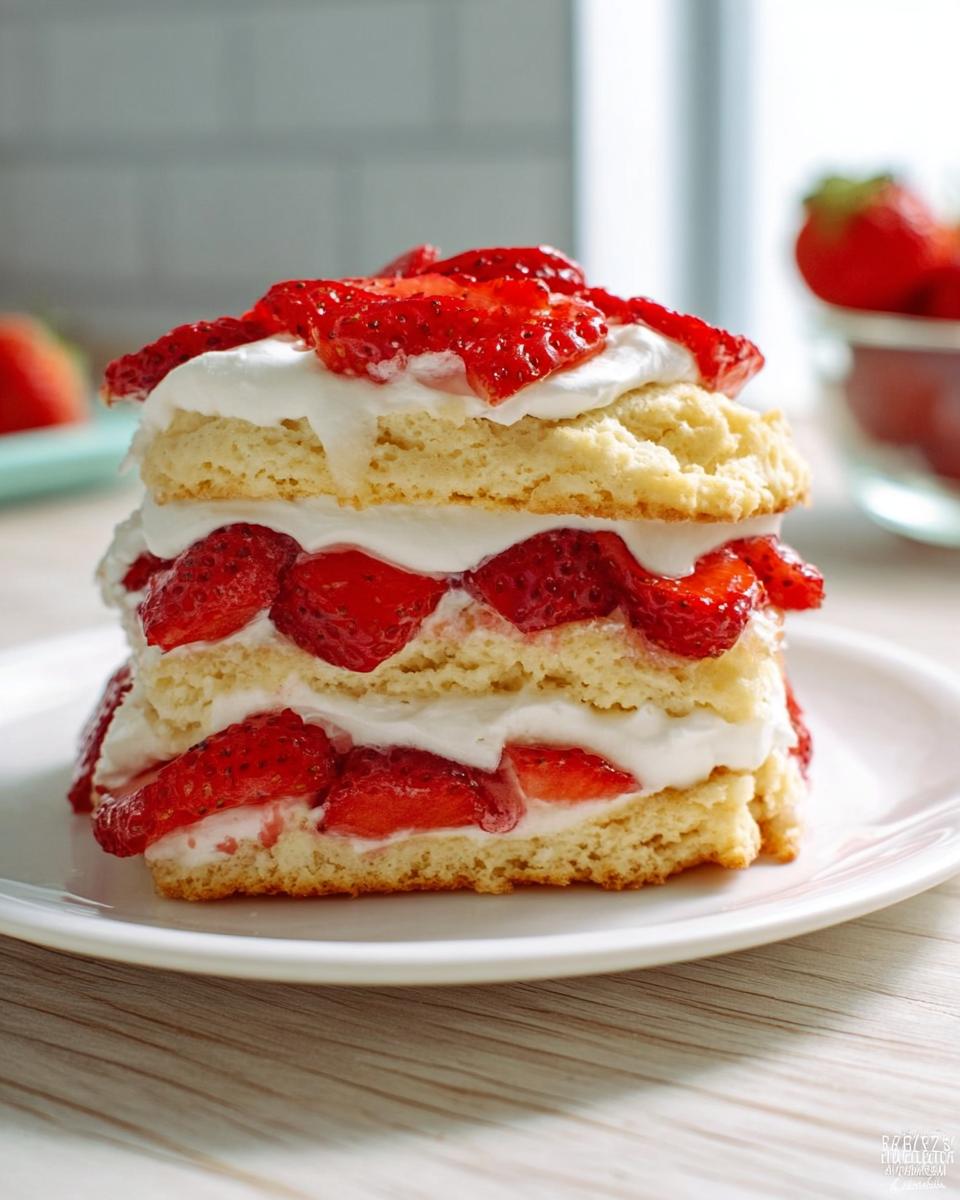
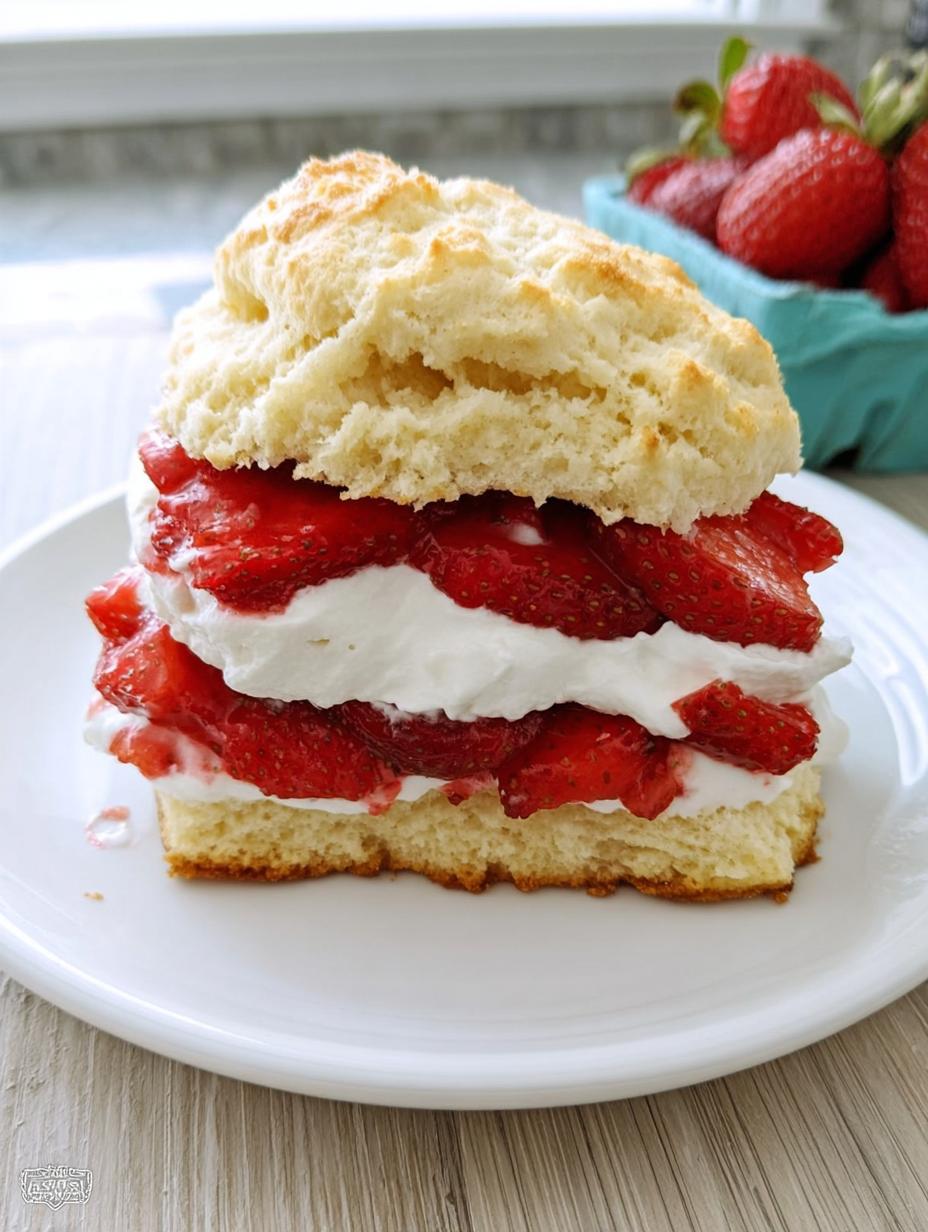
Oh, my gosh, you have to try this Classic Gluten Free Strawberry Shortcake! I’ve spent years trying to nail that perfect, tender biscuit texture without any wheat, and I finally cracked the code. This isn’t some crumbly, sad excuse for a summer dessert; this Classic Gluten Free Strawberry Shortcake is light, fluffy, and tastes exactly like what you remember from childhood gatherings.
Seriously, every summer since I first started baking gluten-free, I have tweaked this recipe until my family couldn’t tell the difference. The secret isn’t just in the flour blend—though that’s important—it’s in how gently we treat that dough. We’re aiming for a biscuit that melts in your mouth, layered with strawberries that have been soaking just long enough to get super juicy. It comes together so fast, too! You’ll have this beautiful, fresh dessert on the table in under an hour, ready for immediate devouring.
It’s my go-to dessert now, and I promise, once you try this method, you won’t look back. Let’s get started on those biscuits!
Essential Components for Your Classic Gluten Free Strawberry Shortcake
When you’re baking gluten-free, the quality of your ingredients matters so much more because there’s no gluten backbone to forgive any mistakes. For this Classic Gluten Free Strawberry Shortcake, we need three main components working in harmony: the juicy fruit, the fluffy biscuit, and the light cream topping. Don’t skip the chilling steps!
Preparing the Macerated Strawberries
This step is crucial for flavor! Take your 3 cups of fresh strawberries and slice them up nicely. Then, toss them with 1/4 cup of granulated sugar. They need to sit in the fridge for at least 15 minutes while you make the dough. This lets them release those beautiful, sweet juices that soak right into the warm shortcake later.
Gathering Dry Ingredients for the Biscuit Shortcake
For the base, you need 2 cups of good quality gluten-free all-purpose flour that already has xanthan gum mixed in—that’s super important for structure here. Whisk that together with 1 tablespoon of baking powder, 1 teaspoon of salt, and another 1/4 cup of sugar. Keep everything dry until the very last minute.
Incorporating Fats and Liquids for the Classic Gluten Free Strawberry Shortcake Base
The fat has to be cold! Cube 6 tablespoons of unsalted butter and cut it into the dry mix until it looks like little peas. For the liquid, we make a quick substitute for buttermilk: mix 1 tablespoon of vinegar into 1 cup of milk and let it sit for five minutes. This acidity helps activate the baking powder and keeps our Classic Gluten Free Strawberry Shortcake tender.
Step-by-Step Instructions for Your Classic Gluten Free Strawberry Shortcake
Okay, this is where the magic happens, but remember what I always say: be quick and be gentle! We want these biscuits to rise up high and proud, not flatten out like pancakes. Follow these steps exactly, and you’ll have the best Classic Gluten Free Strawberry Shortcake you’ve ever tasted.
Preparing the Oven and Macerating the Fruit
First things first, get that oven fired up! Preheat it to a hot 450 degrees Fahrenheit. You need that blast of heat to help the gluten-free dough puff up quickly. While that’s heating, make sure your strawberries are already chilling out with their sugar. If they haven’t been sitting for at least 15 minutes, go put them back in the fridge right now! We need those juices to be ready to go.
Mixing and Forming the Gluten Free Shortcake Dough
Now, let’s deal with the dry ingredients you whisked together. Remember cutting in that cold butter until you had those pea-sized crumbs? That’s the texture we’re aiming for. Next, pour in your soured milk mixture, which should have your egg and vanilla whisked into it. Mix it only until it just barely comes together into a soft dough. Seriously, stop mixing the second you don’t see dry streaks of flour left. Turn that dough out onto a lightly floured surface—use that gluten-free flour you have handy—and gently pat it down to about an inch thick. You are not kneading this! We are aiming for tenderness in this Classic Gluten Free Strawberry Shortcake. Cut out 8 rounds and place them on your parchment-lined baking sheet.
Baking and Cooling the Shortcakes
Pop those beauties into the hot oven and let them bake for 15 to 18 minutes. You’ll know they’re done when the tops are golden brown and they look set in the middle. Don’t overbake them, or they’ll dry out! Let them cool down just a little bit on the pan before moving them to a rack. They need to be warm, not piping hot, when you serve them.
Whipping the Cream Topping
While the shortcakes are cooling, whip up your topping. In a clean bowl, combine your heavy whipping cream, 3 tablespoons of sugar, and 1 teaspoon of vanilla. Beat it until you see soft peaks forming. You don’t want stiff peaks here; soft peaks fold into the strawberries much nicer. That’s it! Now, assemble your masterpiece!
Equipment Needed for Baking Classic Gluten Free Strawberry Shortcake
You don’t need a million fancy gadgets for this recipe, which I love! Simplicity is key when making the Classic Gluten Free Strawberry Shortcake. Make sure you have these basics ready so you can move quickly when the dough comes together.
- Baking Sheet lined with parchment paper
- Mixing Bowls (at least two)
- Pastry Cutter or a sturdy fork
- Biscuit Cutter (or a sharp glass)
- Electric Mixer for the whipped cream
Expert Tips for Tender Gluten Free Shortcakes
Look, the biggest pitfall with gluten-free baking, especially with biscuits, is overworking the dough. Once you add the liquid to the flour, you’re activating the starches and gums, and if you mix too much, you end up with something dense and tough. We are aiming for light, fluffy layers here, so treat that dough like it’s made of spun sugar!
Handling the Dough Gently
When you pat the dough out, don’t press it down hard. Just gently coax it to that 1-inch thickness. And when you cut those rounds? Don’t twist the cutter! Just press straight down and lift straight up. Twisting seals the edges, which stops the shortcake from rising properly in the oven. Minimal fuss is the name of the game for a tender biscuit shortcake. If you want to see more of my baking tips, check out my Medium page.
Achieving Perfect Strawberry Juiciness
Don’t rush the maceration! Those 15 minutes the strawberries spend chilling with the sugar are non-negotiable. If you rush this, the strawberries will just sit there, dry, and you won’t get that gorgeous syrup to drizzle over the warm shortcakes later. That syrup is what turns a good shortcake into an amazing gluten free dessert! For more sweet ideas, see my dessert recipes.
Storing and Reheating Your Classic Gluten Free Strawberry Shortcake
I know it’s tempting to eat all eight shortcakes the moment they come out of the oven, but sometimes you just can’t manage it all! Luckily, the components of this Classic Gluten Free Strawberry Shortcake store pretty well separately. The key is keeping the moisture away from the biscuit until you are ready to serve.
If you assemble the whole thing—biscuit, cream, and strawberries—it gets soggy fast, which is a tragedy. The shortcakes themselves are best eaten the day they are baked, but they are still good the next day if stored correctly. Always store the leftover cream in the fridge, and keep the macerated strawberries chilled too. When you’re ready for a second helping, just warm the plain shortcake slightly—maybe 10 seconds in the microwave—and then assemble it fresh with the cream and fruit. You can find more storage tips on my Pinterest board.
Storage Table
| Component | Storage Method | Duration |
|---|---|---|
| Plain Shortcakes | Airtight container at room temperature | Up to 2 days |
| Macerated Strawberries | Airtight container in the refrigerator | Up to 5 days |
| Whipped Cream | Airtight container in the refrigerator | Up to 3 days |
Common Questions About This Gluten Free Dessert
I get so many questions about adapting this recipe, which is totally normal when dealing with gluten-free baking! People want to know how to keep these delicate biscuits perfect, especially since they are so different from traditional ones. Here are the things I’m asked most often about making sure this biscuit shortcake turns out right every single time.
Can I Make the Shortcakes Ahead of Time?
You can, but I wouldn’t recommend making the whole assembled dessert ahead of time. Like any good biscuit, these are best eaten the day they are baked. If you bake them one day, store them plain in an airtight container, and then assemble them with the strawberries and cream right before serving the next day, they are still fantastic! The minute you add the wet fruit and cream, the texture starts to change, so assemble right before eating for the best experience. If you are looking for other baked goods, check out my easy breakfast pastries.
What is the Best Gluten Free Flour Blend for This Recipe?
This is a big one! You absolutely must use a 2-to-1 or 1-to-1 style gluten-free all-purpose blend that already contains xanthan gum. If your blend doesn’t have it, you need to add about a teaspoon per cup of flour. Xanthan gum is what replaces the structure of the wheat gluten, so skipping it means you’ll end up with crumbs instead of a nice, cohesive biscuit shortcake. Trust me on this one!
How Do I Keep the Whipped Cream Stable?
The key to stable whipped cream is starting with very cold ingredients—the cream, the bowl, and even the whisk attachment if you have time to chill them! Also, don’t over-whip. We aim for soft peaks, not stiff peaks, because stiff cream can break down faster once it sits with the juicy strawberries. If you plan on leaving the assembled dessert out for a party, you can stabilize it slightly by adding 1 tablespoon of powdered sugar mixed with 1/2 teaspoon of cornstarch into the heavy cream right before whipping.
Nutritional Overview
I always get asked about the nutrition in my favorite baked goods, even though I usually tell people, “If it tastes this good, who cares?” But for those of you keeping track, I did my best to break down what’s in a serving of this incredible Classic Gluten Free Strawberry Shortcake. Keep in mind, since we are talking about homemade whipped cream and fresh fruit, these numbers are just estimates based on the ingredients list provided. Don’t hold me to the exact decimal points!
Estimated Nutritional Information Table
These estimates are calculated based on 8 servings of the recipe:
| Nutrient | Amount (Estimated) |
|---|---|
| Calories | 330 |
| Fat | 17 g |
| Carbohydrates | 42 g |
| Protein | 6 g |

Amazing 8-Step Classic Gluten Free Strawberry Shortcake
- Total Time: 33 minutes
- Yield: 8 servings 1x
- Diet: Gluten Free
Description
This gluten free strawberry shortcake features fluffy biscuit-style shortcakes layered with juicy strawberries and whipped cream. It is a fresh, easy dessert.
Ingredients
- 3 cups fresh strawberries sliced
- 1/4 cup granulated sugar
- 2 cups gluten free all purpose flour with xanthan gum
- 1 tablespoon baking powder
- 1 teaspoon salt
- 1/4 cup granulated sugar
- 6 tablespoons unsalted butter cold and cubed
- 1 cup milk
- 1 tablespoon white vinegar
- 1 teaspoon vanilla extract
- 1 large egg
- 1 cup heavy whipping cream
- 3 tablespoons granulated sugar
- 1 teaspoon vanilla extract
Instructions
- Preheat the oven to 450°F and line a baking sheet with parchment paper.
- In a medium bowl, combine the sliced strawberries and sugar. Stir well and refrigerate for at least 15 minutes to release their juices.
- Stir the vinegar into the milk and set aside for 5 minutes to thicken slightly.
- In a large bowl, whisk together the gluten free flour, baking powder, salt, and sugar.
- Cut the cold butter into the flour mixture using a fork or pastry cutter until pea-sized crumbs form.
- Whisk the egg and vanilla into the milk mixture, then pour into the flour mixture. Stir just until a soft dough forms.
- Turn the dough onto a lightly floured surface and gently pat into a 1-inch thick round. Cut into 8 rounds and place on the prepared baking sheet.
- Bake for 15 to 18 minutes until the tops are golden and the centers are set. Cool slightly.
- In a bowl, whip the cream, sugar, and vanilla until soft peaks form.
- Split the shortcakes, layer with strawberries and whipped cream, and serve immediately.
Notes
- Handle the dough gently to keep the shortcakes light and tender.
- Prep Time: 15 minutes
- Cook Time: 18 minutes
- Category: Dessert
- Method: Baking
- Cuisine: American
Nutrition
- Serving Size: 1 serving
- Calories: 330
- Sugar: Unknown
- Sodium: Unknown
- Fat: 17 g
- Saturated Fat: Unknown
- Unsaturated Fat: Unknown
- Trans Fat: Unknown
- Carbohydrates: 42 g
- Fiber: Unknown
- Protein: 6 g
- Cholesterol: Unknown