If you are like me, sometimes you just crave something incredibly decadent but the thought of turning on the oven feels like too much work. That’s why I’m obsessed with this Chocolate Strawberry Icebox Cake! Seriously, this recipe is my go-to when I need a show-stopping dessert without any actual baking involved. Forget fussy pastry cream; the secret weapon here is a ridiculously smooth, rich cocoa mousse made from avocado. Yes, avocado! It sounds wild, I know, but trust me, it makes the creamiest texture imaginable. I’ve whipped up dozens of quick, chilled no-bake treats over the years, and this one always wins.

Essential Ingredients for Your Chocolate Strawberry Icebox Cake
When I say this Chocolate Strawberry Icebox Cake is easy, I mean it—the ingredient list is short, but the quality really matters here. Since we aren’t baking, every single component needs to pull its weight in flavor and texture. Don’t skip the chilling step for the milk; that is non-negotiable if you want that fluffy topping!
We are building this dessert in layers, so let’s break down exactly what you need to gather before you start mixing.
Components for the Avocado Cocoa Mousse
This is the heart of the cake, and ripe avocados are key for that silky texture. You need about one medium, ripe avocado—make sure it’s soft! We mix that with rich cocoa powder, a touch of maple syrup for sweetness, some vanilla extract, a tiny bit of whole milk, and just a pinch of salt to make the chocolate pop.
Creating the Whipped Topping and Fruit Layer
For the topping, we use evaporated whole milk. This is the trick! You have to freeze it just right so it whips up beautifully. We sweeten that with powdered sugar and vanilla. Then, you’ll need a cup of fresh, thinly sliced strawberries to fold gently into half of that whipped cream.
Assembly Elements for the Chocolate Strawberry Icebox Cake
You can’t have an icebox cake without the wafers! You need crisp chocolate wafer cookies to soak up the moisture from the layers. For the very top, if you want to make it look fancy, grab some dark chocolate shavings. That’s it! Simple ingredients creating something amazing.
Here’s a quick look at what you should have ready:
| Component | Quantity |
|---|---|
| Ripe Avocado | 1 (about 5 oz) |
| Cocoa Powder | 3 Tbsp |
| Evaporated Whole Milk | 1/2 cup (must be pre-chilled) |
| Chocolate Wafer Cookies | 8 |
| Fresh Strawberries | 1 cup, sliced |
Equipment Needed for This No Bake Dessert
Because this is a no-bake situation, we don’t need any fancy baking pans, which is fantastic! The main things you absolutely must have are a food processor or a high-powered blender to handle that avocado mousse. It needs to get perfectly smooth, so don’t try to mash it by hand, trust me!
You will also need a sturdy metal bowl and an electric mixer—handheld or stand mixer—for whipping that evaporated milk. A couple of nice serving dishes, since this recipe makes individual portions, and a rubber spatula for folding everything together nicely.
Preparing the Ingredients for Your Chocolate Strawberry Icebox Cake
There are a couple of prep steps that are crucial before you even start mixing the mousse for your Chocolate Strawberry Icebox Cake. First, you need to get that evaporated milk into the freezer. Seriously, set a timer for 25 minutes. You are looking for icy edges, not a solid block, so watch it carefully!
While that’s chilling, take your time hulling and slicing those strawberries thinly. You want them delicate enough to fold into the whipped topping without tearing it apart. Getting these elements ready first means you can move quickly once the mousse is blended and the milk is ready to whip!
Step-by-Step Instructions for Your Chocolate Strawberry Icebox Cake
Okay, now for the fun part where everything comes together! We’re moving fast because the milk needs to be whipped right when it’s perfectly icy. Don’t worry if the timing seems tricky; just have everything measured out and ready to go.
Creating the Smooth Cocoa Mousse Base
First up is that rich, dark mousse. Take your food processor—make sure it’s clean and dry—and scoop in the flesh of your ripe avocado. Toss in your cocoa powder, maple syrup, vanilla extract, whole milk, and that tiny pinch of salt. Now, pulse it, but don’t just turn it on and walk away! Process it for a full 60 seconds, stopping halfway through to scrape down the sides. You are looking for zero lumps. If you see any green streaks, keep going! We want this base smooth as silk.
Whipping the Topping to Stiff Peaks
This is where the magic of chilled evaporated milk comes in. Pull that metal bowl out of the freezer—it should have icy crystals forming around the edges. Start beating that milk on high speed. For the first two minutes, just beat it until you see soft peaks forming, like gentle waves. Then, quickly add your powdered sugar and the second dose of vanilla extract. Keep that mixer going for about one more minute until you hit stiff peaks. When you lift the whisk, the peaks should stand straight up and hold their shape. That’s perfection!
You need to divide that topping immediately. Take about half of it and put it into a separate, clean bowl. Now, gently fold your sliced strawberries into the *other* half. Be gentle here; we don’t want to deflate all that lovely air we just whipped in!
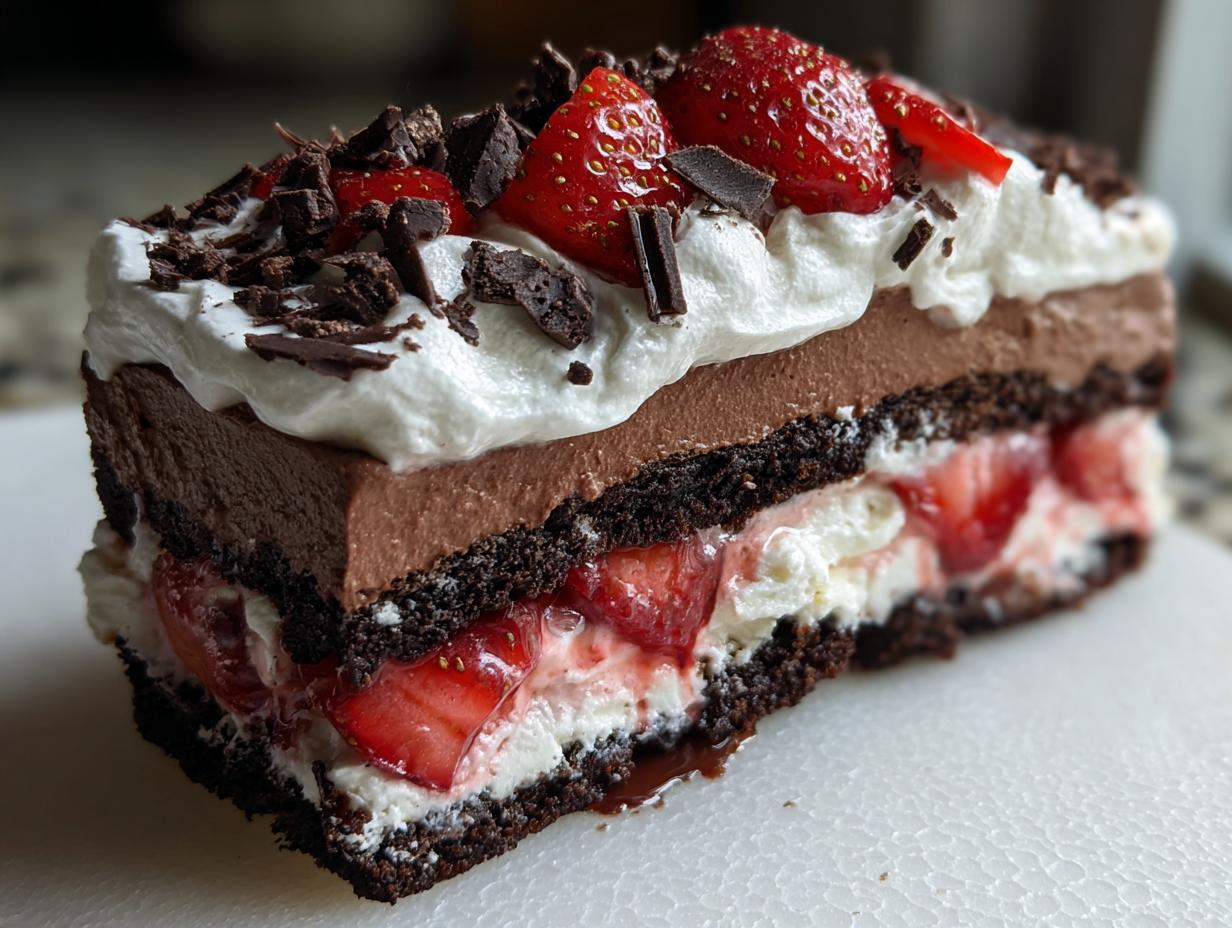
Assembling the Layers of the Chocolate Strawberry Icebox Cake
Time to build our gorgeous Chocolate Strawberry Icebox Cake! Grab your two serving dishes. Break two chocolate wafer cookies—just snap them—to fit snugly on the bottom of each dish. This forms our first layer. Over those wafers, spread one quarter of that smooth chocolate mousse onto each dish. Don’t be shy!
Next, divide that beautiful strawberry-mixed whipped topping evenly and spread it over the mousse layer in both dishes. Break two more cookies over the strawberry layer in each dish. Finally, divide the remaining plain chocolate mousse between the two dishes, spreading it smooth. For the very top layer before chilling, spread a thin layer of the reserved, plain whipped topping just to seal everything in.
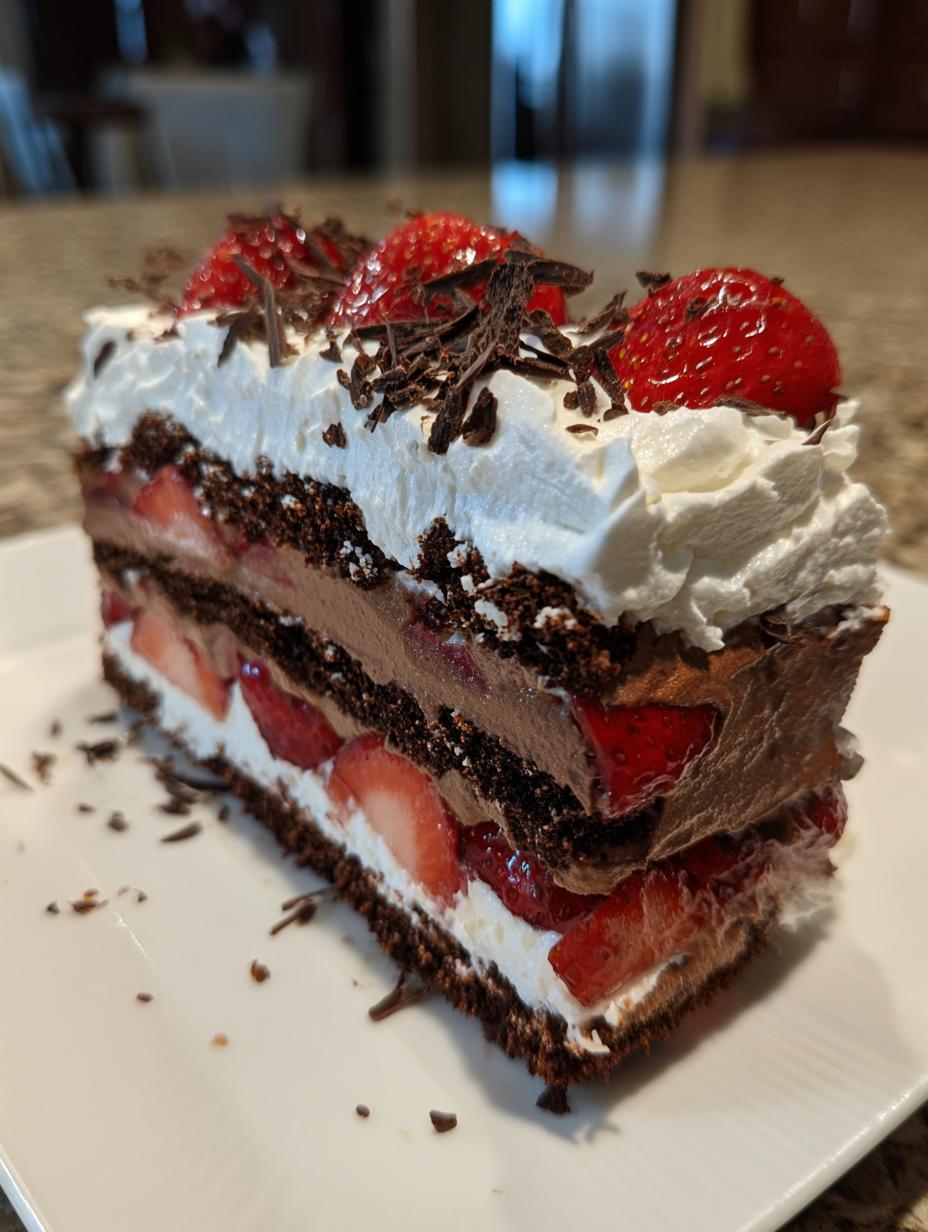
Chilling and Final Presentation
This step requires patience, but it’s essential for the wafers to soften properly. Cover those dishes loosely with plastic wrap and pop them into the refrigerator for at least one full hour. This chilling time lets the wafers absorb the moisture from the mousse and cookie, turning them into a cake-like texture. When you are ready to serve, take them out. If you saved your chocolate shavings, dollop or spread any remaining plain topping on top and sprinkle those shavings over the top. Serve it right away while it’s perfectly chilled!
Tips for Success with Your Chocolate Strawberry Icebox Cake
Getting the textures just right is what makes this no-bake dessert so satisfying. If your mousse seems too thin, it probably means your avocado wasn’t quite ripe enough, or you didn’t process it long enough. Keep blending until it truly looks like thick, dark pudding—no lumps allowed!
When it comes to the whipped topping, the temperature of your mixing bowl matters a lot. If your metal bowl is cold before you even start whipping, you’ll get those stiff peaks much faster. If you accidentally over-beat the topping and it starts looking grainy, don’t panic! Just fold in a tiny splash of cold milk—maybe half a teaspoon—and gently mix it until it comes back together. It usually smooths right out.
Remember to fold the strawberries in very gently. You want those delicate pink swirls throughout the white topping, not just a pile of mushy fruit at the bottom. Slow and steady wins the race with whipped creams! If you are looking for other great dessert ideas, check out my desserts archive.
Storing and Serving Your Chocolate Strawberry Icebox Cake
Honestly, the best way to enjoy this dessert is chilled—that’s why we call it an icebox cake! It needs that cold time for the wafers to soften up into a tender, cake-like layer. If you serve it right away after the one-hour chill, it will still be a bit firm, which some people actually prefer!
I find that 3 to 4 hours in the fridge is the sweet spot. The flavors meld together beautifully, and the texture hits that perfect balance between creamy mousse and soft cookie. It won’t last long, but here is what you need to know about keeping any leftovers. For more quick recipes, see my post on quick snack board ideas.
| Storage Aspect | Detail |
|---|---|
| Serving Temperature | Must be served chilled |
| Refrigeration Time | Up to 2 days |
| Container Type | Airtight container |
Storing Leftovers of Your Chocolate Strawberry Icebox Cake
If you are lucky enough to have any leftovers of this amazing Chocolate Strawberry Icebox Cake, you need to store them right away. Keep them in their serving dish covered tightly with plastic wrap, or transfer them to an airtight container. Because of the fresh fruit and the whipped components, I wouldn’t keep it much longer than two days in the refrigerator. They taste best within 24 hours, but they are perfectly safe for up to 48 hours!
Common Questions About This Easy Dessert
I always get questions when people see that avocado in the ingredients list for this no-bake dessert. Don’t let that throw you; it’s truly just a healthy fat that gives us the most luxurious texture! People often ask about substitutions or how to handle the timing, so here are my best tips for troubleshooting your Chocolate Strawberry Icebox Cake.
I want everyone to succeed because this is such a simple, satisfying treat to make when you’re short on time! You can find more tips and ideas on my Medium profile.
Q. Why is my avocado mousse still chunky?
If you’re still seeing lumps after a full minute of processing, your avocado probably wasn’t ripe enough. You need one that yields easily to gentle pressure. Try adding just one more teaspoon of milk to help the blades catch, and keep processing! It needs to be completely smooth before you move on to the topping.
Q. How long can I leave this dessert in the fridge before serving?
While I recommend serving it within 24 hours for peak wafer softness, it holds up okay for two days. Just make sure it’s sealed tight. Sometimes, if it sits too long, the strawberries can start to bleed color into the mousse, but the flavor is still great!
Can I substitute the chocolate wafers in the Chocolate Strawberry Icebox Cake?
This is a tricky one! The chocolate wafers are important because they have just the right crispness and flavor profile to balance the richness of the mousse. If you absolutely cannot find them, you could try plain vanilla wafers, but you might want to add a tiny bit more cocoa powder to your mousse to compensate for the lost chocolate flavor. Do not use soft cookies, though; they will just turn into mush instantly. We need that initial snap! For more recipe inspiration, check out my banana oatmeal bars.
How long does the evaporated milk need to be chilled before whipping?
This is the most crucial timing element for this dessert. You need to place your metal bowl with the 1/2 cup of evaporated whole milk into the freezer for exactly 25 minutes. It’s not meant to freeze solid; you are aiming for ice crystals to form along the edges. If it’s too liquid, it won’t whip up to those stiff peaks we need for the topping layer of the Chocolate Strawberry Icebox Cake!
Nutritional Data for This Chilled Cake
Now, I have to be honest with you: since this is a no-bake recipe using whole ingredients like avocado and evaporated milk, the exact numbers can really shift depending on the size of your fruit or avocado! What I’m giving you here are just estimates based on the standard measurements. This isn’t a light dessert, but wow, is it worth it! If you are interested in other healthy options, take a look at my dark chocolate nut bars.
| Nutrient | Approximate Value Per Serving |
|---|---|
| Calories | 395 |
| Fat | 20g |
| Carbohydrates | 52g |
| Protein | 7g |
Share Your Experience Making This Chocolate Strawberry Icebox Cake
I seriously hope you get a chance to try this out soon! It’s such a fun, easy way to end a busy day with something truly special. I put a lot of love and testing into getting this avocado mousse just right. You can see more visual ideas on my Pinterest page.
Once you’ve had a chance to chill it and dig in, please come back and let me know what you thought! Rate the recipe below and drop a quick comment telling me how it turned out for you. Was the mousse smooth? Did your whipped topping hold up? I absolutely love hearing from you all!
Print
Amazing Chocolate Strawberry Icebox Cake Secret
- Total Time: 1 hour 15 minutes
- Yield: 2 servings 1x
- Diet: Vegetarian
Description
This no-bake chocolate strawberry icebox cake features layers of cocoa mousse, fresh berries, and whipped topping over crisp wafers for a simple chilled dessert.
Ingredients
- 1 ripe avocado, about 5 ounces
- 3 tablespoons unsweetened cocoa powder
- 2 tablespoons maple syrup
- 1 teaspoon vanilla extract
- 2 tablespoons whole milk
- 1/8 teaspoon fine sea salt
- 1/2 cup chilled evaporated whole milk
- 3 tablespoons powdered sugar
- 1/2 teaspoon vanilla extract
- 1 cup fresh strawberries, hulled and sliced thin
- 8 chocolate wafer cookies
- Dark chocolate shavings for garnish, optional
Instructions
- Place the evaporated milk in a metal mixing bowl and freeze for 25 minutes until ice crystals form along the edges but the milk is not frozen solid.
- Halve the avocado, remove the pit, and scoop the flesh into a food processor. Add cocoa powder, maple syrup, vanilla extract, whole milk, and salt. Process until completely smooth, about 60 seconds, scraping down the sides halfway through.
- Remove the chilled evaporated milk from the freezer and beat with an electric mixer on high speed for 2 minutes until soft peaks form. Add powdered sugar and vanilla extract, then continue beating until stiff peaks form, about 1 more minute.
- Reserve half of the whipped topping in a separate bowl and refrigerate. Gently fold the sliced strawberries into the remaining half.
- Break 2 chocolate wafer cookies to fit the bottom of each of two serving dishes. Spread one quarter of the chocolate mousse over each cookie layer.
- Divide the strawberry whipped topping evenly between the two dishes, spreading it smooth. Break 2 more cookies over each strawberry layer.
- Spread the remaining chocolate mousse over the cookie layers, dividing it evenly. Spread a thin layer of the reserved plain whipped topping over the mousse just to cover. Refrigerate for 1 hour.
- Just before serving, dollop or spread the remaining plain whipped topping over each dessert and garnish with chocolate shavings if desired. Serve immediately.
Notes
- This recipe is best served chilled.
- Use ripe avocados for the smoothest mousse texture.
- Prep Time: 15 minutes
- Cook Time: 0 minutes
- Category: Dessert
- Method: No-Bake/Chilled
- Cuisine: American
Nutrition
- Serving Size: 1 serving
- Calories: 395
- Sugar: Data not provided
- Sodium: Data not provided
- Fat: 20g
- Saturated Fat: Data not provided
- Unsaturated Fat: Data not provided
- Trans Fat: Data not provided
- Carbohydrates: 52g
- Fiber: Data not provided
- Protein: 7g
- Cholesterol: Data not provided