
Oh my gosh, you absolutely have to try this recipe when that sweet tooth hits you out of nowhere! We all know those moments when nothing but rich, creamy chocolate will do, but the thought of turning on the oven is just too much. Well, hello, my new favorite Chocolate Strawberry Fudge! This no-cook magic happens on the stovetop for just a few minutes, and then the fridge does all the heavy lifting.
It’s seriously the fastest way to go from craving to satisfying that craving. The texture is dense and luxurious, thanks to the coconut oil and almond butter base. And those pops of fresh, bright strawberry against the deep cocoa flavor? It’s just heavenly. Trust me, you’ll be making this Chocolate Strawberry Fudge all summer long because zero baking means maximum ease!
Essential Ingredients for Perfect Chocolate Strawberry Fudge
When you’re making something this wonderfully simple, ingredient quality really shines through. Since there’s no baking involved in this Chocolate Strawberry Fudge recipe, every single component matters for the final texture and taste. We are aiming for that perfect balance: deep, dark chocolate flavor cut by the sweet brightness of fresh fruit. Don’t even think about swapping out the good stuff here!
The fat base is crucial because it’s what lets this fudge set up firm in the fridge—no weird gummy texture allowed! We rely on coconut oil to solidify beautifully and almond butter for that creamy body and richness. You need smooth almond butter, not the crunchy kind, unless you want little nut chunks mixed in, which is fine if that’s your jam, but I prefer mine super smooth.
Gathering Your Chocolate Strawberry Fudge Components
Before you even think about turning on the heat, get everything measured and ready to go. This assembly moves fast once the oil melts, so prep is key! The most important prep work involves the strawberries. You need them finely chopped—not pureed, but small enough to distribute evenly without making the fudge watery.
Also, make sure your cocoa powder is lump-free before adding it to the melted oil. A quick whisk in a separate bowl can save you a lot of headache later when you’re trying to smooth out the batter. Seriously, take five extra seconds to sift that cocoa! You can find more great tips on quick recipes like this one over on Medium.
Ingredient Table
| Ingredient | Amount | Preparation Note |
|---|---|---|
| Coconut Oil | 1/2 cup | Melted |
| Unsweetened Cocoa Powder | 3/4 cup | Sifted or whisked |
| Smooth Almond Butter | 3/4 cup | Room temperature is best |
| Pure Maple Syrup | 1/3 cup | Liquid measurement |
| Vanilla Extract | 1 teaspoon | |
| Fine Sea Salt | 1/8 teaspoon | |
| Fresh Strawberries | 1 cup | Finely chopped |
Why You’ll Love This Chocolate Strawberry Fudge
Honestly, this recipe is my secret weapon for last-minute dessert emergencies. It requires zero oven time, which is a blessing during the summer when the kitchen feels like a sauna. The payoff for such little effort is huge!
- It sets up beautifully firm, meaning you get those satisfyingly clean slices of fudge every time.
- The flavor contrast between the deep, slightly bitter cocoa and the fresh, tart strawberries is just spectacular. It keeps the richness from being too heavy!
- It’s incredibly fast to mix up—we’re talking maybe ten minutes of actual work before it heads to the fridge.
- This Chocolate Strawberry Fudge is naturally vegetarian and uses simple, whole-food ingredients that I always have on hand. If you enjoy simple, delicious treats, check out our dark chocolate nut bars for another easy option.
- It’s a fantastic way to use up those gorgeous, ripe strawberries you just bought!
Step-by-Step Instructions for No-Cook Chocolate Strawberry Fudge
Okay, time to get down to business! This is where the magic happens, but remember, it moves fast once you start combining things. The beauty of this Chocolate Strawberry Fudge is that your prep time is really just your active time. Make sure you have your loaf pan ready to go before you even touch the stove!
Preparing the Pan and Melting Fats
First things first: grab that 8×4-inch loaf pan. Line it carefully with parchment paper, making sure you leave a good overhang on the two long sides. This overhang is your handle later on—it’s how you lift the entire slab of fudge out cleanly! Don’t skip this, or you’ll be digging it out with a spoon, and nobody wants mangled fudge.
Next, grab your saucepan. We’re using low heat only for the coconut oil. You only need it fully liquid, which takes about one minute. Seriously, low and slow here; we don’t want it sizzling hot, just melted. Once it’s clear and runny, pull that pan right off the burner. We are using residual heat for the rest of the mixing process!
Creating the Smooth Chocolate Base
This is the most critical mixing stage for perfect Chocolate Strawberry Fudge. With the heat off, you immediately whisk in the almond butter and maple syrup until they start to blend nicely with the melted oil. Then, swiftly incorporate the cocoa powder, vanilla extract, and salt. You need to work quickly but deliberately here. Keep stirring until every single speck of cocoa powder is incorporated and the mixture looks like glossy, melted chocolate pudding. If you see any dry pockets, keep going!
Once it’s perfectly smooth—and I mean *smooth*—pour that rich base right into your prepared loaf pan. Use a spatula to spread it out evenly across the bottom. Try to make the top as flat as you can right now, as it will be much harder to fix once the berries go on.
Setting and Slicing Your Chocolate Strawberry Fudge
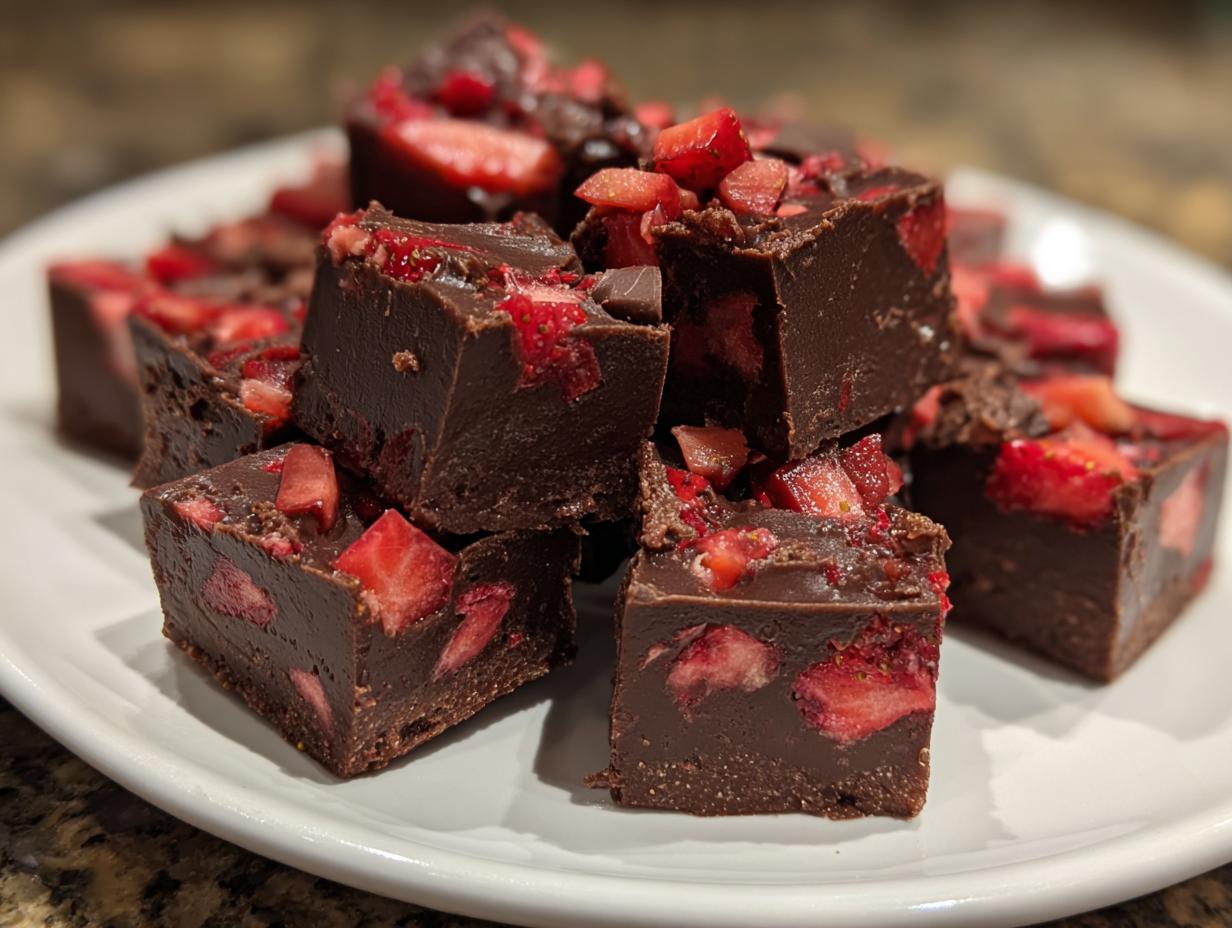
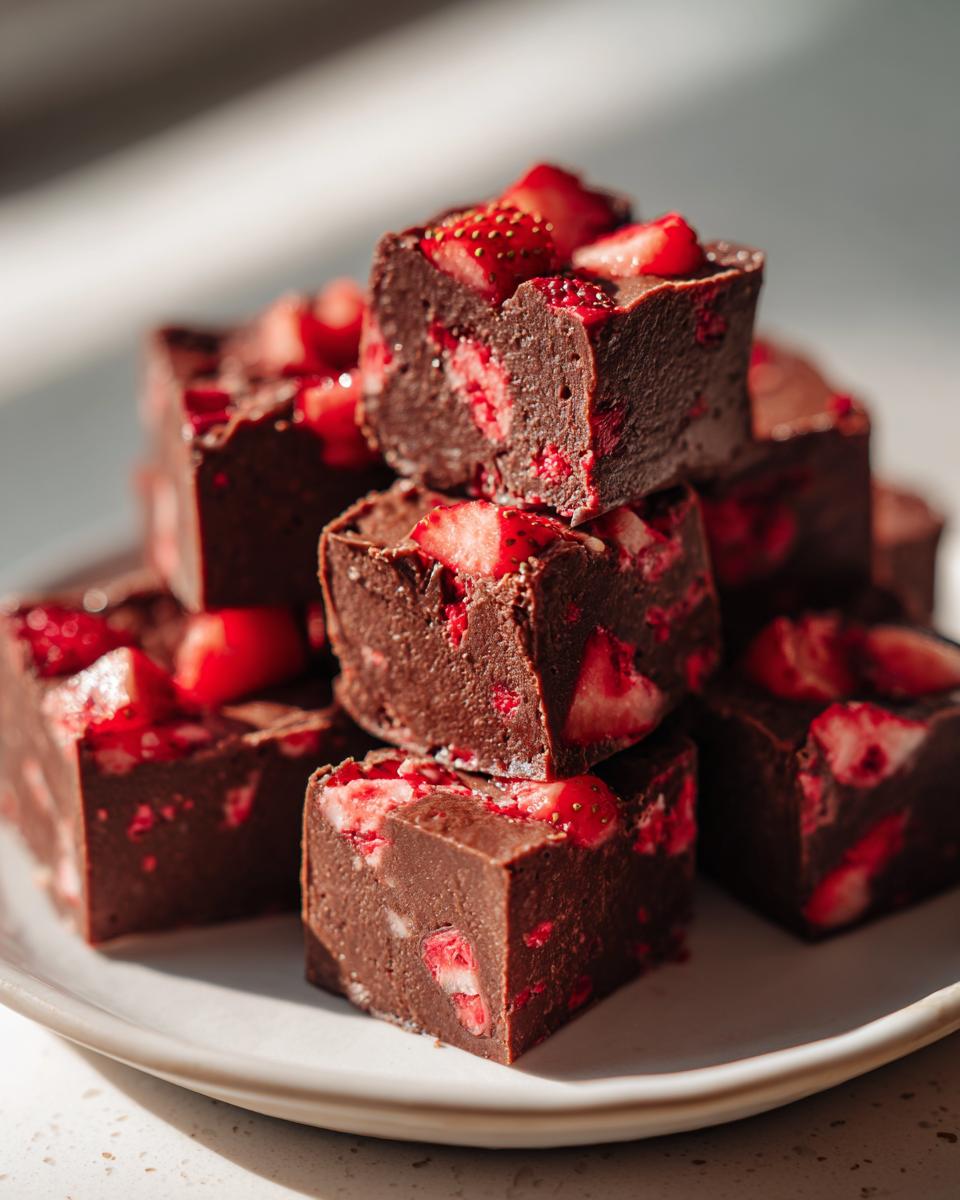
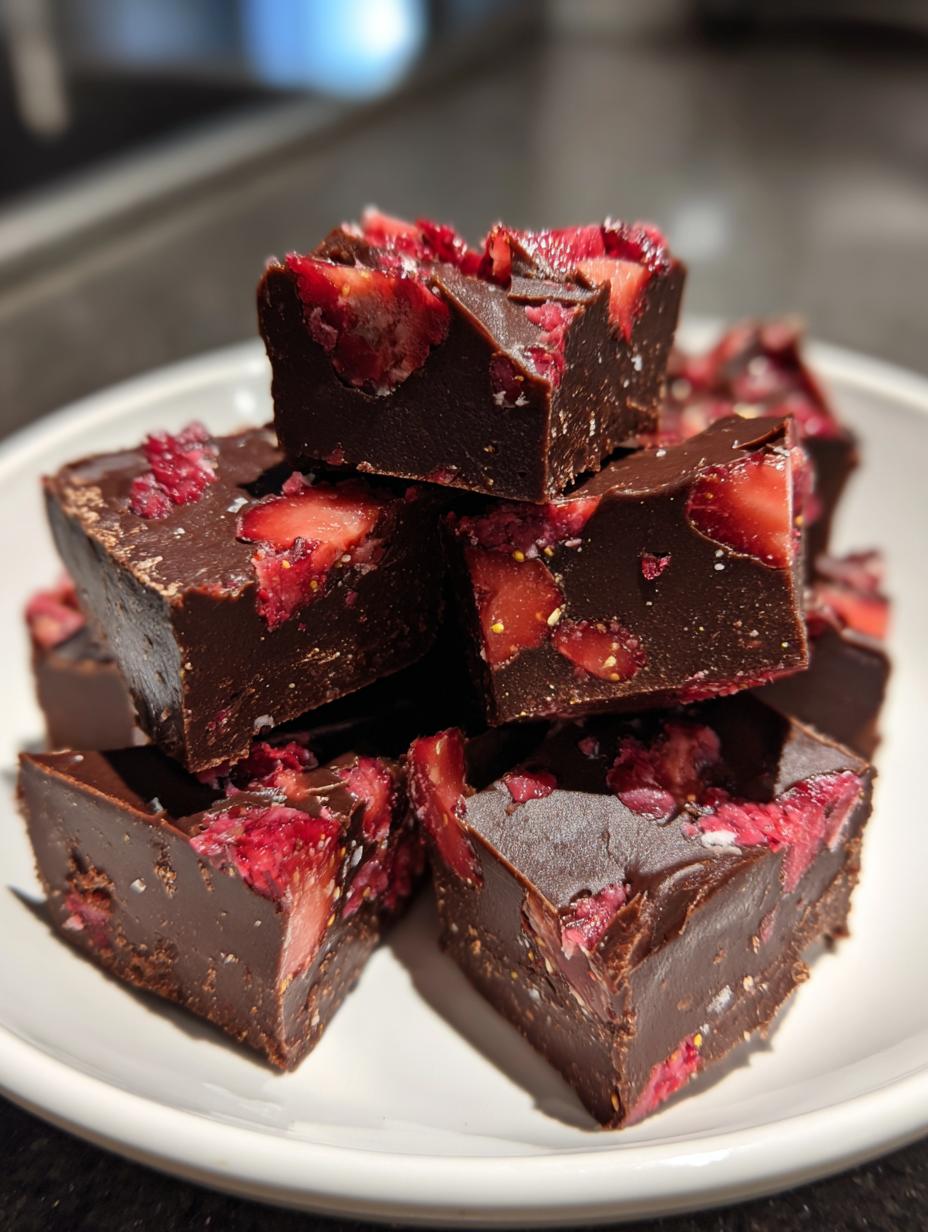
Now for the fruit! Take your finely chopped fresh strawberries and scatter them right over the top of the melted chocolate base. Don’t just dump them in one spot; try to distribute them across the entire surface. Then, gently press them down with the back of your spatula or your fingers just enough so they embed slightly into the fudge. You don’t want them sinking all the way to the bottom, but you also don’t want them just sitting loose on top to fall off when you slice.
That’s it for the active work! Cover the pan loosely with plastic wrap or foil and pop it into the refrigerator. It needs at least two hours to chill completely and set firmly enough to slice. Patience is the final ingredient in this Chocolate Strawberry Fudge! Once it’s firm, just lift it out using those parchment paper handles, place it on a cutting board, and slice it into 16 neat squares. Enjoy that instant gratification! For more visual inspiration, check out our Pinterest boards.
Tips for Success Making Chocolate Strawberry Fudge
Because this Chocolate Strawberry Fudge is no-bake, we have to be extra mindful of how we handle the ingredients, especially the temperature. My biggest tip revolves around the fat: make sure your coconut oil is just melted, not hot! If it’s too hot when you add the almond butter or maple syrup, you risk thinning them out too much, which can lead to a soft, greasy fudge that never sets right.
Also, don’t rush the chilling time! Two hours seems like forever when you’re craving chocolate, but if you try to cut it early, you’ll end up with mush. For the prettiest slices of Chocolate Strawberry Fudge, try chilling it for closer to three hours or even overnight. A sharp knife cuts cleanest when the fudge is rock hard!
Equipment Required for Chocolate Strawberry Fudge
You don’t need much gear for this simple Chocolate Strawberry Fudge, thankfully! You’ll need a small saucepan for melting the oil, a sturdy whisk, and a good spatula for smoothing everything out. The most important piece is that 8×4-inch loaf pan—it gives you those perfect, thick squares. Oh, and of course, a sharp knife for the final slicing!
Frequently Asked Questions About Chocolate Strawberry Fudge
I get so many questions about this quick recipe! It’s so easy to customize, but sometimes you need a little guidance to make sure your Chocolate Strawberry Fudge turns out perfectly creamy every time. Here are the things I hear most often from readers.
Can I substitute the almond butter in this Chocolate Strawberry Fudge?
Yes, you absolutely can make substitutions, but you need to keep the texture consistent! You must use another smooth nut or seed butter with a similar consistency. Cashew butter works beautifully and gives a very mild flavor. If you have a severe nut allergy, sunflower seed butter (SunButter) is a great swap, but be warned—it can sometimes give the fudge a slightly greenish tint due to the reaction with cocoa, though the flavor is usually fine. Avoid runny natural nut butters where the oil separates easily. If you are looking for other easy dessert ideas, check out our recipe for banana oatmeal bars.
How long does the fudge need to chill before slicing?
The recipe calls for a minimum of two hours in the refrigerator, and I usually stick to that if I’m impatient! However, if you want those stunning, clean edges for your Chocolate Strawberry Fudge, I really recommend chilling it for three hours, or even better, letting it set up overnight in the fridge. The colder it is, the easier it is to slice without smearing the chocolate.
What is the best way to store leftover Chocolate Strawberry Fudge?
Because this fudge uses coconut oil and fresh fruit, it needs to stay chilled to maintain that firm texture we love. Store your leftover Chocolate Strawberry Fudge in an airtight container in the refrigerator. It stays perfectly fresh for up to a week! If it starts to get too hard straight out of the fridge, just let the squares sit on the counter for about ten minutes before serving; they soften up beautifully!
Storing and Handling Your Homemade Fudge
Since this is a no-bake treat, how you store your Chocolate Strawberry Fudge is super important to keep that firm texture we worked so hard for! You can’t leave this sitting out on the counter like a standard brownie; the coconut oil will start getting soft quickly, and you’ll have a puddle instead of fudge.
The best part is that it keeps really well in the fridge, so you can make a batch ahead of time for a party or just to have on hand for snacking throughout the week. Just remember to let it sit out for a few minutes before you eat it so it isn’t rock hard straight from the cold!
Storage Table for Homemade Fudge
| Storage Location | Duration | Serving Tip |
|---|---|---|
| Airtight Container (Refrigerator) | Up to 1 week | Let sit at room temperature for 5-10 minutes before eating. |
| Airtight Container (Freezer) | Up to 2 months | Wrap squares individually before freezing for best results. |

Divine 16-Piece Chocolate Strawberry Fudge
- Total Time: 2 hours 10 minutes
- Yield: 16 squares 1x
- Diet: Vegetarian
Description
Creamy no-cook chocolate strawberry fudge. It offers rich flavor with fresh berries and sets firm in the fridge for easy slicing. This is a quick treat perfect for satisfying sweet cravings.
Ingredients
- 1/2 cup coconut oil
- 3/4 cup unsweetened cocoa powder
- 3/4 cup smooth almond butter
- 1/3 cup pure maple syrup
- 1 teaspoon vanilla extract
- 1/8 teaspoon fine sea salt
- 1 cup finely chopped fresh strawberries
Instructions
- Line an 8×4-inch loaf pan with parchment paper, leaving overhang for easy removal.
- Melt coconut oil in a small saucepan over low heat until fully liquid, about 1 minute.
- Remove from heat. Stir in almond butter, maple syrup, cocoa powder, vanilla extract, and salt until fully smooth with no lumps.
- Pour mixture into prepared pan. Spread evenly with a spatula.
- Scatter chopped strawberries over top. Gently press down to embed slightly.
- Refrigerate for 2 hours until firm. Lift out using parchment and cut into 16 squares.
Notes
- Fresh strawberries provide a bright contrast to the chocolate base.
- No baking is required, making this ideal for warm weather.
- Prep Time: 10 minutes
- Cook Time: 0 minutes
- Category: Dessert
- Method: No-Bake
- Cuisine: American
Nutrition
- Serving Size: 1 square
- Calories: 160
- Sugar: Unknown
- Sodium: Unknown
- Fat: 13g
- Saturated Fat: Unknown
- Unsaturated Fat: Unknown
- Trans Fat: Unknown
- Carbohydrates: 10g
- Fiber: Unknown
- Protein: 3g
- Cholesterol: 0mg
