
I’ve tried so many chia pudding recipes, and honestly, most of them end up being gritty little messes. That’s why I spent weeks testing ratios until I landed on this absolute winner. This recipe is the one that actually tastes like a decadent dessert, not something you have to force yourself to eat for health reasons!
The magic here is how incredibly creamy it gets, even though it’s naturally sweetened with just a bit of maple syrup. You just mix it, forget it, and wake up to a perfect, thick texture. It’s the ultimate make-ahead breakfast, which is a lifesaver on busy mornings. Trust me, once you try this specific ratio of liquid to seeds, you’ll never look back. This chocolate chia pudding really delivers on flavor without any fuss.
We’re talking about that perfect, luscious mouthfeel every single time. No graininess allowed in my kitchen!
Gathering What You Need for Perfect Chocolate Chia Pudding
Okay, getting ready to make this doesn’t take long at all. Seriously, the hands-on time is only about five minutes. That’s the beauty of a no-cook recipe like this! Making the best chocolate chia pudding relies on using good quality ingredients, especially the cocoa powder, because that’s where all the flavor comes from.
You don’t need fancy gadgets, honestly. Just a couple of everyday things you probably already have in your pantry.
Essential Ingredients for Chocolate Chia Pudding
- 1½ cups unsweetened almond milk (or whatever milk you love—oat works great too!)
- 6 tablespoons chia seeds (Don’t skimp here, this is what makes it thick!)
- 2 tablespoons unsweetened cocoa powder (Make sure it’s the real, unsweetened kind for the best dark chocolate flavor.)
- 2–3 tablespoons maple syrup or honey (Use 3 tablespoons if you like it sweeter, or start with 2.)
- 1 teaspoon vanilla extract
- ⅛ teaspoon salt (This little bit really wakes up the chocolate flavor in your chocolate chia pudding.)
Equipment List for Making Chocolate Chia Pudding
- Medium mixing bowl or a couple of small jars with lids
- Whisk (Crucial for getting rid of those early clumps!)
- Measuring cups and spoons
- Spatula or spoon for stirring
Step-by-Step Guide to Making Chocolate Chia Pudding
This is honestly the easiest part, but pay attention to the timing—that’s where most people mess up and end up with a big blob of chia seeds at the bottom of the jar. We need to make sure those little seeds get totally hydrated evenly. Don’t worry, it’s mostly hands-off time once you get the mixing down!
Mixing the Base Ingredients
First things first, grab your bowl or your serving jar—I usually use two small mason jars so I can see the layers. Pour in your almond milk, then toss in the cocoa powder, maple syrup, vanilla, and that tiny pinch of salt. Give it a really enthusiastic whisk! You need to get all that cocoa powder dissolved right away, otherwise, you get dusty pockets later. Once it looks mostly smooth, dump in all six tablespoons of chia seeds.
Now, here’s the most important trick before it goes into the fridge: Whisk it hard for about a solid minute. Then, walk away. Set a timer for five minutes. When that timer goes off, stir it again, really thoroughly. This second stir is what prevents the seeds from sinking and clumping up against the bottom. Trust me, skipping that first five-minute rest and second stir means you’ll have a gritty mess, and we do not want that in our chocolate chia pudding.
Chilling Your Chocolate Chia Pudding
Once you’ve done that crucial second stir, cover your bowl or screw the lids onto your jars tightly. Now it’s time for patience! Pop it right into the refrigerator. This isn’t an overnight thing if you’re desperate, but honestly, the longer it chills, the better it gets. I always aim for at least four hours, but overnight is my absolute favorite. When you check it the next morning, you’ll see that the liquid has been completely absorbed, and your chocolate chia pudding should be thick and scoopable, like a lovely, rich mousse.
Finishing and Serving Your Chocolate Chia Pudding
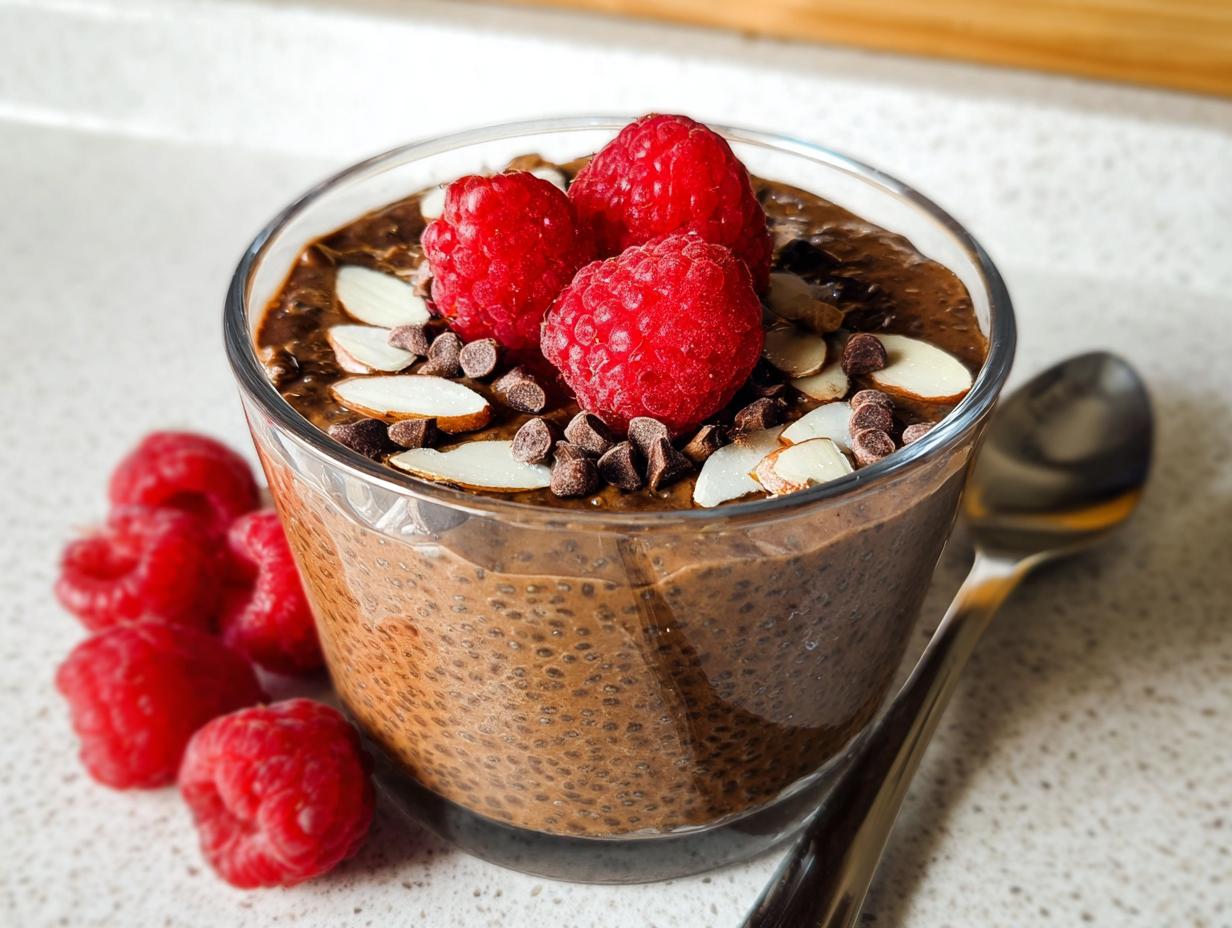
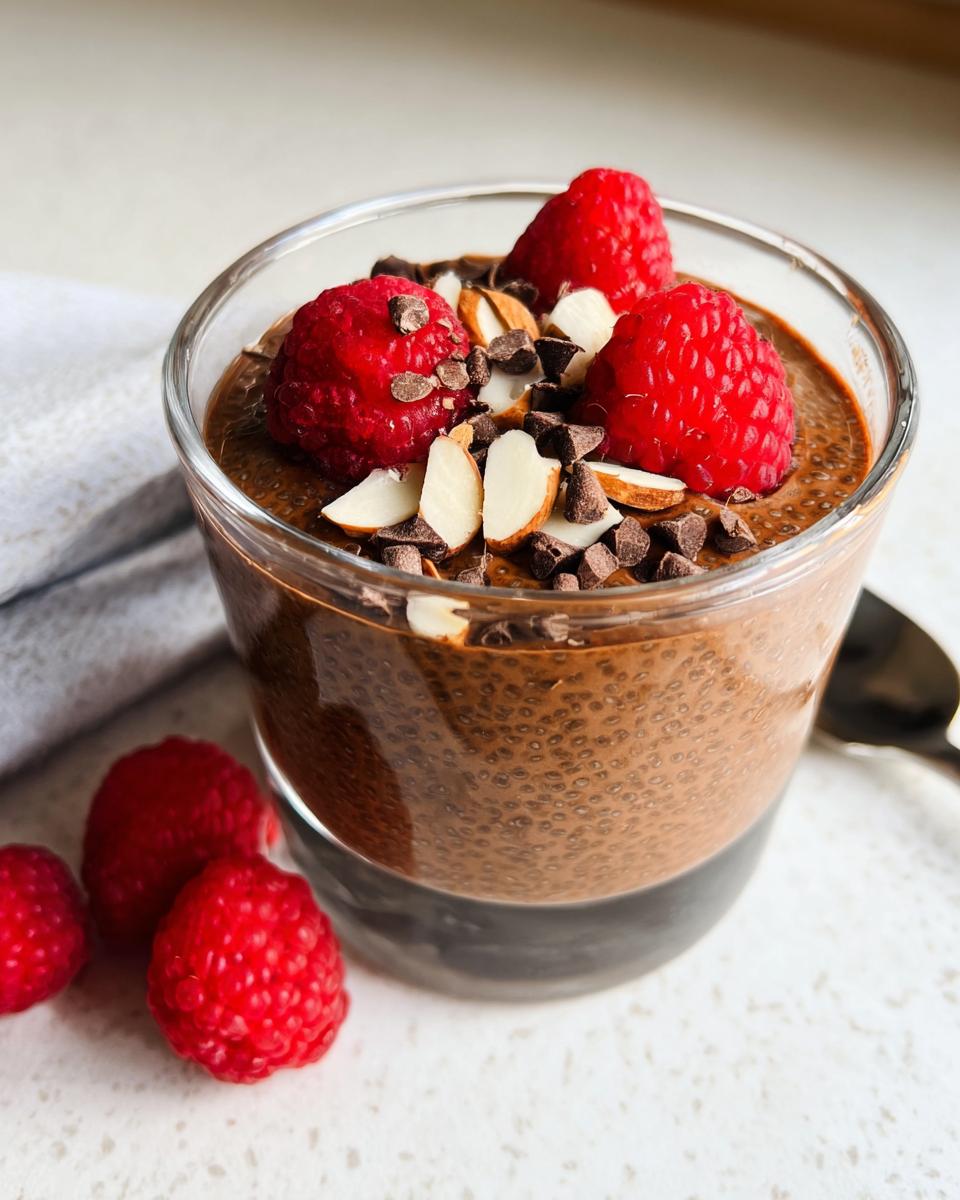
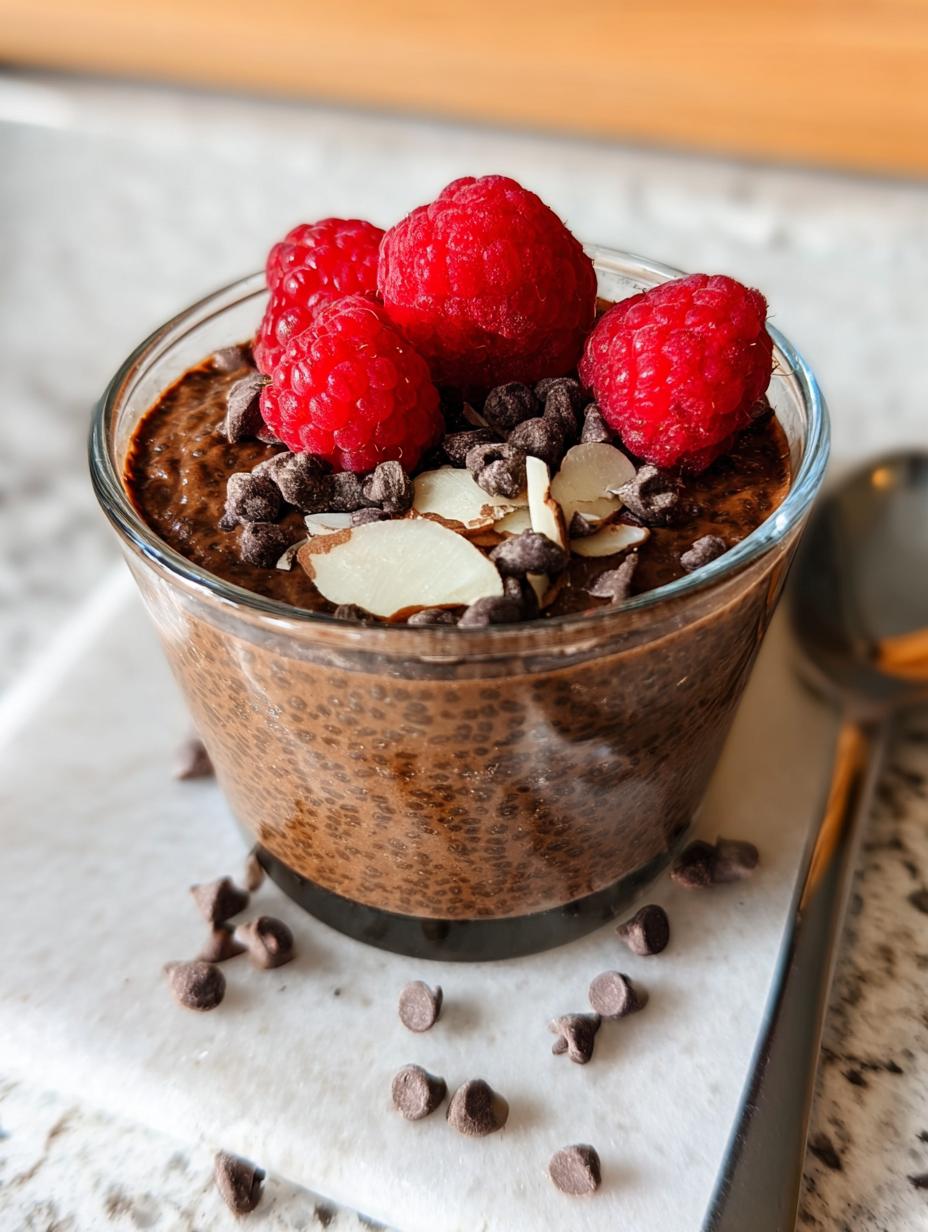
When you’re ready to eat it, give it one last good stir, just to make sure everything is perfectly homogenous. Sometimes the edges can firm up a bit more than the center. If you find it’s gotten *too* thick—and this happens if you use a lot of seeds—just stir in a tiny splash of extra milk until it loosens up to your liking. Don’t add too much or you’ll lose that lovely density! Finally, portion it out into bowls. This is where you can go wild with toppings like fresh raspberries or a sprinkle of sea salt. Enjoy that reward for waiting!
Tips for the Smoothest Chocolate Chia Pudding Texture
When I first started making this, I was so frustrated because it felt like I was eating seeds suspended in chocolate milk—grainy and weird! That’s why I developed my two-step stirring process right after mixing, which I detailed above. That rest period is non-negotiable if you want a creamy texture.
But sometimes, even with perfect stirring, you might want that ultra-luxurious mouthfeel that rivals a store-bought dessert. If you’re aiming for something truly decadent, you need to bring in the blender. This little extra step takes your standard chocolate chia pudding and turns it into something unbelievably smooth.
Achieving a Mousse-Like Consistency
After the pudding has completely set in the fridge—say, after a full night—it will be very firm. Scoop the entire set pudding mixture into a high-powered blender. Add just a tiny splash of extra milk, maybe a tablespoon, just to help the blades move. Blend it on high speed until it’s completely smooth and glossy. It will look totally different—thicker, lighter in color, and airy, almost like chocolate frosting!
Seriously, blending removes all those tiny seed edges, giving you that mousse texture my family begs me to make for dessert. If you want the best possible chocolate chia pudding experience, you have to try blending it once it’s set!
Ingredient Notes and Smart Substitutions
The beauty of this recipe is how flexible it is, even though I have my tried-and-true favorites! If you’re making this for dietary reasons or just ran out of something, you have options. For the milk, unsweetened almond milk is my go-to because it’s neutral, but oat milk makes it even creamier—it adds a lovely richness that’s almost decadent. Coconut milk works too, but be warned, it will give you a definite coconut flavor!
When it comes to sweeteners, maple syrup provides that perfect earthy undertone that plays so nicely with the cocoa. If you prefer honey, go right ahead, but remember honey is slightly sweeter, so you might only need 2 tablespoons instead of 3. For those avoiding liquid sweeteners, you can try using a couple of tablespoons of coconut sugar, but you’ll need to whisk it in really well when the milk is warm so it dissolves completely before adding the seeds.
Also, if you want to make this a real grown-up treat, try adding a teaspoon of instant coffee granules along with the cocoa powder. It just deepens that chocolate flavor beautifully without making it taste like coffee!
Storing and Keeping Your Chocolate Chia Pudding Fresh
This is such a fantastic make-ahead item, which is why I always double the batch! It keeps really well in the fridge, which is great for grab-and-go breakfasts all week long. Because there’s no cooking involved, the texture stays pretty consistent as long as it’s covered properly.
The main thing to remember is that it will only get thicker as time goes on, since those little seeds keep absorbing moisture. If it gets too stiff after a few days, don’t panic—just stir in a little splash of fresh milk when you serve it.
Storage and Reheating Table
| Location | Duration | Serving Tip |
|---|---|---|
| Refrigerator | Up to 5 days | Stir well before serving; add milk if too thick. Serve cold. |
| Freezer | Up to 1 month | Thaw overnight in the fridge; stir well after thawing. |
Frequently Asked Questions About Chocolate Chia Pudding
I always get a ton of questions when I post pictures of this pudding online! It seems simple, but people often wonder about texture or how to make sure it’s truly healthy. Here are the top things folks ask me about making the best chocolate chia pudding.
Q1. Why is my chia pudding grainy instead of creamy?
Oh, that’s the number one complaint! Nine times out of ten, it’s because you didn’t whisk thoroughly enough *before* the seeds settled, or you skipped that crucial second stir after the five-minute rest period. Those seeds clump together instantly if they aren’t fully suspended in the liquid first. If you want guaranteed smoothness, blend the set pudding like I mentioned above!
Q2. Can I make this a vegan pudding without using almond milk?
Absolutely! This recipe is naturally vegetarian, and it’s super easy to make it fully vegan. Just make sure you use maple syrup instead of honey. As for the milk, any non-dairy option works—oat milk is my favorite substitute because it adds a little extra body, making it even richer than the almond milk version.
Q3. How much sugar is actually in this healthy breakfast?
That’s what I love about it—it’s naturally sweetened! If you use 2 tablespoons of maple syrup, the sugar content is quite low for a treat, especially considering the high fiber content. If you skip the sweetener entirely, the flavor will be very dark and bitter, so I don’t recommend removing it completely unless you’re adding a very sweet fruit topping.
Q4. Can I use this recipe for meal prep?
Yes, this is the perfect make-ahead dessert or breakfast! It holds up beautifully in the fridge for about five days. I always make a double batch on Sunday night so I have healthy snacks ready for the week. Just remember to stir it before you eat it!
Sharing Your Delicious Chocolate Chia Pudding Experience
I really hope you loved making this simple, creamy pudding as much as I love perfecting it! It makes my day when I hear how you enjoyed it. Please come back here and let me know how it turned out for you. Did you use raspberries or nuts on top? You can see more of my recipe ideas on Medium.
Don’t forget to leave a star rating below so other folks know this recipe is worth their time! You can also check out my Pinterest boards for more inspiration.
Print
Amazing 1-Step Chocolate Chia Pudding Secret
- Total Time: 35 minutes
- Yield: 3 servings 1x
- Diet: Vegetarian
Description
This chocolate chia pudding is thick, creamy, and naturally sweetened. It is a healthy make-ahead breakfast or dessert ready in minutes.
Ingredients
- 1½ cups unsweetened almond milk (or milk of choice)
- 6 tablespoons chia seeds
- 2 tablespoons unsweetened cocoa powder
- 2–3 tablespoons maple syrup or honey
- 1 teaspoon vanilla extract
- ⅛ teaspoon salt
Instructions
- In a medium bowl or jar, whisk together milk, chia seeds, cocoa powder, maple syrup, vanilla, and salt until fully combined.
- Let the mixture rest for 5 minutes, then stir again to prevent clumping.
- Cover and refrigerate for at least 4 hours or overnight, until the pudding thickens and becomes creamy.
- Before serving, stir again and add a splash of milk if it’s too thick.
- Portion into bowls or jars and top with your favorite fruit, nuts, or chocolate chips.
Notes
- For a mousse-like texture, blend the set pudding in a blender until smooth before serving.
- Prep Time: 5 minutes
- Cook Time: 0 minutes
- Category: Dessert
- Method: No Cook
- Cuisine: American
Nutrition
- Serving Size: 1 serving
- Calories: 225
- Sugar: Unknown
- Sodium: Unknown
- Fat: 12g
- Saturated Fat: Unknown
- Unsaturated Fat: Unknown
- Trans Fat: Unknown
- Carbohydrates: 29g
- Fiber: High
- Protein: 7g
- Cholesterol: 0mg
