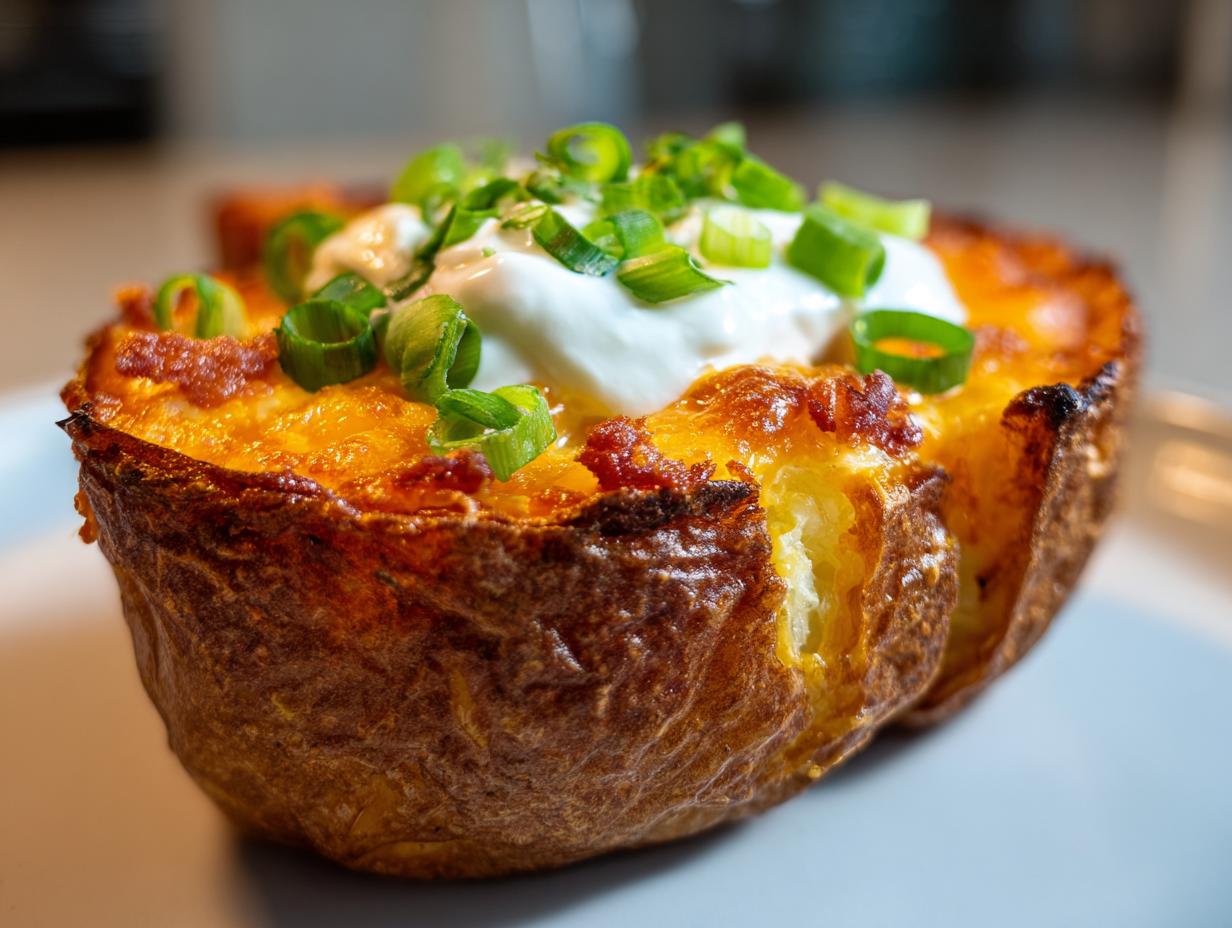
Forget those floppy, sad potato boat things you sometimes get at parties. We are going for the real deal here: the Cheesy Texas Style Potato Skins Crispy Oven Baked! I’m telling you, these are legendary in my house, especially when the big game is on. The absolute secret to making these Cheesy Texas Style Potato Skins Crispy Oven Baked truly shine is getting that shell crunchy—like, satisfyingly crunchy—without drying out the fluffy inside.
I spent way too many weekends experimenting with potato skins. I tried frying them, I tried baking them twice, I tried everything! Honestly, the simplest method—the oven baked one—won out, but only when I followed a specific timing trick. You need to bake them long enough the first time so they are completely cooked through, then give those shells a short, hot blast before you even think about adding cheese.
Trust me on this: when you pull those skins out and they’re golden brown and firm enough to hold all that sharp cheddar and smoky turkey bacon, you’ll understand why I’m so passionate about this recipe. It’s all about texture, and this method nails it every single time!
Essential Ingredients for Cheesy Texas Style Potato Skins Crispy Oven Baked
You can’t fake flavor when it comes to potato skins, and that means using good, solid ingredients. We need powerful potatoes and cheese that actually tastes like cheese! Don’t skimp here; these ingredients are the backbone of our crispy, cheesy Texas-style appetizer. Also, make sure that turkey bacon is cooked until it’s really snappy before you crumble it up—that adds so much necessary texture.
Ingredient Table for Your Cheesy Texas Style Potato Skins Crispy Oven Baked
Here is exactly what you need to gather before we start prepping the potatoes. I like to have everything measured out and ready to go before the first bake, it makes the assembly so much faster later on!
| Ingredient | Amount | Notes / Prep |
|---|---|---|
| Russet Potatoes | 4 large | Must be large for scooping |
| Olive Oil | 1 1/2 Tbsp | Plus extra for brushing skins |
| Sea Salt & Black Pepper | To taste | Use coarse salt if you have it |
| Sharp Cheddar Cheese | 1 3/4 cups | Shredded fresh is always best! |
| Turkey Bacon | 6 slices | Cooked crisp and crumbled |
| Sour Cream | 1/2 cup | For topping (serve cold!) |
| Green Onions | 2 | Thinly sliced for garnish |
Why You Will Love This Cheesy Texas Style Potato Skins Crispy Oven Baked Recipe
Honestly, these aren’t just an appetizer; they are a guaranteed crowd-pleaser. You don’t need a deep fryer to get that amazing crunch, which is a huge win for me on busy weekends. Plus, the total time is just over an hour, and most of that is hands-off baking time!
Here is why this recipe quickly became my go-to for game days and unexpected guests:
- They are truly oven-baked, meaning less mess and no oil splattering everywhere. We get that glorious crispiness naturally.
- The texture contrast is just perfect—fluffy insides, sturdy, crunchy skins, and gooey, sharp cheddar on top.
- This recipe is super easy to scale up if you suddenly have more people showing up than you expected.
- The combination of sharp cheddar and smoky turkey bacon gives it that authentic, hearty Texas flavor profile we all crave.
- Prep is fast! Once the potatoes are baked, assembly takes maybe ten minutes total.
If you want a snack that satisfies everyone without keeping you chained to the stove, this is absolutely the one you need to try immediately. You can find more great snack ideas on our blog.
Equipment Needed to Make Perfect Cheesy Texas Style Potato Skins Crispy Oven Baked
You don’t need a million fancy gadgets for these, thankfully! Just the basics, but having them ready makes the difference between success and a sticky mess. Grab your sturdiest baking sheet and something to scoop with.
- Large Baking Sheet
- Aluminum Foil
- Box Grater (for cheese, if not pre-shredded)
- Sharp Knife
- Spoon with a sturdy edge (for scooping)
- Wire Cooling Rack (optional, but helpful!)
Prepping for the Best Oven Baked Potato Skins
Okay, listen up, because this setup is key to getting those crispy edges! First, get that oven humming at 400°F. Don’t try to rush this part; the heat needs to be stable. Next, line your baking sheet with foil—this is non-negotiable because the oil drips everywhere, and cleaning baked-on potato grease is nobody’s idea of fun!
I like to place a wire rack on top of the foil, inside the baking sheet, if I have one handy. That lets the air circulate underneath the skins later on, which really boosts the crisp factor. If you don’t have one, don’t stress, just make sure your baking sheet has good surface contact for the initial bake.
Step-by-Step Instructions for Crispy Cheesy Texas Style Potato Skins
This is where the magic happens, but you have to follow the timing! We are building layers of texture here, so don’t rush the cooling or the second bake. Keep your oven hot and your movements deliberate. We want fluffy insides and rock-solid shells!
Baking the Potatoes for Maximum Fluffiness
First things first, crank that oven up to 400°F, just like we talked about in the setup. Take your scrubbed and dried potatoes and rub them down thoroughly with that olive oil. Don’t forget the salt and pepper—make sure you get them coated evenly all over the skin. Now, here’s how Grandma taught me to bake them: put the potatoes directly onto the middle oven rack. Having that lined baking sheet underneath is just for catching potential drips, but direct heat cooks them best. Bake them for a solid 45 to 55 minutes. You know they are done when you can easily slide a fork right through the center without any resistance. They need to be totally tender inside!
Creating the Crisp Potato Shells
Once they are done, pull them out and let them cool down for about 10 minutes. They need to be cool enough that you won’t burn your fingers when you handle them! Cut each potato right down the middle, lengthwise. Now, take your spoon and gently scoop out that fluffy potato center. Be careful! You need to leave about a quarter-inch border attached to the skin so the shell has structure. Don’t be stingy with the inside potato, though; save it for mash or my favorite potato soup! Once scooped, brush the inside of the empty skins lightly with a little more olive oil. Put them back on that foil-lined sheet, cut-side up this time, and pop them back into the 400°F oven for just 10 minutes. This crucial second bake starts hardening those edges and drying out the shell so they get nice and crisp!
Loading and Final Bake for Cheesy Texas Style Potato Skins Crispy Oven Baked
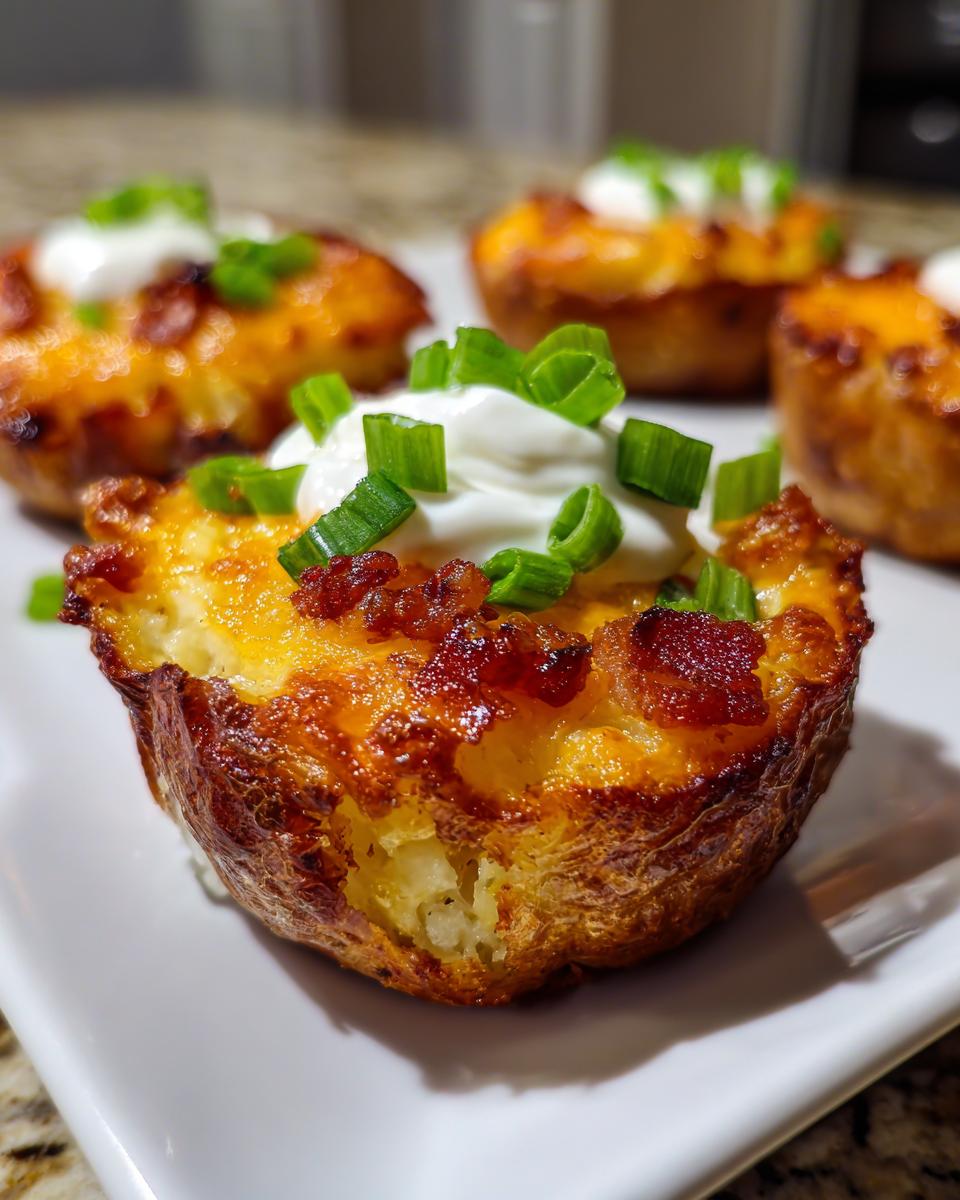
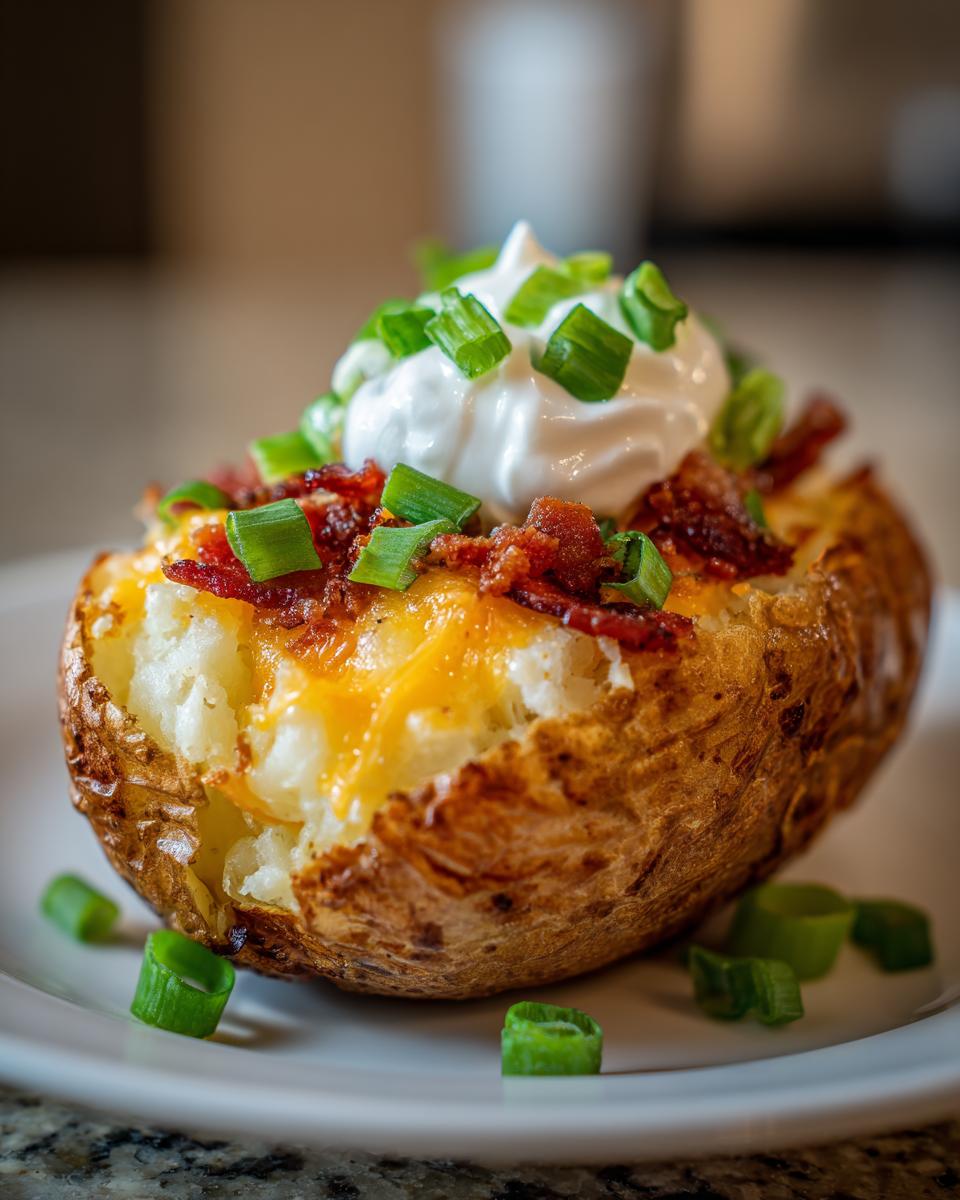
Pull those shells out after the 10-minute crisping bake. They should look slightly golden around the edges now. Time for the good stuff! Divide your sharp cheddar cheese evenly among all those crispy shells. Sprinkle that crumbled, crispy turkey bacon right over the top of the cheese. Pop the loaded skins back into the oven for another 8 to 10 minutes. You are waiting for two things: the cheese needs to be completely melted, bubbly, and maybe just starting to brown a little bit on the edges. Let them rest on the pan for about three to five minutes after they come out—this lets the cheese set up just slightly. Finally, top them with your thinly sliced green onions and serve them hot with a dollop of cold sour cream on the side for dipping!
Tips for Achieving Truly Crispy Cheesy Texas Style Potato Skins
I can’t stress this enough: if you want that perfect Texas-style crunch, you have to respect the moisture levels in this recipe. Soggy skins happen when you rush the drying process or skip that important second bake. We are aiming for a shell that stands up proudly to all that gooey cheese and bacon!
My biggest lesson learned was about the initial moisture on the potato itself. If the skin starts wet, it steams instead of bakes, and steaming is the enemy of crispiness. Also, don’t overload the skins with cheese right away. Too much cold cheese dumped onto a warm skin can actually introduce moisture and prevent that shell from setting up properly during the final melt.
Remember, the goal isn’t just to cook the potato; it’s to dehydrate the outer layer so it crisps up beautifully in the high heat. It takes commitment, but the payoff is worth every extra minute! Check out our Pinterest for more visual inspiration.
Avoiding Moisture for Crispy Results
This is the most important preventative step for crispy skins. After you scrub those Russets, you absolutely must pat them completely dry with paper towels before you even think about adding oil or seasoning. Any water left on the surface turns into steam in the oven, which softens the skin.
When you scoop out the insides, be gentle, but don’t be afraid to scrape the inside walls a bit to make sure you’ve left a thin but sturdy layer of potato flesh attached. After you oil them up for that second 10-minute bake, make sure they are cut-side up so the heat can directly hit the inner wall. This quick blast of dry heat is what sets the structure and locks in the crispiness before the cheese bath happens.
Serving Suggestions for Your Cheesy Texas Style Potato Skins Crispy Oven Baked
These skins are so hearty they can almost stand alone as a meal, but they really shine when served alongside something cool and tangy. Since we’ve packed so much flavor into the potato itself with the cheddar and turkey bacon, you don’t need heavy sides. They are perfect for game day straight out of the oven!
When presenting them, make sure you put the sour cream and green onions right there on the platter. Some people like to serve the sour cream on the side in a little bowl, but I prefer topping each skin individually right before serving—it looks so much more inviting that way!
If you need something else on the table, keep it simple. A big bowl of fresh guacamole or maybe some spicy salsa works wonderfully for an extra dipping option. They are best eaten immediately while the cheese is still molten and the edges are snapping!
Storing and Reheating Leftover Cheesy Texas Style Potato Skins
Oh, leftovers! Sometimes these are even better the next day, but you have to treat them right, or they turn into sad, floppy sponges. If you happen to have any left after everyone attacks the platter, store them correctly right away. Don’t leave them sitting out at room temperature for too long—safety first, always!
The key to reheating is using dry heat to wake up that crispness we worked so hard to achieve. Microwaving is an absolute no-go; it’s the fastest way to turn these into rubbery disappointments. We want crunchy skins, remember?
For best results regarding texture retention, you should ideally skip the sour cream and green onions until *after* you reheat them. Store the toppings separately, okay?
Storage and Reheating Table
| Storage Method | Duration | Reheating Instructions (Best Method) |
|---|---|---|
| Refrigeration | 3 days | Bake at 375°F for 10-12 minutes until cheese melts and edges crisp. |
| Freezing (Unloaded) | 1 month | Bake from frozen at 400°F for 20-25 minutes, then top and finish. |
Frequently Asked Questions About Cheesy Texas Style Potato Skins Crispy Oven Baked
I always get questions when I post these because everyone wants to know the secret to making them perfectly crispy in the oven. Here are some of the most common things people ask me when they try this recipe for the first time!
Can I use regular bacon instead of turkey bacon in this Cheesy Texas Style Potato Skins Crispy Oven Baked recipe?
Absolutely! You certainly can swap out the turkey bacon for regular pork bacon. If you do, just make sure you cook it until it’s really well done and crumbled up nice and fine. The only difference is that regular bacon tends to render a bit more fat, so you might want to gently blot that excess grease off the cooked bacon pieces before crumbling and sprinkling them on top of the cheddar cheese. It won’t change the flavor profile much, just the fat content!
How do I prevent the potato skins from becoming soggy?
This is the million-dollar question! To stop sogginess, you need to follow two critical steps religiously. First, make sure you scrub and pat the potatoes totally dry before the first bake. Second, the second, short bake (Step 6 in the instructions) is non-negotiable. Baking the empty skins cut-side up for 10 minutes dries out the shell structure so it can crisp up when the cheese melts on top. Don’t skip that step!
What is the best cheese to use for the topping?
For that authentic, bold Texas flavor, you have to stick with sharp cheddar cheese. I prefer grating it myself from a block—pre-shredded cheese often has anti-caking agents that stop it from melting as smoothly and richly as fresh shreds do. Sharp cheddar gives you that necessary bite to stand up against the richness of the potato and the saltiness of the turkey bacon. If you want to get really fancy, try mixing half sharp cheddar with half Monterey Jack for extra gooeyness!
Nutritional Estimates for One Cheesy Texas Style Potato Skins Crispy Oven Baked Serving
I always try to keep track of what we’re eating, but remember these are just estimates based on the ingredients listed! Since we use sharp cheddar and turkey bacon, they are definitely hearty snacks, but they pack a good punch of protein too. If you use less cheese or skip the sour cream, those numbers will change, of course!
| Nutrient | Amount (Per Skin) |
|---|---|
| Calories | 260 |
| Fat | 13 grams |
| Carbohydrates | 28 grams |
| Protein | 10 grams |
| Sugar | 2 grams |
| Fiber | 3 grams |
Just a quick note: these numbers are based on 8 total servings as listed in the recipe. If you manage to stretch them to 10 servings, you’ll see the fat and calories drop down nicely! Enjoy them!
Print
Amazing 10 Cheesy Texas Style Potato Skins Crispy Oven Baked
- Total Time: 1 hour 10 minutes
- Yield: 8 potato skins 1x
- Diet: Vegetarian
Description
These cheesy Texas style potato skins are crispy, loaded with cheddar and turkey bacon, and topped with sour cream and green onions. They make a perfect party appetizer.
Ingredients
- 4 large Russet potatoes
- 1 1/2 tablespoons olive oil
- 1 teaspoon sea salt
- 1/2 teaspoon black pepper
- 1 3/4 cups shredded sharp cheddar cheese
- 6 slices turkey bacon, cooked until crisp and crumbled
- 1/2 cup sour cream
- 2 green onions, thinly sliced
Instructions
- Preheat your oven to 400°F. Line a baking sheet with foil.
- Scrub the potatoes clean and pat them dry. Rub all over with olive oil and sprinkle evenly with salt and black pepper.
- Place potatoes directly on the oven rack with the lined baking sheet below to catch drips. Bake for 45 to 55 minutes until fork tender.
- Remove potatoes from the oven and let them cool for 10 minutes until safe to handle. Cut each potato in half lengthwise.
- Using a spoon, carefully scoop out the center of each half, leaving about 1/4 inch of potato attached to the skin for structure. Reserve the scooped potato for another use.
- Brush the inside of each potato skin lightly with additional olive oil. Return the skins to the baking sheet cut side up and bake for 10 minutes until the edges begin to crisp.
- Remove from the oven and divide shredded cheddar evenly among the skins. Top with crumbled turkey bacon.
- Return the skins to the oven and bake for 8 to 10 minutes until the cheese is fully melted and bubbly.
- Remove from the oven and let rest for 3 to 5 minutes. Top with sliced green onions and serve with sour cream.
Notes
- If cooking turkey bacon from raw, make sure it reaches an internal temperature of 165°F before crumbling.
- Prep Time: 15 minutes
- Cook Time: 55 minutes
- Category: Appetizer
- Method: Oven Baked
- Cuisine: American
Nutrition
- Serving Size: 1 potato skin
- Calories: 260
- Sugar: 2 grams
- Fat: 13 grams
- Carbohydrates: 28 grams
- Fiber: 3 grams
- Protein: 10 grams