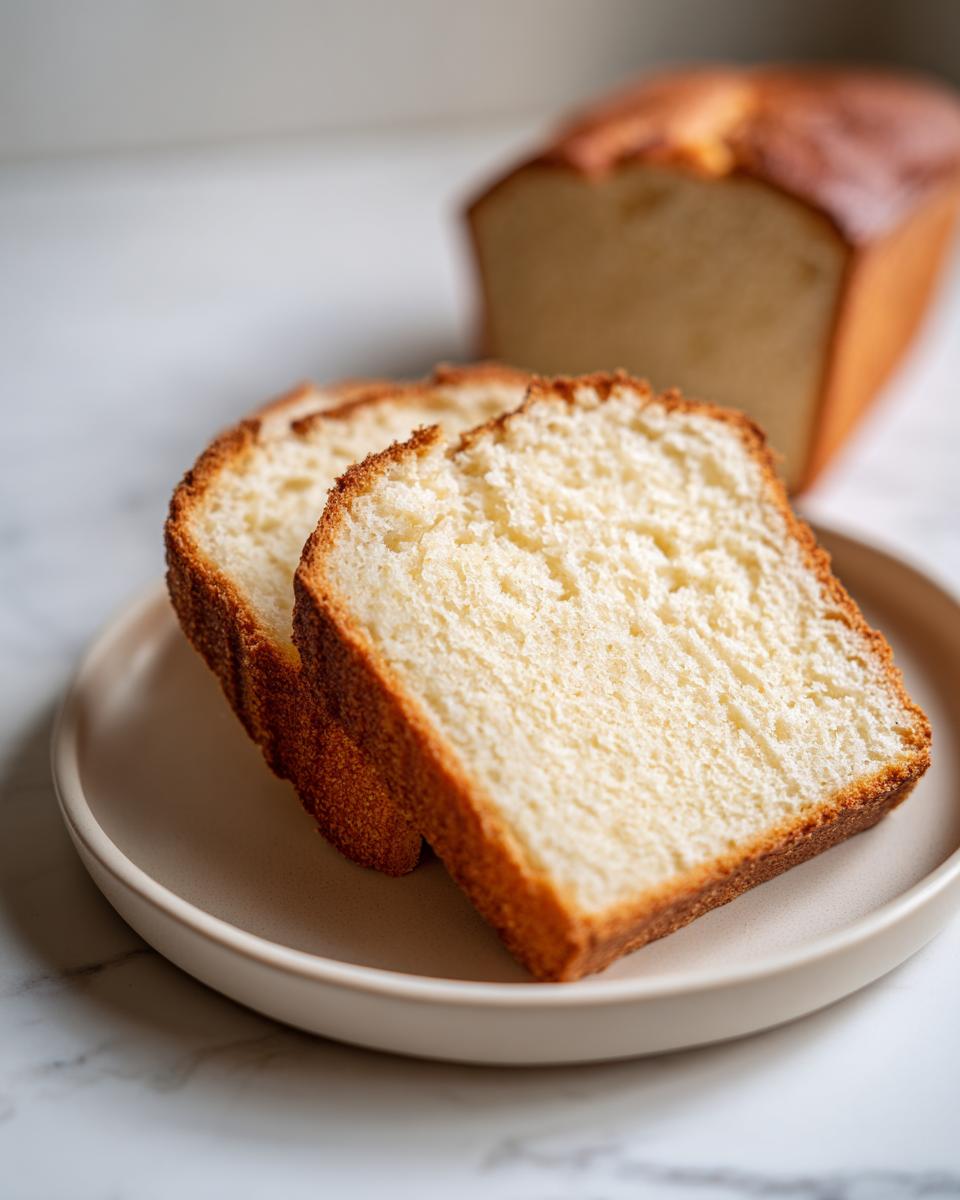
If you’ve ever tried baking with alternative flours, you know the struggle. Sometimes you end up with something crumbly, dense, or just sad. But I promise you, making truly soft and moist almond flour bread is totally possible, and it’s easier than you think! This recipe is my go-to because it delivers that lovely, fluffy texture we all crave, and yes, it’s completely gluten-free.
I spent years trying to figure out how to stop my low-carb loaves from turning into dense bricks. The secret, I discovered, wasn’t just in the almond flour itself—it’s in how you treat the wet ingredients. We are aiming for a bread that’s perfect for morning toast or even a sturdy sandwich, not just something you crumble over a salad.
This particular almond flour bread bakes up beautifully golden in under an hour. Trust me, once you nail this simple technique, you won’t look back. It’s the best loaf I’ve ever made with alternative flours, hands down!
Essential Ingredients for Your Almond Flour Bread
You don’t need a massive pantry for this loaf, which is part of why I love it so much! We rely on a few key players to get that perfect texture without any gluten. Keep everything measured out before you start mixing, because the process moves pretty quickly once you get going.
- 2 cups fine almond flour
- 1 tablespoon coconut flour
- 1 teaspoon baking soda
- ¼ teaspoon salt
- 4 large eggs (room temperature is always best!)
- ¼ cup olive oil or melted butter
- 1 tablespoon honey or maple syrup
- 1 teaspoon apple cider vinegar
Understanding Key Components in Almond Flour Bread
If you’re new to gluten-free baking, you might wonder why we need two different flours. The fine almond flour gives us the body, but it doesn’t absorb liquid well on its own. That’s where the little bit of coconut flour comes in! It acts like a sponge, soaking up extra moisture so your loaf doesn’t end up soggy.
And then there’s the vinegar—don’t skip it! The apple cider vinegar is reacting with the baking soda. This chemical reaction creates carbon dioxide bubbles that give the bread its lift and fluffiness. Without that acid boost, your loaf would be pretty flat, so make sure you’re using that teaspoon!
Equipment Needed to Make Almond Flour Bread
You don’t need a fancy stand mixer for this recipe at all! I usually just grab a couple of bowls and get started. The right tools make the whole process so much smoother, especially when dealing with thick batter.
Here is what you absolutely need on hand:
- Two medium mixing bowls (one for dry, one for wet).
- A whisk for getting those wet ingredients really smooth.
- A rubber spatula—this is crucial for folding everything gently at the end.
- An 8×4-inch loaf pan.
- Parchment paper! Seriously, don’t skip lining this pan, it saves so much cleanup later.
Step-by-Step Instructions for Baking Amazing Almond Flour Bread
Alright, let’s get baking! This is the fun part, and honestly, it’s so fast you’ll wonder why you waited so long to try making your own almond flour bread. The key here is organization—have your pan ready and your oven preheated before you even touch the whisk.
First things first: get that oven warmed up to 350°F. While it’s heating, grab your 8×4-inch loaf pan. I cannot stress this enough: line it completely with parchment paper, leaving some overhang on the long sides. This overhang becomes your built-in handles for lifting the loaf out later. Trust me, trying to wrestle a delicate gluten-free loaf out of a hot pan is nobody’s idea of a good time!
Once the pan is lined, you can move onto the mixing process. We keep the wet and dry separate until the very last minute to control that reaction we talked about. Pay close attention to how thick the batter gets—it’s going to look much thicker than traditional wheat bread batter, but it should still spread easily.
Mixing Wet and Dry Ingredients for Almond Flour Bread
In one bowl, just whisk together all your dry stuff: the almond flour, coconut flour, baking soda, and salt. Make sure you really break up any clumps in the almond flour while you whisk. In the second bowl, beat the eggs, oil, honey, and that crucial apple cider vinegar until everything looks beautifully emulsified and smooth.
Now, the moment of truth! Pour the wet mixture right into the dry ingredients. You only want to stir with your spatula until you no longer see streaks of flour. Stop mixing right there! If you overmix this almond flour bread batter, you’ll deflate all the air we worked hard to create with the vinegar and baking soda, and you’ll end up with a heavy loaf. It should be thick—almost like thick cake batter—but still pourable into your prepared pan.
Baking Time and Testing Your Almond Flour Bread
Once you’ve smoothed the top of your batter in the pan, slide it carefully into that preheated 350°F oven. The baking time is usually around 35 to 40 minutes. Don’t open the oven door before the 30-minute mark, or you risk collapsing your beautiful loaf!
When the time is almost up, look for visual cues: the top should be nicely golden brown. Then, use the toothpick test—insert it right into the center. If it comes out clean, or with just a few moist crumbs clinging to it, your almond flour bread is done! If the batter is wet, give it another five minutes and test again.
Tips for Success When Baking Almond Flour Bread
Even though this recipe is super straightforward, a couple of little tricks can take your loaf from good to absolutely spectacular. My biggest takeaway from my early, crumbly attempts was learning to respect the temperature of the ingredients.
Try to use room temperature eggs. Cold eggs can seize up the fats when they hit the olive oil or melted butter, making your batter look a little curdled. It won’t ruin the loaf, but smooth batter equals a smoother final texture in your almond flour bread.
Next up: cooling! This is non-negotiable for any gluten-free or low carb bread. Let it cool in the pan for a solid 10 minutes. If you try to turn it out immediately, it might break because it’s still steaming and setting up. Once those 10 minutes are up, use those parchment paper handles to lift it onto a wire rack. It must cool completely before you slice it. Seriously, wait until it’s room temperature—slicing warm loaves, even this sturdy almond flour bread, always results in tearing and crumbling.
When you do slice it, use a sharp, long serrated knife and use a gentle sawing motion rather than pressing straight down. A little toasting before serving also really wakes up the nutty flavor, so don’t skip that step!
Common Questions About Your Homemade Almond Flour Bread
I get asked so many questions about this loaf because people are always worried about replacing wheat flour. It’s a learning curve, but once you see how versatile this gluten-free bread is, you’ll be hooked!
Q1. Can I use regular wheat flour instead of almond flour?
No, you really can’t swap these out 1:1. This recipe relies on the high fat and protein content of almond flour, and wheat flour behaves totally differently when mixed with coconut flour. If you want a traditional loaf, you’ll need a different recipe entirely.
Q2. My loaf came out dense. What went wrong?
Usually, density happens for two reasons: either you overmixed the batter after adding the wet ingredients, or you didn’t use the apple cider vinegar. That acid is what creates the necessary lift in a low carb bread like this, so double-check that ingredient!
Q3. Can I sweeten this bread less?
You absolutely can! The honey or maple syrup is there to add a touch of flavor and help with browning, but if you are eating this strictly for savory sandwiches, you can cut that down to just half a teaspoon or even skip it entirely. Just know that the crust might be slightly paler.
Q4. Why is my loaf sticky on the bottom?
This almost always means you didn’t let it cool long enough on the wire rack. The steam needs a place to escape, and if you trap it in the pan or slice it while it’s still warm, the moisture condenses and makes the bottom sticky. Patience pays off here!
Storing and Serving Your Delicious Almond Flour Bread
One of the great things about this recipe is how well it keeps, especially compared to traditional bread that goes stale so fast. Because it’s high in healthy fats, this almond flour bread stays soft for quite a while if you treat it right. For everyday eating, I usually keep our loaf right on the counter in an airtight container. It stays perfectly good for about two days.
If you know you won’t finish it in two days, or if your kitchen is really warm, definitely move it to the refrigerator. It keeps beautifully in the fridge for up to five days. When you pull it out of the fridge, it will be a little firm, but that’s okay! Just slice off what you need and pop it into the toaster or a dry pan for a minute. Toasting is really the best way to bring back that fresh-baked flavor!
Here’s a quick rundown of my storage rules:
| Storage Location | Max Time | Best Serving Method |
|---|---|---|
| Room Temperature (Airtight) | 2 Days | Best toasted |
| Refrigerator | Up to 5 Days | Toast or lightly warm |
Suggested Pairings for Your Almond Flour Bread
This bread is so versatile! For breakfast, it’s fantastic with just a smear of butter and a drizzle of honey. If you’re using it for sandwiches, try avocado and everything bagel seasoning for a great low-carb lunch. It also holds up well under creamy fillings, so don’t be shy with the cream cheese!
Nutritional Snapshot of Almond Flour Bread
I know some of you are tracking macros, and that’s totally fine! What I love about this loaf is that it’s packed with those good fats from the almonds, which keeps you feeling full way longer than regular white bread ever could. It’s a powerhouse for a gluten-free bread option.
Here’s a quick look at what you can generally expect from one slice. Keep in mind, because we’re using whole-food ingredients, your exact numbers might tweak a little based on the brand of almond flour you grab! Check out more tips.
| Nutrient | Estimate Per Slice |
|---|---|
| Calories | 180 |
| Fat | 16g |
| Protein | 6g |
| Carbohydrates | 4g |
*Disclaimer: Nutritional information is an estimate and may vary based on specific ingredient brands used.*
Share Your Experience Making Almond Flour Bread
I really hope you give this recipe a try! It’s such a game-changer when you want that comforting bread texture without the gluten. Once you pull your beautiful golden loaf out of the oven, please come back and let me know how it turned out! See more recipe ideas.
Did you try it toasted? Did you use olive oil or butter? Drop a comment below and tell me your thoughts—I absolutely love reading about everyone’s successes! Try this moist banana bread next!
Tips for Success When Baking Almond Flour Bread
Even though this recipe is super straightforward, a couple of little tricks can take your loaf from good to absolutely spectacular. My biggest takeaway from my early, crumbly attempts was learning to respect the temperature of the ingredients.
Try to use room temperature eggs. Cold eggs can seize up the fats when they hit the olive oil or melted butter, making your batter look a little curdled. It won’t ruin the loaf, but smooth batter equals a smoother final texture in your almond flour bread.
Next up: cooling! This is non-negotiable for any gluten-free or low-carb bread. Let it cool in the pan for a solid 10 minutes. If you try to turn it out immediately, it might break because it’s still steaming and setting up. Once those 10 minutes are up, use those parchment paper handles to lift it onto a wire rack. It must cool completely before you slice it. Seriously, wait until it’s room temperature—slicing warm loaves, even this sturdy almond flour bread, always results in tearing and crumbling.
When you do slice it, use a sharp, long serrated knife and use a gentle sawing motion rather than pressing straight down. A little toasting before serving also really wakes up the nutty flavor, so don’t skip that step!
Common Questions About Your Homemade Almond Flour Bread
I get asked so many questions about this loaf because people are always worried about replacing wheat flour. It’s a learning curve, but once you see how versatile this gluten-free bread is, you’ll be hooked!
Q1. Can I use regular wheat flour instead of almond flour?
No, you really can’t swap these out 1:1. This recipe relies on the high fat and protein content of almond flour, and wheat flour behaves totally differently when mixed with coconut flour. If you want a traditional loaf, you’ll need a different recipe entirely.
Q2. My loaf came out dense. What went wrong?
Usually, density happens for two reasons: either you overmixed the batter after adding the wet ingredients, or you didn’t use the apple cider vinegar. That acid is what creates the necessary lift in a low carb bread like this, so double-check that ingredient!
Q3. Can I sweeten this bread less?
You absolutely can! The honey or maple syrup is there to add a touch of flavor and help with browning, but if you are eating this strictly for savory sandwiches, you can cut that down to just half a teaspoon or even skip it entirely. Just know that the crust might be slightly paler.
Q4. Why is my loaf sticky on the bottom?
This almost always means you didn’t let it cool long enough on the wire rack. The steam needs a place to escape, and if you trap it in the pan or slice it while it’s still warm, the moisture condenses and makes the bottom sticky. Patience pays off here!
Storing and Serving Your Delicious Almond Flour Bread
One of the great things about this recipe is how well it keeps, especially compared to traditional bread that goes stale so fast. Because it’s high in healthy fats, this almond flour bread stays soft for quite a while if you treat it right. For everyday eating, I usually keep our loaf right on the counter in an airtight container. It stays perfectly good for about two days.
If you know you won’t finish it in two days, or if your kitchen is really warm, definitely move it to the refrigerator. It keeps beautifully in the fridge for up to five days. When you pull it out of the fridge, it will be a little firm, but that’s okay! Just slice off what you need and pop it into the toaster or a dry pan for a minute. Toasting is really the best way to bring back that fresh-baked flavor!
Here’s a quick rundown of my storage rules:
| Storage Location | Max Time | Best Serving Method |
|---|---|---|
| Room Temperature (Airtight) | 2 Days | Best toasted |
| Refrigerator | Up to 5 Days | Toast or lightly warm |
Suggested Pairings for Your Almond Flour Bread
This bread is so versatile! For breakfast, it’s fantastic with just a smear of butter and a drizzle of honey. If you’re using it for sandwiches, try avocado and everything bagel seasoning for a great low-carb lunch. It also holds up well under creamy fillings, so don’t be shy with the cream cheese!
Nutritional Snapshot of Almond Flour Bread
I know some of you are tracking macros, and that’s totally fine! What I love about this loaf is that it’s packed with those good fats from the almonds, which keeps you feeling full way longer than regular white bread ever could. It’s a powerhouse for a gluten-free bread option.
Here’s a quick look at what you can generally expect from one slice. Keep in mind, because we’re using whole-food ingredients, your exact numbers might tweak a little based on the brand of almond flour you grab! See more recipe ideas.
| Nutrient | Estimate Per Slice |
|---|---|
| Calories | 180 |
| Fat | 16g |
| Protein | 6g |
| Carbohydrates | 4g |
*Disclaimer: Nutritional information is an estimate and may vary based on specific ingredient brands used.*
Share Your Experience Making Almond Flour Bread
I really hope you give this recipe a try! It’s such a game-changer when you want that comforting bread texture without the gluten. Once you pull your beautiful golden loaf out of the oven, please come back and let me know how it turned out! See more recipe ideas.
Did you try it toasted? Did you use olive oil or butter? Drop a comment below and tell me your thoughts—I absolutely love reading about everyone’s successes! Try this moist banana bread next!
Print
Amazing 1-Hour Almond Flour Bread Secret
- Total Time: 50 minutes
- Yield: 12 slices 1x
- Diet: Gluten Free
Description
This easy almond flour bread is soft, moist, and gluten-free. It is perfect for breakfast toast or sandwiches and bakes in under an hour with minimal effort.
Ingredients
- 2 cups fine almond flour
- 1 tablespoon coconut flour
- 1 teaspoon baking soda
- ¼ teaspoon salt
- 4 large eggs
- ¼ cup olive oil or melted butter
- 1 tablespoon honey or maple syrup
- 1 teaspoon apple cider vinegar
Instructions
- Preheat oven to 350°F. Line an 8×4-inch loaf pan with parchment paper.
- Whisk together almond flour, coconut flour, baking soda, and salt in a medium bowl.
- Whisk eggs, olive oil, honey, and apple cider vinegar in a separate bowl until smooth.
- Pour the wet ingredients into the dry and stir until just combined. The batter should be thick but pourable.
- Transfer the mixture to the prepared loaf pan and smooth the top with a spatula.
- Bake for 35–40 minutes, or until golden brown and a toothpick inserted in the center comes out clean.
- Cool in the pan for 10 minutes, then transfer to a wire rack to cool completely before slicing.
Notes
- Store in an airtight container at room temperature for 2 days or in the refrigerator for up to 5 days.
- Toast before serving for best flavor.
- Prep Time: 10 minutes
- Cook Time: 40 minutes
- Category: Bread
- Method: Baking
- Cuisine: American
Nutrition
- Serving Size: 1 slice
- Calories: 180
- Sugar: N/A
- Sodium: N/A
- Fat: 16g
- Saturated Fat: N/A
- Unsaturated Fat: N/A
- Trans Fat: N/A
- Carbohydrates: 4g
- Fiber: N/A
- Protein: 6g
- Cholesterol: N/A