If you’re anything like me, you’ve been burned by gluten-free cookies before. They turn out crumbly, or they taste like cardboard trying too hard to be cakey. Not these! I spent ages tweaking this recipe because I needed perfection—I needed Fudgy Chocolate Crinkle Cookies Gluten Free that tasted exactly like the classic versions, only safer for my friends with sensitivities. And wow, did I nail it.
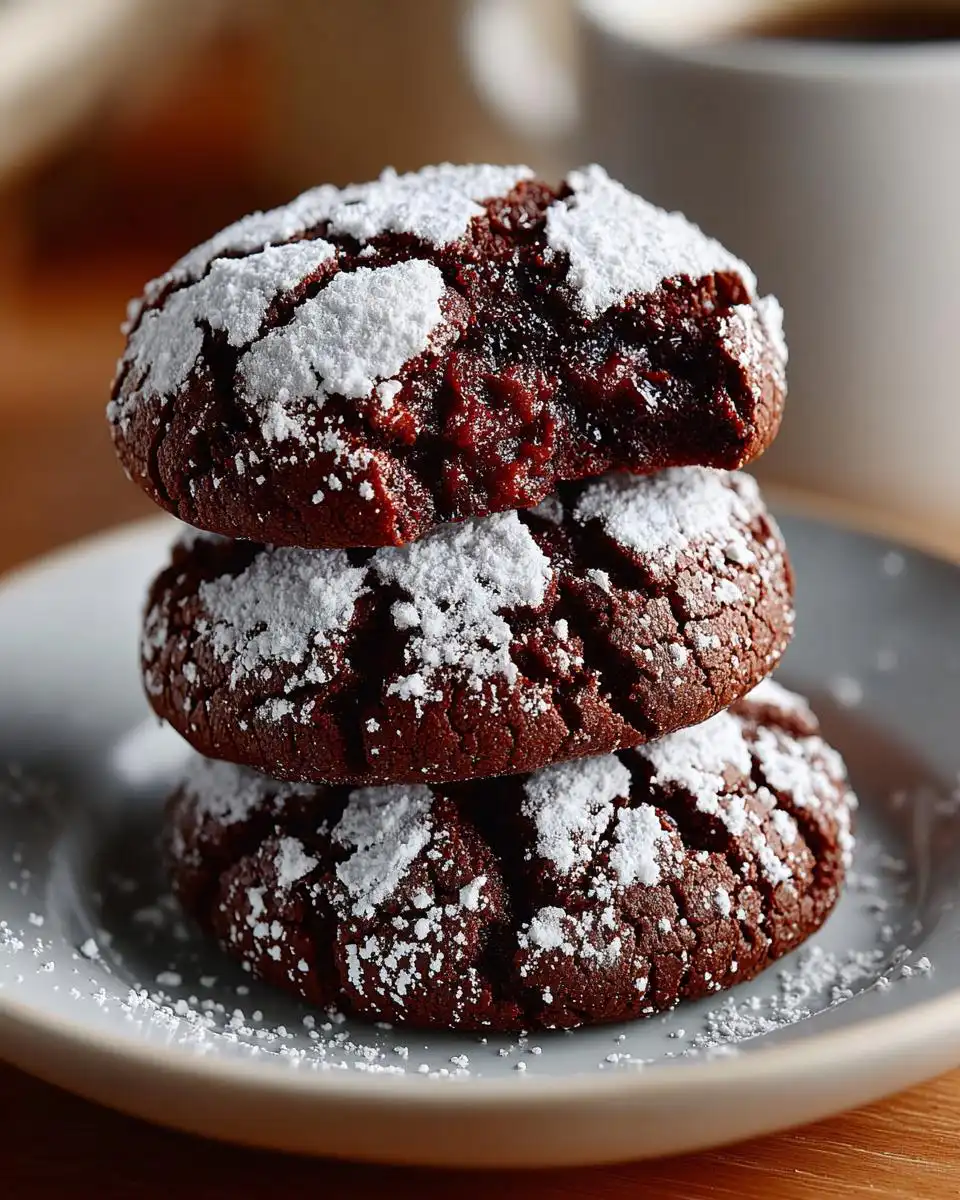
The magic here is the texture trifecta: intensely fudgy inside, delightfully chewy around the edges, and that beautiful, snowy crackle on top. You get all that incredible, rich cocoa flavor without any gritty texture, which is the number one mistake I see when people bake gluten-free chocolate treats.
I’ve learned over the years that with gluten-free baking, you can’t just swap ingredients willy-nilly. You need the right balance of fat and moisture to mimic the structure flour usually provides. That’s why chilling the dough is non-negotiable in this recipe. It keeps them thick and chewy. Trust me, after trying countless batches that spread into flat, oily puddles, this method works every single time for a perfect, easy gluten-free result.
Gathering Ingredients for Fudgy Chocolate Crinkle Cookies Gluten Free
Before we even think about mixing, we have to talk about the supplies. Making truly Fudgy Chocolate Crinkle Cookies Gluten Free relies on having good quality ingredients ready to go. Don’t rush this part! For the creaming step to work right, your butter needs to be softened—not melted, just soft enough to leave a dent when you poke it.
Also, listen up: your eggs absolutely must be at room temperature. Cold eggs shock the butter mixture and make it curdle a little, which ruins that beautiful structure we are trying to build. As for the flour, I insist on using a 1-to-1 gluten-free all-purpose blend that already includes xanthan gum. It saves so much trouble, and using one specifically designed for baking means you get that perfect chewy crumb without having to guess amounts.
Essential Components for Perfect Fudgy Chocolate Crinkle Cookies Gluten Free
Here’s what you need to pull out of the pantry for these amazing Fudgy Chocolate Crinkle Cookies Gluten Free. Make sure your cocoa powder is good quality; it’s the star flavor! Also, that tiny bit of instant espresso powder? It doesn’t make them taste like coffee, I promise. It just deepens the chocolate flavor so much. It’s my secret trick for really rich cookies.
- Butter: 1/4 cup, softened just right.
- Sugars: You need both granulated and packed brown sugar for that chewiness.
- Eggs: Two large ones, and they must be room temperature!
- Dry Stuff: 1/2 cup plus 1 tablespoon of your preferred GF all-purpose flour (with xanthan gum included).
- Flavor Boosters: Cocoa powder, salt, vanilla, and that little bit of espresso powder.
- Mix-ins: Half a cup of chocolate chips—I prefer semi-sweet.
- The Coating: A full cup of powdered sugar mixed with 1/4 cup of granulated sugar—that combo gives the best crackle!
Equipment Needed for Baking
You don’t need a million fancy gadgets for these cookies, which is why I love them for a weeknight treat. You do need something to mix with, though.
- A large mixing bowl and an electric mixer (handheld or stand mixer works great).
- Measuring cups and spoons—precision matters here!
- A rubber spatula for scraping down the sides.
- Parchment paper to line your baking sheets.
- A small bowl for mixing up your rolling sugar.
- A cookie scoop or a tablespoon measure for uniform balls.
Mastering the Preparation of Fudgy Chocolate Crinkle Cookies Gluten Free
Okay, this is where we move from ingredient gathering to actual magic making. Getting the texture right for Fudgy Chocolate Crinkle Cookies Gluten Free is all about how you handle the mixing process. If you rush the creaming, or if you overmix the flour, you’ll end up with something that spreads too much in the oven. We want thick, chewy cookies, not flat chocolate discs, right?
The key to that dense, rich center we are aiming for comes from properly incorporating air early on and then stopping mixing the second the flour disappears. It’s a delicate balance, but once you see how easy it is, you’ll be hooked on this recipe for all your chocolate cookie needs! If you want to see more of my favorite baking tips, check out my latest posts.
Creaming Fats and Sugars
First things first: grab that softened butter, the granulated sugar, and the brown sugar. We’re going to beat these together until they look light and fluffy. The recipe says about 30 seconds, but I always go a little longer—maybe a full minute—just until the mixture loses that grainy look. You’re creating air pockets here, and those pockets are what give the cookie structure even without gluten. If you stop too soon, the cookies will be heavy!
Incorporating Wet and Dry Elements
Once that base looks perfect, beat in your room-temperature eggs one at a time, followed by the vanilla. Scrape down the bowl so everything is happy and incorporated. Now comes the crucial part where you have to stop yourself from mixing too much! Add all your dry ingredients—the cocoa, the special GF flour blend, baking powder, soda, salt, and that espresso powder. Mix on low speed, or even by hand, until you see *just* the last streaks of flour vanish. Seriously, as soon as you don’t see dry powder, stop. Overmixing the gluten-free flour develops a gummy texture, and we are avoiding that at all costs.
The Crucial Chill Time for Fudgy Chocolate Crinkle Cookies Gluten Free
This step is non-negotiable if you want those perfect, thick Fudgy Chocolate Crinkle Cookies Gluten Free. Cover the bowl and stick that dough in the fridge for at least two hours. I often leave mine overnight! Why the wait? Well, gluten-free flours are thirsty, and they need time to fully hydrate. Chilling also solidifies the fats, which means when these cookie balls hit the hot oven, they hold their shape instead of melting out. It’s the secret to thickness! For more baking inspiration, follow me on Pinterest.
Baking Techniques for Optimal Crinkle Appearance
The dough is chilled, the oven is heating up—now we focus on making them look as good as they taste! The signature look of a crinkle cookie comes entirely from how you handle the dough right before it goes into the heat. A cold dough ball rolling around in sugar creates those deep cracks as it bakes and spreads just a tiny bit.
Make sure your oven hits that 350°F mark before you even think about scooping. A proper preheat is key for cookies because it sets the outside quickly, which helps lock in that chewy center. If your oven is too cool, they just spread flat before they have a chance to puff up.
Rolling and Sugaring the Dough Balls
When you’re ready to roll, grab your tablespoon scoop. I always keep a tiny bowl of water nearby—just dip your fingertips in it lightly before you grab the dough. This little bit of moisture helps keep the sticky chocolate dough from clinging to your hands while you roll it into a neat ball. It makes the job much cleaner, trust me! If you are looking for other easy baking recipes, try my healthy chocolate dessert options.
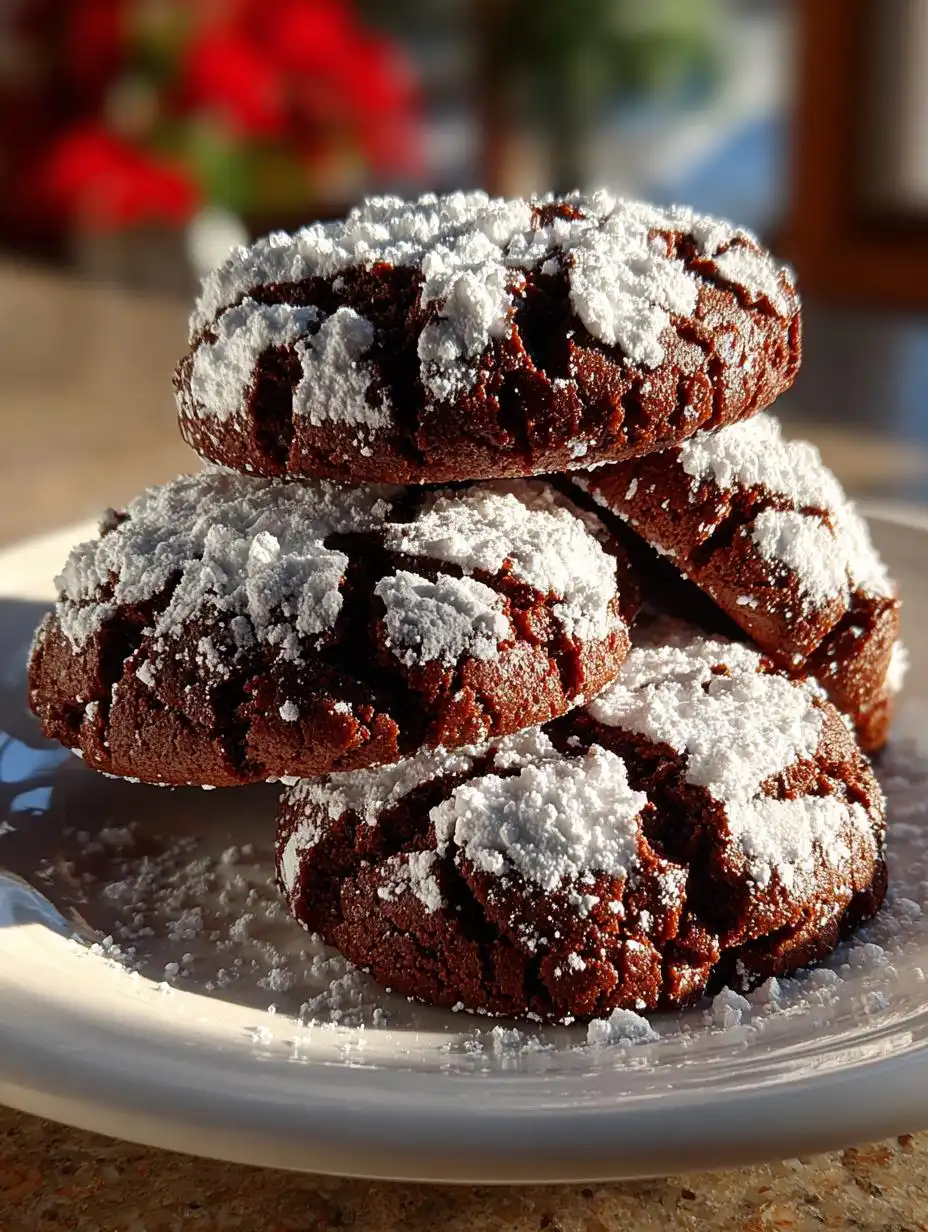
Once you have your ball, roll it generously through that waiting bowl of mixed powdered and granulated sugar. Don’t be shy! You want a thick, opaque coating. This sugar coating is what bakes up into those beautiful white cracks against the dark chocolate. After the first roll, I usually give each ball a quick second dip in the sugar just to make sure it’s completely covered before placing it on the parchment-lined sheet.
Oven Time and Visual Cues
Place those sugar-coated balls onto your prepared baking sheet, making sure they have plenty of space between them—about two inches apart is good. Now, slide them into that 350°F oven for 10 to 12 minutes. This is the hardest part: resisting the urge to overbake!
You are looking for cookies that look puffed up and have those lovely crackled tops. The edges should look set, but the very center should still look a little soft, almost underdone. That softness is your guarantee of a fudgy texture later on. If you bake them until they look completely hard in the middle, they will be cakey when they cool. Remember, they continue setting up on the hot pan for a good 15 minutes after they come out, so pull them right at that 10-minute mark if you’re unsure!
Why You Will Love These Fudgy Chocolate Crinkle Cookies Gluten Free
Honestly, these cookies are going straight into the core rotation once you try them. They are everything you want in a holiday cookie but without any of the usual gluten-free drama. I’m so proud of how these turned out, and I know you’ll be thrilled every time you pull a tray out of the oven.
Forget dry, crumbly messes. These Fudgy Chocolate Crinkle Cookies Gluten Free deliver pure satisfaction:
- They are incredibly quick to mix up—the hands-on prep time is barely 10 minutes!
- The flavor is intensely rich; that hint of espresso really makes the cocoa sing.
- You get that perfect three-way texture: fudgy center, chewy edge, and a beautiful snowy crackle.
- They are completely safe for our gluten-free friends, meaning everyone at the party can enjoy them.
Storage and Handling of Your Fudgy Chocolate Crinkle Cookies Gluten Free
These cookies are so good, you might not have any leftovers, but just in case you manage to save a few of these amazing Fudgy Chocolate Crinkle Cookies Gluten Free, you need to store them correctly. Because they are so moist and fudgy, they can dry out faster than a standard crisp cookie if left exposed.
The good news is that they are super easy to keep fresh! We don’t want to put them in the fridge, though; that humidity can sometimes make the sugar coating get sticky or dissolve weirdly. They are best kept right on the counter, just like Grandma used to do with her best chocolate treats. If you are looking for other great dessert ideas, check out my dessert recipes section.
Storing Leftovers Safely
For best results, make sure your cookies are cooled completely—I mean stone cold—before you even think about covering them up. If you trap any warmth, you’ll get condensation, and that makes for soggy bottoms. Once they are totally cool, stack them gently in an airtight container. You can put a small piece of parchment paper between layers if you’re worried about the tops sticking, but usually, they stack fine.
Stored this way at room temperature, these cookies stay perfectly fudgy and chewy for about four to five days. If you really need them to last longer, you can freeze them! Just make sure they are wrapped tightly in plastic wrap first, then placed in a freezer-safe bag. They keep well frozen for up to three months, and you can just let them thaw on the counter for an hour when you want one!
Frequently Asked Questions About Fudgy Chocolate Crinkle Cookies Gluten Free
I know when you’re baking gluten-free, you always have questions before you start. It’s smart to check first! Dealing with specialty flours can be tricky, but this recipe is pretty forgiving once you know the rules. Here are the things people ask me most often when they are making their first batch of Fudgy Chocolate Crinkle Cookies Gluten Free.
Can I substitute the GF flour blend in this Fudgy Chocolate Crinkle Cookies Gluten Free recipe
This is the million-dollar question for gluten-free baking, isn’t it? I strongly recommend sticking to the 1-to-1 blend that already contains xanthan gum, like King Arthur Measure for Measure or Bob’s Red Mill 1:1. These blends are formulated to mimic wheat flour’s structure. If you use straight almond flour or coconut flour, the structure will completely collapse, and you won’t get that chewy texture. If your blend *doesn’t* have xanthan gum, you’ll need to add about half a teaspoon to the dry ingredients, or they will be too crumbly.
How to Get the Best Crinkle Effect
The crinkle is all about temperature and coating! First, make sure that dough is well-chilled—if it’s warm, it will spread before it cracks. Second, roll those balls thoroughly in the sugar mixture. I roll them once, gently press them down slightly to help the sugar adhere, and then roll them a second time. You want them completely covered so there’s no chocolate showing through before they go into the oven. That sugar coating is what creates the dramatic contrast when they bake!
Why did my Fudgy Chocolate Crinkle Cookies Gluten Free spread too much?
Nine times out of ten, spreading happens because the butter was too warm when you mixed the dough, or you skipped the chilling step. If the dough is too soft when you scoop it, the fat melts too fast in the heat, and the cookie pancake spreads out before the structure can set. Always check that your dough is firm to the touch before rolling and baking! If you’re looking for more tips on avoiding baking fails, check out my About Me page for background on my testing process.
Understanding the Nutrition of Your Fudgy Chocolate Crinkle Cookies Gluten Free
I’m not going to lie; these are rich cookies. They are loaded with butter, sugar, and glorious chocolate, so they aren’t exactly a diet food! But knowing what’s in them is important, especially when baking gluten-free, because sometimes those substitutes can sneak in extra sugars or fats. Since I base this recipe around a standard GF flour blend, the final numbers are always an estimate, but it gives you a good ballpark idea of what you’re enjoying.
I know many of you are tracking macros or just curious about the indulgence factor, so I crunched the numbers based on the yield of 12 cookies. When you make your own batch of these Fudgy Chocolate Crinkle Cookies Gluten Free, remember that ingredient brands can slightly change the final outcome!
Estimated Nutritional Breakdown
Here is the estimated breakdown per cookie, based on the ingredients provided. Please treat this as a guide rather than a strict nutritional label:
| Nutrient | Estimated Amount (Per Cookie) |
|---|---|
| Calories | 200 |
| Fat | 9 g |
| Carbohydrates | 28 g |
| Protein | 5 g |
See? Not too bad for something this intensely chocolatey and fudgy! The protein content is surprisingly decent thanks to the eggs and cocoa powder, which is always a nice bonus when enjoying your Fudgy Chocolate Crinkle Cookies Gluten Free.
Share Your Perfect Batch of Fudgy Chocolate Crinkle Cookies Gluten Free
I’ve shared all my secrets, and now it’s your turn! I really, truly want to see your gorgeous, crackly results. Did you get that perfect fudgy center? Please leave a comment below telling me how they turned out and give this recipe a rating so others can find these amazing Fudgy Chocolate Crinkle Cookies Gluten Free. Tag me on social media when you share photos—I love seeing your baking success!
Print
Shocking 12 Fudgy Chocolate Crinkle Cookies Gluten Free
- Total Time: 2 hours 20 minutes
- Yield: 12 cookies
- Diet: Gluten Free
Description
These chocolate crinkle cookies are fudgy, chewy, and crackly on top. This is an easy gluten free cookie made with rich cocoa flavor.
Ingredients
- 1 4 cup unsalted butter softened
- 1 2 cup granulated sugar
- 1 2 cup packed brown sugar
- 2 large eggs at room temperature
- 2 teaspoons vanilla
- 1 2 cup plus 1 tablespoon cocoa powder
- 1 cup plus 1 tablespoon gluten free all purpose baking flour with xanthan gum
- 1 2 teaspoon baking powder
- 1 2 teaspoon baking soda
- 1 4 teaspoon salt
- 1 2 teaspoon instant espresso powder
- 1 2 cup chocolate chips
- 1 cup powdered sugar (for rolling)
- 1 4 cup granulated sugar (for rolling)
Instructions
- Add butter, granulated sugar, and brown sugar to a large bowl. Beat until creamy, about 30 seconds.
- Beat in eggs and vanilla until fully incorporated.
- Add cocoa powder, gluten free flour, baking powder, baking soda, salt, and espresso powder. Mix until just combined.
- Fold in chocolate chips evenly.
- Cover the dough and refrigerate for at least 2 hours until firm.
- Preheat oven to 350°F. Line a baking sheet with parchment paper.
- Combine powdered sugar and granulated sugar in a small bowl.
- Scoop about 1 1 2 tablespoons of dough and roll into balls using slightly damp hands.
- Roll each ball in the sugar mixture and place on the baking sheet spaced apart.
- Bake for 10 to 12 minutes until puffed with crackled tops and soft centers.
- Cool cookies on the baking sheet for 15 minutes. Transfer to a rack to cool completely.
Notes
- Cookies will continue to set as they cool. Avoid overbaking for a fudgy texture.
- Prep Time: 10 minutes
- Cook Time: 10 minutes
- Category: Dessert
- Method: Baking
- Cuisine: American