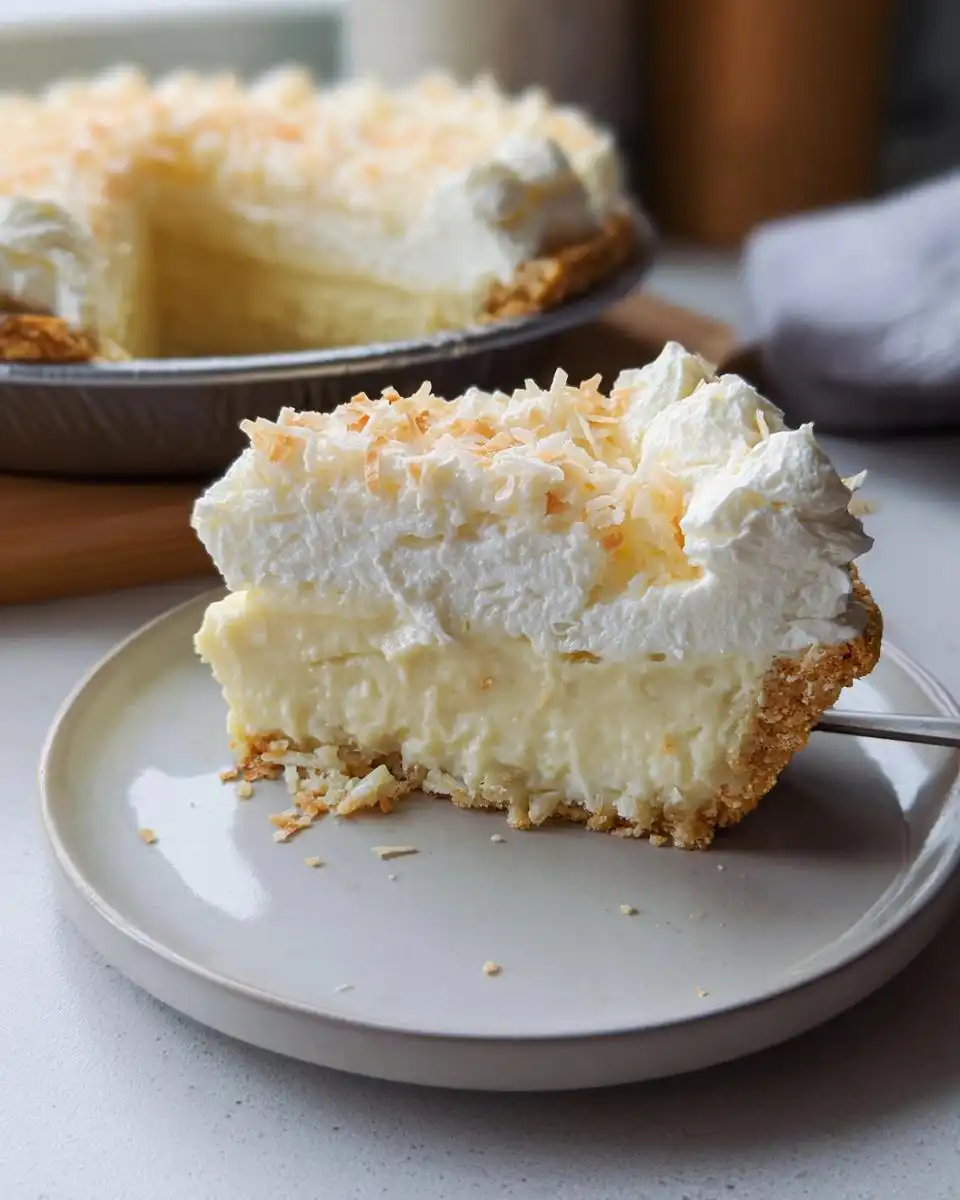
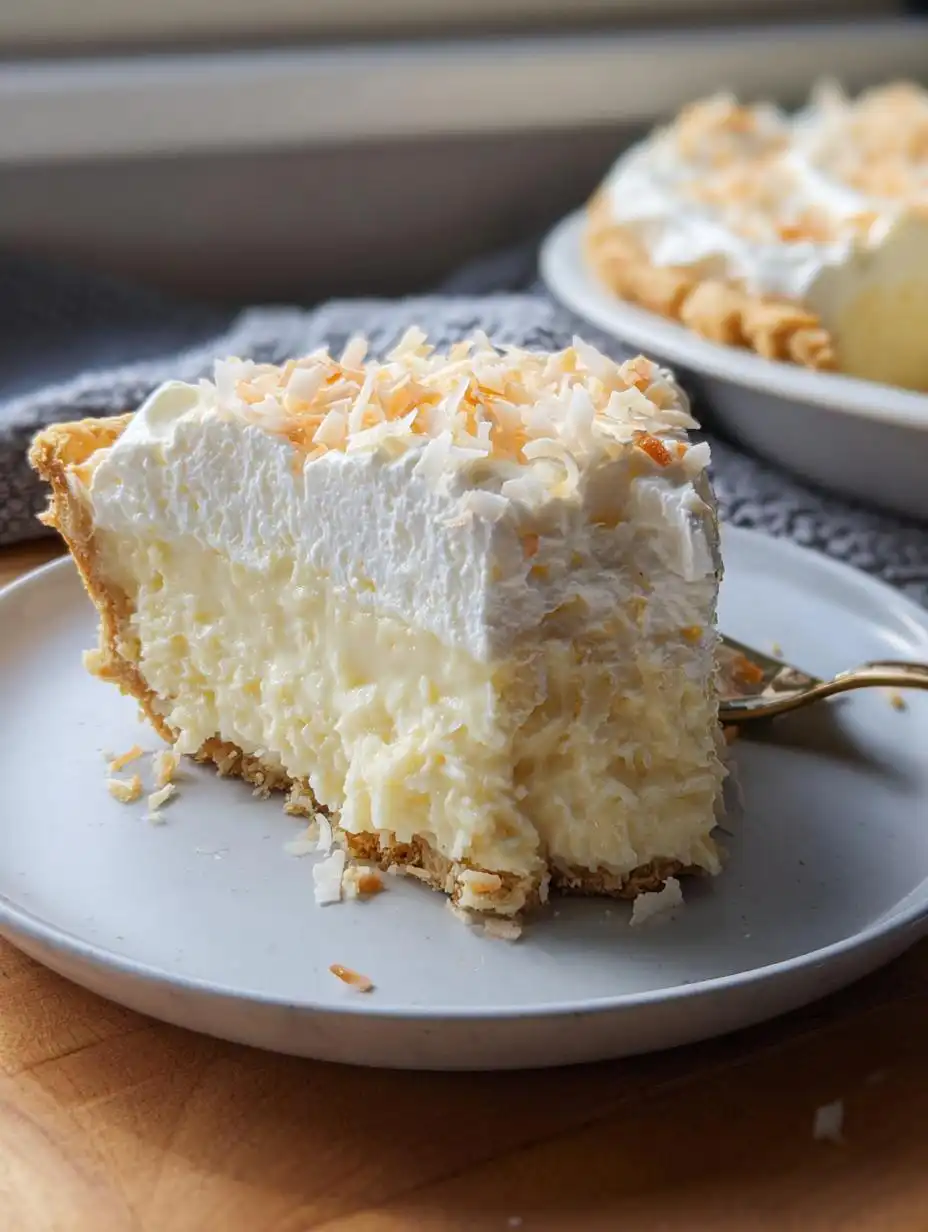
When I crave that perfect slice of nostalgic comfort food, nothing beats a classic diner dessert, and let me tell you, this Gluten Free Coconut Cream Pie with Creamy Filling hits every single spot! People think gluten-free means compromising on that rich, decadent texture, but this recipe proves them completely wrong. We skip the tricky pastry work entirely and use a crust made purely from toasted coconut—it’s naturally gluten free and absolutely addictive.
I spent ages perfecting the custard base, trying to get that velvety smooth texture without any graininess. Trust me, getting the balance right between the egg yolks and the gluten free flour is key for that amazing, thick, creamy filling. Once you master this, you’ll never look at another pie recipe again!
Essential Components for Your Gluten Free Coconut Cream Pie with Creamy Filling
You can’t fake flavor here, so grab every single item on this list! For the best results in this Gluten Free Coconut Cream Pie with Creamy Filling, we need precision, especially with the custard. Don’t try to swap out the specifically labeled gluten free flour—it really matters for the texture!
Ingredients for the Gluten Free Coconut Crust
This crust is the foundation, and since we aren’t using any traditional flour, we need the coconut mixture to hold together perfectly. Make sure your butter is melted and ready to go!
| Ingredient Type | Item | Quantity | Preparation Notes |
|---|---|---|---|
| Crust | Sweetened Shredded Coconut | 2 1/2 cups | |
| Crust | Unsalted Butter | 3 tablespoons | Melted |
| Crust | Large Egg Whites | 2 |
Components for the Creamy Coconut Filling
This is where the magic happens! We need those egg yolks for richness, but they must be separated from the whites—the whites go into the crust, remember? And please, double-check that bag: we need the gluten free all-purpose flour with xanthan gum mixed in for structure.
| Ingredient Type | Item | Quantity | Preparation Notes |
|---|---|---|---|
| Filling | Granulated Sugar | 2/3 cup | |
| Filling | Gluten Free All-Purpose Flour | 1/3 cup | With xanthan gum |
| Filling | Milk | 2 cups | |
| Filling | Large Egg Yolks | 2 | |
| Filling | Sweetened Shredded Coconut | 1 cup | |
| Filling | Vanilla Extract | 1 tablespoon | |
| Filling | Unsalted Butter | 1 teaspoon |
Whipped Topping Ingredients
Keep these ingredients nice and cold until the last minute. We want maximum volume for that gorgeous cloud on top!
| Ingredient Type | Item | Quantity | Preparation Notes |
|---|---|---|---|
| Topping | Heavy Whipping Cream | 1 1/2 cups | |
| Topping | Powdered Sugar | 1/2 cup | |
| Topping | Vanilla Extract | 1 teaspoon |
Step-by-Step Assembly of the Gluten Free Coconut Cream Pie with Creamy Filling
Okay, this is the fun part where everything comes together! We move fast, but we don’t rush the cooling, that’s the secret to a perfect slice. Follow these steps for your Gluten Free Coconut Cream Pie with Creamy Filling, and you’ll have a winner.
Preparing and Baking the Coconut Crust
First things first, crank that oven up to 350°F. Grab your 9-inch pie dish and give it a light grease—just a little insurance policy. In a bowl, you’re mixing the 2 1/2 cups of shredded coconut with the melted butter and those two egg whites. Mix it until it looks like damp sand, you know? Then, press it! Press that mixture firmly into the bottom and all the way up the sides of the dish. It needs to be compact! Bake this beauty for about 22 to 25 minutes. You’re looking for a gorgeous, even golden brown. Once it’s out, you have to let it cool completely. Seriously, completely cool, or the hot filling will turn your crisp crust soggy!
Creating the Rich Creamy Filling
While that crust is cooling down—or after—we tackle the custard. In your saucepan, start by whisking the sugar and that special gluten free flour together. This is important! Whisking the dry ingredients first prevents lumps later. Now, slowly whisk in the milk and those two egg yolks until the mixture is totally smooth. Place it over medium heat. You must stir constantly here; don’t walk away! Keep stirring until it thickens up and starts bubbling, then let it bubble for one full minute. That minute cooks out the starchiness. Take it off the heat right away! Stir in the remaining cup of coconut, the vanilla, and that tiny bit of butter until everything melts together. Pour that hot custard right into your cooled crust.
Finishing Your Gluten Free Coconut Cream Pie with Creamy Filling
This is the hardest part: waiting! Cover the pie gently, but here’s my big trick from years of making these: press a piece of plastic wrap directly onto the surface of the hot custard. This stops that annoying skin from forming on top. Pop the whole Gluten Free Coconut Cream Pie with Creamy Filling into the fridge for a minimum of three hours, or until it’s totally set. It needs to be firm before we pile on the clouds!
Whipping the Final Topping
When you’re ready to serve, grab your cold heavy cream, powdered sugar, and vanilla. Beat it hard! You want stiff peaks that hold their shape when you lift the whisk. Don’t overwhip it, or you’ll end up with butter—oops! Spread that fluffy topping over the chilled, set pie. You can pipe it if you’re feeling fancy, but I usually just swirl it with the back of a spoon.
Expert Tips for a Flawless Gluten Free Coconut Cream Pie with Creamy Filling
Listen, even with the best recipe, things can sometimes go sideways, right? Don’t worry, I’ve been there! Getting this pie perfect is all about managing those few tricky spots, like the custard cooking and keeping that crust crisp. A truly flawless Gluten Free Coconut Cream Pie with Creamy Filling is totally achievable if you pay attention to these small details.
Ingredient Selection and Temperature Matters
When you’re making the custard, using milk that’s closer to room temperature helps prevent the whole mixture from seizing up when you add the yolks. If the milk is ice cold, the hot starch mixture can shock the yolks and cause them to curdle. Also, use high-quality sweetened coconut flakes; the cheaper stuff can sometimes taste a little dusty, and we want pure coconut flavor here!
Achieving Perfect Crust Texture
The number one killer of a great coconut crust is adding the filling too soon. When you press the crust into the pan, really pack it down, especially up the sides. Think of it like packing brown sugar for a sandcastle! Then, when it comes out of the oven, you must let it cool until it’s room temperature—or even slightly cool to the touch—before you even think about pouring in that hot custard. That complete cooling time sets the butter and egg white structure, guaranteeing you won’t end up with a soggy bottom slice.
Serving Suggestions for Your Creamy Dessert
This rich Gluten Free Coconut Cream Pie with Creamy Filling really stands on its own, but if you want to dress it up just a little, keep the sides simple. Since the pie is already so sweet and creamy, I usually skip heavy sauces. A tiny sprinkle of toasted coconut flakes right before serving gives a nice textural contrast that I love.
For a little zest, a thin shaving of lime zest over the whipped cream is fantastic—it really brightens up all that coconut flavor. If you’re serving it after a big meal, just a small sliver is perfect. It’s a showstopper dessert, so don’t overcomplicate the presentation!
Storing Leftovers of Your Gluten Free Coconut Cream Pie with Creamy Filling
Pie leftovers! The best kind of leftovers, right? Since this pie has that beautiful, delicate custard filling and a beautiful cloud of whipped cream on top, storage is key to keeping everything tasting fresh. You definitely want to keep this Gluten Free Coconut Cream Pie with Creamy Filling chilled the entire time. If you leave it out on the counter, that creamy filling is going to get sad fast, and the whipped topping will weep.
When you’re saving slices or the whole pie, you need to cover it, but be smart about it. If you press plastic wrap directly onto the whipped cream, you’ll ruin the pretty swirls! I usually use a cake dome if I have one, or I tent a large piece of foil loosely over the top so it doesn’t touch the cream. The crust stays surprisingly crisp if it stays cold.
| Storage Item | Method | Duration | Reheating Guidance |
|---|---|---|---|
| Whole Pie/Slices | Cover lightly with plastic wrap or dome | Up to 3 days refrigerated | Do not reheat; serve chilled. |
And listen, never, ever try to reheat this pie. That whipped cream will melt into a puddle, and the custard definitely isn’t meant for the microwave. This pie is designed to be served cold, straight from the fridge. That chill really lets the coconut flavor shine through in the filling!
Addressing Common Questions About This Gluten Free Coconut Cream Pie
It’s normal to have a few questions when you’re dealing with a custard-based, naturally gluten-free dessert. I get asked about substitutions all the time, especially when folks are trying to make this Gluten Free Coconut Cream Pie with Creamy Filling fit their pantry. Don’t stress; we can troubleshoot! You can see more of my recipe tips on Pinterest.
Can I make the crust ahead of time?
Yes, you absolutely can! The coconut crust is pretty sturdy once baked and cooled. I often bake the crust the day before I plan to assemble the whole pie. Just let it cool completely after baking, and store it at room temperature under a loosely tented piece of foil. Don’t put it in the fridge yet! You don’t want condensation messing up that crisp texture before you pour in your filling.
What if my filling does not thicken?
Oh, that’s the worst! If your custard seems soupy even after cooking for that extra minute, it usually means one of two things: either the heat wasn’t quite high enough, or you didn’t cook it long enough after it started bubbling. If it’s still warm, try putting it back on medium-low heat and whisking like crazy for another minute or two. If it won’t thicken up at all, sometimes adding just half a teaspoon more of that gluten free flour mixed with a tiny splash of cold milk can save it. Whisk that slurry in quickly and bring it back up to a gentle simmer.
Can I use regular dairy milk instead of whole milk?
You can, but I really, really prefer whole milk for this recipe. The higher fat content in whole milk is what gives the custard its luxurious, rich mouthfeel. If you use 2% or skim milk, the resulting creamy filling might be a little looser, and it won’t have that deep, satisfying richness we are aiming for. It will still work, but it won’t be quite as decadent!
Share Your Experience Making This Pie
Now that you’ve seen all my little secrets for the perfect slice, I really want to hear from you! Did this Gluten Free Coconut Cream Pie with Creamy Filling live up to the hype? Did the coconut crust turn out perfectly golden brown for you? You can read more about my recipe philosophy on Medium.
Please take a moment to rate the recipe below and tell me about your experience in the comments. Did you add a little extra vanilla, or maybe try toasting your coconut a bit darker? I love seeing how you make this classic dessert your own!
Print
Gluten Free Coconut Cream Pie: 1 Rich Slice
- Total Time: 3 hours 50 minutes
- Yield: 8 slices
- Diet: Gluten Free
Description
This gluten free coconut cream pie features a rich, creamy filling and a naturally gluten free coconut crust, topped with fluffy whipped cream. It is a classic dessert.
Ingredients
- Coconut crust: 2 1/2 cups sweetened shredded coconut
- Coconut crust: 3 tablespoons unsalted butter melted
- Coconut crust: 2 large egg whites
- Coconut filling: 2/3 cup granulated sugar
- Coconut filling: 1/3 cup gluten free all-purpose flour with xanthan gum
- Coconut filling: 2 cups milk
- Coconut filling: 2 large egg yolks
- Coconut filling: 1 cup sweetened shredded coconut
- Coconut filling: 1 tablespoon vanilla extract
- Coconut filling: 1 teaspoon unsalted butter
- Whipped topping: 1 1/2 cups heavy whipping cream
- Whipped topping: 1/2 cup powdered sugar
- Whipped topping: 1 teaspoon vanilla extract
Instructions
- Preheat the oven to 350°F. Lightly grease a 9-inch pie dish.
- Mix the shredded coconut, melted butter, and egg whites in a medium bowl until combined.
- Press the mixture firmly into the bottom and up the sides of the pie dish.
- Bake for 22 to 25 minutes until golden brown. Cool the crust completely.
- Whisk together the sugar and gluten free flour in a medium saucepan.
- Gradually whisk in the milk and egg yolks until smooth.
- Cook over medium heat, stirring constantly, until thickened and bubbling. Continue cooking for 1 minute.
- Remove the pan from the heat. Stir in the shredded coconut, vanilla extract, and butter.
- Pour the hot custard into the cooled crust and smooth the top.
- Cover the pie and refrigerate for at least 3 hours until fully set.
- Beat the heavy cream, powdered sugar, and vanilla until stiff peaks form.
- Spread or pipe the whipped cream over the chilled pie before serving.
Notes
- Press plastic wrap directly onto the custard while chilling to prevent a skin from forming.
- Prep Time: 25 minutes
- Cook Time: 25 minutes
- Category: Dessert
- Method: Baking
- Cuisine: American