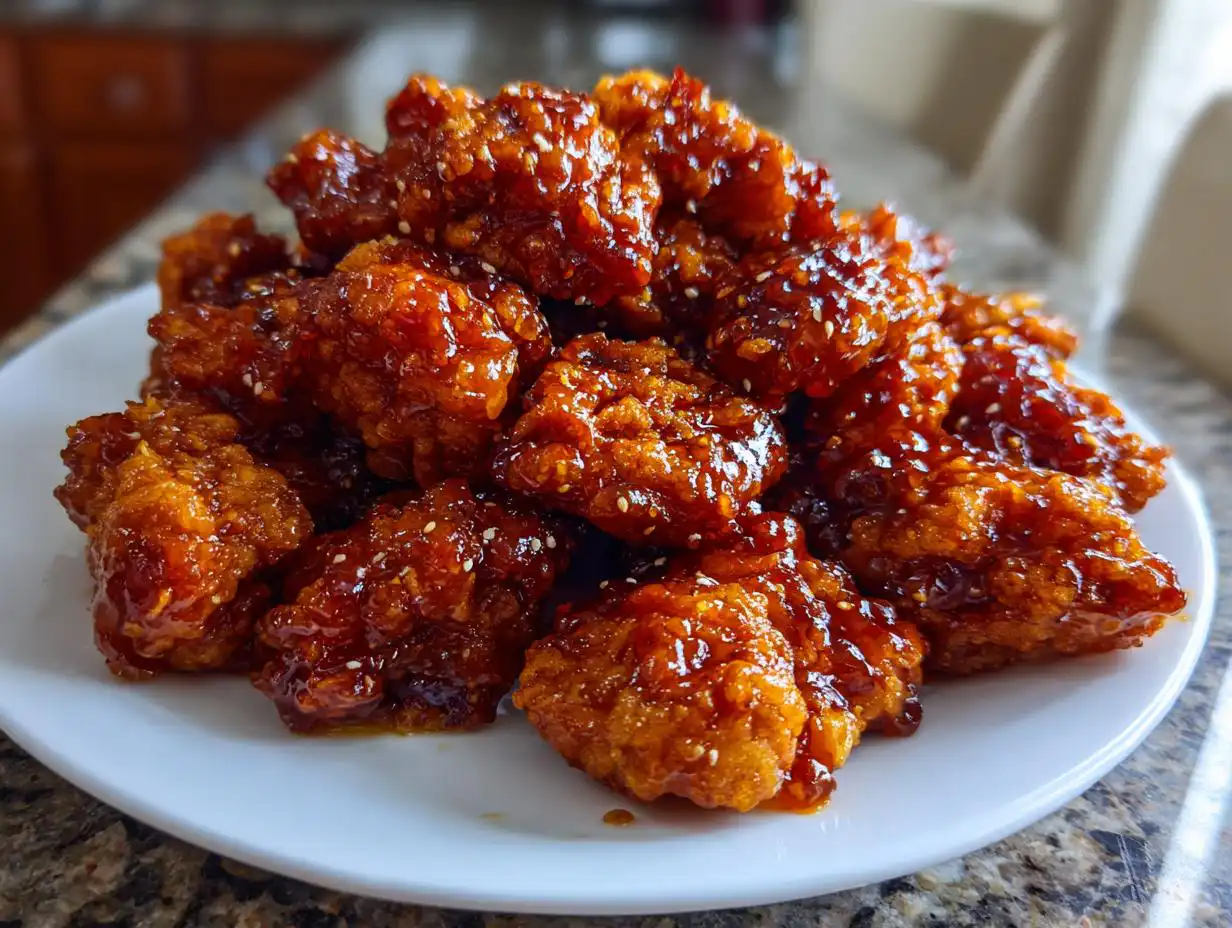
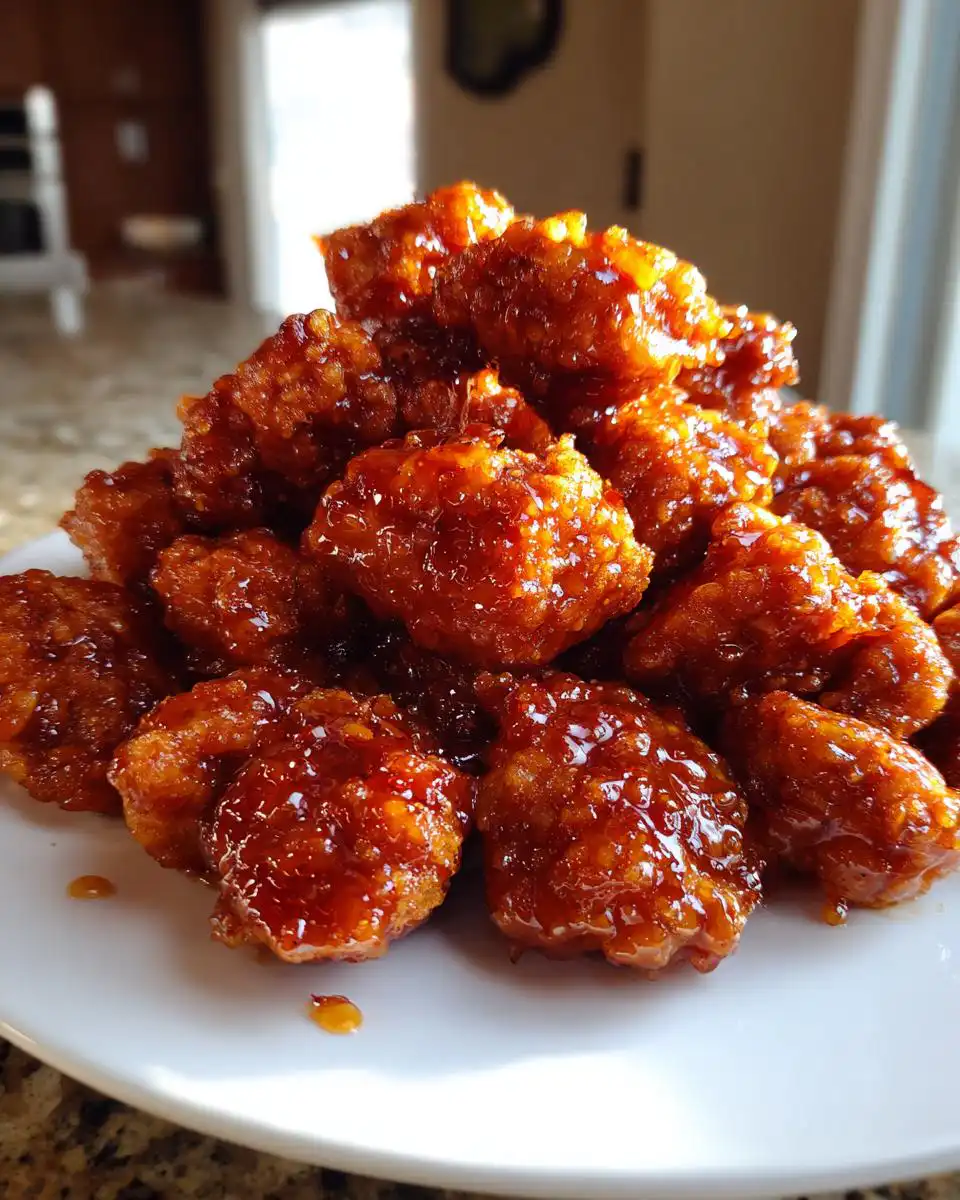
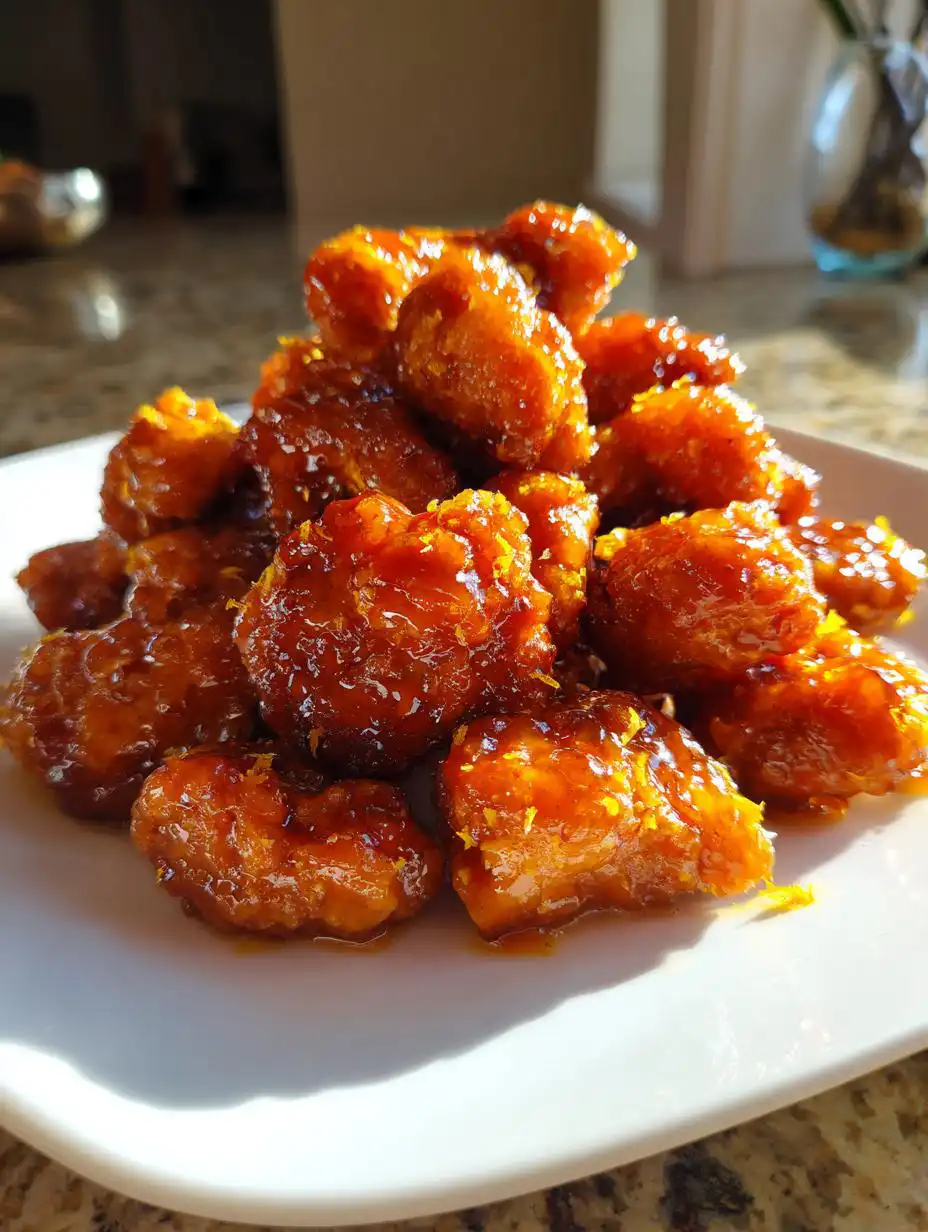
You know that feeling when you crave takeout but you want it better, fresher, and totally homemade? That’s exactly why I perfected this recipe. Forget those soggy versions you sometimes get! The absolute magic in making the best Crispy Gluten Free Orange Chicken at Home is nailing the coating so it stays shatteringly crisp, even after it swims in that glorious, sticky sauce. After about a dozen attempts—seriously, I’m obsessed—I finally figured out the exact flour-to-starch ratio that locks in the crunch. Trust me, this is the closest you’ll get to restaurant quality without leaving your kitchen!
Gathering Your Ingredients for Crispy Gluten Free Orange Chicken at Home
Getting ready to make this Crispy Gluten Free Orange Chicken at Home is half the fun! Because we are skipping the wheat flour, precision here is super important to get that authentic takeout texture. Layout everything before you start heating the oil; timing is everything when frying chicken, and you don’t want to be scrambling for the rice vinegar mid-sauce-making. I always lay out my ingredients in little bowls—it just makes the process flow so much smoother.
We need a few key players for the coating to really adhere and crisp up beautifully, and then we need the flavor bombs for that signature citrus punch. Don’t substitute the fresh orange juice; the bottled stuff just doesn’t have the same bright zing we are aiming for here.
Chicken and Coating Components
For the chicken, we’re using 1 1/2 pounds of boneless, skinless breasts cut into nice, manageable 1-inch pieces. You want them bite-sized! The secret to the crunch is the 1/2 cup of gluten free all-purpose flour combined with the 1/2 cup of cornstarch. That starch is what gives it that delicate, crispy shell. We mix that with two teaspoons of ground ginger before we even start dipping. Make sure your two large eggs are well beaten so the chicken gets a nice, even coat before it hits that flour mix.
Crafting the Signature Orange Sauce
This is where the sweet and tangy magic happens! You need 1/2 cup of fresh orange juice, balanced perfectly with 1/4 cup of rice vinegar for that necessary tang. I use 3 tablespoons of gluten free soy sauce—please make sure it’s GF, or you’ll ruin the whole point! We sweeten it up with 1/3 cup of granulated sugar and 1/3 cup of brown sugar. Don’t skip the brown sugar; it adds a depth the white sugar alone can’t touch. Finally, garlic powder and another half teaspoon of ground ginger give it that background warmth.
Equipment Needed for Perfect Crispy Gluten Free Orange Chicken at Home
You don’t need a deep fryer for this amazing Crispy Gluten Free Orange Chicken at Home, thank goodness! We are keeping this simple and using what you probably already have. Having the right tools just makes the frying part way less stressful. It’s all about control, especially with hot oil!
Essential Tools for Frying and Saucing
- A large, heavy-bottomed skillet for frying the chicken evenly.
- A reliable instant-read thermometer—seriously, this is crucial for hitting that 350°F oil temp!
- Two mixing bowls: one for the egg wash and one for the dry coating mixture.
- A whisk for making the cornstarch slurry smooth.
- Tongs for safely turning the chicken pieces in the hot oil.
Step-by-Step Instructions for Crispy Gluten Free Orange Chicken at Home
Okay, deep breath! This is where the magic happens. Making the Crispy Gluten Free Orange Chicken at Home might sound intimidating because of the frying, but if you follow these steps, you’ll be amazed at how fast this comes together—we’re talking 30 minutes total! The key is workflow: prep everything first, then fry, then sauce immediately.
Preparing the Chicken Coating
First thing’s first: Get your dredging station ready. In one big bowl, you need to whisk together your dry ingredients really well. That’s the gluten free flour, the cornstarch—remember, that starch is your crispiness insurance—and the first dose of ground ginger. In a second bowl, just have your two large eggs beaten up. Now, take your 1-inch chicken pieces, dip them fully into the egg wash until they’re dripping a little, and then immediately move them into the dry mix. Make sure they are totally coated, pressing the flour mixture onto the chicken so it really sticks. Shake off any excess flour before they hit the oil!
Achieving the Crispy Fry
Time for the hot oil! Pour your two cups of neutral frying oil into that skillet and get it heating over medium-high. You absolutely must use a thermometer here; we are aiming for a steady 350°F. If it’s too cold, the chicken gets greasy, and if it’s too hot, the coating burns before the inside cooks. Once you hit that temperature, drop the chicken in—but here’s the note from the recipe card: work in small batches! Don’t overcrowd the pan, or the temperature will drop instantly. Fry each batch for about 3 to 4 minutes until they look gorgeous and golden brown. Pull them out when the internal temp hits 165°F and set them on paper towels to drain. Don’t clean the pan yet; we need that flavor base for the sauce!
Developing the Sticky Orange Sauce
Carefully drain off most of that frying oil, but leave just a tiny bit behind for flavor. Turn the heat down to medium. Now, toss in your sugars—the granulated and the brown—along with the garlic powder and the second measuring of ground ginger. Stir that around for just a minute until it smells incredible. Then, slowly pour in the orange juice, rice vinegar, and gluten free soy sauce. Keep stirring until those sugars dissolve completely. Now for the thickening! In a separate tiny bowl, whisk the two tablespoons of cornstarch with two tablespoons of water until it’s a smooth slurry—no lumps allowed! Pour that slurry into the simmering sauce and stir constantly. It thickens up fast, usually in about 2 to 3 minutes, turning beautiful and glossy. Take it off the heat for just a second.
Tossing and Finishing the Crispy Gluten Free Orange Chicken at Home
This is the finale! Put the heat back on low. Gently return all those beautiful, crispy pieces of chicken back into the skillet with the sauce. Use tongs to toss everything together quickly and carefully. You want every piece coated in that sticky orange glaze without letting it sit and steam for too long—that’s how you lose the crunch! Once everything is shiny and coated, take it off the heat immediately and serve it up hot. Enjoy your incredible Crispy Gluten Free Orange Chicken at Home!
Tips for Success with Your Gluten Free Orange Chicken Recipe
Even with the best recipe, sometimes things go a little sideways, right? Especially when we’re dealing with frying gluten free coatings, texture is everything. I’ve learned a few tricks over the years to ensure every batch of this Crispy Gluten Free Orange Chicken at Home turns out perfectly crunchy and flavorful. Listen to these, and you’ll never have a soggy piece again!
Maintaining Oil Temperature for Crispness
I cannot stress this enough: the oil temperature dictates the crunch factor. If you drop the chicken into oil that’s below 340°F, that coating acts like a sponge and soaks up grease instead of crisping. It gets heavy and chewy, which is the opposite of what we want! If you don’t have a thermometer, you can test it by dropping a tiny pinch of the coating mix in; if it sizzles vigorously right away, you’re good to go. Also, remember to fry in small batches—if you pile it in, the oil temperature crashes, and suddenly you’re making boiled chicken instead of crispy chicken!
Sauce Consistency Control
The sauce is supposed to be sticky, not runny, and definitely not cement! The tricky part is the cornstarch slurry. Always whisk the cornstarch and water in a separate bowl until it looks like milk—no dry powder hiding at the bottom. When you add it to the sauce, you need to stir constantly. If it gets too thick too fast, just take it off the heat for 30 seconds and stir vigorously. If it’s still too thin after it simmers for the full two minutes, you can quickly whisk up another tiny slurry (about half a teaspoon of cornstarch mixed with a teaspoon of water) and whisk that in. It will thicken right up!
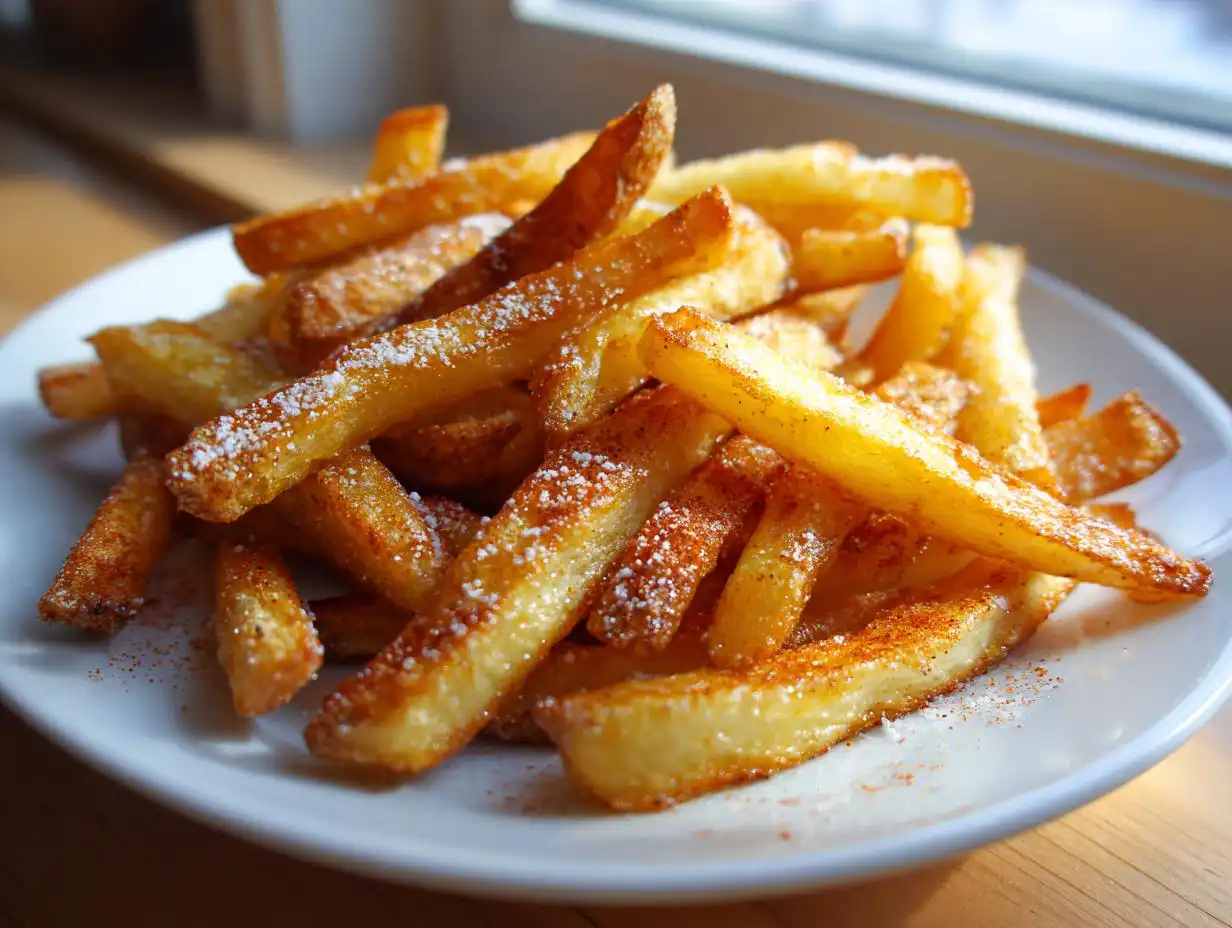
Serving Suggestions for Your Main Dish
This Crispy Gluten Free Orange Chicken at Home is so bold and flavorful, it really shines when paired with something simple and fresh. Since the sauce is rich and sticky, we need sides that can absorb that delicious glaze or offer a cool, fresh contrast. It’s a main event dish, so the sides should play a supporting role!
Ideal Vegetable Pairings
- Steamed white or brown rice—the absolute best vehicle for soaking up every last drop of that orange sauce.
- Lightly steamed broccoli florets or snap peas tossed with just a tiny bit of sesame oil. They give you that necessary green crunch.
- A simple side of shredded cabbage or carrots tossed with a light rice vinegar dressing to cut through the richness of the chicken.
Storing and Reheating Leftover Gluten Free Orange Chicken
Oh, leftovers! They are great, but let’s be honest, fried food never quite tastes the same the next day. When you reheat this Gluten Free Orange Chicken, the coating will soften a bit because it’s been sitting in that sticky sauce. Don’t worry, we can revive it! The key is using dry heat to bring back some of the texture rather than steaming it in the microwave.
Storage Guidelines and Reheating Methods
| Storage Method | Reheating Suggestion |
|---|---|
| Store in an airtight container in the fridge for up to 3 days. | Spread chicken on a baking sheet and bake at 375°F for about 8-10 minutes until heated through and slightly crisped again. |
Frequently Asked Questions About Crispy Gluten Free Orange Chicken at Home
I get so many questions once people see how good this Crispy Gluten Free Orange Chicken at Home turns out! It’s a popular recipe, and I totally get why you want to tweak it or make part of it ahead of time. Here are the questions I hear most often from fellow home cooks! If you want to see more recipe ideas, check out my Pinterest board!
Can I Bake or Air Fry This Gluten Free Orange Chicken Instead?
You absolutely can try to bake or air fry it! If you do, I highly recommend spraying the coated chicken pieces generously with cooking spray before you cook them. Baking at 400°F for about 15-20 minutes, flipping halfway, works okay, but you won’t get that deep, authentic, shatteringly crisp texture we achieved by pan-frying in oil. Air frying is better; try 380°F for about 10 minutes. Just remember, it won’t be quite as sticky since the sauce is added after the crisping step!
What is the Best Gluten Free Flour Blend to Use?
For this recipe, the 1/2 cup of gluten free all-purpose flour needs to be a blend that already contains xanthan gum, if possible. If your blend doesn’t have it, add about half a teaspoon to your dry mix. I personally love the blends that are mostly rice or potato-based for this kind of coating. Honestly, the cornstarch is doing most of the heavy lifting for the crunch, so almost any standard GF blend works fine! For more recipe inspiration, you can also find me on Medium.
How Far in Advance Can I Make the Orange Sauce?
The sauce is fantastic for making ahead! You can definitely whip up the entire sticky orange sauce mixture (steps 6 through 8) up to three days in advance. Just store it in an airtight container in the fridge. When you’re ready to eat, gently reheat the sauce in the skillet until it’s simmering and smooth again. Then, just fry your chicken fresh and toss it right in. It saves so much time when you want a quick weeknight meal!
Understanding Estimated Nutritional Data
Just a quick note, folks! Since we are dealing with frying oil and specific brands of gluten free flour can change things slightly, these numbers are just great estimates for one serving. They are based on the ingredients listed for the Crispy Gluten Free Orange Chicken at Home, but your exact results might vary a little bit depending on how much sauce sticks!
| Nutrient | Amount Per Serving |
|---|---|
| Calories | 360 |
| Fat | 11 g |
| Carbohydrates | 45 g |
| Protein | 23 g |

Best 1-Hit Crispy Gluten Free Orange Chicken
- Total Time: 30 minutes
- Yield: 4 servings
- Diet: Gluten Free
Description
This gluten free orange chicken is crispy, sticky, and full of bold citrus flavor. It features pan-fried chicken coated in a sweet-tangy orange sauce for a takeout-style meal at home.
Ingredients
- 1 1/2 pounds boneless skinless chicken breasts cut into 1-inch pieces
- 1/2 cup gluten free all-purpose flour
- 1/2 cup cornstarch
- 2 teaspoons ground ginger
- 2 large eggs beaten
- 2 cups neutral frying oil
- 1/2 cup fresh orange juice
- 1/4 cup rice vinegar
- 3 tablespoons gluten free soy sauce
- 1/3 cup granulated sugar
- 1/3 cup brown sugar
- 1 teaspoon garlic powder
- 1/2 teaspoon ground ginger
- 2 tablespoons cornstarch
- 2 tablespoons water
Instructions
- Whisk together the gluten free flour, cornstarch, and ground ginger in a large bowl.
- Dip the chicken pieces into the beaten eggs, then coat them evenly in the flour mixture.
- Heat the oil in a large skillet over medium-high heat until it reaches 350°F.
- Fry the chicken in batches for 3 to 4 minutes per batch until lightly golden and cooked through to an internal temperature of 165°F.
- Transfer the chicken to a paper towel-lined plate and carefully discard excess oil from the skillet.
- In the same skillet over medium heat, add the granulated sugar, brown sugar, garlic powder, and ground ginger.
- Stir in the orange juice, rice vinegar, and gluten free soy sauce and cook until the sugar dissolves.
- Whisk the cornstarch and water together, then stir this mixture into the sauce. Cook for 2 to 3 minutes until thick and glossy.
- Return the chicken to the skillet and toss until evenly coated in the sauce.
- Serve immediately while hot.
Notes
- Fry the chicken in small batches to keep the coating crisp and evenly cooked.
- Prep Time: 15 minutes
- Cook Time: 15 minutes
- Category: Main Dish
- Method: Pan-Frying
- Cuisine: American Chinese