

I am so excited you’re here because we are diving headfirst into making my absolute favorite thing: Vegan Sushi! Forget those tiny, expensive rolls you get at restaurants. Making sushi at home is actually so much easier than you think, and honestly, the freshness just can’t be beat. This recipe is all about packing in the crunchiest vegetables and getting that perfect, slightly sticky rice base.
Seriously, if you’ve been intimidated by rolling sushi, please don’t be. We’re going to break down every single step. You’ll see that the whole process, from prepping the veggies to rolling up that final piece, comes together surprisingly fast. We’re aiming for vibrant colors and textures that make every bite interesting.
The best part about this Vegan Sushi recipe is that it relies on simple, clean ingredients. No weird processed stuff needed! We’re talking crisp cucumber, creamy avocado, and the star of the show—my homemade tangy pickled ginger. Trust me, once you make the ginger from scratch, you’ll never go back to the store-bought stuff again. It really elevates the whole experience!
Why This Recipe Makes the Best Vegan Sushi
What sets this recipe apart from other Vegetable Sushi is the commitment to texture and flavor balance. We aren’t just throwing raw veggies in. Every component is treated right to maximize its taste and hold up during the roll. It’s the combination of fresh, bright flavors that makes this roll sing.
- The vegetables stay incredibly crisp because we prep them right before rolling.
- That perfectly ripe avocado just melts in your mouth, balancing the vinegar in the rice.
- And honestly, the homemade pickled ginger? It’s non-negotiable. It cuts through the richness perfectly.
Quick Prep and Simple Assembly for Your Vegan Sushi
You might think making sushi means spending all day in the kitchen, but that’s just not true with this recipe. We’ve streamlined everything! You’ll spend about 30 minutes prepping everything—that’s just slicing up your goodies and mixing the rice seasoning.
The actual cooking time is incredibly short, maybe 15 minutes total for the rice. The rolling itself flies by once you get the hang of the first one. I promise, you can have beautiful, fresh Easy Sushi Rolls ready faster than delivery can get to your door!
Gather Your Ingredients for Amazing Vegan Sushi
Okay, now for the fun part: gathering your supplies! When you’re making Vegan Sushi at home, having everything prepped and ready to go is the secret to keeping the assembly stage stress-free. Don’t start rolling until all your vegetables are cut, your rice is seasoned, and your ginger is chilling in the fridge! If you want to see more of my favorite recipes, check out my Pinterest boards.
We’ve broken the ingredients down so you know exactly what goes where. Having everything measured out beforehand means you can focus entirely on getting that perfect roll shape, instead of scrambling for the salt shaker halfway through. This list covers everything you need for the rolls and the star side component.
Essential Components for Vegetable Sushi Rolls
You basically need three groups of things to make this work beautifully. First, we have the rice essentials—that’s the rice itself and the seasoning that makes it sticky and tart. Second, we have the beautiful, colorful fillings that make this Vegetable Sushi so satisfying.
And finally, you absolutely must have the pickling ingredients ready for that homemade ginger. It’s a small extra step, but trust me, it’s worth every second. I’ve listed the exact amounts you’ll need below for about four rolls.
Table of Ingredients for Vegan Sushi
Here are the precise measurements. Please pay close attention to how I specified the cuts—that makes a huge difference in how well your Easy Sushi Rolls hold together!
- For the Rice: 1\u00bd cups sushi rice, 2 cups water, 3 tablespoons rice vinegar, 1 tablespoon sugar, \u00bd teaspoon salt.
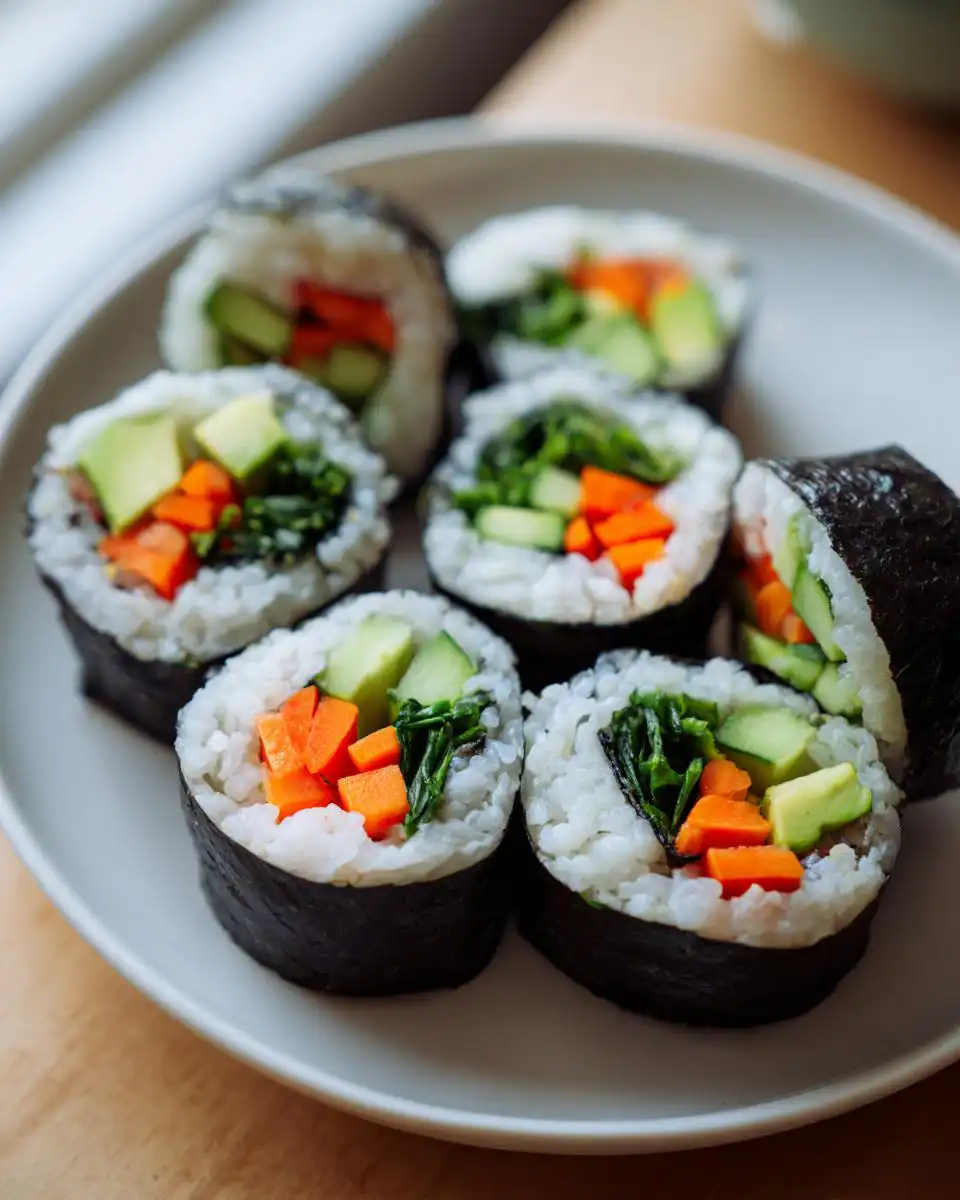
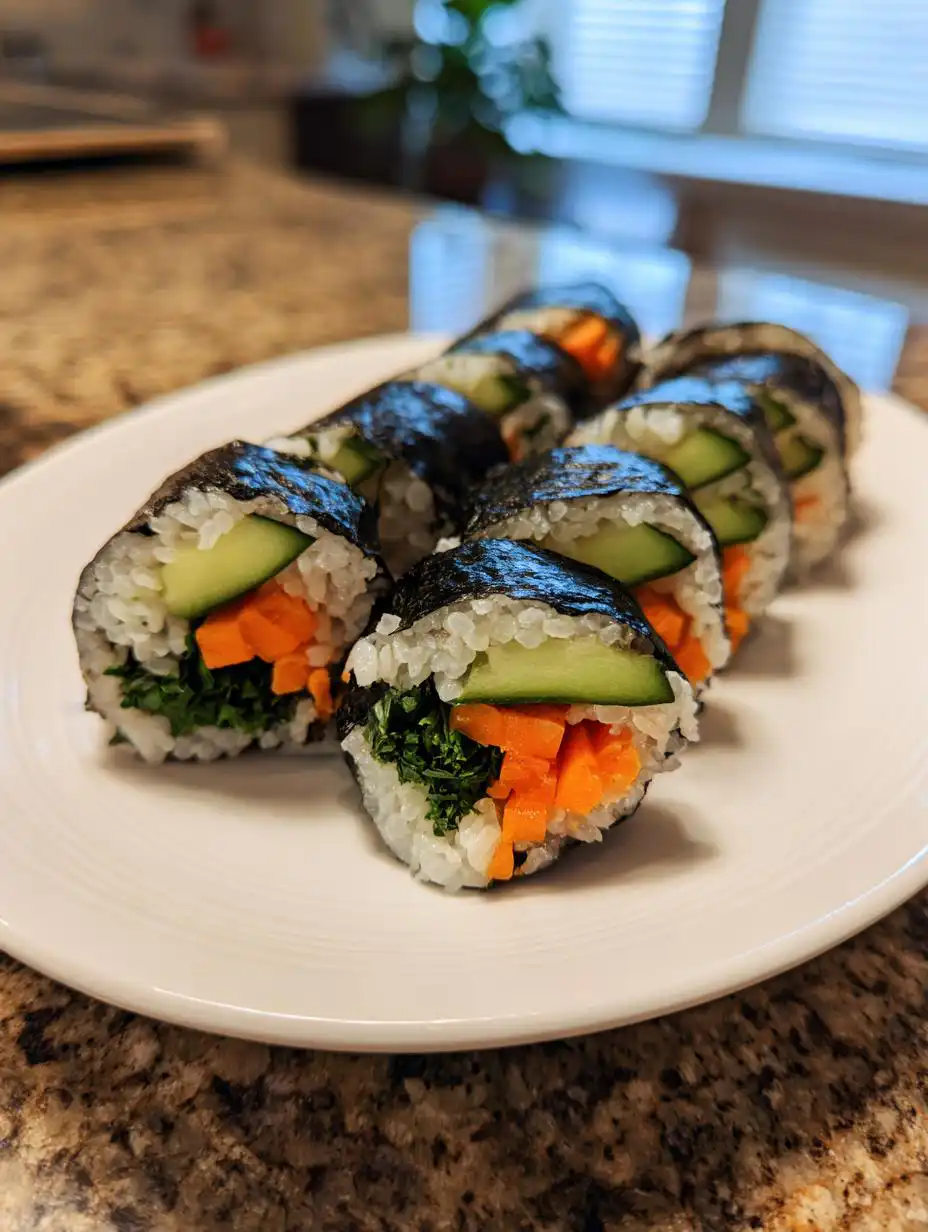
- For the Vegetable Fillings: 1 small cucumber, julienned; 1 small carrot, julienned; 1 avocado, sliced; \u00bd red bell pepper, thinly sliced; 1 small bunch spinach, blanched and squeezed dry; 4 nori sheets.
- For the Pickled Ginger: 1 cup thinly sliced young ginger (peeled), \u00bd teaspoon salt, \u00bd cup rice vinegar, \u00bc cup sugar, 2 tablespoons water.
Mastering Homemade Pickled Ginger for Your Vegan Sushi
I cannot stress this enough: the homemade pickled ginger is what takes your Vegan Sushi from good to absolutely incredible. Store-bought ginger is often too sweet or too soft, but making your own means you control the snap and the tang. It’s such a simple process, but it requires a little patience while it marinates.
We use young ginger here because it’s milder and easier to slice thinly. The goal is a bright pink color and a fantastic crunch. Don’t skip the initial salt and blanching steps! Those two things work together to soften the ginger just enough so it’s not overwhelmingly spicy, but it keeps that wonderful, satisfying bite.
This tangy component is essential for cutting through the richness of the avocado and the starchiness of the rice. Once you see how easy it is to create this bright pink addition, you’ll be making extra batches just to snack on! You can read more about my recipe philosophy on Medium.
Step-by-Step Pickling Process for Tangy Ginger
This is where we transform that tough root into something delicate and delicious. Make sure you have a clean, heat-safe glass jar ready for storage later. The steps are sequential, so follow them in order for the best results.
- First, we get rid of some of that harsh flavor. Sprinkle your thinly sliced ginger with salt and let it sit for about 10 minutes. You’ll see some moisture start to pull out—that’s good!
- Next, drop those salted slices into boiling water and blanch them for just one quick minute. Immediately drain them really well. This step is crucial for texture, so don’t skip it!
- While that’s happening, gently heat the rice vinegar, sugar, and a tiny bit of water until the sugar fully dissolves into that brine. You don’t need to boil it, just get it hot enough to dissolve everything.
- Pour that warm brine right over your blanched, drained ginger in the jar. Cap it up, let it cool on the counter, and then stash it in the fridge for at least an hour before you start rolling your Vegetable Sushi.
Preparing the Sushi Rice Base for Your Vegan Sushi
If there is one thing you absolutely cannot rush when making Vegan Sushi, it’s the rice. Seriously, mushy or hard rice will ruin the whole experience, no matter how perfect your vegetables are. The rice has to be sticky enough to hold together when you roll it, but still light and fluffy when you bite into it. This takes a little precision, but it’s totally manageable! If you are looking for other recipes to try, I have plenty!
We use classic short-grain sushi rice here. The key is rinsing it until the water runs perfectly clear. This washes away excess starch, which prevents your rolls from turning into a gummy mess later on. Once it’s rinsed, we move straight into cooking it gently.
Cooking the Sushi Rice Perfectly
This method is foolproof, provided you don’t peek! Add your rinsed rice and the measured water into a pot. Bring that straight up to a rolling boil over medium-high heat—you need that initial burst of steam.
As soon as it boils, slap the lid on tight, turn the heat down as low as it will go—we’re talking barely a simmer—and let it cook undisturbed for exactly 15 minutes. Don’t lift that lid! After 15 minutes, take the whole pot off the burner, but leave the lid on for another 10 minutes. This resting period lets the steam redistribute, making sure every single grain is perfectly cooked through.
Seasoning the Rice for Authentic Flavor
While that rice is resting, we make the magic seasoning! In a tiny saucepan, gently warm the rice vinegar, sugar, and salt until everything is totally dissolved. You just want it warm enough to mix, not hot enough to boil again. Set this aside to cool slightly.
Once the rice has rested, transfer it to a large, shallow bowl—wood is traditional, but glass or ceramic works fine. Now, drizzle that seasoning over the rice. Use a wooden spoon or a paddle and cut down through the rice, folding it gently. Don’t stir or mash it! We are folding to coat every grain without crushing the structure we just worked so hard to build. Keep folding until it cools down to room temperature. That’s when your rice is ready for rolling those beautiful Vegetable Sushi!
Assembling and Rolling Your Vegetable Sushi Rolls
This is the moment of truth! All that careful work on the rice and the ginger is about to pay off. Making great Vegan Sushi rolls is all about layering correctly so that when you apply pressure, everything stays perfectly centered. Don’t worry if your first one looks a little wonky; mine certainly did when I first started! Just keep practicing the rolling motion.
We need the bamboo mat ready to go. If you want to keep your mat super clean, you can wrap it tightly in plastic wrap first. This is a game-changer for cleanup, especially when dealing with sticky rice.
Laying Out the Nori and Rice Foundation
Take one sheet of nori and lay it on your bamboo mat. Remember this trick: the rough side of the nori should be facing up, and the shiny side should be facing down against the mat. That rough side is what grips the rice!
Now, wet your hands slightly—this stops the rice from sticking to you like glue. Scoop out a thin, even layer of your seasoned rice and spread it gently over the nori. You want an even coat, but don’t press it down hard! The general rule is to leave about an inch of the nori bare at the top edge, away from you. That bare strip is what we use to seal the roll closed later.
Layering the Fresh Vegetable Fillings
This is where we build the structure. You want to place your fillings in a tight horizontal line, starting about an inch up from the bottom edge of the rice, closer to you. We layer them to ensure every slice of the final Vegetable Sushi gets a bite of everything!
I like to put the sturdiest things down first, like the julienned cucumber and carrot, near the bottom edge. Then, I layer the spinach next, followed by the bell pepper slices. Finally, I lay the slices of creamy avocado right on top of everything else. Keep the fillings centralized and don’t overstuff it, or you won’t be able to close the roll!
The Technique for a Tight Vegan Sushi Roll
Time to roll! Grab the bottom edge of the bamboo mat with your thumbs, tucking the edge of the nori right over the vegetables. Use your fingers to hold the fillings in place as you make that first tight tuck. Once you’ve made that first roll, pull the mat back gently, keeping the pressure even.
Continue rolling forward, applying gentle, firm pressure with the mat after each turn. You want it snug, like a firm hug, not squished like a pancake. When you reach that bare inch of nori at the top, dip your finger in a little water and wet that edge lightly. Finish the roll, pressing gently one last time to seal it shut. If you sealed it right, it should stick perfectly!
Cutting and Serving Your Homemade Vegan Sushi
You’ve done the hard part—the rolling is complete! Now we need to make sure these beautiful Vegan Sushi creations look as amazing as they taste. Getting clean cuts is surprisingly tricky if you use the wrong tools. A dull knife will just squish all the gorgeous filling out the sides, and nobody wants that sad, flattened roll!
Presentation is half the fun, right? I usually arrange them standing up on a simple platter, maybe with a little pile of those homemade pickled ginger slices right in the center. A little dish of soy sauce and a dab of wasabi completes the setup. It looks professional, but you made it in your own kitchen! For more healthy dinner ideas, check out my dinner recipes.
Achieving Clean Slices on Your Vegan Sushi
This is the one place I insist you don’t cut corners! You absolutely must use a very sharp knife. If your knife isn’t sharp, it’s going to drag the nori and smoosh the rice. But even a sharp knife needs help with sticky rice.
Before you make your very first cut, dip the blade into a glass of water and let the water run down the length of the knife. Wipe off the excess so it’s damp, not dripping. Slice through the roll in one smooth, downward motion—don’t saw back and forth! After every one or two cuts, wipe the knife clean and re-wet it. This keeps the rice from sticking to the blade and ensures you get those beautiful, distinct pieces of Vegetable Sushi every single time.
Storing Leftovers of Your Delicious Vegan Sushi
I hope you don’t have too many leftovers because this Vegan Sushi tastes best fresh! However, if you do have some rolls left over from your feast, storage is key to keeping them edible the next day. Sushi, especially when it has fresh veggies, doesn’t hold up as well as cooked foods, so we have to be smart about how we keep it.
The main thing to remember is that rice quality drops quickly once it’s refrigerated, so try to eat it within 24 hours for the best texture. And definitely store the pickled ginger separately!
Best Practices for Storing and Reheating
For the rolls themselves, wrap them tightly in plastic wrap or place them in a truly airtight container. Keep them in the coldest part of your fridge. I wouldn’t recommend trying to reheat sushi; it’s meant to be eaten cold or at room temperature. If it’s been more than 24 hours, I’d sadly toss it.
Now, the homemade pickled ginger is a different story! It thrives in the cold. Keep that sealed jar in the fridge, and it will stay wonderfully tangy and crisp for weeks!
| Item | Storage Method | Maximum Time |
|---|---|---|
| Leftover Sushi Rolls | Airtight container in refrigerator | Up to 24 hours |
| Homemade Pickled Ginger | Airtight jar in refrigerator | 2–3 weeks |
Frequently Asked Questions About Making Vegan Sushi
I know you might have a few lingering questions once you look over all these steps for making amazing Vegan Sushi. It’s totally normal! When you’re making something new, especially a technique-heavy food like this, it’s good to know where you can tweak things and where you absolutely shouldn’t.
Here are the most common things people ask me when they try this recipe for the first time. I’ve tried to give practical answers so you feel confident rolling!
Can I Substitute the Vegetables in this Vegan Sushi Recipe?
Absolutely! That’s the beauty of Vegetable Sushi—you can customize it based on what’s in season or what you love. Feel free to swap in things like shredded carrots, asparagus (blanched!), or even finely sliced sweet potato. The main thing to remember is structure. Don’t use anything too watery or too bulky, or your roll won’t seal properly. Keep the avocado in there, though; it provides necessary creaminess!
How long does the homemade pickled ginger for Vegan Sushi last?
This is the best part about making it yourself! Since we follow the blanching and brining steps, the homemade pickled ginger lasts a surprisingly long time compared to the rolls themselves. As long as you keep it sealed tightly in that jar in the fridge, it stays good and tangy for about two to three weeks. That means you can make a batch and enjoy it with all your future Easy Sushi Rolls!
Why is my sushi rice mushy instead of sticky?
That’s almost always due to over-rinsing or over-mixing the rice after seasoning. If you didn’t rinse the starch off properly, it gets gummy. If you stirred or mashed the rice while folding in the vinegar mixture, you broke the grains. Remember, we want to gently *fold* the seasoning in until it’s just combined, not mix it like you’re making mashed potatoes!
Estimated Nutritional Data for This Vegan Sushi Recipe
It’s important to remember that these numbers are just an estimate, especially since we’re using fresh vegetables that can vary slightly in size and ripeness. But this gives you a great baseline for enjoying your Vegan Sushi guilt-free! We calculated this based on the recipe yielding four rolls, so the numbers below reflect one serving size.
This is truly a light and satisfying main course. Look at that low fat content! It just proves you don’t need heavy oils or sauces to make something delicious.
| Nutrient | Estimated Value (Per Roll) |
|---|---|
| Calories | 220 |
| Fat | 6g |
| Carbohydrates | 38g |
| Protein | 5g |

Amazing 220 Cal Vegan Sushi Now
- Total Time: 45 minutes
- Yield: 4 rolls
Description
This vegan sushi recipe is fresh, colorful, and easy to make at home, featuring crisp vegetables, creamy avocado, and tangy homemade pickled ginger.
Ingredients
- 1½ cups sushi rice
- 2 cups water
- 3 tablespoons rice vinegar (for rice)
- 1 tablespoon sugar (for rice)
- ½ teaspoon salt (for rice)
- 1 small cucumber, julienned
- 1 small carrot, julienned
- 1 avocado, sliced
- ½ red bell pepper, thinly sliced
- 1 small bunch spinach, blanched and squeezed dry
- 4 nori sheets
- 1 cup thinly sliced young ginger (peeled)
- ½ teaspoon salt (for ginger)
- ½ cup rice vinegar (for ginger)
- ¼ cup sugar (for ginger)
- 2 tablespoons water (for ginger)
Instructions
- Sprinkle salt over the sliced ginger and let it sit for 10 minutes.
- Boil a small pot of water and blanch the ginger slices for 1 minute. Drain the ginger well.
- In a saucepan, heat ½ cup rice vinegar, ¼ cup sugar, and 2 tablespoons water until the sugar dissolves.
- Pour the hot mixture over the ginger in a glass jar. Cool the ginger to room temperature, then refrigerate for at least 1 hour.
- Rinse sushi rice under cold water until the water runs clear.
- Add rice and 2 cups of water to a pot. Bring to a boil, reduce heat to low, cover, and cook for 15 minutes.
- Remove the pot from heat and let it sit for 10 minutes.
- In a small bowl, mix 3 tablespoons rice vinegar, 1 tablespoon sugar, and ½ teaspoon salt. Warm gently until dissolved.
- Fold the seasoning mixture into the rice using a wooden spoon. Cool the rice to room temperature.
- Place a sheet of nori on a bamboo sushi mat, shiny side down.
- Spread an even layer of rice over the nori, leaving 1 inch uncovered at the top edge.
- Arrange cucumber, carrot, avocado, bell pepper, and spinach in a line across the rice.
- Roll tightly from the bottom, using the mat to press gently. Seal the edge with a touch of water.
- Slice each roll into 6–8 pieces using a sharp, wet knife.
- Serve with soy sauce, wasabi, and homemade pickled ginger.
Notes
- Store leftover sushi in an airtight container in the refrigerator for up to 24 hours.
- Pickled ginger keeps for 2–3 weeks in the refrigerator.
- Prep Time: 30 minutes
- Cook Time: 15 minutes


