Oh my gosh, you guys! I have to tell you about the snack that has completely taken over my kitchen lately. You know how sometimes you just crave that crunchy, cheesy, satisfying bite of nachos, but then you remember you’re trying to keep things lighter? Well, I found the answer, and it’s these incredible cauliflower nachos. Seriously, who knew we could ditch the chips?
I was getting so tired of the same old veggie platters when movie night rolled around. I needed something hearty! The first time I roasted these cauliflower slices, I almost ate the entire pan before I even added the cheese. They get just perfectly crisp on the edges but stay tender inside. It’s the perfect low-carb trick!
We’re talking about that amazing Mexican flavor profile—smoky, a little spicy, and totally loaded with toppings—but without feeling like you need a nap immediately after eating them. Trust me, once you try this, you won’t even miss the corn chips. It’s magic, I tell you, pure kitchen magic!
Gathering Everything for Perfect Cauliflower Nachos
Okay, before we even think about turning on the oven, we need to have everything prepped and ready to go. This recipe moves quickly once those cauliflower slices hit the heat, so organization is key! Don’t worry, it’s mostly just chopping and measuring. You want everything measured out and sitting right next to your mixing bowl.
The secret to getting that amazing flavor into the base is coating every single slice evenly with the spices before they bake. That’s why mixing them in a big bowl works better than trying to toss them on the sheet pan—you get better coverage, I promise!
Essential Ingredients for Amazing Cauliflower Nachos
| Ingredient | Preparation Note |
|---|---|
| Cauliflower | Cut into ½-inch thick slices |
| Olive Oil | For tossing |
| Spices (Garlic Powder, Cumin, Paprika, etc.) | Measured out |
| Sea Salt | To taste |
| Refried Beans | Measured |
| Shredded Cheese | ¾ cup, ready for sprinkling |
| Jalapeño | Thinly sliced |
| Cherry Tomatoes | Diced |
| Red Onion | Diced |
| Cilantro | Chopped fresh |
| Avocado | Diced |
Necessary Equipment for Baking Your Cauliflower Nachos
You won’t need anything fancy here, which I love! Make sure you grab a nice big mixing bowl—the bigger the better for tossing those spices around without making a huge mess on your counter. You’ll definitely need a large baking sheet, and I highly recommend lining it with parchment paper. It keeps cleanup under five minutes!
- Large mixing bowl
- Large, rimmed baking sheet
- Parchment paper (or olive oil spray)
- Small knife and cutting board for toppings
Mastering the Roasting Process for Your Cauliflower Nachos
This is where we create the foundation for truly epic cauliflower nachos. If you skimp on the seasoning here, the whole thing falls flat! We are transforming bland cauliflower into something smoky, savory, and almost chip-like. It takes a little patience, but the payoff is huge.
Don’t rush this initial bake, either. We need those edges to crisp up nicely so they can handle the toppings later without turning soggy. Think of this first step as building sturdy little edible plates for all the cheesy goodness coming next.
Seasoning the Cauliflower Base
Grab that big bowl we talked about and toss in all your flavor boosters: olive oil, garlic powder, onion powder, cumin, paprika, chili powder, and salt. Now, get your hands in there! You need to physically coat every single slice. I like to press the spices right onto the surface of the florets. Make sure they are lying flat on the baking sheet in a single layer—no overlapping allowed! If they overlap, they steam instead of roast, and we don’t want steamed cauliflower when we’re aiming for nachos!
Achieving Tender, Golden Cauliflower
Preheat your oven to 425°F. That high heat is important for getting that nice browning. Slide that sheet in and set your timer for 20 minutes. Around the 10-minute mark, you need to pull them out and flip every single piece over. Seriously, flip them all! When they come out after that 20 minutes, they should look golden brown around the edges, and when you poke them gently, they should give just a little. They aren’t totally soft yet, but they need that color and tenderness before we move on to the cheese layer.
Building the Ultimate Layered Cauliflower Nachos
Okay, now for the best part! We have these perfectly seasoned, slightly crispy cauliflower slices, and it’s time to turn them into actual, proper cauliflower nachos. This is where the magic really happens, moving from a roasted vegetable to a hearty, cheesy feast. Remember, we’re trying to build layers that hold up, so try to keep the toppings relatively centered on the cauliflower base.
Once the cauliflower is roasted, gently push all those pieces toward the middle of your baking sheet. This creates a sort of central mound, which helps keep everything contained when you add the wet ingredients. It’s a little trick I learned after my first batch slid right off the edges and onto the oven floor—oops! Keep everything cozy!
We are going for maximum melt factor here, so don’t be shy with the cheese, but distribute it evenly so every chip gets a little bit of gooey goodness. The second bake is quick, just long enough to get that cheese looking bubbly and delicious, but we don’t want to overcook the cauliflower now that it’s already tender.
Melting the Cheese on Your Cauliflower Nachos
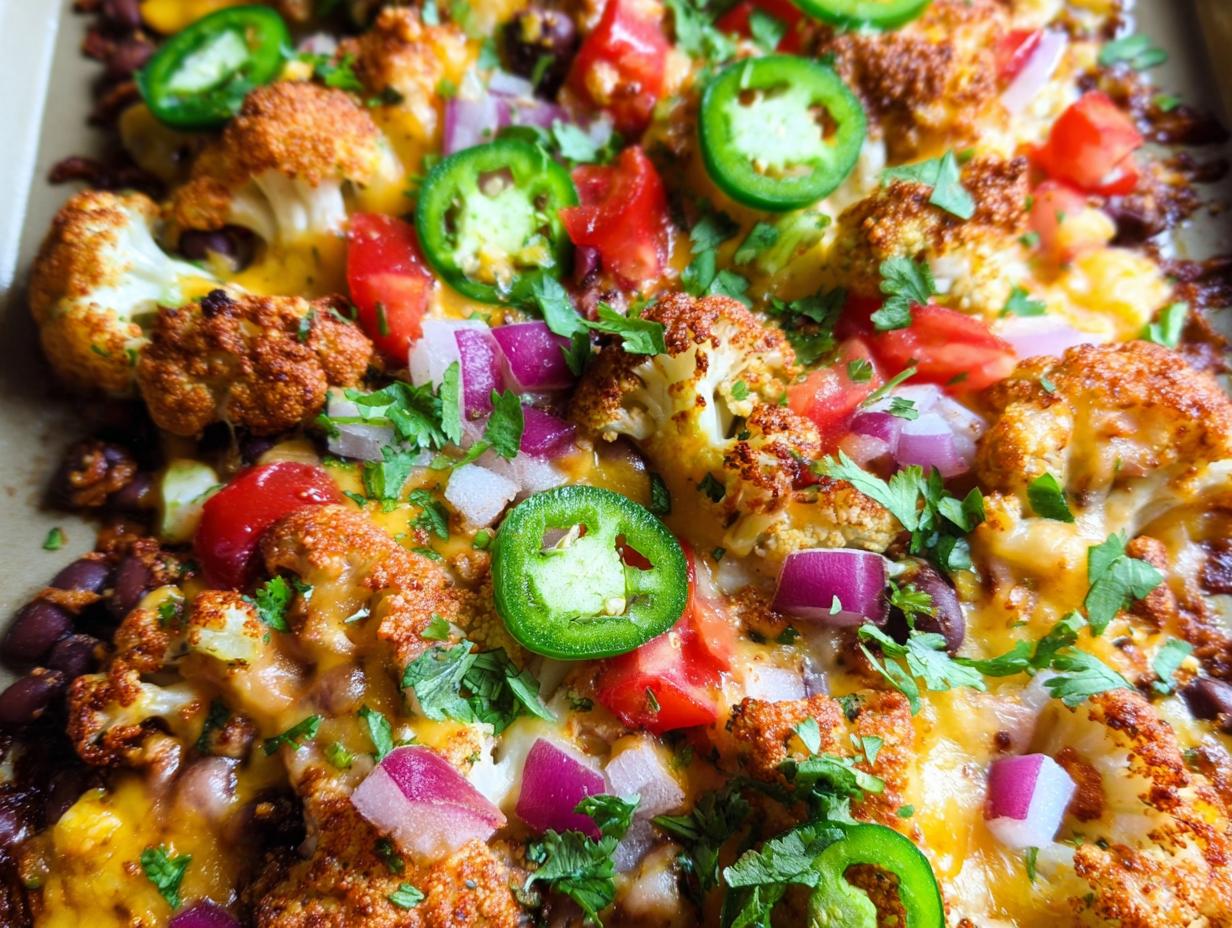
First step: take those roasted slices and spoon your refried beans over them. Just dollop a little bit onto each piece or spread a small amount across the surface. Next, grab that shredded cheese—Mexican blend or sharp cheddar works best—and sprinkle it liberally over the beans. Don’t forget the jalapeño slices! Scatter those around now too, so they soften up just a touch in the heat.
Put the whole pan right back into that 425°F oven. You are only baking this for about 6 to 7 minutes. That’s barely any time, but it’s just enough to get the cheese completely melted and wonderfully bubbly. Keep an eye on it through the oven door. The moment it looks gooey and inviting, pull them out immediately! We want happy, melted cheese, not brown, tight cheese.
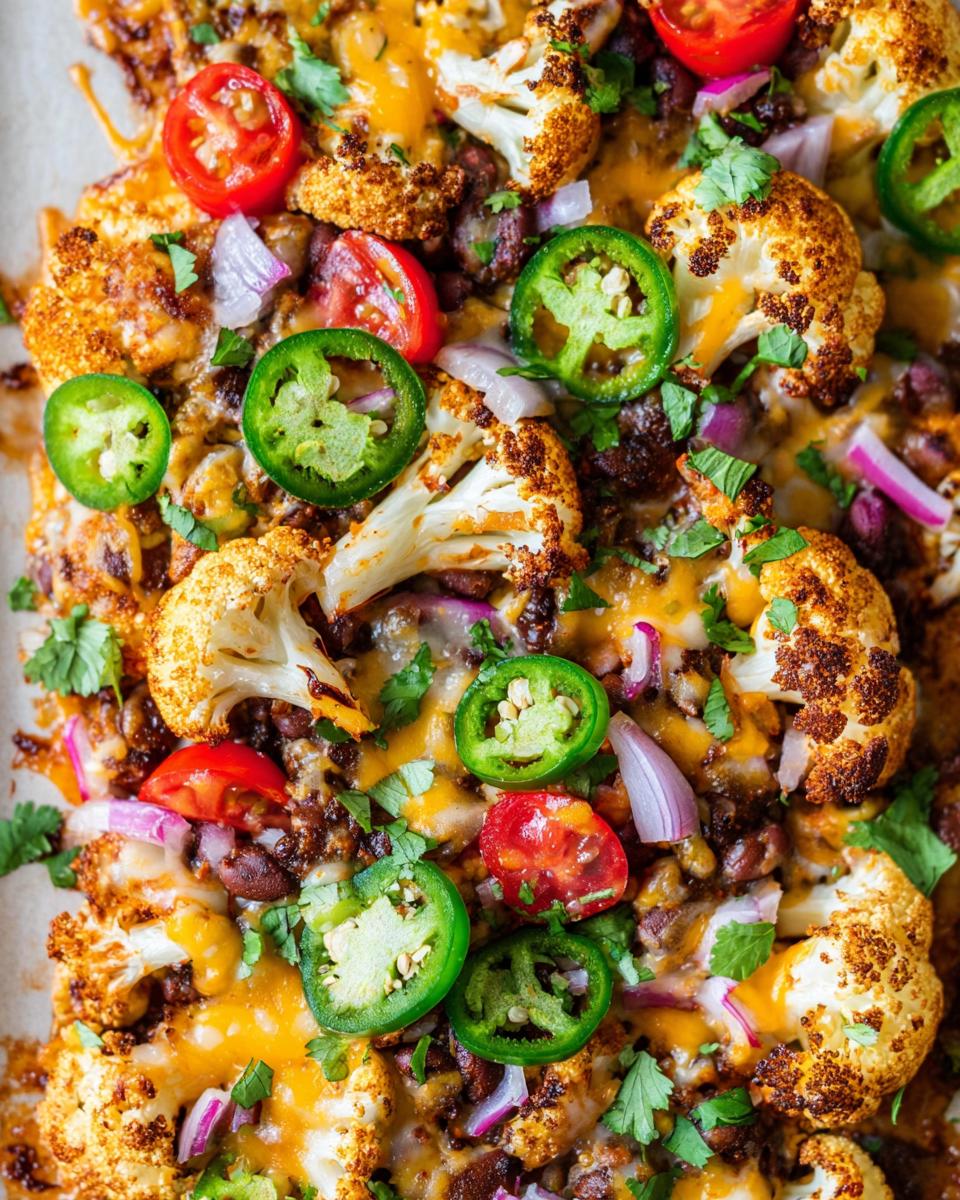
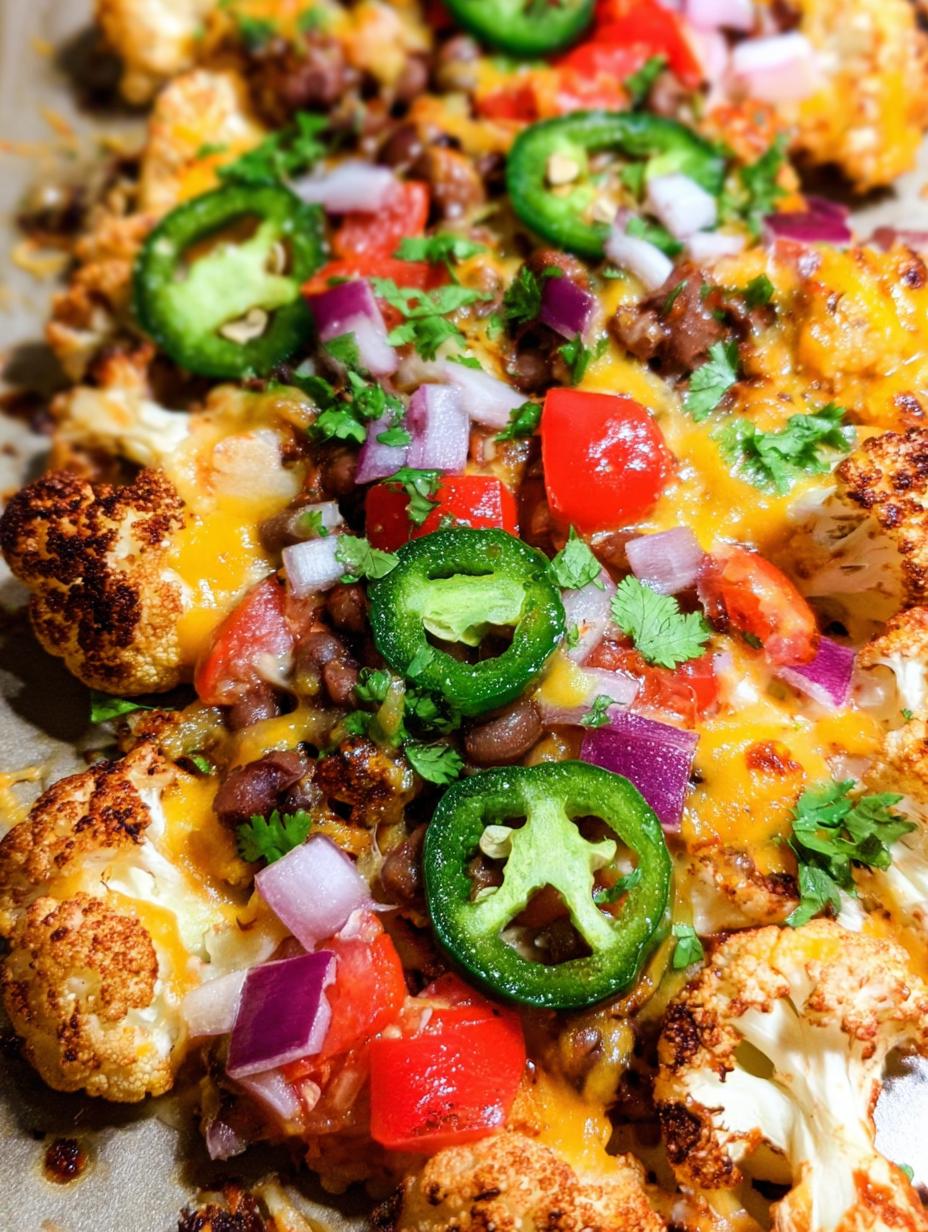
Fresh Toppings That Complete Your Cauliflower Nachos
The second the cheese is perfectly molten, you need to pull the pan out because the final step is adding all the fresh, cool toppings. This contrast is what makes these cauliflower nachos so addictive! You move from hot, smoky, and cheesy to bright, sharp, and creamy in one bite. It’s the perfect balancing act.
I always like to give the pan a minute to cool down just slightly before I start piling everything on. This keeps the avocado from getting warm and mushy right away, which is a tragedy we want to avoid! Presentation matters here, too, because these look so vibrant when they come out of the oven.
Adding Freshness and Texture
Now we layer on the crunch and color! Take your diced cherry tomatoes and sprinkle them evenly over the cheese layer. Next come the diced red onions—I love that sharp bite they give! Then, you want a generous shower of fresh, chopped cilantro over everything. Cilantro truly wakes up the smoky spices we used earlier.
Finally, the avocado. I dice mine right before serving so it stays nice and firm. Scatter those creamy chunks across the top. If you’re serving these right away, you can present the whole pan on the table—it looks amazing! If you want, a little dollop of plain Greek yogurt or some extra salsa on the side is fantastic for dipping the edges. If you are looking for a great Greek yogurt ranch dip, check out this recipe!
Tips for Making Your Cauliflower Nachos Absolutely Perfect
I’ve made this recipe probably twenty times since I first figured out the ratios, and I have a few non-negotiable tips to ensure your cauliflower nachos are always fantastic. First, let’s talk about that non-stick surface again. If you skip the parchment paper, you must use a generous spray of oil, or those beautiful, seasoned edges will stick to the pan, and you’ll end up breaking your cauliflower chips when you try to move them! For more great snack ideas, check out my posts on Medium.
The biggest texture game-changer for me was realizing that the cauliflower needs to be totally dry before it gets oiled and spiced. I blot the slices with a paper towel after rinsing them. Wet cauliflower steams, and we are aiming for roast, remember? This makes a huge difference in how crispy they get!
Timing is also crucial for the second bake. That 6-to-7-minute melt time is perfect, but if you leave them in longer, the fresh toppings you add later won’t taste as vibrant. Serve these immediately! They are best enjoyed piping hot straight from the oven, so get everyone gathered around the pan when they come out.
Storing and Warming Leftover Cauliflower Nachos
Things I love: Nachos. Things I don’t love: Soggy leftovers. It happens to the best of us—you make a huge batch of these amazing cauliflower nachos, and there are still a few slices left the next day. The key here is handling the moisture situation correctly, especially since we have fresh avocado and tomatoes involved!
If you plan on having leftovers, my biggest piece of advice is to serve the fresh toppings—the avocado, tomatoes, onions, and cilantro—on the side. Keep the cheesy, bean-covered cauliflower base separate. That way, the base is the only thing you have to worry about reheating! If you want to see other great snack ideas, check out my Pinterest board.
Keeping Your Cauliflower Nachos Fresh
If you do have leftovers with toppings already on them, try to remove the fresh stuff first. For the cheesy base, you’ll want to store it in a single layer if possible, or just stack it gently in an airtight container. Don’t leave it sitting out too long, obviously! If you store it properly, it should be good in the fridge for about two days. Any longer than that, and the texture starts to suffer a bit.
- Storage Time: Up to 2 days in the refrigerator.
- Best Practice: Store the cheesy base separately from fresh toppings like avocado and tomato.
- Container: Use an airtight container to minimize moisture loss.
Reheating for the Best Flavor
Okay, here is the golden rule: Do not, I repeat, do *not* try to microwave these! Microwaving turns our beautiful roasted cauliflower into sad, steamy mush. We need to bring back that roasted texture! If you are looking for a recipe for loaded nachos (the traditional kind), check that out too!
The oven is your best friend for reheating these cauliflower nachos. Set it to about 350°F. Spread the leftovers out on a baking sheet—again, single layer if you can manage it. Pop them in for about 8 to 10 minutes. This gives the cheese a chance to re-melt nicely and helps dry out any residual moisture that crept in from the fridge. Once they are hot all the way through and the cheese is soft, pull them out and add your fresh toppings right before serving. Trust me, it tastes almost as good as the first time!
Frequently Asked Questions About Cauliflower Nachos
I get so many messages asking about tweaks and substitutions for these cauliflower nachos, so I thought I’d answer the most common ones right here! It’s important to know you can customize these, even though I swear by my original spice blend. Don’t be afraid to experiment once you get the base down!
People often ask if they can use different vegetables or different types of cheese. Yes, you absolutely can! The method works for almost any sturdy vegetable, although I think cauliflower is the best for holding up the toppings. Keep reading for my best advice on making these fit your kitchen!
Q1. Can I use black beans instead of refried beans?
Absolutely! If you prefer black beans, just make sure they are rinsed well and mashed slightly before you spoon them over the cauliflower. You don’t want whole beans rolling off when you try to eat it. Black beans offer a slightly firmer texture, which is great!
Q2. What’s the best way to keep these truly low carb?
To keep these firmly in the low carb category, just watch your toppings! Skip the beans entirely (or use low-carb black soybeans if you find them) and focus on extra avocado, salsa, and maybe some shredded lean chicken instead of beans. The cauliflower base itself is naturally low in net carbs, so you’re already winning there.
Q3. Can I use store-bought seasoning packets instead of mixing my own spices?
You can, but honestly, I highly discourage it! Most store-bought taco seasonings have added sugar and anti-caking agents that don’t help with the roasting process. Mixing the cumin, paprika, and chili powder yourself takes about one minute, and the flavor is so much fresher and cleaner. It’s worth the tiny effort!
Q4. My cauliflower slices keep breaking when I try to flip them. What am I doing wrong?
This usually means one of two things: either your slices are too thin—aim for a solid ½ inch—or they aren’t roasting long enough in the first step! If they are too thin, they turn brittle. If they haven’t had enough time at 425°F to soften internally, they snap instead of bending when you flip them. Give them that full 20 minutes!
Understanding the Nutritional Profile of These Cauliflower Nachos
I know a lot of you are looking for snacks that are satisfying but won’t derail your eating goals, and that’s why these cauliflower nachos are such a winner! Because we are using roasted cauliflower instead of fried corn chips, we slash a lot of the heavy fats and carbs right away. It’s a huge win for feeling good after snacking! If you are interested in other low-carb vegetable bases, check out my recipe for tahini honey cauliflower.
Now, remember that nutrition info is always an estimate, especially since your cheese choice and how much avocado you pile on can change things fast. But generally speaking, these are packed with flavor without being overly heavy. It’s a great way to sneak in more vegetables, too!
Estimated Nutritional Data
Based on the recipe serving six people, here’s what you can generally expect per serving. This is just an estimate, so please take it with a grain of salt, but it shows you why this recipe is a lighter choice!
| Nutrient (Estimate Per Serving) | Amount |
|---|---|
| Calories | 150 |
| Fat | 10g |
| Carbohydrates | 10g |
| Protein | 5g |
Share Your Experience Making These Cauliflower Nachos
I truly hope you give these cheesy, spicy cauliflower nachos a try for your next game night or quick dinner! I put my heart into perfecting that roast and spice blend, and I just love hearing when you all get to enjoy them too.
When you make your batch, I really want to know what you think! Did you stick to my spice ratio, or did you sneak in a little extra smoked paprika? Did you use cheddar or a Mexican blend for the cheese? And most importantly, how did you handle the toppings? I’m always looking for new ideas! If you are looking for a great creamy corn dip to serve alongside, try this one!
Please don’t be shy! Drop a comment below and let me know how they turned out. A rating helps other cooks know if this recipe is worth their time, and I read every single review. Happy cooking, and enjoy those guilt-free nachos!
Print
Amazing 150-Calorie Cauliflower Nachos
- Total Time: 42 minutes
- Yield: 6 servings 1x
- Diet: Low Carb
Description
These cheesy cauliflower nachos use roasted cauliflower slices instead of chips, topped with beans, cheese, and fresh vegetables for a low-carb, flavorful snack or meal.
Ingredients
- 1 medium head cauliflower, cut into ½-inch slices
- 1 tablespoon olive oil
- ½ teaspoon garlic powder
- ½ teaspoon onion powder
- ½ teaspoon ground cumin
- ½ teaspoon smoked paprika
- ¼ teaspoon chili powder
- ½ teaspoon sea salt
- ⅓ cup refried beans
- ¾ cup shredded Mexican blend or cheddar cheese
- 1 jalapeño, thinly sliced
- ½ cup diced cherry tomatoes
- ¼ cup diced red onion
- ¼ cup chopped fresh cilantro
- 1 ripe avocado, diced
Instructions
- Preheat the oven to 425°F. Line a large baking sheet with parchment paper or lightly coat with olive oil spray.
- In a large bowl, toss cauliflower slices with olive oil, garlic powder, onion powder, cumin, paprika, chili powder, and salt until evenly coated.
- Spread cauliflower in a single layer on the prepared sheet, ensuring pieces do not overlap.
- Roast for 20 minutes, flipping once halfway through, until golden brown and tender.
- Remove from the oven and push the roasted cauliflower pieces toward the center of the pan to form a nacho-style base.
- Spoon refried beans evenly over the cauliflower, sprinkle cheese on top, and layer with jalapeño slices.
- Return to the oven and bake for 6 to 7 minutes, until the cheese is melted and bubbly.
- Remove from the oven and top with tomatoes, red onion, cilantro, and avocado.
- Serve immediately straight from the pan or transfer to a serving platter.
Notes
- Add grilled chicken or black beans for extra protein.
- Drizzle with Greek yogurt or salsa before serving for a complete meal.
- Prep Time: 15 minutes
- Cook Time: 27 minutes
- Category: Appetizer, Snack
- Method: Baking
- Cuisine: Mexican-inspired
Nutrition
- Serving Size: 1 serving
- Calories: 150
- Sugar: Not specified
- Sodium: Not specified
- Fat: 10g
- Saturated Fat: Not specified
- Unsaturated Fat: Not specified
- Trans Fat: Not specified
- Carbohydrates: 10g
- Fiber: Not specified
- Protein: 5g
- Cholesterol: Not specified