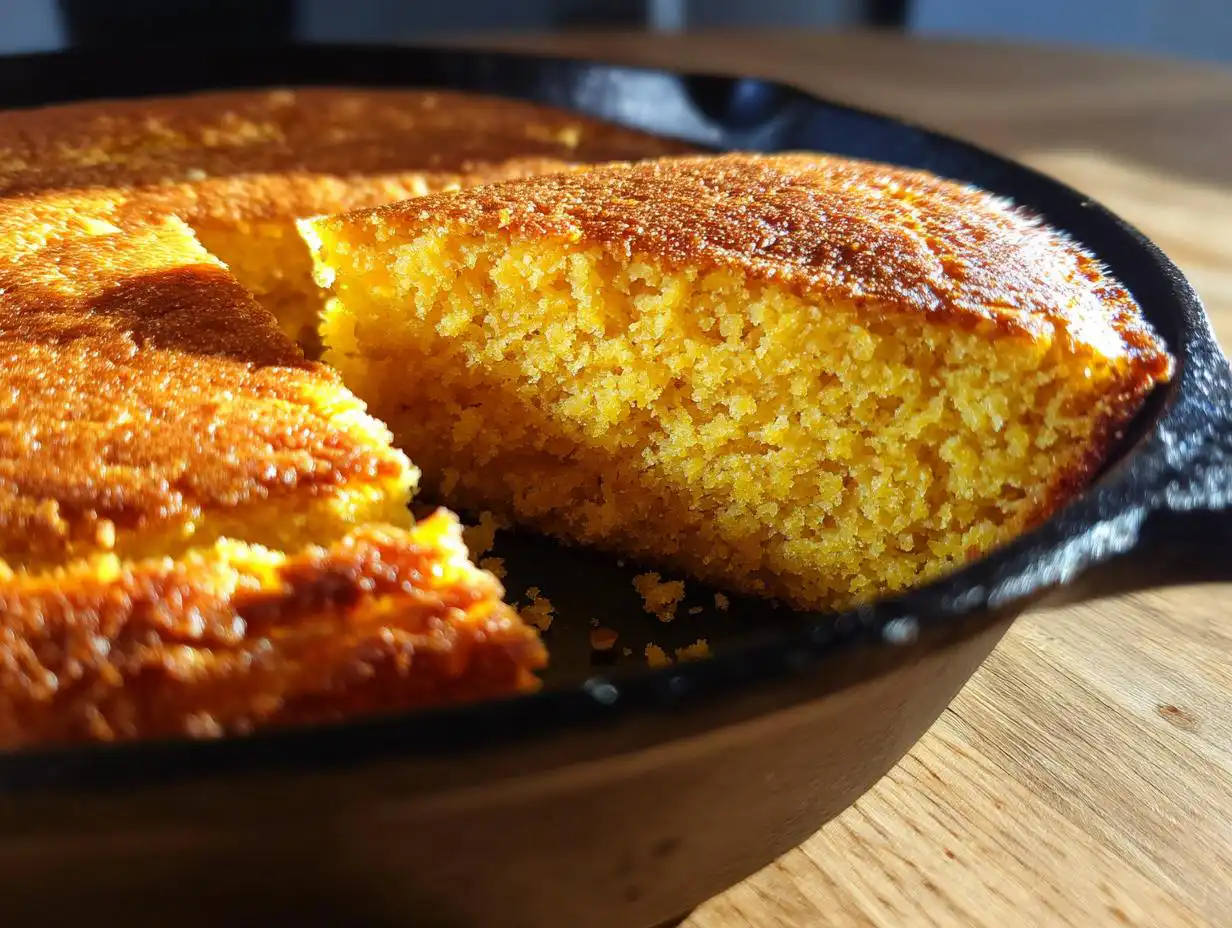
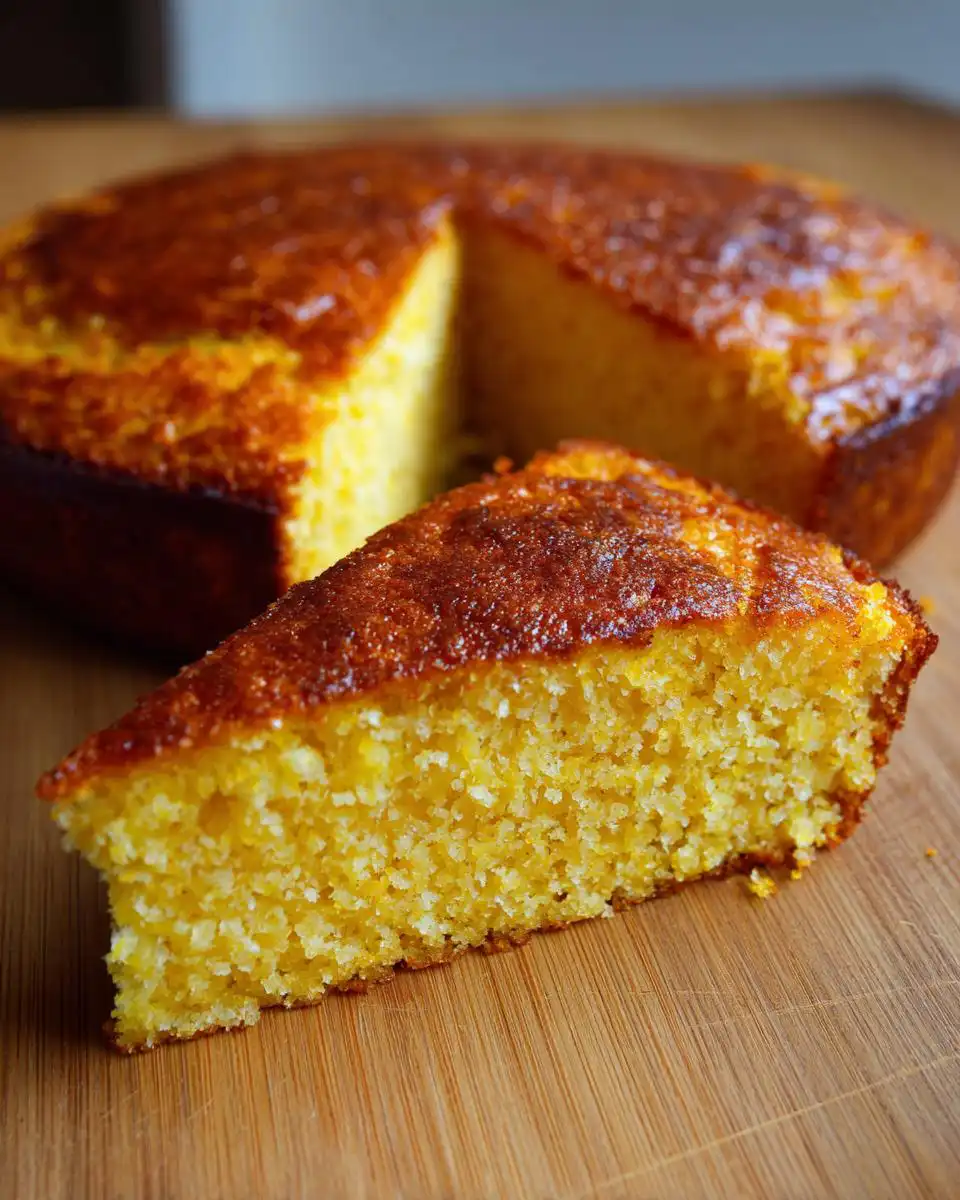
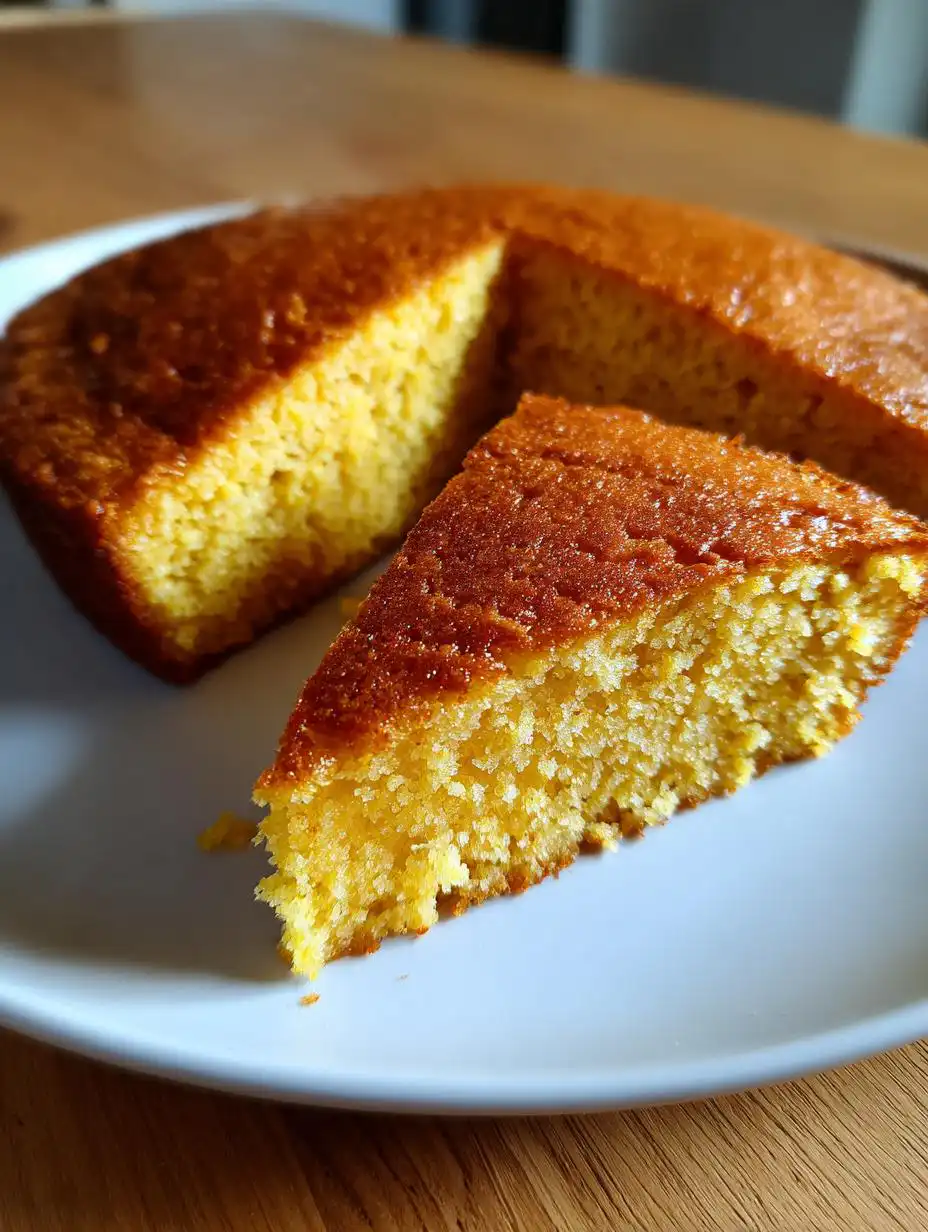
If you think you’ve had good cornbread, I’m here to tell you that you haven’t truly lived until you’ve had this Southern-style skillet cornbread. Forget those pale, crumbly squares you sometimes see! My goal with this recipe is always that crunchy, dark golden crust that snaps when you cut into it, while the inside stays unbelievably tender and soft. It’s a texture contrast that just screams comfort food.
This isn’t just some random baking project; this is the real deal, perfected over years of trying to match what my Aunt Mae used to make down in Georgia. Trust me, the secret weapon here isn’t just the buttermilk—it’s getting that beautiful cast iron skillet screaming hot before the batter even touches it. That sizzle when the batter hits the fat? That’s the sound of success right there. It locks in the moisture and creates that signature crispness you just can’t get any other way.
I’ve tried every trick in the book, and this method consistently delivers the best skillet cornbread, every single time. It’s simple, it’s fast, and it tastes like home.
Essential Ingredients for Authentic Skillet Cornbread
You can’t rush greatness, and that starts with respecting your ingredients. When making true Southern skillet cornbread, quality matters way more than quantity. We only need a few things, so make sure they’re the right ones! I keep my pantry stocked specifically for this recipe because substitutions just don’t give you that same deep, savory flavor.
Dry Components for Your Skillet Cornbread
When it comes to the cornmeal, you absolutely need fine yellow cornmeal here. Skip the coarse grind; we want that smooth texture that bakes up soft inside. We use all-purpose flour, but it’s the leavening that gives it a lift—a teaspoon of baking powder and half a teaspoon of baking soda work together with the buttermilk to give our skillet cornbread just enough rise without making it cakey.
Wet Ingredients and Fats
Buttermilk is non-negotiable, my friends! It reacts with the soda to create those beautiful bubbles, and that slight tang balances the richness. You’ll need one cup of buttermilk and about half a cup of regular milk for hydration, plus one large egg. For the fat, I usually reach for shortening because it gives the crispiest edges, but melted butter works perfectly well if you prefer that deeper flavor. Remember, you need that fat melted for the batter AND extra to grease that hot skillet!
Equipment Needed for the Best Skillet Cornbread
Honestly, you don’t need a ton of fancy gadgets for this recipe, which is what I love about it! It’s humble baking at its best. But there is one piece of equipment that is absolutely mandatory if you want this to taste like it came straight from a Southern kitchen. If you don’t own one, now is the time to invest!
You’ll need a sturdy mixing bowl for the dry stuff and another one for the wet ingredients. Always use a whisk for the dry ingredients; it helps distribute that baking soda evenly. Then, of course, you need measuring cups and spoons to keep things accurate.
Why Cast Iron Matters
Okay, let’s talk about the star: the cast iron skillet. If you try to make this in a glass dish or a regular non-stick pan, it just won’t be the same, I promise you. Cast iron holds heat like nothing else. We preheat that skillet until it’s actually hot before we pour in the batter.
That intense, even heat immediately starts cooking the bottom and edges of the batter. That’s what creates that deep, mahogany-brown crust that snaps when you poke it with a fork. It gives you that perfect texture contrast—crispy outside, fluffy inside—that is the absolute hallmark of real, authentic cornbread.
Step-by-Step Instructions for Skillet Cornbread
Alright, let’s get down to business! This is where the magic happens, and frankly, it’s shockingly fast. The entire process from mixing to baking this incredible skillet cornbread takes less than 40 minutes total. The key here is multitasking—you’re heating your oven and your skillet at the same time. Don’t rush the preheating steps; they are crucial for that signature crust!
Preparing the Hot Skillet
First thing’s first: Crank that oven up to 450 degrees Fahrenheit. While the oven is warming up, grab your 9-inch cast iron skillet. Place it right on the stovetop over medium heat. Now, add about one tablespoon of your melted shortening or butter right into that cold skillet. You want that fat to heat up with the pan slowly. This gives you time to whisk your wet and dry ingredients together while the fat reaches the perfect temperature.
You’ll know the skillet is ready not when the butter melts, but when the fat is shimmering slightly and looks almost ready to smoke. This is the secret to the sizzle! If you add the batter to cool fat, you get soggy cornbread; if you add it to smoking hot fat, you get that amazing crust.
Mixing the Skillet Cornbread Batter
While the skillet is heating, we mix! Whisk your dry ingredients—the cornmeal, flour, salt, baking powder, and soda—together really well in one bowl. This ensures the leavening is distributed evenly. In a second bowl, just give your buttermilk, milk, and egg a quick whisk until they look happy and combined.
Now, pour the wet into the dry. And here is my biggest tip: Stir *just* until you see no more dry streaks of flour. Seriously, stop stirring! If you overmix, you’ll develop the gluten in the flour, and instead of fluffy cornbread, you’ll end up with tough little hockey pucks. Once combined, gently fold in that remaining melted fat from the stovetop. It should look slightly lumpy—that’s perfect!
Baking for Golden Perfection
This is the moment of truth! Carefully pour all that wonderful batter right into your screaming hot, greased skillet. You should hear an immediate, satisfying sizzle all around the edges. That sound means the crust is forming! Let it sit right there on the stovetop for exactly one minute—no more, no less—to really sear those edges.
After that minute, gently transfer the whole skillet into your preheated 450-degree oven. Bake it for about 20 to 25 minutes. You’re looking for a deep golden brown color across the top. Test it by inserting a toothpick into the center; if it comes out clean, you’re done! Let it cool in the skillet for about 10 minutes before you slice it into wedges. Trust me, waiting those 10 minutes helps it set up beautifully.
Tips for Achieving Superior Skillet Cornbread Texture
Getting that perfect, shatteringly crisp edge on your skillet cornbread is all about managing heat and moisture. If your crust isn’t snapping, you probably didn’t get that skillet hot enough before the pour! Remember, we’re treating that cast iron like a griddle for the first minute.
Another thing people often mess up is the mixing. I cannot stress this enough: mix your batter until it’s *just* combined. Seriously, stop stirring when you still see a few little streaks of flour. If you stir until it’s perfectly smooth, you’re going to lose the soft interior we worked so hard to create. Lumps are your friend here!
For extra moisture insurance, I always brush the top with a little extra melted butter right when it comes out of the oven. It soaks in immediately and keeps the top from drying out while it cools. That little step elevates the whole experience, making sure every bite of your skillet cornbread is both crispy and tender.
Ingredient Notes and Substitutions for Skillet Cornbread
Sometimes you just don’t have the perfect ingredients on hand, and that’s okay! We can make a few smart swaps without completely ruining the integrity of this beautiful skillet cornbread. The most common problem is running out of buttermilk, and thankfully, that’s an easy fix.
If you are out of buttermilk, you can make a quick substitute right at home! Just take your regular milk and add one tablespoon of white vinegar or lemon juice for every cup of milk you need. Stir it gently and let it sit on the counter for about five minutes until it looks slightly curdled. That acidity will activate the baking soda perfectly, just like real buttermilk would for your skillet cornbread.
For the fat, I prefer shortening because it gives you that slightly higher smoke point and the crispiest crust possible. However, if you only have butter, go ahead and use it! It will give the cornbread a richer, deeper flavor, though the edge might be slightly less aggressively crisp. Just make sure whatever fat you use is fully melted before you add it to the batter and definitely before you heat up that skillet!
Serving Suggestions for Your Skillet Cornbread
This cornbread is hearty enough to stand on its own, but honestly, why would you stop there? It’s the perfect vehicle for soaking up all the delicious juices from your main course. I never serve a pot of beans or chili without a wedge of this nearby! If you are looking for great side dishes, check out some of my other recipes.
The classic way, of course, is warm with a pat of good quality salted butter melting right into the center. That salty, creamy richness against the slightly sweet, savory crust is just perfection. My kids love it drizzled with honey—it really brings out the sweetness of the cornmeal.
If you’re serving this alongside a big Sunday dinner, it’s fantastic crumbled over the top of a hearty vegetable soup. Or, if you’re feeling extra Southern, try placing a slice on your plate and topping it with a spoonful of homemade pimento cheese. Seriously, try that combination—you won’t regret it!
Storing and Reheating Your Skillet Cornbread
It’s a rare day when there are leftovers of this amazing cornbread, but if you do manage to save some, you want to treat it right! The biggest enemy of leftover cornbread is dryness, especially that beautiful crust we worked so hard to achieve. You need to store it correctly to keep that moisture locked in.
If you plan on eating it within a couple of days, just wrap the wedges tightly in plastic wrap, and then place them in an airtight container or a Ziploc bag. Keep it on the counter. Don’t put it in the fridge unless you absolutely have to; the cold air dries it out way too fast for my liking.
Reheating is where you bring that crust back to life! The microwave is a total disaster for cornbread—it makes it rubbery. Instead, you want to wake up that cast iron skillet again, or use a regular baking sheet. A quick trip back into a warm oven is the best way to refresh the texture.
Here’s my quick guide for keeping your leftovers happy:
| Storage Method | Duration | Reheating Tip |
|---|---|---|
| Airtight Container (Counter) | 1-2 Days | Quick 5-minute warm-up in a 350°F oven. |
| Freezer (Wrapped Tightly) | Up to 2 Months | Thaw overnight, then bake at 350°F until heated through. |
| Refrigerated | Up to 4 Days | Brush lightly with water before reheating in the oven to restore moisture. |
Frequently Asked Questions About Skillet Cornbread
I get so many questions about this recipe because everyone wants that perfect crust! Here are a few things I hear most often about making truly authentic skillet cornbread.
Q1. Can I make this without buttermilk?
I really hope you can use buttermilk because that acidity is key to the flavor and reaction with the baking soda! But if you absolutely can’t, see my substitution tip above—just mix regular milk with a splash of vinegar or lemon juice. It works in a pinch for this skillet cornbread, though the flavor won’t be quite as deep.
Q2. My cornbread stuck to the pan! What went wrong?
Oh, that’s the worst! If it sticks, it means your cast iron skillet wasn’t hot enough when you poured the batter in. That initial, aggressive sizzle is what creates the non-stick barrier. You need to preheat the skillet on the stovetop for several minutes until the fat is shimmering before you add the batter. Next time, try using a little extra shortening in the pan! For more baking tips, you can check out my posts on Medium.
Q3. Do I have to use shortening, or is butter okay?
You can use either, but I strongly recommend shortening if your main goal is a super crispy edge. Butter burns a little faster and has a lower smoke point, which can sometimes affect how well that crust sets. If you use butter, just watch it carefully while it preheats! Either way, make sure the fat is fully melted before you add it to the batter and definitely before you heat up that skillet!
Q4. Why is my skillet cornbread cakey instead of dense?
If your skillet cornbread is too light and fluffy, you probably overmixed the batter. Remember what I said? Stop stirring as soon as the flour disappears. Overmixing develops gluten, which makes it stretchy like cake batter rather than crumbly and dense like real Southern cornbread should be!
Reader Feedback and Next Steps
I’ve shared all my secrets, from the hot skillet technique to why you absolutely cannot overmix your batter. Now it’s your turn! I truly hope you take the time to try this recipe for yourself. There is nothing more satisfying than pulling a perfectly golden, sizzling wedge of homemade skillet cornbread out of the oven.
When you make this, please come back and tell me all about it! Did you get that beautiful snap on the crust? Did you serve it with honey or just a mountain of butter? I want to hear every detail. Your feedback helps me know what works and what other home cooks are looking for. You can also see what others are pinning on my Pinterest page.
If you loved this recipe, don’t forget to give it a rating at the top of the page. And if you have a favorite Southern side dish that pairs perfectly with this skillet cornbread, drop me a comment below so we can share ideas. Happy baking, everyone!
Print
Amazing skillet cornbread: 1 trick ensures success
- Total Time: 35 minutes
- Yield: 8 servings
- Diet: Vegetarian
Description
This southern-style skillet cornbread is golden and crisp outside, soft inside, and baked to perfection in cast iron for the best texture and flavor.
Ingredients
- 1 cup fine yellow cornmeal
- ½ cup all-purpose flour
- 1 teaspoon salt
- 1 teaspoon baking powder
- ½ teaspoon baking soda
- 1 cup buttermilk
- ½ cup milk
- 1 large egg
- ¼ cup melted shortening or butter, plus extra for greasing
Instructions
- Preheat oven to 450°F. Place a 9-inch cast-iron skillet on the stovetop over medium heat and add 1 tablespoon shortening or butter. Let it melt while you prepare the batter.
- In a medium bowl, whisk together cornmeal, flour, salt, baking powder, and baking soda.
- In another bowl, whisk together buttermilk, milk, and egg until smooth.
- Pour the wet ingredients into the dry ingredients and stir until just combined.
- Stir in the melted shortening or butter and mix gently until incorporated.
- Carefully swirl the hot skillet to coat the bottom with the melted fat. Pour in the batter—it should sizzle on contact.
- Let the cornbread cook on the stovetop for 1 minute to form crisp edges, then transfer to the oven.
- Bake for 20 to 25 minutes, or until golden brown and a toothpick inserted in the center comes out clean.
- Cool for 10 minutes before slicing into wedges. Serve warm with butter or honey.
Notes
- For extra richness, brush the top with melted butter right after baking.
- Prep Time: 10 minutes
- Cook Time: 25 minutes
- Category: Side Dish
- Method: Baking
- Cuisine: American