I’m going to let you in on a little secret: making real, bakery-quality homemade baguette doesn’t require fancy equipment or hours of hard labor. Forget everything you think you know about kneading dough until your arms ache! This recipe is pure magic because it uses the no-knead method, which lets time do all the heavy lifting for us.
Seriously, this method is so straightforward, I almost feel guilty calling it a recipe. You only need four basic things, but the resulting homemade baguette has that shatteringly crisp crust and that airy, chewy interior that makes you think you accidentally bought it from a Parisian bakery. Trust me, once you master this technique, you’ll never look at store-bought bread the same way again. It’s all about patience, not punching dough!
We’re going to let the long, slow fermentation develop incredible flavor. It takes a little planning ahead, but the actual hands-on work is maybe 20 minutes tops. Get ready to impress everyone with the best homemade baguette you’ve ever made!
Gather Your Four Simple Ingredients for Homemade Baguette
The beauty of this no-knead bread is that it’s incredibly frugal and relies on the quality of just four core items. Since we aren’t kneading, the long, slow rest time needs the right fuel to create all those beautiful bubbles and that deep flavor you expect from a fantastic homemade baguette. Don’t feel like you have to run out and buy specialty items; simple pantry staples truly shine here.
When you see the ingredient list, you might think, “That’s it?” That’s the point! The long fermentation process is what transforms these basic building blocks into something spectacular. We rely on the yeast to work slowly over many hours, which is far more effective than aggressive mixing.
Essential Components for Amazing Homemade Baguette
- Flour: You need 6 cups of all-purpose or bread flour. Bread flour is slightly better because it has more protein, which means a chewier crumb, but all-purpose works just fine for this recipe. Make sure you have extra for dusting!
- Yeast: Two teaspoons of active dry yeast. Make sure your yeast is fresh—if it’s old, it won’t wake up during that long rest period.
- Salt: Two teaspoons of fine salt. This is crucial for flavor and controlling the yeast activity, so don’t skip it!
- Water: Three cups of warm water, and this is important: aim for about 100°F. If it’s too hot, you’ll kill the yeast; too cold, and it will sleep through its entire job.
Equipment Needed for Your Homemade Baguette Project
Even though this is a no-knead recipe, you still need a few things to make the magic happen smoothly. First, grab a really large bowl—and I mean large—because that dough is going to expand a ton during the first rise. You’ll also need a sturdy, clean surface that you can flour up well when it’s time to shape the loaves.
Next up, you’ll want a standard baking sheet to hold your baguettes during the second rise and baking. And here’s a pro tip for getting that bakery look: you need a razor blade or a very sharp knife for scoring the dough just before it goes into the oven. It sounds dramatic, but it’s essential for a good oven spring and that classic baguette look.
Step-by-Step Instructions for Your First Homemade Baguette
Okay, now for the fun part! This process is so hands-off, but you need to pay attention during the shaping and baking stages. Don’t rush the resting period; that’s where the real flavor develops for your homemade baguette.
Mixing the Dough: The No-Knead Start for Homemade Baguette
First things first, let’s get everything mixed up. Grab that big bowl. Whisk your flour, yeast, and salt together really well. You want those dry ingredients totally incorporated before we add any liquid—this is super important because we aren’t kneading later to fix any clumps!
Now, pour in your warm water—remember, right around 100°F, like a nice warm bath! Use a wooden spoon or a spatula and just stir until everything comes together into a shaggy, sticky mess. I mean it, it will look awful! It should be too sticky to handle properly, and that’s exactly what we want for a successful homemade baguette. Resist the urge to add more flour! Cover that bowl tightly with plastic wrap. We are done touching it for a very long time.
The Long Rest: Developing Flavor in Your Dough
This is where the patience comes in, but it’s totally worth it. You need to let this dough rest on your counter at room temperature for a solid 12 to 18 hours. Seriously, set a timer for the next day! You’ll know it’s ready when the surface is covered in bubbles and the dough has visibly doubled, maybe even tripled, in size. It will look incredibly active and alive.
If you punch it down or try to rush it, you lose all that wonderful flavor development that the long rest creates. Just let it sit quietly in a spot where it won’t get cold. This slow fermentation is the key to getting that open, airy texture without any effort from your arms.
Gently Shaping the Loaves for Your Homemade Baguette
Once the dough is ready, generously flour your work surface. Gently scrape the dough out of the bowl—don’t punch it or try to shape it yet! Divide that beautiful mass into three roughly equal portions. Now, we work gently. You want to preserve those gas bubbles we spent 15 hours creating!
Take one portion and gently stretch it out with floured hands until you have a rough 12-inch log shape. Don’t worry if it looks a little uneven; we’re aiming for rustic here. This gentle handling is what keeps the final homemade baguette light and airy. Repeat this process for the other two portions. Place these shaped loaves onto a floured baking sheet, giving them a little space between each one.
Final Proofing and Oven Preparation
Cover the shaped loaves lightly with a clean kitchen towel. Now they need a second, shorter rise, which takes about 1 to 2 hours in a warm spot. They should look puffy and soft, but not quite doubled again. While they are puffing up, it’s time to get the oven screaming hot!
Set your oven to 450°F. This is crucial: grab a deep, oven-safe pan—a cast iron skillet works great—and place it on the bottom rack while the oven preheats. You need to pour 2 cups of very hot water into that pan right before you load the bread. That steam is what gives you that signature crisp crust.
Scoring and Baking Your Crisp Crust Homemade Baguette
Once the oven is hot and the steam pan is ready, it’s time to score. Take your very sharp knife or lame and quickly make 3 or 4 diagonal cuts across the top of each loaf. The cuts should be shallow, maybe half an inch deep. This lets the bread expand correctly when it hits the heat.
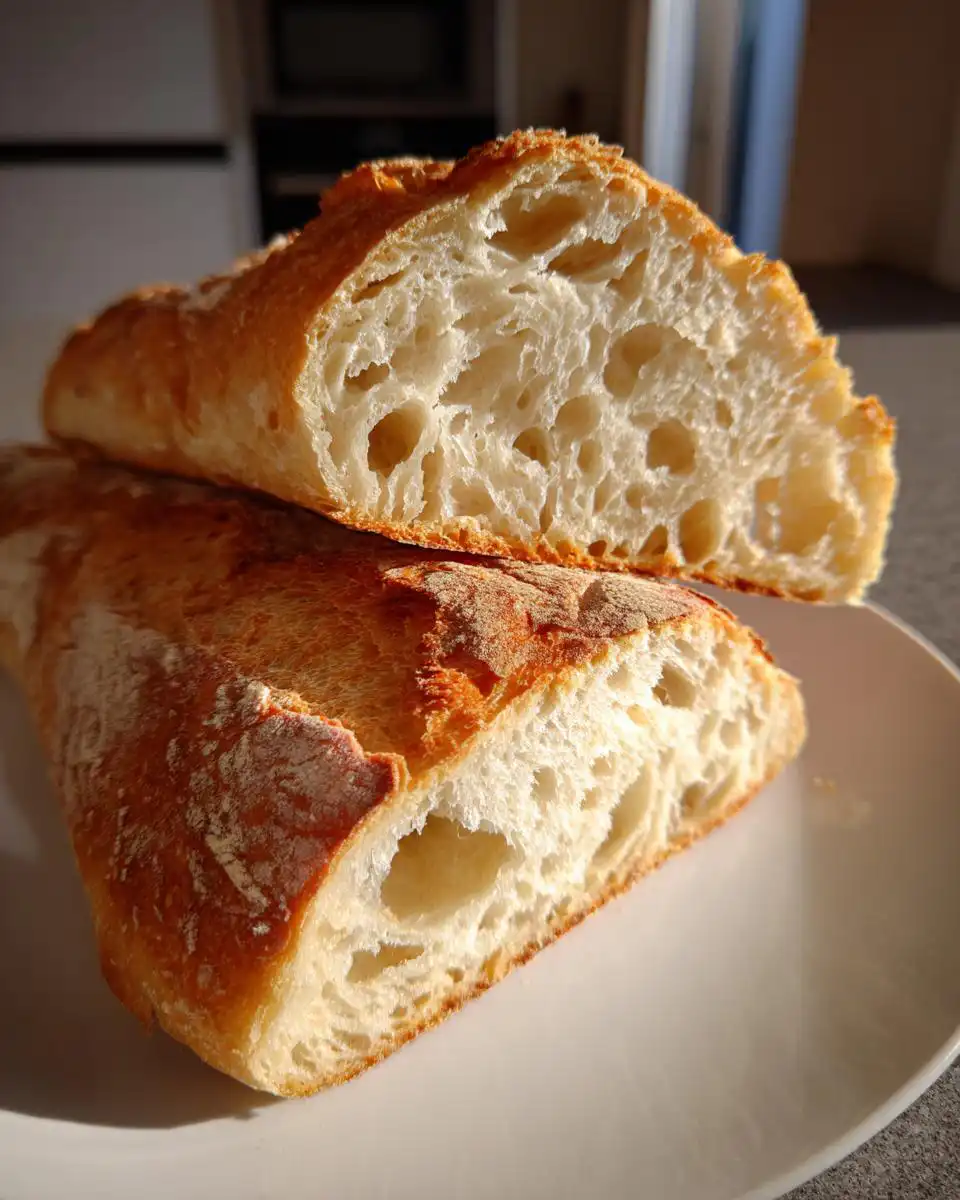
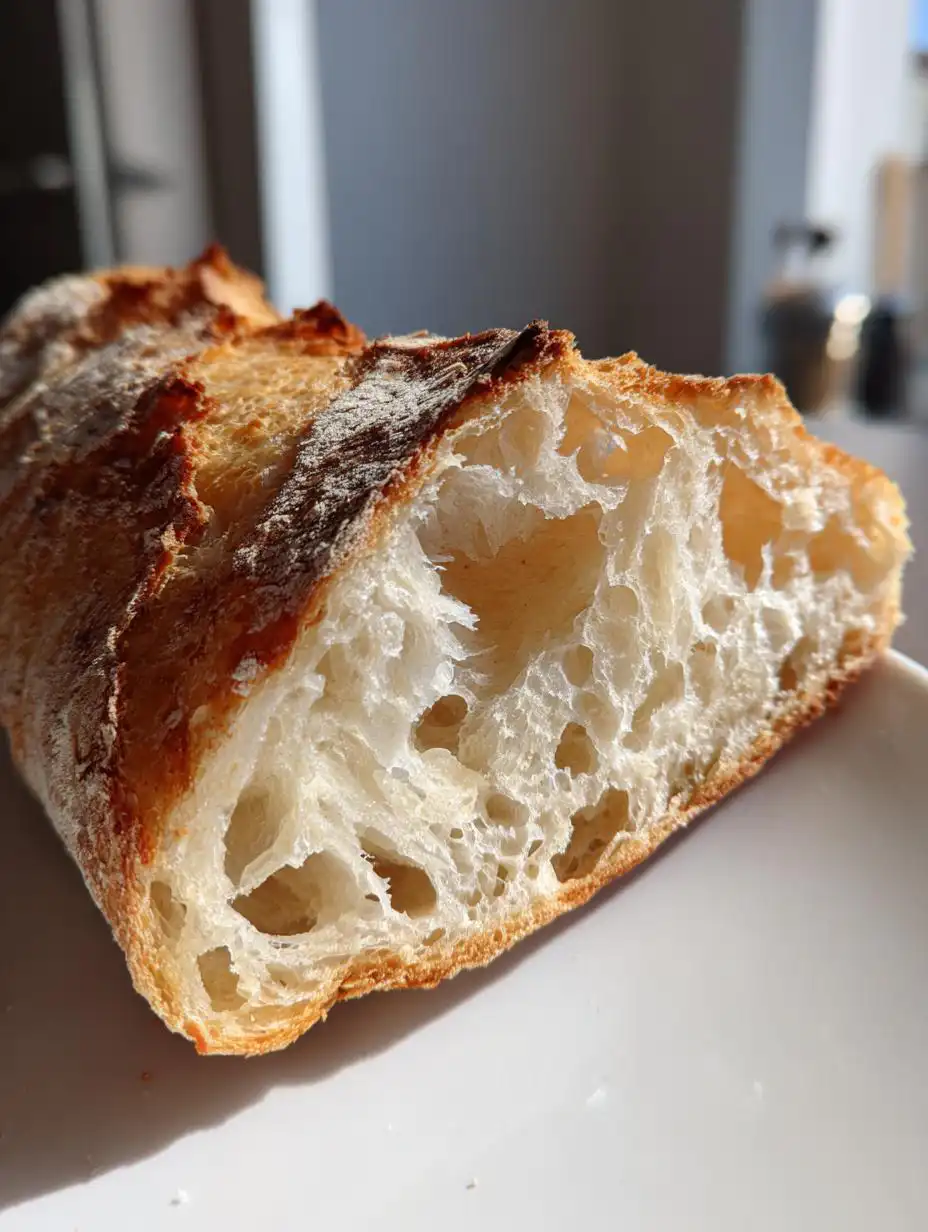
Carefully slide the baking sheet with your scored loaves onto the middle rack, directly over the steaming pan. Bake for 10 minutes with the steam present. After 10 minutes, carefully open the oven door (watch out for the steam!) and remove the water pan completely. Continue baking for another 25 to 30 minutes until your homemade baguette is a deep, gorgeous golden brown and sounds hollow when you tap the bottom. Cool them completely on a wire rack!
Tips for Achieving Bakery-Style Homemade Baguette Success
You’ve done the hard part—the long rest and the careful shaping! Now we focus on those finishing touches that take your bread from “homemade” to “bakery case.” The steam in the beginning is non-negotiable if you want that beautiful, shatteringly crisp crust on your homemade baguette. If you don’t have a pan for water, you can spray the inside walls of the oven heavily with water right after you slide the bread in, but you have to be quick!
Another huge tip for texture: don’t let the loaves cool on the baking sheet. As soon as they come out of the oven, transfer them immediately to a wire cooling rack. If they sit on a flat surface, the steam trapped underneath will soften that beautiful crust you worked so hard for. Give them space all around!
Also, try not to peek too much during those first 10 minutes of baking with steam. Opening the oven drops the temperature rapidly, and we want to keep that heat up high to encourage maximum oven spring. Patience right to the end ensures the best possible homemade baguette. If you are looking for more baking inspiration, check out my writing on Medium.
Storing and Reheating Your Wonderful Homemade Baguette
I know, you probably want to eat all three loaves right away, but if you manage to have leftovers, storing them correctly is key to keeping that lovely crust intact. The biggest mistake people make is sticking their fresh bread in the refrigerator. Trust me, the fridge is the enemy of a good crust; it makes bread stale so fast!
For the best results, you want to keep your homemade baguette at room temperature wrapped loosely in a clean kitchen towel or a paper bag. This lets the bread breathe a little bit while protecting it from drying out too fast. If you must store it longer than a day, slicing it and freezing the pieces is the way to go. We’re going to cover the best way to bring them back to life later! For more quick recipe ideas, see my Pinterest boards.
Keeping Your Homemade Baguette Fresh
If you plan to eat the bread within 12 hours, just leave it on the counter wrapped in a clean cloth bag or a paper bag. The paper bag helps keep the crust firm, while the cloth keeps the inside soft. If you need it to last two or three days, you should slice the bread first, put the slices in a freezer-safe bag, and freeze them. Never put a whole, uncut baguette in plastic wrap on the counter; it traps moisture and makes the crust soggy overnight.
Reheating for Maximum Crispness
When you’re ready to enjoy that frozen or day-old bread, we need to reintroduce some dry heat to wake up that crust. Don’t even think about the microwave!
The best way is to preheat your oven—or even a toaster oven—to about 350°F. Place the baguette (or slices) directly on the rack for about 5 to 8 minutes. You’ll hear it start to crackle again as the moisture evaporates from the outside. This quick blast brings back almost all the crispness you had on day one. It tastes like it just came out of the oven! If you are looking for other simple bread recipes, check out my guide on focaccia bread.
Frequently Asked Questions About Your Homemade Baguette
I get so many questions about this recipe because it seems too easy to be true! Don’t worry if your first attempt doesn’t look exactly like the ones in the fancy French bakeries; bread baking is all about practice. Here are a few things folks ask me most often when they are trying this no-knead method.
Q: Can I substitute the warm water with cold water?
You absolutely can, but you have to be prepared for a much, much longer rest time. Cold water slows the yeast down significantly. Instead of 12 to 18 hours, you might need 24 hours or even longer, depending on how warm your kitchen is. Stick to warm water if you want bread today or tomorrow! If you need a quick bread fix, perhaps try my 5-minute bread recipe.
Q: My dough didn’t rise at all during the long rest. What happened?
This usually points to dead yeast or water that was too hot. If you suspect your yeast wasn’t active, try blooming a tiny bit of the yeast in a spoonful of warm water with a pinch of sugar first. If it doesn’t bubble up in 5 minutes, toss the whole batch and start over with fresh yeast. It’s frustrating, but that first rise is everything!
Q: I don’t have a deep pan for steam. What’s a good alternative?
Steam is vital for that crispy crust, but you can use a large, oven-safe metal bowl instead of a shallow pan. Another trick is to use a spray bottle filled with plain water. Right after you load the bread, quickly open the door and spray the walls and ceiling of the oven three or four times, then shut the door fast. Just remember to do this only once or twice in the first 10 minutes!
Quick Reference: Ingredient and Storage Table
Sometimes you just need a quick cheat sheet before you start mixing, right? I keep these handy in my recipe binder. It saves me from digging through all my stories to find that exact water temperature!
Ingredient List Table
| Ingredient | Amount |
|---|---|
| All-Purpose or Bread Flour | 6 cups (plus extra for dusting) |
| Active Dry Yeast | 2 teaspoons |
| Fine Salt | 2 teaspoons |
| Warm Water (approx. 100°F) | 3 cups |
Storage Guidelines Table
This table shows you exactly how long your hard work will keep, depending on how you store it. Remember, the goal is always to keep that crust crisp!
| Storage Method | Duration | Best For |
|---|---|---|
| Countertop (Loosely Wrapped in Cloth/Paper) | Up to 1 day | Maximum crust freshness |
| Freezing (Sliced) | Up to 1 month | Long-term storage |
| Refrigerator | Not Recommended | Causes rapid staling/soggy crust |

Amazing 3-Ingredient Homemade baguette secret
- Total Time: 13 hours 5 minutes
- Yield: 3 baguettes (12 servings)
- Diet: N/A
Description
This no-knead homemade baguette has a crisp crust and soft interior. Made with just four simple ingredients, it’s bakery-quality bread at home.
Ingredients
- 6 cups all-purpose or bread flour, plus extra for dusting
- 2 teaspoons active dry yeast
- 2 teaspoons fine salt
- 3 cups warm water (about 100°F)
Instructions
- Mix dough: In a large bowl, whisk flour, yeast, and salt together. Pour in warm water and stir until a sticky dough forms. Do not knead.
- First rise: Cover the bowl tightly with plastic wrap and let the dough rest at room temperature for 12 to 18 hours, until bubbly and doubled in size.
- Shape baguettes: Generously flour a clean surface and your hands. Turn the dough out and divide it into 3 portions. Gently shape each into a 12-inch log without deflating the air.
- Second rise: Place the loaves on a floured baking sheet. Lightly cover with a towel and let rise in a warm spot for 1 to 2 hours, until puffy.
- Preheat oven: Set oven to 450°F. Place a deep baking pan filled with 2 cups of hot water on the bottom rack to create steam.
- Score and bake: Use a sharp knife to score each baguette 3–4 times diagonally across the top. Bake for 10 minutes with steam, then remove the water pan.
- Finish baking: Continue baking for another 25 to 30 minutes, until the crust is golden brown and crisp.
- Cool: Transfer baguettes to a wire rack and cool for at least 15 minutes before slicing.
Notes
- This recipe requires a long resting time for the dough.
- Use warm water around 100°F for the yeast activation.
- Creating steam in the oven results in a crispier crust.
- Prep Time: 25 minutes
- Cook Time: 40 minutes
- Category: Bread
- Method: No-Knead Baking
- Cuisine: French