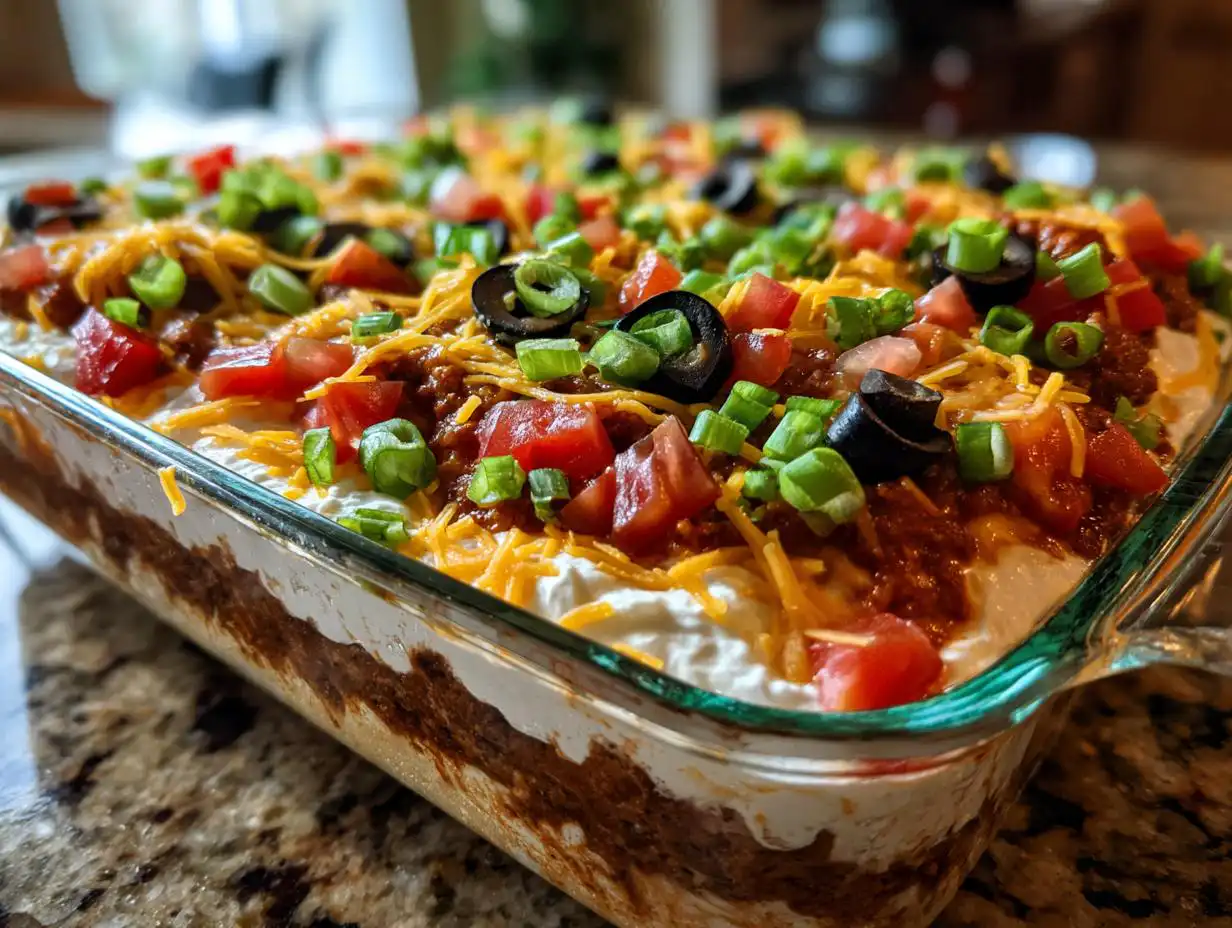
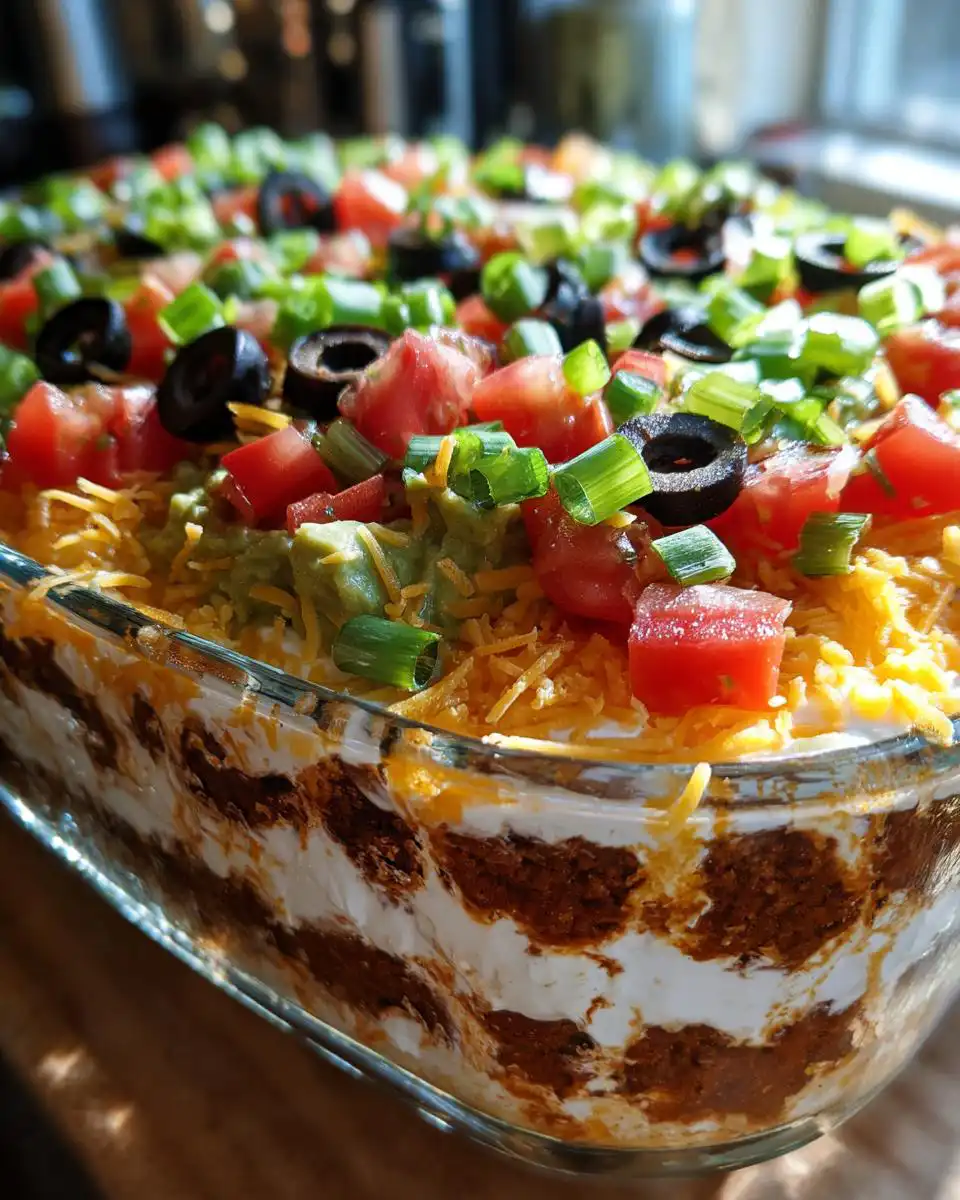
When game day rolls around, or when you realize you forgot to bring a dish to the potluck, having a go-to crowd-pleaser is essential. And trust me, nothing disappears faster than this seven layer dip. I’m talking about the kind of appetizer that has people hovering over the bowl, scooping up every last bit!
This isn’t just some lazy, store-bought assembly job, either. We’re making layers that actually taste vibrant and fresh. It’s hearty enough to feel like a mini-meal, thanks to that creamy bean base, but lightened up with bright, homemade guacamole. Every time I bring this to a gathering, people ask for the recipe immediately. It’s colorful, it’s satisfying, and honestly, it’s just plain fun to make. You’re going to love how easy it is to pull together something this impressive!
Essential Components for Your Seven Layer Dip
You know, the secret to a truly fantastic seven layer dip isn’t just the layering—it’s making sure every single layer tastes amazing on its own. If you skimp on the quality here, the whole thing falls flat. We’re building flavor from the bottom up, so we need good, honest ingredients.
We’ve broken this down into three main groups: the warm base layers, the fresh creamy middle layers, and the cold, crunchy toppings. Don’t rush the seasoning, especially in the beans and the guacamole. That’s where the magic happens! When you use quality components, you don’t even need to bake anything to get that satisfying, savory flavor profile we’re aiming for.
Ingredient List for Layered Perfection
Here is everything you’ll need to gather up before you start assembling. I wrote down all the exact amounts from my testing so you don’t have to guess! Make sure you have everything measured out before you start spreading, because things move fast once you get going.
- 1 can (16 ounces) refried beans
- 1 teaspoon olive oil
- 1/2 teaspoon cumin
- 1/4 teaspoon chili powder
- 1 cup plain Greek yogurt
- 1 teaspoon lime juice
- 1 teaspoon taco seasoning
- 1/4 teaspoon salt
- 2 ripe avocados
- 1 tablespoon lime juice (for guacamole)
- 2 tablespoons chopped cilantro (for guacamole)
- 2 tablespoons salsa
- 1/4 teaspoon garlic powder
- Salt and black pepper to taste
- 1 cup diced tomatoes
- 1/2 cup chopped green onions
- 1 cup shredded cheddar or Mexican blend cheese
- 1/4 cup sliced black olives
- 2 tablespoons chopped cilantro (for garnish)
Equipment Needed for Assembling the Seven Layer Dip
You don’t need any fancy gadgets for this, which is another reason I love it! Just set up a little assembly line. You’ll definitely want a sturdy 9×9-inch serving dish—that size is perfect for chip dipping without the dip spreading too thin. Grab a couple of mixing bowls, a small skillet for warming the beans, and a rubber spatula for smoothing those layers out nicely.
Expert Steps to Build the Perfect Seven Layer Dip
Okay, here’s where the fun starts! Building this dip is like creating a delicious, savory rainbow. Since we aren’t actually baking anything, timing is all about preparation and chilling. Follow these steps exactly, and you’ll keep those layers perfectly separated—no messy blending allowed!
Preparing the Warm Bean Base Layer
We start with the foundation, and we want it warm and flavorful, not straight out of the can cold. Get a small skillet heating over medium heat and drizzle in that olive oil. Toss in your refried beans, cumin, and chili powder. Stir this mixture around for about two or three minutes until it’s steaming gently. Don’t let it bubble aggressively, we just want it warmed through and fragrant! Once it’s ready, immediately scrape that seasoned bean mixture into the bottom of your 9×9 dish. Use your spatula to press it firmly and evenly across the entire bottom. This solid, warm base is what holds everything else up.
Creating the Seasoned Yogurt Topping
Time for layer number two! Grab a clean mixing bowl—you don’t want any bean residue in here—and combine your Greek yogurt, that little bit of lime juice, the taco seasoning, and the salt. Whisk this vigorously until everything is completely smooth. You want zero clumps of seasoning powder remaining. Taste it quickly! It should have a nice zesty punch. Gently spoon this yogurt mixture over the bean layer. Use the back of the spoon or your spatula to spread it carefully right to the edges. Be gentle so you don’t drag the bean layer up!
Crafting the Homemade Guacamole Layer
This layer is crucial, so make sure those avocados are perfectly ripe—soft but not brown! Mash them in a separate bowl. I like mine slightly chunky, but you do you! Once mashed, mix in the lime juice, cilantro, salsa, garlic powder, salt, and pepper. This is where you balance the flavor; you want that bright lime cutting through the richness of the avocado. Spread this bright green guacamole layer over the seasoned yogurt. Again, take your time spreading; a thin, even layer is key to keeping the seven layer dip structure intact.

Layering the Fresh Toppings and Garnish
Now we move to the cold, crisp toppings, and the order really matters for presentation! First, sprinkle your diced tomatoes evenly across the guacamole. Next, scatter those chopped green onions over the tomatoes. Then, generously cover everything with your shredded cheese. Finally, dot the top with the sliced black olives. You want a nice distribution of color across the surface. Just before serving (or right before the chill time), sprinkle that last bit of fresh chopped cilantro over the very top for a pop of green!
Critical Chilling Time for the Seven Layer Dip
This is the step everyone wants to skip, but please, don’t! You absolutely must chill this dip for at least 30 minutes before you bring it out to the party. Why? Because those warm beans at the bottom need time to cool down and firm up. If you serve it right away, the layers will slide and smoosh together the second someone digs in. Chilling lets the flavors—especially the seasonings in the beans and yogurt—meld together beautifully, giving you distinct, scoopable layers.
Why This Seven Layer Dip Recipe Works So Well
I’ve made a lot of appetizers over the years, and honestly, this recipe is a winner because it checks all the boxes without stressing me out. It’s the perfect combination of fresh ingredients and easy assembly. You get all those wonderful, savory Mexican-American flavors without having to turn on the oven for anything other than maybe warming the beans for a minute!
Quick Prep Time Overview
One of the biggest wins here is the speed. You are only looking at about 20 minutes of active prep time, plus that 5 minutes to warm up the beans. That means you can seriously decide to make this dip an hour before guests arrive and still look like a total pro. It’s fast, but it tastes like you spent all afternoon on it! If you want more quick appetizer ideas, check out my Pinterest board for inspiration.
Flavor Profile and Dietary Notes
Since we’re skipping the ground beef or chicken you sometimes see in other versions, this dip is wonderfully vegetarian friendly, which is great for mixed crowds. The flavor profile is bright and layered—sharp lime, creamy beans, savory spices, and fresh veggies. It hits salty, tangy, and fresh notes all in one scoop. It’s a truly satisfying Mexican-American inspired appetizer. For more vegetarian options, see my Medium articles.
Tips for Making the Best Seven Layer Dip
Even though this recipe is pretty straightforward, I’ve picked up a few tricks over the years that guarantee success, especially when you’re trying to impress a crowd. If you follow these little pointers, your seven layer dip will look professional and taste incredible. It’s all about those small details!
Ingredient Substitutions in Your Seven Layer Dip
The original recipe calls for Greek yogurt, and I love it because it’s thick and tangy, holding its shape really well. But listen, if you don’t have Greek yogurt on hand, don’t panic and run to the store! You can absolutely use regular sour cream instead. Just make sure whatever you use is full-fat if you can, because the lower-fat versions tend to be a bit watery, and we definitely don’t want a soupy layer in the middle of our dip. If you are looking for other ways to use yogurt, check out this chocolate Greek yogurt snack recipe.
Achieving Visually Appealing Layers
The biggest tip for keeping those layers looking separate and beautiful is the spreading technique. Always use a clean spatula or the back of a spoon for each new layer, moving from the center outwards very gently. Think of it like frosting a cake—you don’t want to press down hard! For the guacamole and yogurt, try spooning dollops evenly across the surface first, and *then* gently coax them into an even layer. This prevents you from accidentally scraping up the layer underneath. For more tips on presentation, you might enjoy reading about festive appetizer boards.
Storing and Serving Your Seven Layer Dip
This dip is definitely best when it’s served cold, fresh from the fridge. Remember that chilling time we talked about? That’s what keeps everything firm and scoopable for hours at a party. If you have leftovers, this dip stores beautifully! Just make sure you cover the dish tightly with plastic wrap—pressing the wrap directly onto the surface of the cheese and cilantro helps prevent any weird crust from forming.
We never reheat this dip, ever! Warming it up turns that beautiful guacamole layer into soup and makes the yogurt runny. It’s designed to be a cold appetizer. If you’re making it for a party the next day, just assemble everything except the very top layer of cilantro, cover it, and keep it cold. Add the last garnish right before you put it out!
Storage and Leftover Guidelines
Because we are using fresh guacamole, the lifespan is dictated by that avocado layer, sadly. It’s honestly at its absolute peak flavor and color on day one. If you store it tightly covered, it’s perfectly safe and still tastes great for two full days. By day three, the guacamole starts to look a little sad, even under the other layers, so I usually try to finish it up by then. Never leave it sitting out at room temperature for more than two hours, though!
| Storage Method | Duration |
|---|---|
| Airtight Container (Refrigerated) | Up to 3 Days |
| Room Temperature | Max 2 Hours (Food Safety!) |
Frequently Asked Questions About the Seven Layer Dip
I get so many questions about this recipe! It’s such a popular dish, and people always want to know how to tweak it for their specific needs. Here are the things I hear most often when folks are planning their spread.
Can I make the seven layer dip ahead of time?
Yes, you absolutely can! I often assemble the entire thing—beans, yogurt, guacamole, and all the cold toppings—the night before I need it. The key is to cover it tightly and keep it in the fridge overnight. The chilling time really helps the flavors marry up. Just try to hold off on sprinkling that final garnish of fresh cilantro until about 15 minutes before you serve it so it stays bright green and doesn’t wilt.
What is the best way to serve this party dip?
Tortilla chips are the classic choice, of course! But because this is such a hearty party dip, I always put out a big bowl of sturdy, scoop-style tortilla chips—the flimsy ones break right away. I also like to include some veggie sticks like carrots, celery, and bell pepper strips. It gives people a lighter option, and it makes the whole presentation look more abundant! If you need another great dip recipe, try this cottage cheese queso dip.
How long does this seven layer dip last in the refrigerator?
Because we are using fresh guacamole, the lifespan is dictated by that avocado layer, sadly. It’s honestly at its absolute peak flavor and color on day one. If you store it tightly covered, it’s perfectly safe and still tastes great for two full days. By day three, the guacamole starts to look a little sad, even under the other layers, so I usually try to finish it up by then. Never leave it sitting out at room temperature for more than two hours, though!
Nutritional Snapshot of the Seven Layer Dip
Now, I know when you’re making a huge bowl of dip for a crowd, you aren’t usually counting calories, but it’s good to have a general idea of what you’re serving! Since this recipe relies heavily on beans, avocado, and yogurt, it packs a decent amount of protein and healthy fats. Just remember, these numbers are estimates based on standard ingredient sizes, so your mileage might vary depending on how heavy-handed you are with the cheese!
| Nutrient | Amount Per Serving |
|---|---|
| Serving Size | 1/10 of dip |
| Calories | 160 |
| Fat | 10g |
| Carbohydrates | 11g |
| Protein | 6g |

Make amazing seven layer dip in 25 mins
- Total Time: 25 minutes
- Yield: 10 servings
- Diet: Vegetarian
Description
This seven layer dip is a colorful, flavor-packed appetizer perfect for gatherings, game days, or potlucks. Layers of creamy beans, seasoned yogurt, homemade guacamole, and fresh toppings come together for a dip that’s hearty, fresh, and totally scoopable.
Ingredients
- 1 can (16 ounces) refried beans
- 1 teaspoon olive oil
- 1/2 teaspoon cumin
- 1/4 teaspoon chili powder
- 1 cup plain Greek yogurt
- 1 teaspoon lime juice
- 1 teaspoon taco seasoning
- 1/4 teaspoon salt
- 2 ripe avocados
- 1 tablespoon lime juice (for guacamole)
- 2 tablespoons chopped cilantro (for guacamole)
- 2 tablespoons salsa
- 1/4 teaspoon garlic powder
- Salt and black pepper to taste
- 1 cup diced tomatoes
- 1/2 cup chopped green onions
- 1 cup shredded cheddar or Mexican blend cheese
- 1/4 cup sliced black olives
- 2 tablespoons chopped cilantro (for garnish)
Instructions
- Warm olive oil in a small skillet over medium heat. Stir in refried beans, cumin, and chili powder. Cook 2 to 3 minutes until warmed through. Spread this mixture in an even layer on the bottom of a 9×9-inch dish.
- In a bowl, mix yogurt, lime juice, taco seasoning, and salt. Spread this mixture over the beans.
- Mash avocados in a separate bowl. Stir in lime juice, cilantro, salsa, garlic powder, salt, and pepper. Spread this guacamole mixture over the yogurt layer.
- Add toppings in order: tomatoes, green onions, cheese, and black olives.
- Garnish with chopped cilantro.
- Chill for at least 30 minutes before serving with tortilla chips or veggie sticks.
Notes
- This dip is best served cold after chilling.
- You can substitute sour cream for Greek yogurt if preferred.
- Use your favorite salsa variety.
- Prep Time: 20 minutes
- Cook Time: 5 minutes
- Category: Appetizer
- Method: Layering and Chilling
- Cuisine: Mexican-American