Oh my goodness, you HAVE to try this recipe! I’m not kidding when I say these are the creamiest, most decadent vegan chocolate truffles you will ever put in your mouth. Seriously, they taste like they came from a fancy European chocolatier, but guess what? They only use four main ingredients, and there’s absolutely no dairy or refined sugar hiding in them. It’s pure magic!
I discovered this simple trick years ago when I needed a last-minute, impressive gift for my neighbor who mentioned she was trying to cut back on dairy. I whipped these up in about twenty minutes of active time, and they were gone before I could even grab one for myself! The secret is that beautiful marriage of good dark chocolate and full-fat coconut milk. If you follow these steps exactly, you’ll have perfect, velvety little bites every single time. Forget complicated tempering; we are keeping this easy and delicious!
Why You’ll Love These Vegan Chocolate Truffles
Honestly, these little spheres of chocolate bliss are my go-to dessert for pretty much any occasion. They look incredibly elegant, but they are shockingly simple to make. You don’t need any fancy equipment or complicated skills, which I love!
- They are incredibly rich and creamy—you won’t miss the butter, I promise!
- Clean ingredients mean you know exactly what you’re eating. No weird stuff here!
- They come together faster than ordering takeout.
- Perfect for making ahead; they are the ultimate thoughtful, edible gift.
- The customizable coatings let you get creative depending on who you’re serving.
Quick Preparation for Rich Vegan Chocolate Truffles
The best part? You are looking at maybe 20 minutes of actual hands-on work. We melt, we mix, and then the fridge does the heavy lifting! There’s no baking, no waiting around for rising times—just pure, focused mixing followed by a nice chill. It’s the perfect recipe when you need a serious chocolate fix fast. For more sweet ideas, check out these dark chocolate nut bars.
Essential Ingredients for Perfect Vegan Chocolate Truffles
Okay, friend, let’s talk about what goes into these amazing vegan chocolate truffles. Since there are so few ingredients, quality really shines through here. You can’t hide behind excessive sugar or flavoring when you only have a handful of items doing the heavy lifting. Trust me on this—using the right stuff makes all the difference between a good truffle and a mind-blowing one.
We are keeping this recipe clean, which means we skip the heavy cream and butter you usually find in classic ganache. Instead, we rely on plant-based powerhouses to give us that gorgeous, melt-in-your-mouth texture. Before you start melting anything, take a minute to gather these items. You’ll be so glad you did when everything comes together so smoothly! You can see more of my recipe ideas on Medium.
Ingredient Clarity and Quality for Vegan Chocolate Truffles
I want to be super clear on a few points so your truffles set up perfectly. First, the chocolate chips or chopped bar needs to be high quality—aim for at least 60% cocoa solids, maybe even 70% if you like a deeper, less sweet profile. Second, you absolutely must use full-fat canned coconut milk. Don’t grab the carton kind; we need that thick cream off the top for the richness. And finally, that beautiful sweetness comes from pure maple syrup. It adds a subtle depth that refined sugar just can’t touch. It’s worth grabbing the real deal!
| Ingredient | Amount |
| Dark Chocolate Chips | 1 cup |
| Full-Fat Coconut Milk | 1/3 cup |
| Maple Syrup | 2 tablespoons |
| Creamy Almond Butter | 1/3 cup |
| Fine Salt | Pinch |
| Coatings (Cacao, Fruits) | As needed |
Equipment Needed for Your Vegan Chocolate Truffles
Don’t stress about needing fancy machinery for these! We are keeping the equipment list super simple so you can get right to the mixing. Make sure you have these few things ready before you start melting, or you’ll be scrambling later.
- A medium bowl that fits over a small saucepan (for the double boiler method).
- A sturdy whisk or spatula for mixing.
- Parchment paper for lining a small baking sheet.
- A small cookie scoop or measuring spoon (about 2 teaspoons).
- Three small, shallow bowls for your coating options.
Step-by-Step Instructions for Vegan Chocolate Truffles
Ready to make some magic? This is where those incredible vegan chocolate truffles come together. The process is broken into two main parts: creating that silky smooth base and then shaping and coating them beautifully. Don’t rush the chilling time—that’s non-negotiable for getting the right texture! If you are looking for another quick dessert, try these banana oatmeal bars.
Creating the Smooth Vegan Chocolate Truffle Base
First, set up your double boiler—that’s just a heatproof bowl sitting snugly over a pot with just a little bit of simmering water underneath. Don’t let the water touch the bottom of your bowl, or you’ll scorch the chocolate! Toss your dark chocolate chips, the full-fat coconut milk, and the maple syrup into that top bowl. Stir it gently until it’s completely melted and looks glossy and smooth. That’s the sign to take it off the heat immediately, or it gets too hot!
Once it’s off the heat, whisk in your creamy almond butter and that tiny pinch of salt. Keep whisking until everything is fully emulsified—you want zero streaks of almond butter remaining. Now for the patience part: cover that bowl and pop it into the refrigerator. You need to chill this base for a solid two hours. It needs to be firm enough that you can scoop it without it melting all over your hands.
Shaping and Coating Your Vegan Chocolate Truffles
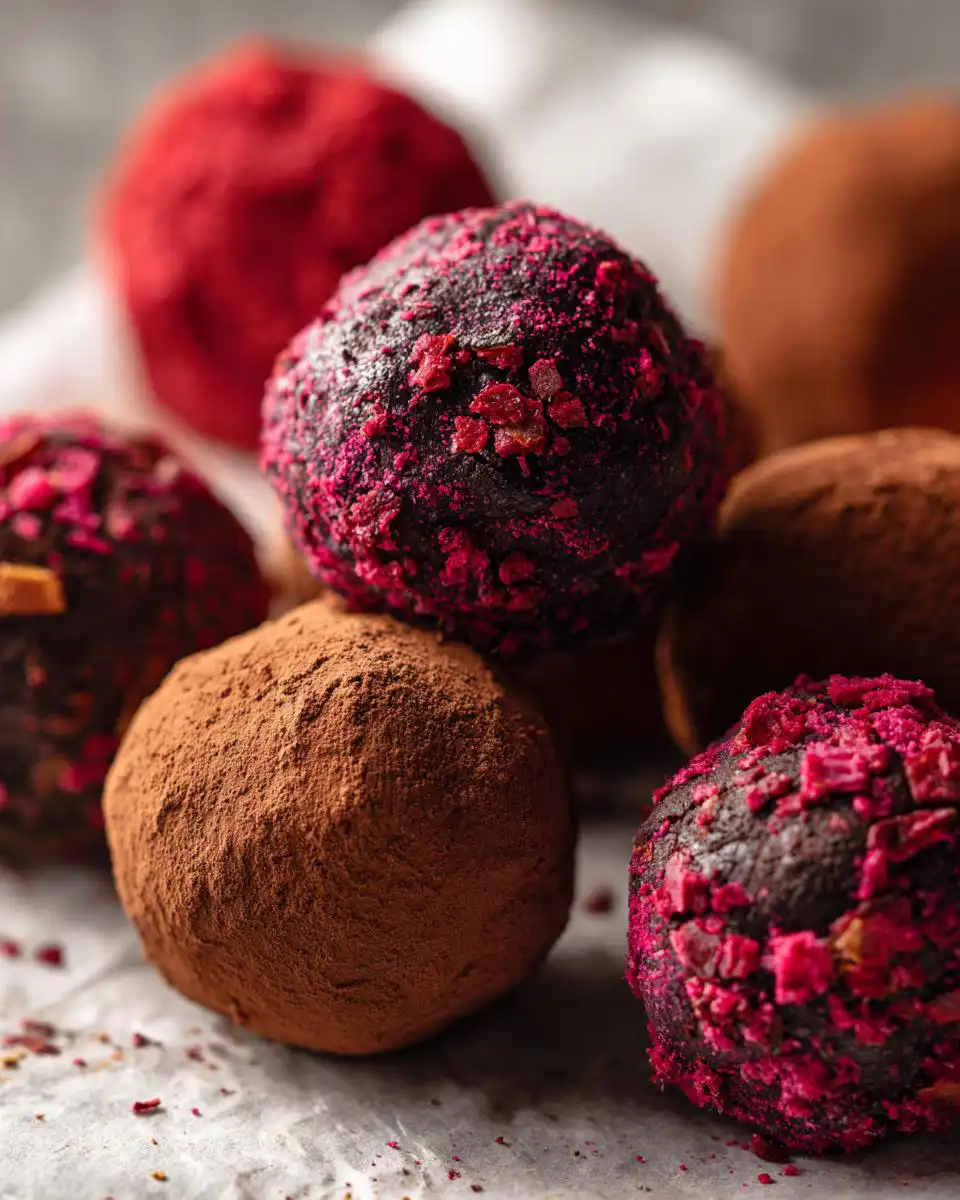
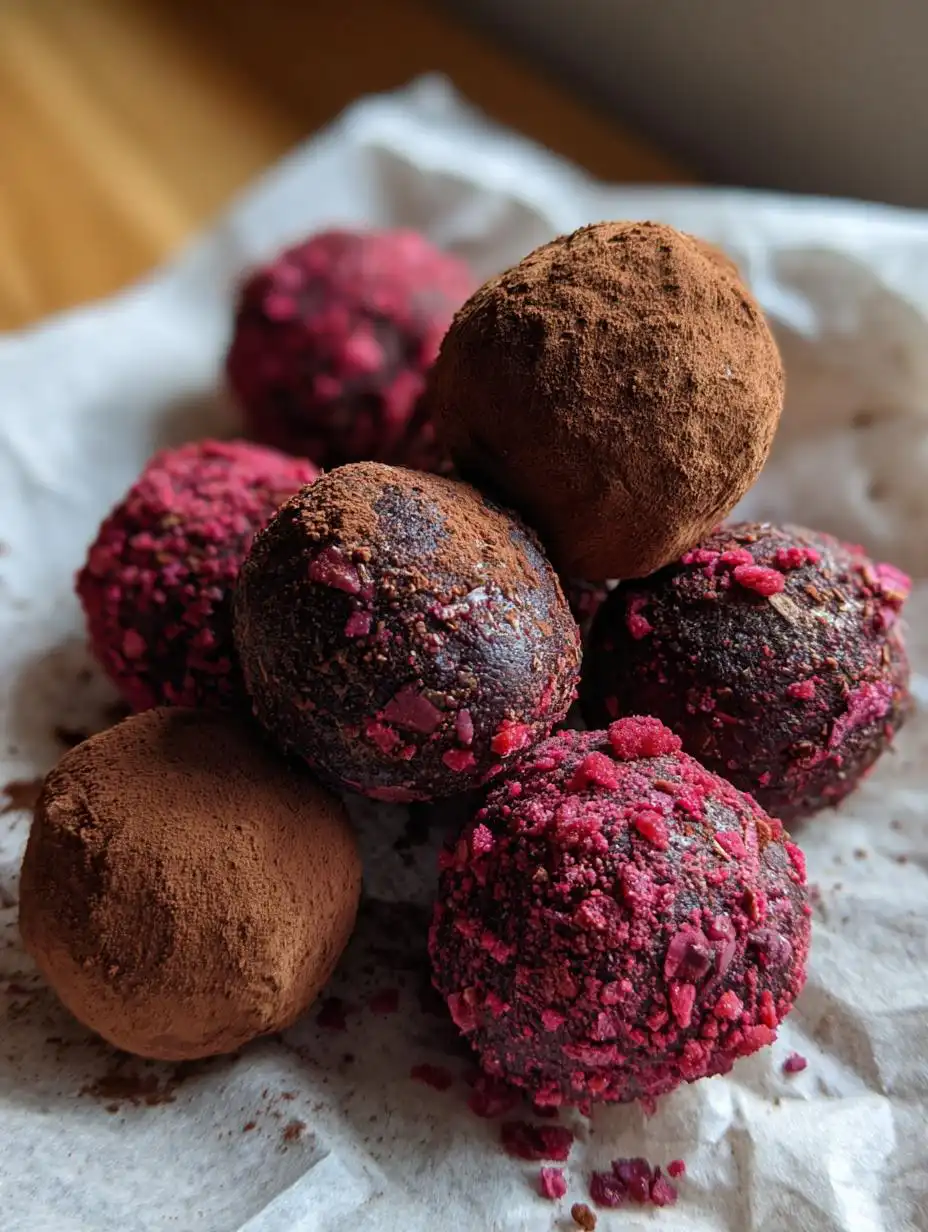
While it chills, get your coatings ready. I love having three separate bowls—one with the cacao powder, and two with my crushed freeze-dried raspberries and strawberries. Line a small baking sheet with parchment paper; this makes cleanup a breeze and stops them from sticking.
When the mixture is firm, grab a small cookie scoop—I use the smallest one I have, usually about two teaspoons. Scoop out the mixture and roll it quickly between your palms to form a nice, round ball. Work fast because the warmth from your hands will start to soften them up! Drop the rolled ball into your first coating bowl. Roll it around until it’s completely covered. We want an even layer—no bare spots!
Place the coated truffle onto your lined sheet. Once you’ve rolled and coated all of them, pop the whole tray back into the fridge for about 15 minutes. This final, quick chill helps them set up perfectly before serving or storing. Honestly, watching them firm up is so satisfying!
Expert Tips for Perfect Vegan Chocolate Truffles
Even with a recipe this simple, sometimes things don’t go exactly to plan, right? Don’t panic if your ganache mixture seems a little off after the first chill. A few tweaks based on your kitchen temperature or the exact chocolate you used can save the day. Remember, these are forgiving, but knowing these little tricks makes you look like a total pro! If you’re looking for more baking tips, check out how to make lemon raspberry eclairs.
The goal is a firm, scoopable texture—not hard like a rock, and definitely not runny like soup. I always try to slightly under-chill it first, because it’s easier to firm up a soft mixture than it is to rescue one that’s too hard!
Troubleshooting Texture in Your Vegan Chocolate Truffles
If, after two hours, your mixture is still too soft and gooey to scoop cleanly, it means it needs more time to set up. Put it back in the fridge for another 30 to 45 minutes. If it’s still resisting, you can try adding just one extra tablespoon of almond butter, but mix it in really well and then chill again. Don’t add too much, or the flavor will change!
Now, what if you accidentally chilled it too long and it’s hard as a brick? Seriously, this happens! Don’t try to roll it like that, or it will crack. Just leave the bowl on the counter for about 10 to 15 minutes to let it soften up slightly. You want it workable, not melty. If you’re in a rush, you can briefly microwave the whole bowl for just 5-second bursts, stirring well after each one, until you can easily scoop it again. That little bit of warmth brings it right back to life!
Flavor Variations for Vegan Chocolate Truffles
Once you master the base recipe, you can start playing around with flavor additions while keeping that amazing four-ingredient structure intact. The best part is that you only need a tiny bit of extract or spice added right before you chill the mixture. It’s a simple way to create totally new treats! For more savory inspiration, see this broccoli cheddar pasta recipe.
Here are three of my favorite ways to shake things up:
- Zesty Orange Truffles: Add 1 teaspoon of pure orange extract and about 1 teaspoon of fresh orange zest to the chocolate mixture right after you remove it from the heat. It brightens up the dark chocolate beautifully!
- Mint Chocolate Dream: Stir in 1/2 teaspoon of high-quality peppermint extract along with the almond butter. You can even use crushed peppermint candies as a coating instead of the dried fruit for an extra crunch.
- Spiced Mocha Kick: Whisk in 1/2 teaspoon of instant espresso powder and a tiny pinch of ground cinnamon when melting the chocolate. This gives the truffles a rich, deep coffee flavor that pairs wonderfully with the almond butter.
Storing and Enjoying Your Vegan Chocolate Truffles
These are fantastic because they hold up so well, which makes them brilliant for gifting! Since they don’t have any dairy or eggs, they stay fresh for much longer than traditional chocolate candies. You just need to make sure they are kept cool to maintain that perfectly rolled shape. I always make a double batch because they disappear so fast in my house! You can find more great recipe ideas on my Pinterest page.
If you manage to keep some around after the initial frenzy, here’s how to store them properly so they taste just as good days later:
| Storage Location | Duration |
| Refrigerator | Up to 3 Weeks |
| Freezer (Airtight) | Up to 2 Months |
How to Keep Vegan Chocolate Truffles Fresh
The key here is keeping them protected from air and humidity. Always place your finished, coated truffles into a very good airtight container. If you’re stacking them, use a small piece of parchment paper between the layers so the coatings don’t stick together. They must be stored in the refrigerator because the coconut milk base will soften significantly at room temperature, especially if your kitchen is warm!
If you freeze them, let them thaw slowly in the fridge for a few hours before you plan to eat them. They taste best when they are slightly chilled, not rock hard, so give them a little time to come back to that perfect, melt-in-your-mouth consistency.
Frequently Asked Questions About Vegan Chocolate Truffles
I get so many questions about this recipe because people are always amazed at how simple it is! Here are a few of the most common things folks ask when they are trying these no refined sugar treats for the first time. If I didn’t answer your burning question, just drop me a note!
Can I substitute the coconut milk in these vegan chocolate truffles
That full-fat coconut milk is really important because it provides the high fat content we need to create that creamy ganache texture without using dairy. If you absolutely cannot use coconut milk, you can try using a very thick, high-fat cashew cream or soy-based heavy cream substitute, but you might need to adjust the chilling time. Make sure whatever you use is full-fat, not the watery carton version, or your mixture might stay too soft!
What is the best chocolate to use for vegan chocolate truffles
For the best flavor and texture, I always recommend using a high-quality dark chocolate bar that you chop yourself, rather than chips. Look for something around 60% to 72% cocoa solids. The higher the quality, the smoother the melt! Since we aren’t using much sweetener, if you use chocolate that is 80% or higher, you might find the final truffle a little too bitter, so stick to that 60-70% range for that perfect balance.
Q3. How firm should the mixture be before I start rolling?
The mixture should be firm enough that when you scoop it out, it holds its shape for a few seconds before slowly starting to slump. It should feel cool and dense, almost like firm cookie dough, but not rock hard. If it’s too soft, it will melt instantly in your hands!
Sharing Your Delicious Vegan Chocolate Truffles
I truly hope you enjoyed making these little bites of heaven! Once you’ve rolled the last one and admired your handiwork, I’d love to hear what you thought. Did you use the raspberry coating or go for the pure cacao dust? Drop a rating right below the recipe card—it helps other bakers know these are worth making!
And please, snap a picture! Tag me on social media if you share your gorgeous vegan chocolate truffles. Seeing them in your kitchens is the best part of my day!
Print
Amazing 4 Ingredient vegan chocolate truffles
- Total Time: 20 minutes
- Yield: 26 truffles
- Diet: Vegan
Description
Make creamy, rich vegan chocolate truffles with just four ingredients. Perfect for gifting or a quick dessert — no dairy or refined sugar needed.
Ingredients
- 1 cup dark chocolate chips or chopped dark chocolate (about 6 ounces)
- 1/3 cup full-fat coconut milk
- 2 tablespoons maple syrup
- 1/3 cup creamy almond butter
- Pinch of fine salt
- 2 tablespoons cacao powder (for coating)
- 2 tablespoons crushed freeze-dried raspberries (for coating)
- 2 tablespoons crushed freeze-dried strawberries (for coating)
Instructions
- Place dark chocolate, coconut milk, and maple syrup in a medium heatproof bowl.
- Set the bowl over a pot of simmering water and stir until smooth and glossy. Remove from heat.
- Whisk in almond butter and salt until fully blended.
- Chill the mixture in the refrigerator for 2 hours, or until firm enough to scoop.
- Line a small baking sheet with parchment paper.
- Use a small cookie scoop (about 2 teaspoons) to portion the truffle mixture. Roll each portion between your palms into a smooth ball.
- Place cacao powder and crushed fruits in separate small bowls. Roll each truffle in your chosen coating until evenly coated.
- Transfer truffles to the lined sheet and refrigerate for 15 minutes to set.
- Store truffles in an airtight container in the refrigerator for up to 3 weeks.
Notes
- These truffles come together in minutes for an elegant treat or thoughtful edible gift.
- You have endless options for coatings beyond the listed fruits and cacao powder.
- Prep Time: 20 minutes
- Cook Time: 0 minutes
- Category: Dessert
- Method: No-bake
- Cuisine: American