Listen up, because I’ve cracked the code on a dessert that even my non-vegan friends fight over. We’re talking about the most decadent, unbelievably creamy **vegan chocolate cheesecake** you will ever put in your mouth. Seriously, forget everything you thought you knew about dairy-free desserts!
I spent years trying to get that perfect, dense, yet utterly smooth texture without any cream cheese or heavy cream. It felt impossible until I stopped trying to mimic dairy and started respecting what cashews can do. This recipe is the result of about six separate kitchen explosions and way too many late nights, but trust me—it’s worth every second.
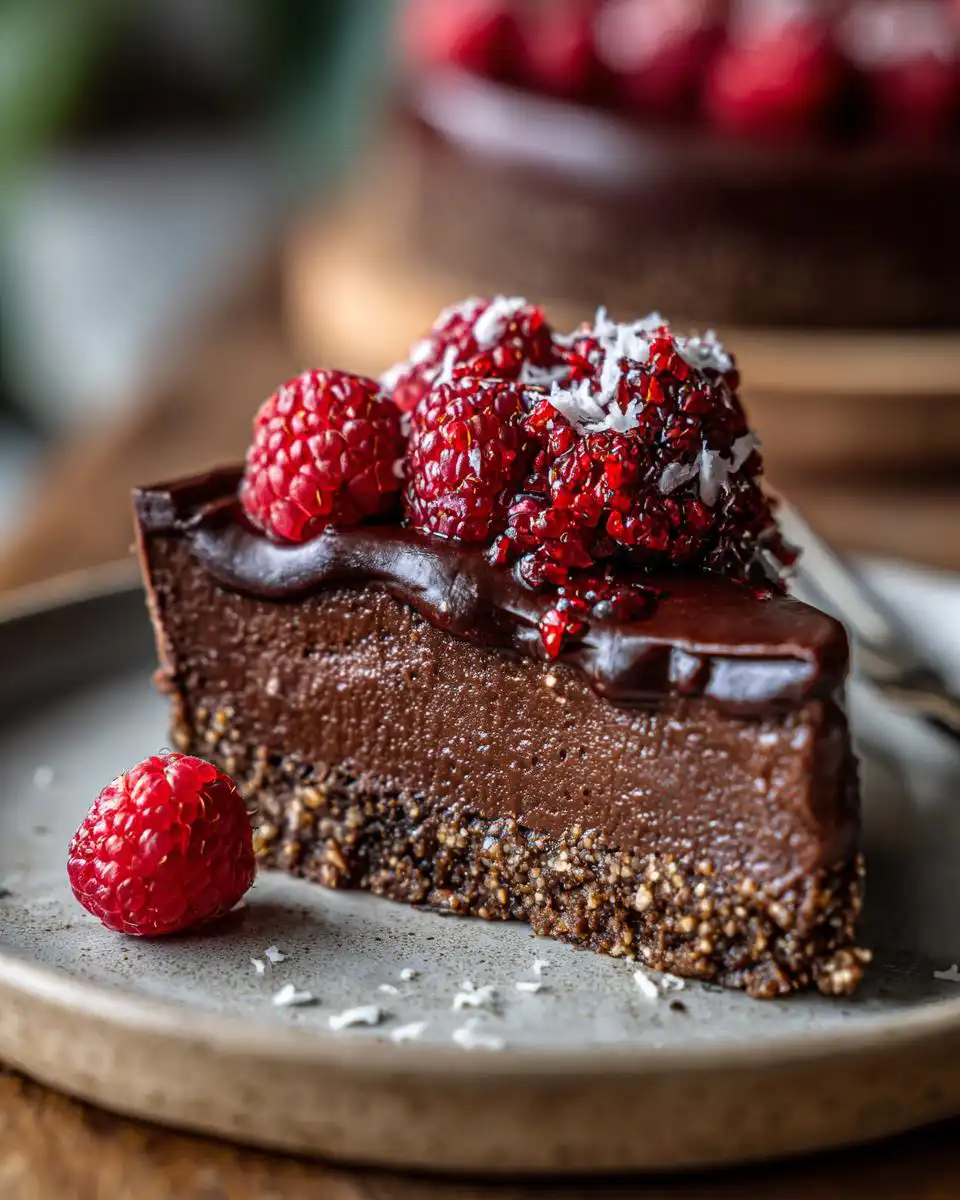
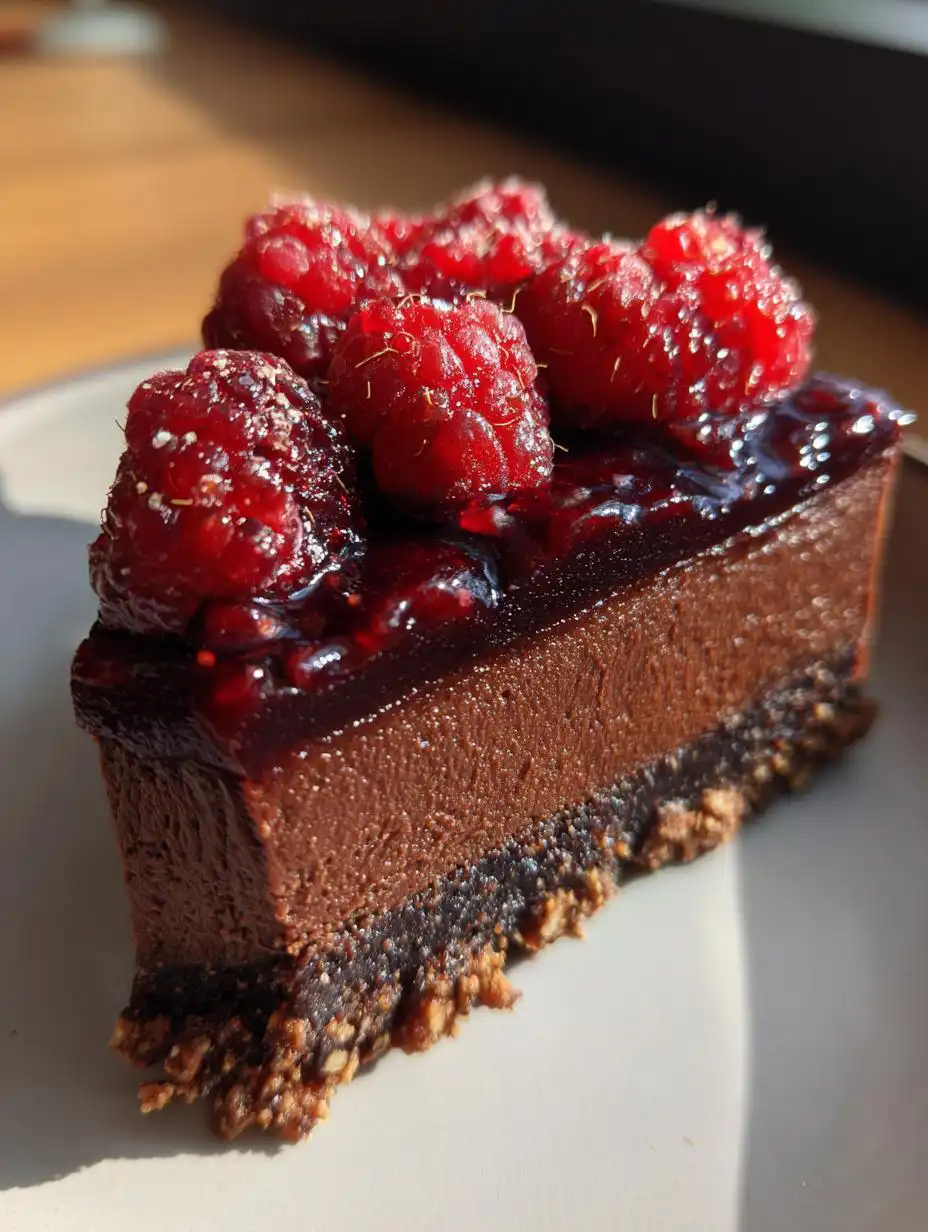
The secret lies in the combination of soaked cashews and full-fat coconut milk, which gives this baked beauty its signature richness. It bakes up firm, it slices like a dream, and the nutty pecan crust just sings underneath that dark chocolate filling. You absolutely need this recipe for your next gathering!
Essential Components for Your Vegan Chocolate Cheesecake
When you’re making something this rich and decadent, especially a **vegan chocolate cheesecake**, precision really matters. This isn’t the time to start swapping out mystery ingredients! I’ve laid out the components below because getting the right texture—that ultra-creamy filling against that crunchy base—depends entirely on using exactly what I list here. Don’t worry, once you have the items, putting it together is a breeze!
Gathering Ingredients for the Nutty Chocolate Crust
For the crust, we want texture and flavor, so we are using raw pecans and almond flour. Make sure your coconut sugar is finely ground, and you’ll need to have your 1/3 cup of coconut oil melted and ready to go before you start pulsing things in the food processor. It needs to come together into a nice, slightly sticky clump.
Assembling Ingredients for the Silky Filling
This is where the magic happens! The base for this silky filling is 1 1/2 cups of raw cashews. You absolutely must soak these in water for at least four hours, or even better, overnight, and then drain them completely. You also need plain coconut yogurt and the thick cream from the top of a can of full-fat coconut milk—don’t use the watery stuff at the bottom!
Preparing the Fresh Raspberry Topping
We’re keeping this simple so the chocolate shines. Just a cup of fresh raspberries stirred with two tablespoons of coconut sugar. They’ll macerate while the cake bakes and chills, creating their own beautiful, slightly tart syrup. If you are looking for other fruit-based dessert ideas, check out these lemon raspberry eclairs recipe.
Equipment Needed for a Perfect Vegan Chocolate Cheesecake
To make sure this comes out looking professional, you’ll want a few key tools ready to go. A food processor is essential for breaking down the nuts for the crust. For the filling, you need a high-speed blender—this is non-negotiable for that smooth, no-grittiness factor! And finally, you must use an 8-inch springform pan; it makes releasing this beauty so much easier.
Step-by-Step Instructions: Baking Your Vegan Chocolate Cheesecake
Okay, here we go! This is the fun part where we turn those carefully measured ingredients into the most spectacular **vegan chocolate cheesecake** imaginable. Follow these steps closely, especially around the cooling, and you’ll be rewarded with perfection. Don’t rush anything!
Preparing and Setting the Chocolate Crust
First things first, get your oven preheated to 350°F. Grab that 8-inch springform pan—I like to give it a quick swipe with coconut oil just to be safe, even though the crust is oily. Now, for the crust mixture: toss your pecans, almond flour, coconut sugar, cocoa powder, and salt into the food processor. Pulse it until those pecans are chopped up nice and small, but not paste! Once that looks good, drizzle in your melted coconut oil and pulse again until the whole thing starts clumping together when you squeeze a bit in your hand. That’s your sign it’s ready!
Press that mixture firmly and evenly into the bottom of the springform pan. I usually use the bottom of a flat glass to really compact it down. Pop that into the oven for 15 minutes exactly. You want it to smell fragrant and look set. Once it’s done, pull it out and let it cool down while we tackle the filling. Don’t forget to drop the oven temp down to 325°F!
Creating the Smooth Filling for the Vegan Chocolate Cheesecake
This is where your high-speed blender earns its keep! You need to combine those soaked, drained cashews with the coconut yogurt, coconut milk, maple syrup, the melted vegan chocolate, lemon juice, tapioca starch, cocoa powder, vanilla, and salt. Trust me on this: you need to blend it until it is completely, utterly smooth. I mean, put the blender on high and let it run for a full 3 to 5 minutes. Stop and scrape down the sides a few times if you need to, but you want zero graininess left. If you stop too soon, your cheesecake will feel gritty, and we aren’t having that!
Once that filling looks like liquid silk, pour it right over your cooled crust in the springform pan. Give the pan a couple of gentle taps on the counter to help any big air bubbles escape. We don’t want hollow spots!
The Baking Process and Gradual Cooling Technique
Slide the pan onto the middle rack in your 325°F oven. Bake this beauty for 45 to 55 minutes. You’ll know it’s ready because the edges will look firm and set, but the very center should still have a gentle jiggle—like thick pudding. This jiggle is crucial!
Now, here is the most important trick for this baked **vegan chocolate cheesecake**: Do not take it out immediately! Turn the oven off completely. Prop the oven door open just a crack—I usually stick a wooden spoon handle in the door to keep it from closing tight. Leave the cheesecake inside for a full hour as it cools down slowly. This gradual temperature change prevents that awful cracking on top. It’s so important!
Chilling and Finishing Your Vegan Chocolate Cheesecake
After that hour in the cooling oven, carefully remove the pan and let it cool on the counter until it hits room temperature. Then, cover it loosely and move it to the refrigerator. It needs a minimum of four hours to firm up completely, but honestly, chilling it overnight makes it taste even richer and it slices so much cleaner. I always aim for overnight! If you want to see more of my recipe tips, check out my Medium profile.
Right before you serve it, whip up that simple raspberry topping. Just stir those fresh raspberries with the coconut sugar and let them sit on the counter for about ten minutes while you get your plates ready. Spoon that juicy topping over your perfectly chilled dessert, and enjoy the cheers!
Tips for Success with Cashew-Based Vegan Chocolate Cheesecake
Listen, making a spectacular **vegan chocolate cheesecake** relies on respecting the ingredients, especially when you aren’t using dairy. People often run into trouble when they rush the two most important parts: soaking and blending. If you follow these two pointers, you’ll get that professional, silky texture every single time.
Achieving the Creamiest Filling Texture
If your filling isn’t smooth, it’s almost always because the cashews weren’t soft enough or you stopped blending too soon. You have to soak those cashews! Four hours is the minimum, but if you can manage overnight, do it. They should feel squishy, not hard, when you drain them. When you blend, don’t cheat the time—I really mean 3 to 5 minutes on high speed. You are basically trying to liquefy a nut in there, so keep blending until you can’t feel any grit when you rub a bit of the mixture between your fingers. That’s how you know you’ve nailed the texture!
Substitution Guidance for the Coconut Crust Flour
I love the almond flour and pecan combo because it sets up so beautifully, but if you have a nut allergy, you can try a substitution. For the flour portion, you can use finely ground sunflower seeds or even rolled oats pulsed until they are flour consistency. For the fat, if you absolutely must skip the coconut oil in the crust, use refined avocado oil instead. Unrefined oil might give your crust a weird coconut flavor you don’t want in your **vegan chocolate cheesecake**. Stick to the maple syrup and coconut sugar, though—those are key to the flavor profile!
Frequently Asked Questions About Vegan Chocolate Cheesecake
I get so many questions about this recipe because it’s so different from traditional baking! People worry about the cashews, or how to get that perfect slice of **vegan chocolate cheesecake**. Here are the top three things I hear most often.
Can I make this vegan chocolate cheesecake without soaking the cashews?
Oh, please don’t try it! I know soaking takes time, but if you skip it, your filling will be gritty, not silky. The cashews absolutely need to absorb water to become soft enough for your blender to completely liquefy them into a smooth cream. If you’re in a real pinch, you can boil them for about 15 minutes, drain them, and then blend, but soaking is always better for the texture.
How does the chilling time affect the final texture of the cheesecake?
Chilling is basically the last step of baking for this recipe! If you only chill for 4 hours, it will be firm enough to eat, but it might still be a little soft in the middle, and it’ll be harder to slice cleanly. If you chill it overnight, the tapioca starch has time to fully set up, and the whole **dairy-free dessert** becomes wonderfully dense and sliceable. I always recommend overnight if you can manage it!
What is the best way to slice this dairy-free dessert cleanly?
This is a game-changer for any cheesecake, vegan or otherwise! Once the cheesecake is fully chilled, take a really sharp, thin knife and dip it into a tall glass of hot water. Wipe the knife completely dry with a paper towel, and then make one clean slice. Reheat the knife in the hot water and wipe again before your next cut. This melts the fat slightly along the edge, giving you those beautiful, clean slices every time. For more visual inspiration, feel free to browse my Pinterest boards.
Storing and Serving Your Dairy-Free Dessert
This **dairy-free dessert** is actually wonderful the next day—the flavors really meld together beautifully overnight! Because of the coconut fat and cashews, it stays fresh and creamy for quite a while in the fridge, which is great for leftovers. Don’t even think about leaving this out on the counter for too long once it’s been sliced. If you are interested in other dessert recipes, check out the archives!
Storage and Shelf Life Details
You want to keep any leftovers covered tightly in the refrigerator. I usually use the springform pan base and just cover the top with plastic wrap, but an airtight container works even better if you’ve already sliced it up. Unlike traditional cheesecake, this one holds up really well!
| Storage Location | Maximum Shelf Life |
| Refrigerator (Airtight) | Up to 1 Week |
| Freezer (Wrapped tightly) | Up to 1 Month |
If you freeze it, let it thaw slowly in the refrigerator overnight before serving. It tastes almost as good as fresh!
Estimated Nutritional Profile for Vegan Chocolate Cheesecake
It’s always tricky giving exact numbers for homemade recipes, especially when we’re dealing with whole foods, but I wanted to give you a good idea of what you’re getting into with this rich **vegan chocolate cheesecake**. This data is an estimate based on the ingredients used for one slice. It’s decadent, but packed with good fats! For more healthy meal ideas, see my dinner recipes.
Nutritional Data Table
Here is the breakdown. Remember, this is just an estimate!
| Component | Value |
| Serving Size | 1 slice |
| Calories | 420 |
| Total Fat | 32 g |
| Carbohydrates | 30 g |
| Protein | 8 g |
Share Your Experience Making This Recipe
I put my heart and soul into making this the best **vegan chocolate cheesecake** recipe out there, but now I need to hear from you! Did it turn out perfectly creamy? Did your family even suspect it was dairy-free? Please drop a comment below and let me know how it went. A rating helps others find this recipe, too!
Print
Amazing 1 vegan chocolate cheesecake secret
- Total Time: 1 hour 30 minutes
- Yield: 10 slices
- Diet: Vegan
Description
This baked vegan chocolate cheesecake is ultra-creamy and rich with a nutty chocolate crust and silky filling. A dairy-free dessert everyone loves.
Ingredients
- For the crust: 1 cup raw pecans
- 1 1/2 cups almond flour
- 1/3 cup coconut sugar
- 3 tablespoons cocoa powder
- 1/2 teaspoon fine sea salt
- 1/3 cup melted coconut oil
- For the filling: 1 1/2 cups raw cashews, soaked in water for 4 hours, then drained and rinsed
- 1 cup plain coconut yogurt
- 3/4 cup canned full-fat coconut milk
- 1/3 cup pure maple syrup
- 1/4 cup semi-sweet vegan chocolate, melted
- 2 tablespoons fresh lemon juice
- 3 tablespoons tapioca starch
- 3 tablespoons cocoa powder
- 1 teaspoon vanilla extract
- 1/2 teaspoon fine sea salt
- For the topping: 1 cup fresh raspberries
- 2 tablespoons coconut sugar
Instructions
- Preheat the oven to 350°F. Lightly grease an 8-inch springform pan with coconut oil and set it on a baking sheet.
- In a food processor, blend pecans, almond flour, coconut sugar, cocoa powder, and salt until the pecans are finely chopped. Add melted coconut oil and pulse until the mixture clumps together.
- Press the crust mixture evenly across the bottom and slightly up the sides of the pan. Bake for 15 minutes until firm and fragrant. Set aside to cool.
- Reduce the oven temperature to 325°F.
- In a high-speed blender, blend soaked cashews, coconut yogurt, coconut milk, maple syrup, melted chocolate, lemon juice, tapioca starch, cocoa powder, vanilla, and salt until completely smooth, about 3 to 5 minutes.
- Pour the filling over the cooled crust. Tap the pan a few times on the counter to release air bubbles.
- Bake for 45 to 55 minutes until the edges are set and the center jiggles slightly. Turn off the oven and leave the cheesecake inside with the door slightly open for 1 hour to cool gradually.
- Transfer to the refrigerator and chill for at least 4 hours or overnight until firm.
- To make the topping, stir raspberries with coconut sugar in a bowl and let sit for 10 minutes until juicy.
- Serve chilled cheesecake topped with the raspberry mixture. Keep leftovers in the refrigerator for up to 1 week.
Notes
- Keep leftovers in the refrigerator for up to 1 week.
- Prep Time: 30 minutes
- Cook Time: 60 minutes
- Category: Dessert
- Method: Baking
- Cuisine: American