Okay, listen up, because I finally cracked the code on the most decadent dessert you can make without ever turning on your oven! Seriously, this Chocolate Cream Pie is my go-to when I need something ridiculously impressive but only have about twenty minutes of active time. Forget complicated baking—we’re dealing with pure, smooth indulgence here.
The secret sauce? A richly flavored, slightly nutty crust made from almonds and dates, paired with a filling so creamy, you won’t believe it’s completely vegan. I spent ages perfecting the cashew blend so it sets up perfectly firm in the freezer. Trust me, when you pull this out, topped with that gorgeous whipped coconut cream, everyone will be begging for the recipe. It’s rich, it’s easy, and it tastes like you spent all day fussing over it. Win-win!
Why You Will Love This No-Bake Chocolate Cream Pie
This isn’t just another pie recipe; it’s a weeknight miracle that delivers gourmet results with zero fuss. I love how fast it comes together, and honestly, it makes me feel great serving something this rich that fits right into a vegan lifestyle. It’s the perfect balance of textures!
Quick Preparation Time
- You only need about 20 minutes of hands-on work. That’s right, 20 minutes! The rest is just waiting patiently for the freezer to do its magic.
Decadent Vegan Texture
- The filling is so unbelievably smooth thanks to those soaked cashews—it melts in your mouth.
- The crust has the best little crunch from the almond flour that balances the super creamy center perfectly.
Essential Ingredients for Your Chocolate Cream Pie
When making this amazing Chocolate Cream Pie, you can’t just throw things in! Since this is a no-bake recipe, the ingredients *are* the structure, so make sure you follow my notes on preparation. We need the right texture from the crust and the right creaminess from the filling. Don’t even think about substituting the cashews—they are the bedrock of that unbelievably smooth texture!
Ingredients for the Nutty Chocolate Crust
- 1 1/4 cups almond flour (This gives us that nice, sturdy crumb base.)
- 3/4 cup pitted Medjool dates, softened and drained (Make sure they are soft; soak them in hot water for 10 minutes if they seem hard!)
- 1/4 cup unsweetened cocoa powder
- 2 tablespoons melted coconut oil
- 1 teaspoon pure maple syrup
- 1/4 teaspoon fine sea salt
Ingredients for the Smooth Chocolate Filling
- 1 1/2 cups raw cashews, soaked and drained (This is crucial! Soak them for at least 4 hours, then drain them well before you blend.)
- 1/2 cup full-fat canned coconut milk (Make sure this comes straight from the can after chilling overnight for the best results.)
- 4 ounces dark chocolate, melted and cooled slightly
- 1/3 cup pure maple syrup
- 2 tablespoons melted coconut oil
- 2 tablespoons unsweetened cocoa powder
- 1 tablespoon vanilla extract
- 1/2 teaspoon fine sea salt
Equipment Needed for Making the Chocolate Cream Pie
You don’t need a stand mixer or a fancy oven for this job, which is the best part! Because we are blending everything, your food processor is going to be your absolute best friend here. Make sure it’s clean and ready to go for both the crust and the filling.
- A high-powered food processor (essential for those smooth cashews!)
- A 6-inch springform pan (this makes removal so easy)
- A rubber spatula for smoothing the top
- A small saucepan or microwave-safe bowl for melting the chocolate
Step-by-Step Instructions for Perfecting Your Chocolate Cream Pie
Alright, time to get messy! This is where the magic happens, and honestly, it’s so straightforward. Just follow these steps exactly, and you’ll have the most amazing Chocolate Cream Pie sitting pretty in your fridge. Remember, since we aren’t baking anything, the preparation is everything!
Preparing the No-Bake Chocolate Crust
First things first: get your 6-inch springform pan ready. I usually give mine a light swipe of coconut oil inside, or if you’re feeling extra cautious, line the bottom with a circle of parchment paper. Now, grab all those crust ingredients—the almond flour, the softened dates, cocoa, and so on—and toss them into your food processor. Pulse it, pulse it, pulse it! You’re looking for a mixture that starts sticking together when you pinch it, kind of like damp sand.
Once it clumps up into a soft, sticky dough, dump it into your prepared pan. Use your fingers or the back of a spoon to press that crust down firmly and evenly across the bottom. Make sure it’s neat around the edges! Once it’s packed in tight, just set that crust aside while we whip up the filling.
Creating the Creamy Chocolate Filling
Wipe out your food processor—no need to wash it perfectly, just get the big chunks out. Now we add the stars of the show: your soaked and thoroughly drained cashews, the chilled coconut milk, the slightly cooled melted dark chocolate, maple syrup, oil, vanilla, and the rest of the cocoa and salt. Start blending!
This part requires patience. Blend it for a good two or three minutes straight. You’ll need to stop every 30 seconds or so to scrape down the sides where the mixture likes to hide. Keep going until it’s absolutely velvety smooth. If you see any tiny grit, it means you need to blend longer! We want pure, luxurious creaminess for this Chocolate Cream Pie filling.
Assembling and Setting the Chocolate Cream Pie
Pour that gorgeous, thick chocolate filling right over your waiting crust. Smooth the top gently with your spatula so it looks professional. Then, give the bottom of the pan a couple of gentle taps on the counter—this is my trick to getting rid of any hidden air bubbles that might ruin the texture later. Place the whole thing carefully into the freezer for at least three hours, or if you have more time, the fridge for six hours until it’s totally firm to the touch.
Garnishing Your Finished Chocolate Cream Pie
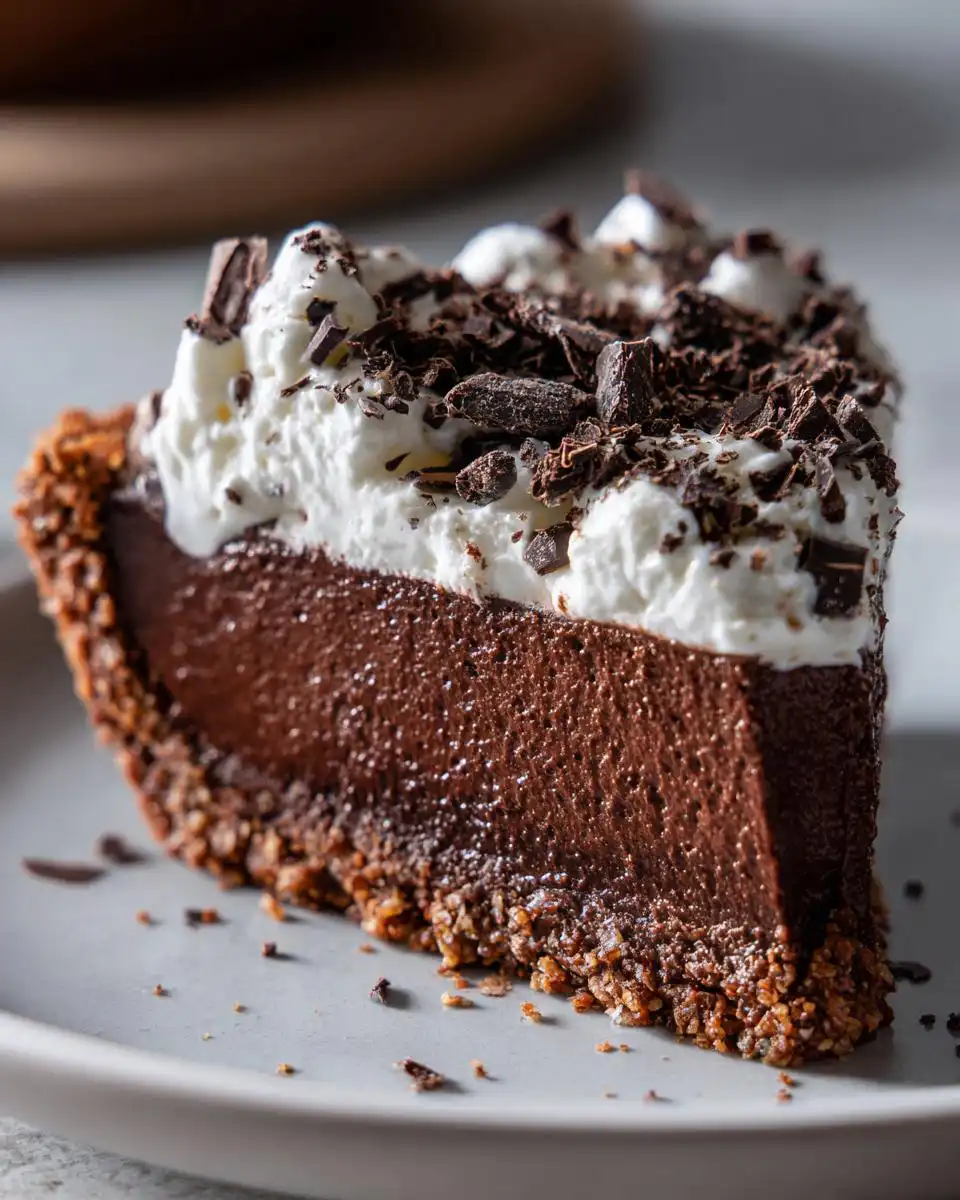
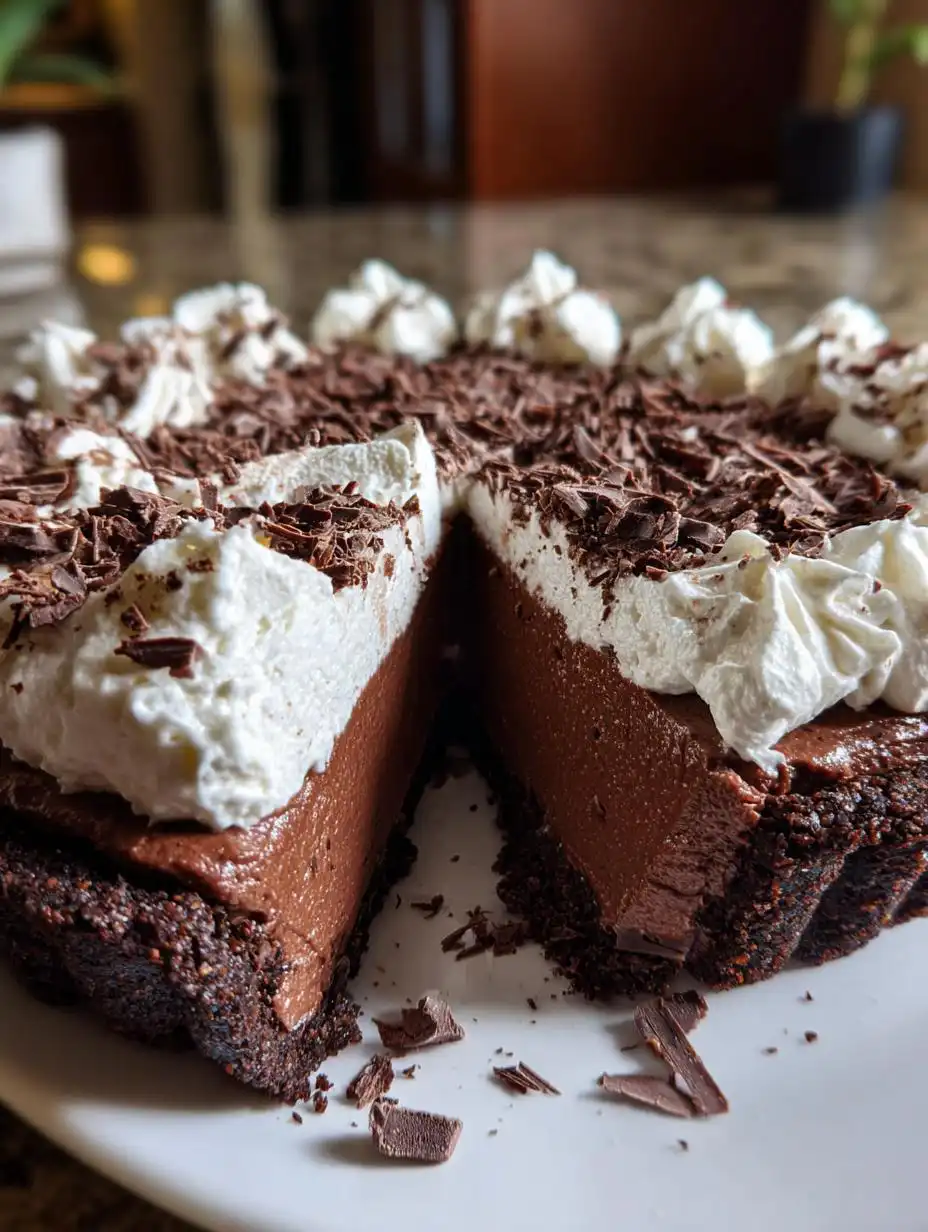
Once it’s set, it’s time for the fun part! Whip up your chilled coconut cream until it’s light and fluffy—it’s so much better than store-bought whipped topping, I promise. Dollop that cream generously over the top of your pie. Then, grab some dark chocolate shavings or chips and sprinkle them on top for that perfect finishing touch.
Here’s the pro move for serving: Get a sharp knife and dip the blade into a glass of warm water. Wipe it dry quickly, and then slice! The warm blade cuts right through the frozen filling cleanly. Dip and wipe between every single slice for picture-perfect wedges!
Pro Tips for Success with Your Chocolate Cream Pie
Listen, even though this is a no-bake recipe, there are a few little secrets that separate an “okay” pie from a “call-the-family-to-come-see-this” pie. Don’t worry if your first attempt feels a little sticky; we can troubleshoot anything! These tips are based on my own little kitchen disasters, so you can skip the heartache! If you want to see more of my kitchen tips, check out my posts on Medium.
Mastering the Cashew Cream Consistency
If your food processor is really struggling to get that filling completely smooth, don’t just keep running it until it smokes! That’s when you can add a tiny splash—I mean, just a teaspoon at a time—of more coconut milk. But be careful! Too much liquid, and your pie won’t set up firm; it’ll stay a little bit too soft, even after freezing. We want thick, luxurious cream, not soup!
Achieving Clean Slices
I cannot stress this enough: the warm knife trick is non-negotiable if you want those beautiful, sharp edges. If you try to cut this firm, frozen pie with a cold knife, you’ll just end up dragging the filling everywhere and making a mess. Dip the knife in hot water, wipe it dry quick, slice, and repeat! It makes all the difference when you serve it up. You can also find more visual guides on Pinterest.
Frequently Asked Questions About This Chocolate Cream Pie
I know you might have a few questions floating around, especially if you’re new to making no-bake desserts or plant-based treats. It’s totally normal! I’ve gathered the ones I get asked the most about this fantastic recipe.
Can I use different nuts for the Chocolate Cream Pie crust?
That’s a great question about substitutions! While the almond flour gives us a specific texture, you can definitely swap it out. Walnuts or pecans work wonderfully if you have those on hand. Just make sure you toast them lightly first to bring out their flavor, and then process them down until they resemble coarse flour before adding the dates and cocoa. This keeps the crust rich and flavorful!
How long does this No-Bake Chocolate Cream Pie last in the refrigerator?
Since this pie is packed with healthy fats and relies on being frozen or chilled to set, it keeps really well! If you store it covered tightly in the refrigerator, it stays deliciously creamy for about four to five days. If you freeze it, it lasts much longer, usually up to a month, though the texture is best if eaten within the first two weeks. Remember to let it thaw slightly before slicing if you enjoy it straight from the freezer!
Storing and Reheating Your Delicious Chocolate Cream Pie
This pie is fantastic because it stores like a dream! Since we aren’t dealing with eggs or dairy, cleanup is easy, and leftovers are even easier to manage. You can keep it in the fridge for immediate enjoyment, or pop it in the freezer if you want to save some for a future craving—which I highly recommend, because it’s just as good later! If you are looking for other great dessert storage ideas, check out my guide on desserts.
Storage Duration Table
| Storage Location | Recommended Duration |
| Refrigerator (Covered Tightly) | Up to 5 days |
| Freezer (Airtight Container) | Up to 4 weeks |
Understanding the Estimated Nutrition of This Vegan Chocolate Cream Pie
I always get asked about the nutrition since this pie is so rich but totally plant-based. Please remember these numbers are just estimates based on the ingredients I used, especially since the sugar content in dates can vary! But it gives you a good idea of what you’re enjoying when you grab a perfect slice of this Vegan Chocolate Cream Pie.
Estimated Nutritional Data Table
| Serving Size | 1 slice |
| Calories | 365 |
| Fat | 27g |
| Carbohydrates | 27g |
| Protein | 6g |
Share Your Experience Making This Chocolate Cream Pie
Seriously, I want to know what you think! Did you try the warm knife trick? Did your crust turn out perfectly nutty? Don’t be shy! Drop a comment below and let me know how your Chocolate Cream Pie turned out. Rating the recipe helps other folks see just how easy and delicious this no-bake treat is. Happy blending!
Print
Amazing 20-Minute Chocolate Cream Pie Secret
- Total Time: 20 minutes
- Yield: 10 slices
- Diet: Vegan
Description
This no-bake Chocolate Cream Pie features a nutty chocolate crust and a smooth, creamy filling. It is an easy, indulgent, and decadent vegan dessert.
Ingredients
- 1 1/4 cups almond flour
- 3/4 cup pitted Medjool dates, softened and drained
- 1/4 cup unsweetened cocoa powder
- 2 tablespoons melted coconut oil
- 1 teaspoon pure maple syrup
- 1/4 teaspoon fine sea salt
- 1 1/2 cups raw cashews, soaked and drained
- 1/2 cup full-fat canned coconut milk
- 4 ounces dark chocolate, melted and cooled slightly
- 1/3 cup pure maple syrup
- 2 tablespoons melted coconut oil
- 2 tablespoons unsweetened cocoa powder
- 1 tablespoon vanilla extract
- 1/2 teaspoon fine sea salt
- 1 can chilled coconut cream, whipped (for garnish)
- Dark chocolate shavings or chips (for garnish)
Instructions
- Lightly grease a 6-inch springform pan with coconut oil or line the base with parchment paper.
- Add almond flour, dates, cocoa powder, coconut oil, maple syrup, and salt to a food processor. Pulse until the mixture forms a soft, sticky dough.
- Press the dough evenly into the prepared pan to form a crust. Set aside.
- In the same processor, blend cashews, coconut milk, melted chocolate, maple syrup, coconut oil, cocoa powder, vanilla, and salt. Blend for 2 to 3 minutes until creamy and smooth, scraping the sides as needed.
- Pour the filling over the crust and smooth the top with a spatula. Tap the pan gently on the counter to remove air bubbles.
- Freeze for at least 3 hours or refrigerate for 6 hours until firm.
- Before serving, top with whipped coconut cream and sprinkle with chocolate shavings or chips.
- Slice with a sharp knife dipped in warm water for clean edges and serve chilled.
Notes
- Soften Medjool dates in hot water for 10 minutes before using.
- Cashews must be soaked in water for at least 4 hours and then drained before blending.
- Use a sharp knife dipped in warm water for clean slices.
- Prep Time: 20 minutes
- Cook Time: 0 minutes
- Category: Dessert
- Method: No-Bake
- Cuisine: American