Oh my gosh, you have to try this! When the weeknights get crazy and I’m staring into the fridge thinking, “What can I make in under thirty minutes that tastes like takeout?” this recipe is my absolute hero. Seriously, we’re talking about juicy little bites of chicken swimming in a sweet and savory pineapple glaze. The best part? That glaze! I spent ages tweaking the brown sugar and pineapple juice ratio until I got it just right—it coats the chicken so beautifully, making it super sticky without being gloppy. Trust me, once you try this Hawaiian Chicken Bowl, you’ll be making it every single week. It’s just that good!
Why You’ll Love This Hawaiian Chicken Bowl
This recipe is a weeknight dream, truly. You get this massive, bold flavor without spending half your evening chained to the stove. It hits every mark: it’s fast, it’s packed with that perfect sweet and tangy punch, and it sets you up for easy lunches all week long.
Quick Prep and Cook Times
The beauty here is the speed. We are looking at only about 15 minutes of hands-on prep time, and then another 15 minutes of cooking. That means you can have dinner on the table in half an hour flat! It’s perfect for those days when you get home late and just need something satisfying immediately.
Flavor Profile and Texture
What sells this dish is the textural contrast, honestly. You get those wonderfully tender pieces of chicken—seared just right—mixed with peppers that still have a little snap to them. But the star? That thick, glossy, sticky glaze made from pineapple that clings to everything. It’s pure comfort food, but bright!
Essential Equipment for Your Hawaiian Chicken Bowl
You don’t need a ton of fancy gadgets for this one, which is another reason I love it for a busy schedule. Having the right basic tools makes the process smooth, especially when you’re moving fast from searing chicken to making the sauce. Efficiency is key here!
Key Cooking Tools
- A large skillet or wok for searing the chicken and sautéing the veggies.
- A small bowl and whisk dedicated just to mixing up that amazing sauce base.
- A good set of measuring cups and spoons—especially when dealing with liquids like soy sauce!
Gathering Ingredients for the Hawaiian Chicken Bowl
Okay, ingredients time! This recipe looks fancy, but it uses staples you probably already have, which is fantastic for quick cooking. The secret to making this Hawaiian Chicken Bowl truly shine is paying attention to two things: using fresh pineapple for that bright, juicy burst, and always grabbing low-sodium soy sauce. We want flavor, not a salt bomb, right?
Chicken and Produce
For the main event, you’ll need about a pound and a half of boneless, skinless chicken breasts cut into nice, even 1-inch cubes. Don’t skimp on the fruit and veggies! Grab 2 cups of fresh pineapple chunks—cut them about the same size as your chicken. You also need one large red bell pepper and one large green bell pepper, both diced into 1-inch squares. Finally, save those green onions for the very end; we’ll thinly slice about two of them for garnish.
Crafting the Sticky Glaze
This is where the magic happens, so measure carefully! You’ll whisk together half a cup of pineapple juice, one-third cup of low-sodium soy sauce, and one-third cup of packed brown sugar. Add a tablespoon of apple cider vinegar for that necessary tang. Don’t forget the flavor boosters: 2 cloves of garlic, minced fine, and about a teaspoon of fresh ginger, grated. And remember that cornstarch slurry? That’s 1 tablespoon of cornstarch mixed with 1 tablespoon of cold water—it’s what makes the sauce cling!
Base and Seasoning
For searing, just a tablespoon of olive oil is plenty. For seasoning the chicken itself, keep it simple with half a teaspoon of kosher salt and a quarter teaspoon of black pepper. And of course, you need a good base—plan on having 4 cups of white rice cooked and ready to go. That rice soaks up all that extra sauce, so don’t skip it! If you are looking for other quick dinner ideas, check out this broccoli cheddar pasta.
Step-by-Step Instructions for the Hawaiian Chicken Bowl
This process moves fast once you get going, so read through these steps once before you start cooking! We want to keep everything moving so the flavors marry perfectly and nothing sits too long.
Preparing the Base and Sauce Components
First things first: get your rice going! Cook that 4 cups of white rice according to the package directions and keep it warm. You want it ready when the chicken comes off the heat. While that’s bubbling away, take a small bowl and whisk together all your sauce ingredients: the pineapple juice, low-sodium soy sauce, brown sugar, apple cider vinegar, minced garlic, and grated ginger. You have to whisk this until that brown sugar is completely dissolved. If the sugar crystals are still gritty, your glaze won’t be smooth later—so give it a good thirty seconds of mixing!
Searing the Chicken for the Hawaiian Chicken Bowl
Next up is getting that beautiful color on the chicken. Heat a tablespoon of olive oil in your large skillet or wok over medium-high heat. Don’t rush this heat; you want it hot enough to sizzle when the chicken hits the pan. Toss your 1-inch chicken cubes with the salt and pepper right before they go in. Add them to the hot skillet, but don’t crowd the pan! If you dump it all in at once and it looks stuffed, take half out and cook it in batches. Sear them for about 6 to 8 minutes, turning them every so often until all sides are golden brown and cooked through. We are looking for an internal temperature of 165°F. Once they pass the check, pull that chicken out onto a clean plate and set it aside. Don’t wipe out the pan!
Sautéing Vegetables and Fruit
We are using the same skillet, right? All those tasty brown bits stuck to the bottom are flavor gold! Add your diced red and green bell peppers and the fresh pineapple chunks right into the pan. Sauté these for about 4 or 5 minutes. You want the peppers to be tender-crisp—still a little bite left in them—and you want to see those pineapple edges just starting to caramelize a bit. That sweetness deepens when it gets a little color.
Thickening the Signature Glaze
Now, pour that sauce mixture you whisked earlier right into the skillet with the peppers and pineapple. Use your spoon to scrape up all those browned bits stuck to the bottom—that’s crucial flavor! Bring this mixture up to a gentle simmer. Once it’s simmering, grab your cornstarch slurry (remember, 1 tablespoon cornstarch mixed with 1 tablespoon cold water). Whisk that slurry into the simmering sauce. Keep stirring constantly for about 1 to 2 minutes. You will see it transform right before your eyes into that thick, glossy glaze we want. It should coat the back of your spoon!
Finishing the Hawaiian Chicken Bowl
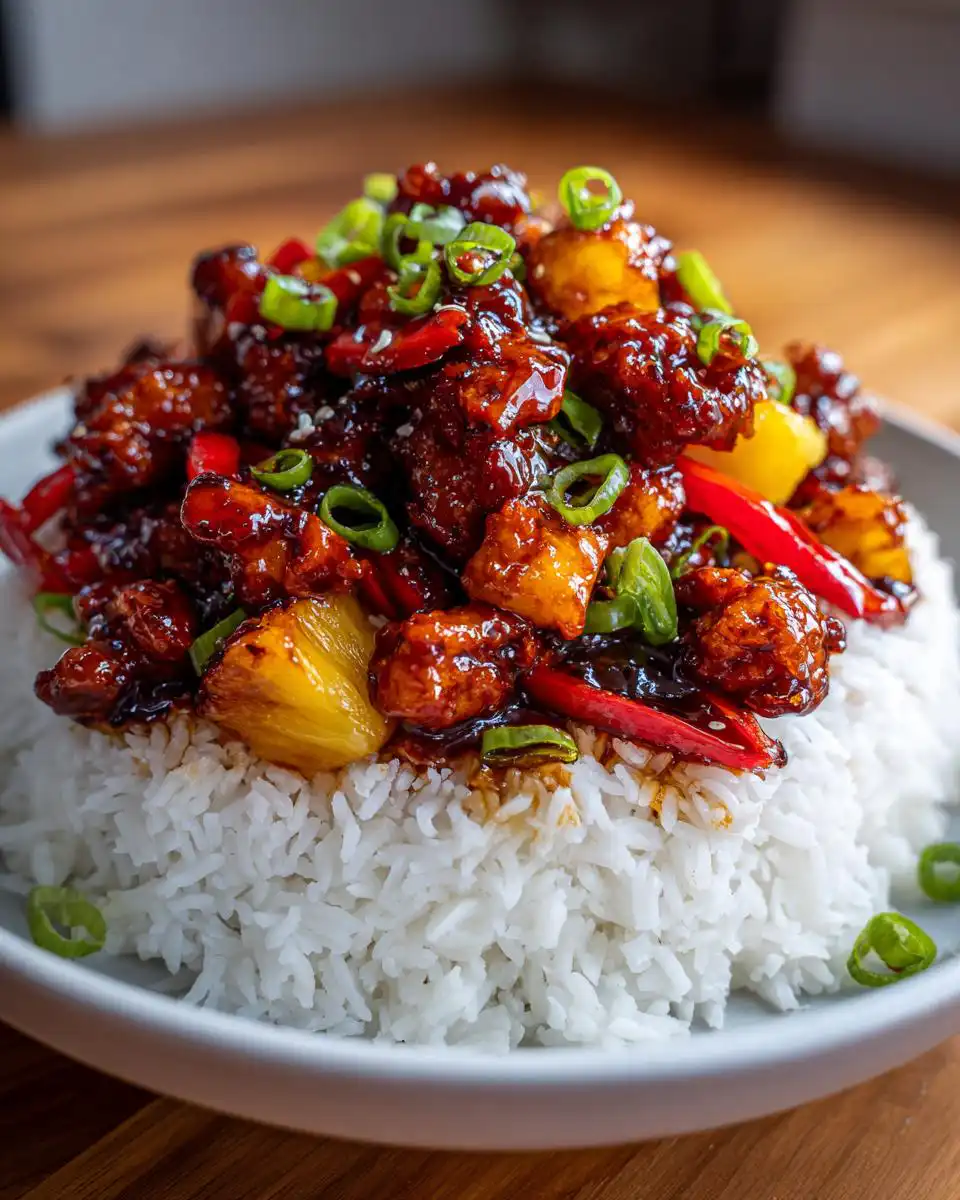
Time for the grand finale! Return the seared chicken (and any juices that collected on the plate—don’t waste those!) back into the skillet with the thickened glaze. Toss everything gently but thoroughly until every piece of chicken is hot and totally coated in that sticky sauce. Divide your warm, fluffy rice evenly into four bowls. Spoon that beautiful Hawaiian chicken mixture right on top of the rice. Finish it off with a sprinkle of those thinly sliced green onions for a fresh pop of color and mild onion flavor. Dinner is served!

Tips for a Perfect Hawaiian Chicken Bowl
Even though this recipe is straightforward, a couple of tiny tricks can take your bowl from good to absolutely restaurant-worthy. Getting that glaze texture perfect and making sure your chicken has that nice sear are the two biggest things that elevate the whole dish. Pay attention to these details, and you’ll nail it every time!
Controlling the Glaze Consistency
If you pull the sauce off the heat and it seems way too thin, don’t panic! Just mix up another tiny slurry—maybe just half a teaspoon of cornstarch with a teaspoon of cold water—and whisk that in while simmering for another minute. If, however, you accidentally added too much slurry and it turned into actual glue, just whisk in a tablespoon or two of extra pineapple juice or water until it loosens up back into that perfect, glossy coating for your chicken.
Achieving Chicken Browning
The absolute key to getting that rich color and flavor on your chicken pieces is not overcrowding the pan. Seriously, I learned this the hard way! If you dump all 1.5 pounds of chicken in there at once, the temperature of the skillet drops instantly, and the chicken steams instead of searing. It ends up pale and a little chewy. Cook it in two batches if you have to! You want to hear a definite sizzle when it hits the oil, and you want space between the pieces so that delicious browning can actually happen.
Storing and Reheating Your Hawaiian Chicken Bowl
This recipe is a meal prep superstar, which is why I make a double batch sometimes! Knowing how to store it properly ensures that sticky glaze stays fantastic and the rice doesn’t turn into a brick in the fridge. Since we are using low-sodium soy sauce, it keeps really well. You just need to pack smart! For more meal prep inspiration, check out my ground turkey meal prep ideas.
Storage Guidelines
The best way to store leftovers is by keeping the sauce and the rice separate if possible, but if you’re packing it all together for lunch, make sure you use airtight containers. Since this dish holds up so well, you can safely refrigerate your individual Hawaiian Chicken Bowl portions for about 3 to 4 days. Always let it cool down completely before sealing the lid, though, or you risk condensation making things soggy!
Reheating Instructions
You have a couple of options here. The microwave is fastest, of course. Pop a portion in for about 60 to 90 seconds, stirring halfway through so it heats evenly. If you want to bring back a bit more texture, especially to the chicken and peppers, I recommend reheating it on the stovetop in a small non-stick pan over medium heat for about 4 minutes. Add a tiny splash of water or extra pineapple juice if it seems too dry after refrigeration!
Storage and Reheating Quick Reference Table
| Item | Storage Duration (Refrigerated) | Reheating Method | Estimated Time |
|---|---|---|---|
| Hawaiian Chicken Bowl (Assembled) | 3–4 Days | Microwave | 60–90 Seconds |
| Hawaiian Chicken Bowl (Assembled) | 3–4 Days | Stovetop (Small Pan) | 4 Minutes |
Frequently Asked Questions About Your Hawaiian Chicken Bowl
I get asked about this recipe all the time, especially when people are trying to figure out their weekly meal plan. Here are some of the most common things people wonder about before they dive into making this sticky, amazing meal!
Can I use frozen pineapple in this Hawaiian Chicken Bowl?
You certainly can use frozen pineapple chunks in a pinch! Just make sure you thaw them completely first and drain off any excess icy water before adding them to the skillet with the peppers. Fresh pineapple gives you that brighter, tangier flavor, and it caramelizes a little cleaner, but frozen works just fine, especially if you are focused on convenience.
Is this recipe suitable for meal prepping lunches?
Absolutely, yes! This is one of my favorite things to make specifically for meal prep lunches. The chicken stays nice and tender even when chilled. I usually portion out the rice and the chicken mixture into four separate containers. They reheat beautifully in the microwave, and honestly, sometimes I think the pineapple sauce tastes even better the next day once the flavors have really settled in! You can see more of my recipe ideas on Medium.
Estimated Nutritional Data for Hawaiian Chicken Bowl
I always like to include a rough idea of what you’re getting when you sit down to eat this delicious meal. Keep in mind these numbers are estimates based on the ingredients listed. Since we use low-sodium soy sauce, we keep the salt a little more controlled, but everyone’s measuring is a little different!
Nutritional Breakdown Table
| Nutrient | Amount Per Serving |
|---|---|
| Calories | 480 |
| Fat | 8g |
| Carbohydrates | 62g |
| Protein | 42g |
Please remember this is an estimate! If you add extra rice or use a different cut of chicken, those numbers will shift a bit. Enjoy knowing you’re getting a good serving of protein with all that great flavor! If you enjoy quick chicken meals, you might also like this sheet pan sticky ginger sesame chicken.
Share Your Hawaiian Chicken Bowl Creations
I truly hope this recipe becomes a staple in your rotation! Once you’ve made your first batch, please come back and leave a rating. I’d love to see pictures of your finished Hawaiian Chicken Bowl creations on social media—tag me so I can cheer you on! You can also find more visual inspiration on my Pinterest boards.
Print
Amazing 4-Ingredient Hawaiian Chicken Bowl
- Total Time: 30 minutes
- Yield: 4 servings
Description
Sticky Hawaiian Chicken Bowls featuring juicy chicken bites glazed in a sweet and savory pineapple sauce, served over fluffy rice with crisp peppers. This recipe is ideal for meal prepping.
Ingredients
- 1.5 pounds boneless skinless chicken breasts (cut into 1-inch cubes)
- 1 tablespoon olive oil
- 2 cups fresh pineapple chunks (about 1-inch pieces)
- 1 large red bell pepper, seeded and diced into 1-inch squares
- 1 large green bell pepper, seeded and diced into 1-inch squares
- 1/2 teaspoon kosher salt
- 1/4 teaspoon ground black pepper
- 1/2 cup pineapple juice (canned or fresh)
- 1/3 cup low-sodium soy sauce
- 1/3 cup brown sugar, packed
- 1 tablespoon apple cider vinegar
- 2 cloves garlic, minced
- 1 teaspoon fresh ginger, grated
- 1 tablespoon cornstarch mixed with 1 tablespoon cold water (slurry)
- 4 cups cooked white rice
- 2 green onions, thinly sliced (for garnish)
Instructions
- Cook the white rice according to package directions and set it aside, keeping it warm.
- Whisk together the pineapple juice, soy sauce, brown sugar, apple cider vinegar, minced garlic, and grated ginger in a small bowl until the sugar dissolves.
- Heat the olive oil in a large skillet or wok over medium-high heat.
- Add the chicken cubes to the hot skillet, seasoning them with the salt and pepper.
- Sear the chicken for 6 to 8 minutes, stirring occasionally, until all sides are golden brown and the internal temperature reaches 165°F.
- Remove the cooked chicken from the skillet and set it aside on a clean plate.
- Add the diced red and green bell peppers and the pineapple chunks to the same skillet.
- Sauté the vegetables and fruit for 4 to 5 minutes until the peppers are tender-crisp and the pineapple begins to caramelize on the edges.
- Pour the prepared sauce mixture into the skillet with the peppers and pineapple, scraping up any browned bits from the bottom of the pan.
- Bring the sauce to a gentle simmer, then stir in the cornstarch slurry.
- Cook for 1 to 2 minutes, stirring constantly, until the sauce thickens into a glossy glaze.
- Return the cooked chicken and any accumulated juices to the skillet, tossing everything together until the chicken is hot and fully coated in the sauce.
- Divide the cooked rice evenly among four bowls.
- Top the rice with the Hawaiian chicken mixture and garnish with sliced green onions before serving.
Notes
- This recipe reheats well, making it suitable for meal prep throughout the week.
- Use low-sodium soy sauce to control the salt content.
- Prep Time: 15 minutes
- Cook Time: 15 minutes