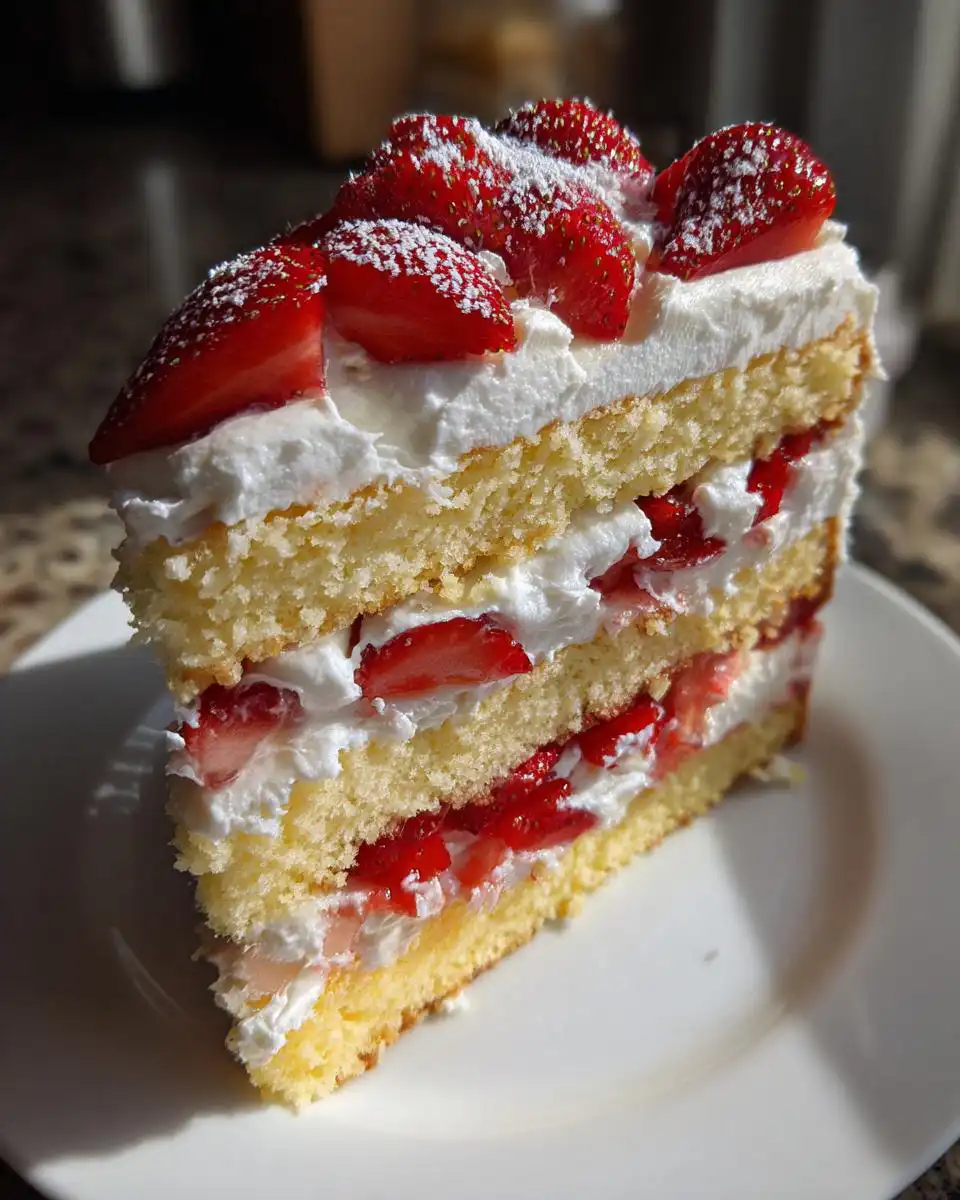
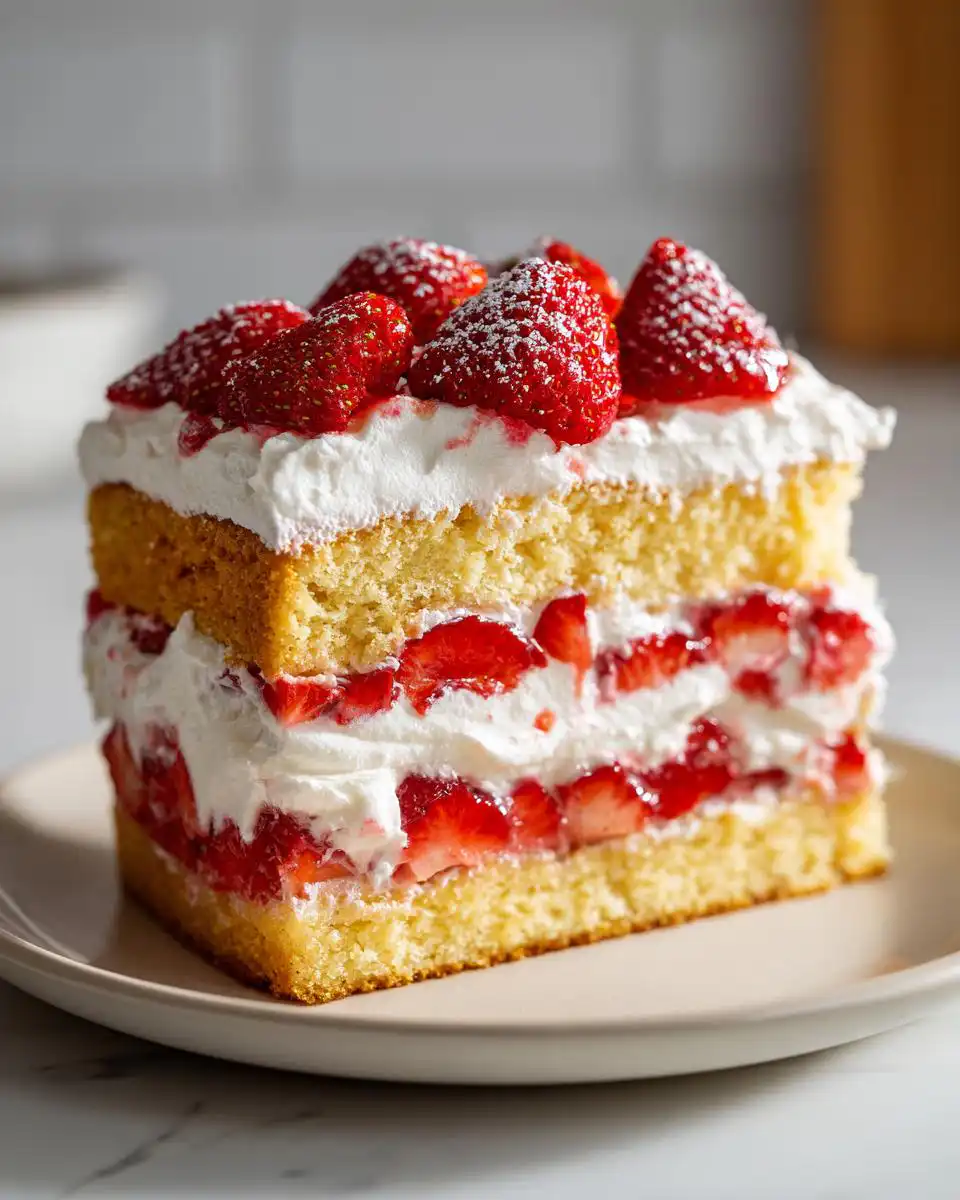
It’s that time of year when the strawberries start showing up looking absolutely perfect at the farmer’s market, smelling like pure sunshine. Nothing says summer celebration like a proper, towering Strawberry Shortcake Layer Cake for Parties, right? But let’s be honest, making those tall, impressive cakes usually feels like a whole production. Well, I’m here to tell you that you can absolutely nail that show-stopping look without needing a pastry degree!
I’m Jordan Bell, coming to you from Asheville, NC. I learned a lot about clean eating and real flavor when I was working toward my 80-pound weight loss, and that lesson is what drives my blog, Easy Detox Recipes. I still love my Southern comfort food, but I focus on making it clean and approachable. This vanilla sponge cake, fluffy with cream and dripping with fresh berries, is proof that you don’t have to sacrifice that classic indulgence. You can see some of my other recipe ideas over on Medium.
This recipe takes the idea of simple strawberry shortcake and elevates it into a gorgeous, multi-layered beauty that looks hard but is actually super manageable for any home baker. We’re using a simple oil-based sponge that stays incredibly moist, meaning you get that amazing height without the fuss of tricky butter creaming methods. Trust me, this will be your new go-to celebration cake!
Gathering What You Need for Strawberry Shortcake Layer Cake for Parties
When planning a big bake like this, I always lay everything out first—it saves so much time later! Since we aren’t dealing with fussy butter creaming, the prep is pretty quick. You’ll need ingredients for the light vanilla sponge, the juicy strawberry mixture, and, of course, that dreamy cream topping. Don’t skip lining those pans; it’s a lifesaver!
Here’s a quick look at everything you need to pull together this amazing celebration cake:
| Component | Key Ingredients |
|---|---|
| Cake Sponge | Flour, Sugar, Eggs, Milk, Oil |
| Strawberries | Fresh Berries, Sugar, Jam, Lemon Juice |
| Frosting | Heavy Cream, Powdered Sugar, Vanilla |
Cake Components for Your Strawberry Shortcake Layer Cake for Parties
For the vanilla sponge, we keep the dry stuff simple: two and a half cups of all-purpose flour, two teaspoons of baking powder, half a teaspoon of baking soda, and half a teaspoon of fine sea salt. Then for the wet side, grab one and three-quarters cups of granulated sugar, three-quarters cup of a neutral oil—I usually use sunflower—four large eggs that are at room temperature, one tablespoon of vanilla extract, and one and a quarter cups of whole milk, also room temperature.
Filling and Frosting Ingredients
For the berries, you need two full pounds of strawberries, hulled and sliced. To get them juicy, mix them with half a cup of granulated sugar, two tablespoons of strawberry jam for depth, and one tablespoon of fresh lemon juice. For that cloud-like frosting, make sure you have three cups of very cold heavy whipping cream, three-quarters cup of powdered sugar, and two teaspoons of vanilla extract. Everything needs to be ready to go!
Essential Equipment for Baking Your Strawberry Shortcake Layer Cake for Parties
You don’t need a professional kitchen for this, but a few key tools make the difference between a good cake and a great one. Since we are building a tall layer cake, having the right pans is crucial for even baking. Make sure you have three round cake pans—eight or nine inches works best for this amount of batter.
You’ll need sturdy mixing bowls, of course, for both the dry ingredients and the wet batter. A whisk is great for the dry stuff, but you’ll definitely want an electric mixer for that whipped cream frosting. Don’t forget parchment paper; I swear by it to guarantee those layers release perfectly every single time!
Step-by-Step Instructions for Strawberry Shortcake Layer Cake for Parties
This is where the magic happens! Even though we are making a grand-looking cake, the process is really straightforward. Just follow these steps, and you’ll be amazed at the results you get from this easy layer cake recipe.
Preparing the Vanilla Sponge Layers
First things first—get your oven cranked up to 350 degrees Fahrenheit. Now, take those three cake pans and grease and flour them really well. If you have parchment paper, cut circles to line the bottoms; this is your insurance policy against sticking! In a medium bowl, whisk together your flour, baking powder, baking soda, and salt until everything looks uniform. Don’t skip this whisking step!
In your big mixing bowl, whisk the sugar and oil until they look smooth, like a pale syrup. Then, add your room-temperature eggs one at a time, mixing well after each addition, followed by that tablespoon of vanilla. Now, gently introduce the dry ingredients in two batches, alternating with the milk. Remember, we are aiming for smooth, not overworked! Stir just until you see no dry streaks left in the batter. This gentle mixing keeps the crumb tender.
Baking and Cooling the Cake Layers
Divide that beautiful batter evenly between your three prepared pans. Pop them into the preheated oven and set your timer for 20 minutes. You’re looking for the tops to spring back lightly when you tap them, and a toothpick inserted into the center should come out clean. This usually takes about 20 to 25 minutes total. Once they look done, pull them out and let them rest in the pans for about 10 minutes. Then, turn them out onto cooling racks. They absolutely must be completely cool before we even think about frosting them, or the cream will turn into soup!
Creating the Macerated Strawberry Filling
While the cakes are cooling down, let’s get those berries ready. Stir your sliced strawberries together in a bowl with the half cup of sugar, the two tablespoons of strawberry jam, and the lemon juice. Don’t rush this part! Let this mixture sit on the counter for at least 20 minutes. This process, called macerating, releases all those gorgeous, glossy juices that soak beautifully into the cake layers. If you are looking for more ways to use fresh fruit, check out this burrata salad recipe!
Whipping the Cream Frosting
This frosting needs to be cold, cold, cold! Pour your three cups of heavy whipping cream into a clean, chilled bowl. Start beating it on medium speed, and once it starts looking frothy, add the powdered sugar and vanilla. Keep beating until you hit medium stiff peaks. You want the cream to hold its shape nicely—when you lift the whisk, the peak should stand up without flopping over. Be careful not to go too far, or you’ll end up with butter!
Assembling Your Perfect Strawberry Shortcake Layer Cake for Parties
Time to build! Place your first cake layer on your serving plate. Spread a thin layer of that whipped cream right over the top—this acts as the glue. Spoon on a generous layer of those juicy strawberries, making sure to leave most of the extra juice behind in the bowl for now. Repeat with the second layer: cream, then berries. Top it off with the final cake layer. Cover the entire outside—top and sides—with the remaining whipped cream. Finally, use those beautiful leftover strawberries to decorate the top. Chill this magnificent Strawberry Shortcake Layer Cake for Parties for at least an hour so everything sets up properly before slicing.
Tips for Success: Mastering Your Strawberry Shortcake Layer Cake for Parties
I’ve definitely had a few meltdowns trying to assemble these tall cakes, so I learned the hard way what makes the difference between a picture-perfect bake and a leaning tower of sweet disaster! The biggest secret isn’t in the ingredients, but in the timing and temperature control. Stick with these quick tips, and you’ll master this impressive dessert.
Temperature Matters for Layer Cake Success
Okay, this is non-negotiable for the sponge: your eggs and milk must be at room temperature when you mix them into the batter. When cold ingredients hit the oil/sugar mixture, it can cause the batter to curdle a little, which leads to a denser, less fluffy cake. You want that soft vanilla sponge! If you are interested in other baking tips, check out how I make keto brownies.
Now, for the flip side: the frosting. That heavy cream needs to be ice cold—I mean, straight from the back of the fridge cold. If your cream isn’t cold enough, it will take forever to whip up, and you risk over-beating it into grainy butter before it ever gets stiff enough to hold up those layers.
Achieving Clean Slices on Your Strawberry Shortcake Layer Cake for Parties
If you try to slice this cake right after assembly, you’ll end up with cream everywhere and messy layers. The crucial step is that one hour of chilling time—don’t skip it! That sets the cream so it acts almost like a firm filling.
When it’s time to cut into your beautiful Strawberry Shortcake Layer Cake for Parties, grab your sharpest, long serrated knife. Dip the blade into hot water and wipe it dry right before you make the cut. Heat helps the knife glide right through the cream and soft cake without dragging. Wipe the knife clean between every single slice—this keeps your serving plate looking as good as the cake did!
Storing and Serving Your Celebration Cake
Because this cake is stacked high with glorious fresh berries and real whipped cream, storage is super important if you want it to stay safe and look great. You absolutely must keep this cake refrigerated until you are ready to serve it. Fresh cream doesn’t mess around, so don’t leave it sitting out for long periods. The notes say within two hours, which is smart for food safety! You can find more food safety tips on Pinterest.
When you chill it, make sure you cover the slices if you have leftovers so the cake layers don’t dry out. You can eat it straight from the fridge, which gives you a nice firm slice, but I personally like to let it sit on the counter for about 15 minutes before serving. That little bit of warmth softens the cream just enough. Here’s how I keep track of leftovers:
| Condition | Storage Recommendation |
|---|---|
| Assembled Cake | Covered in the refrigerator |
| Leftover Slices | Covered tightly to prevent drying |
| Serving Temp | Serve chilled or let sit 15 minutes first |
Frequently Asked Questions About This Strawberry Shortcake Layer Cake for Parties
It’s only natural to have questions when you’re tackling a big, beautiful dessert like this! I get asked all the time about timing and substitutions, so let’s clear those up right now so you can bake with confidence.
Can I make the cake layers ahead of time?
Oh yes, you absolutely can! The vanilla sponge layers are sturdy enough that if you wrap them tightly in plastic wrap once they are completely cool, they keep beautifully at room temperature for up to two days. I usually do this the day before a party. Just make sure they are wrapped well so they don’t dry out before we assemble the final Strawberry Shortcake Layer Cake for Parties.
What is the best way to keep the Strawberry Shortcake Layer Cake for Parties fresh?
Because we are using real whipped cream—no stabilizers here!—refrigeration is essential. Once assembled, cover the cake loosely with plastic wrap or put it under a cake dome in the fridge. If you have leftovers, covering the individual slices is key to stopping that gorgeous cake from drying out. It keeps well for about two days, but honestly, a cake this good never lasts that long!
Can I substitute any ingredients in this impressive Strawberry Shortcake Layer Cake for Parties?
For the sponge, I really encourage you to stick to the oil instead of butter; that’s what keeps the texture so light and moist for this easy layer cake. If you are worried about dairy, you can swap the whole milk for an unsweetened, neutral-flavored plant milk, like almond or soy. For the cream, though, you really must use heavy whipping cream; alternatives just won’t whip up stiff enough to hold that impressive height.
Sharing Your Delicious Strawberry Shortcake Layer Cake for Parties
Now that you’ve created this stunning, yet surprisingly simple, towering dessert, I truly can’t wait to hear about it! Did it survive the trip to the party? Did everyone ask for the recipe? Drop a comment below and tell me how your beautiful Strawberry Shortcake Layer Cake for Parties turned out, and please give it a star rating so other bakers know they can trust this method!
Print
3 Amazing Strawberry Shortcake Layer Cake Secrets
- Total Time: 1 hour 20 minutes including cooling
- Yield: 12 servings
- Diet: Vegetarian
Description
Bake a show stopping strawberry shortcake layer cake with vanilla sponge, clouds of cream, and berries that is perfect for parties and celebrations. This tall layer cake feels easy enough for a home baker.
Ingredients
- 2 and one half cups all purpose flour
- 2 teaspoons baking powder
- One half teaspoon baking soda
- One half teaspoon fine sea salt
- 1 and three quarters cups granulated sugar
- Three quarters cup neutral oil such as canola or sunflower
- 4 large eggs at room temperature
- 1 tablespoon vanilla extract
- 1 and one quarter cups whole milk at room temperature
- 2 pounds strawberries hulled and sliced
- One half cup granulated sugar
- 2 tablespoons strawberry jam
- 1 tablespoon fresh lemon juice
- 3 cups cold heavy whipping cream
- Three quarters cup powdered sugar
- 2 teaspoons vanilla extract
Instructions
- Heat the oven to 350 degrees Fahrenheit and grease and flour three round cake pans about eight or nine inches across, then line the bottoms with parchment if you have it.
- Whisk flour, baking powder, baking soda, and salt in a medium bowl until combined.
- In a large bowl whisk sugar and oil until smooth, then whisk in the eggs one at a time followed by vanilla.
- Add the dry ingredients to the wet mixture in two additions, alternating with the milk, and stir gently just until the batter is smooth with no dry streaks.
- Divide the batter evenly among the pans and bake for 20 to 25 minutes until the tops spring back when lightly touched and a toothpick in the center comes out clean.
- Cool the cakes in the pans for 10 minutes, then turn onto racks and let them cool completely.
- For the strawberries, stir sliced berries with sugar, strawberry jam, and lemon juice in a bowl and let them sit for at least 20 minutes until glossy and juicy.
- For the whipped cream frosting, beat cold cream with powdered sugar and vanilla on medium high speed until it reaches medium stiff peaks that hold a billowy shape.
- Place the first cake layer on a serving plate, spread a thin layer of whipped cream over the top, spoon on a layer of strawberries while leaving some juice in the bowl, and repeat with the second layer.
- Set the final cake layer on top, cover the top and sides with more whipped cream, and decorate the top with remaining strawberries.
- Chill the cake for at least one hour before slicing so the layers set, and for food safety keep the cake refrigerated until serving and return leftovers to the refrigerator within two hours.
Notes
- Make sure cake layers are fully cool before adding cream so the frosting does not melt.
- Do not overwhip the cream or it can turn grainy and start to separate.
- Slice strawberries evenly so the layers stack neatly and the cake cuts cleanly.
- Use a serrated knife and gentle sawing motion to slice the chilled cake.
- Store the assembled cake covered in the refrigerator for up to two days.
- Keep slices covered so the cake does not dry out and the cream stays fresh.
- Serve leftovers straight from the refrigerator or let sit briefly at room temperature for a softer texture.
- Prep Time: 40 minutes
- Cook Time: 25 minutes
- Category: Dessert
- Method: Baking
- Cuisine: American