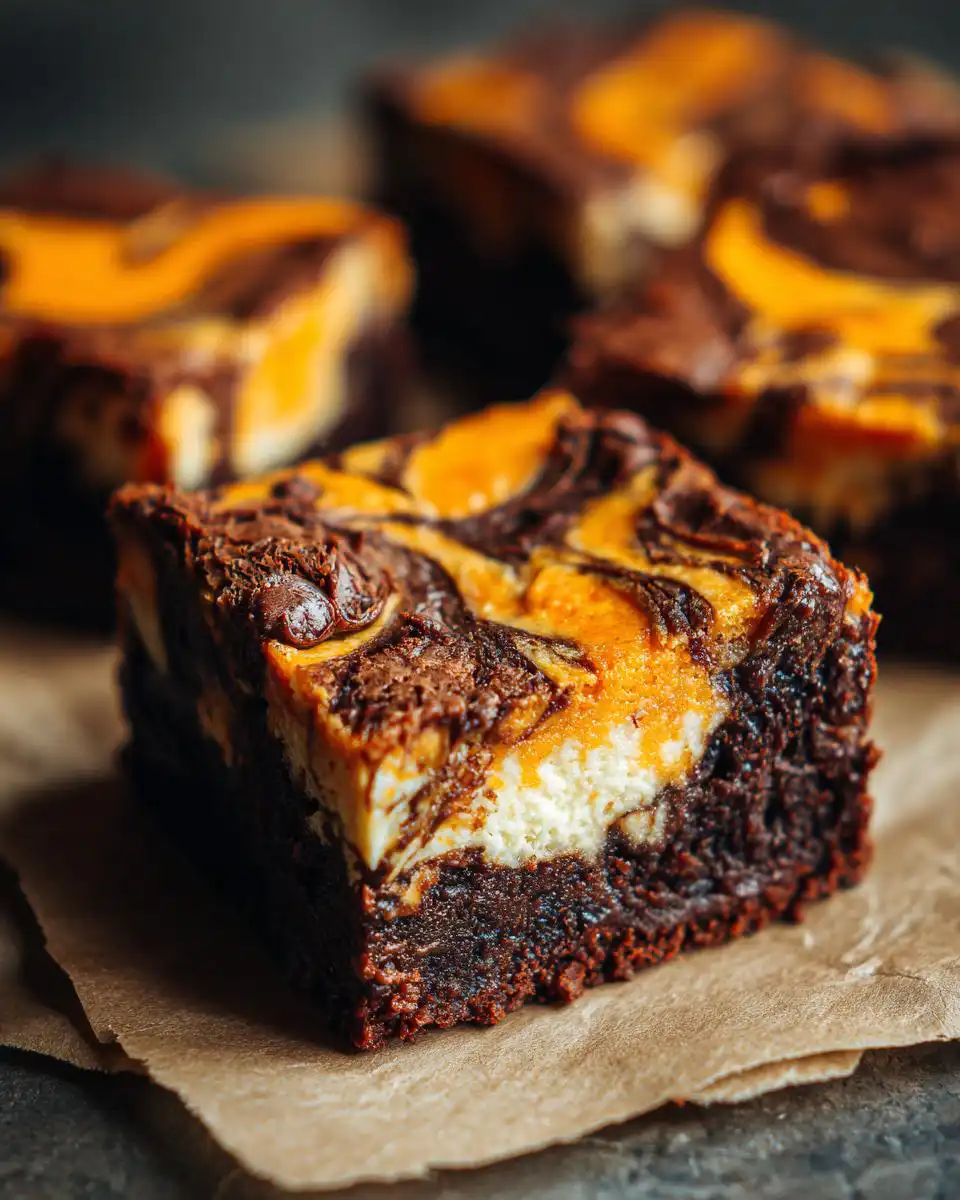
When I first started my journey to lose 80 pounds, I thought I had to kiss goodbye all the rich, comforting foods I grew up loving in Asheville, NC. I mean, how could you possibly eat Southern comfort food and detox at the same time? It seemed impossible! But that challenge is exactly what launched my whole Easy Detox Recipes blog. I realized that clean eating doesn’t mean sacrificing flavor, it just means finding smarter ways to make those indulgent treats sing. That’s why I’m so excited to share these decadent cream cheese swirl brownies with you today! They are the perfect marriage of that dark, fudgy chocolate base I crave and a bright, creamy cheesecake ribbon. They come together fast, too. Seriously, these have become my go-to dessert when I need something special without spending hours in the kitchen.
Why You’ll Love This cream cheese swirl brownies Recipe
I promise you, these marbled chocolate squares are going to be your new favorite thing to bake when company drops by unexpectedly. They look fancy because of that beautiful swirl, but honestly, they are so straightforward. You get all the indulgence without any of the fuss that usually comes with layered desserts.
Quick Flavor Fix
The total time commitment here is less than an hour, which is perfect for those weeknight cravings or when you need a quick dessert for a potluck. You just mix, layer, and bake! It’s practically foolproof, even if you’re new to baking.
Fudgy Texture Guaranteed
Forget dry, cakey brownies—that is not what we are making here! The base uses dark cocoa powder and oil, which guarantees that dense, rich, melt-in-your-mouth fudgy texture we all dream about. That dark chocolate pairs so perfectly with the tangy cream cheese layer.
Essential Ingredients for Perfect cream cheese swirl brownies
When we talk about making these brownies the absolute best, it all comes down to the quality and state of your ingredients. I’ve tested this recipe dozens of times, trying substitutes, and trust me, sticking to these core components is what gives you that perfect fudgy base and that bright, tangy swirl. It’s the contrast that makes these so addictive! I’m always sharing my favorite tips.
Brownie Layer Components
For the chocolate foundation, we need a few specific things to make sure it’s rich and dense. We are using white sugar, all-purpose white flour, and that special Hershey’s Special Dark cocoa powder. That dark cocoa is key for the color and deep flavor! Don’t forget the salt and baking powder for balance. Then, we bring in the wet stuff: two large eggs, vegetable oil for moisture, and a teaspoon of pure vanilla extract to round everything out.
Cream Cheese Swirl Components
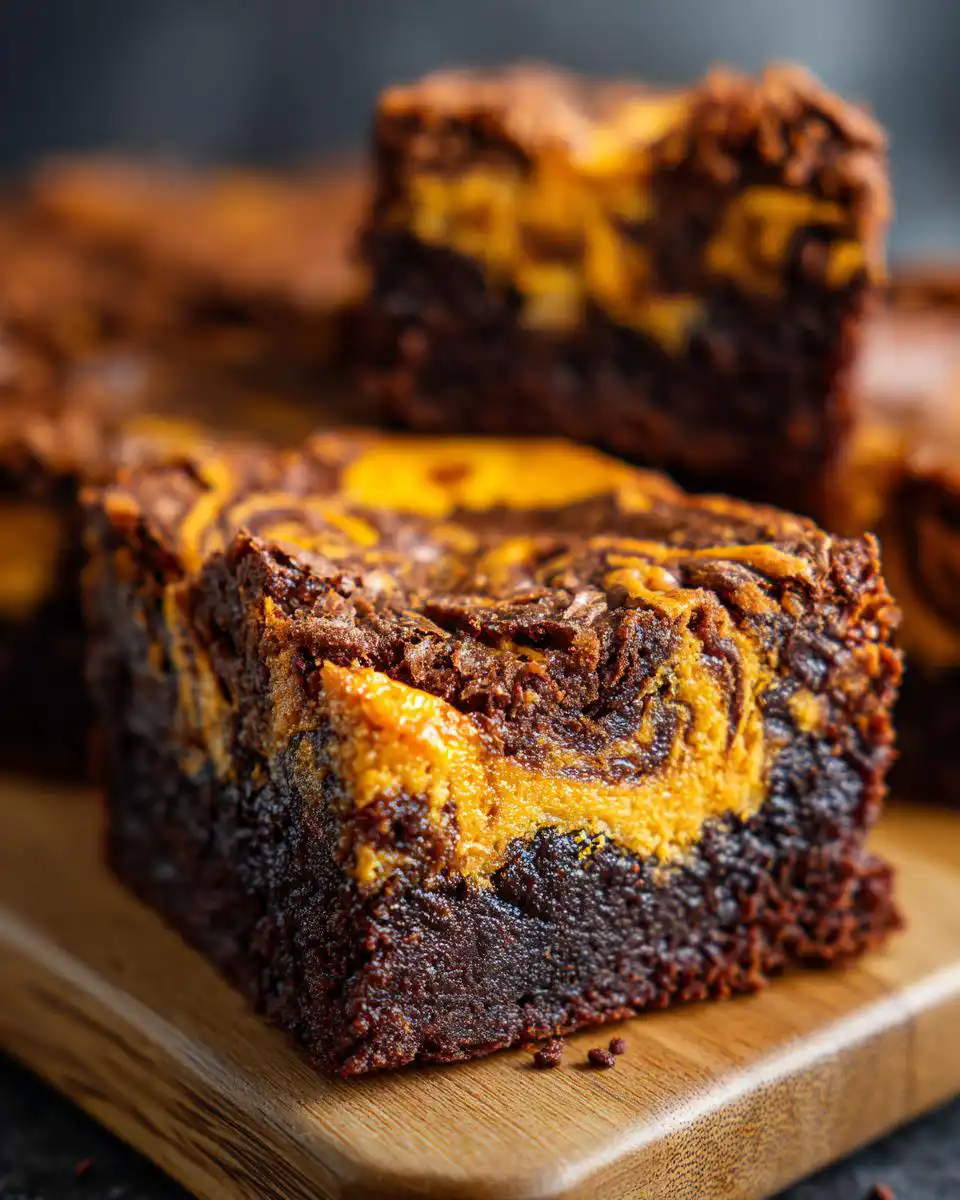
This is where the magic ribbon comes from! You absolutely must have 8 ounces of cream cheese, and I mean it—it has to be at room temperature. If it’s cold, you’ll end up with lumps, and we want smooth sailing here. We mix that with another portion of white sugar, one large egg for structure, and half a teaspoon of vanilla. The final touch that makes these my signature is a few drops of orange food coloring; it gives the swirl a beautiful, bright hue that pops against the dark chocolate.
Equipment Needed for Your cream cheese swirl brownies
You don’t need a fancy stand mixer for this recipe, which is another reason I love it so much! Keep your tools simple, and you’ll be done in a flash. We’re looking for basic mixing bowls to handle our layers separately.
- One medium bowl for the dry brownie ingredients.
- One small bowl for the wet brownie ingredients.
- A separate bowl for mixing that gorgeous cream cheese filling.
- An 8×8-inch baking dish—that’s the perfect size for this amount of batter.
- Parchment paper is your best friend for easy cleanup!
- A whisk, a fork, and a rubber spatula for mixing everything up.
Step-by-Step Instructions for Making cream cheese swirl brownies
Okay, grab your apron because this is the fun part! We are moving fast, but we aren’t rushing the important mixing steps. Remember, these are going into a 350°F oven, so let’s get everything ready before we start stirring things together.
Preparing the Baking Pan and Dry Mix
First things first: get that oven preheated to 350 degrees Fahrenheit. While it warms up, grab your 8×8-inch baking dish. Line it completely with parchment paper, making sure the paper hangs over the sides a little bit—that’s your built-in handle for lifting the finished brownies out later. Spray that parchment lightly with nonstick spray, just to be safe. Now, for the dry stuff: In a medium bowl, grab your whisk and combine the white sugar, flour, the dark cocoa powder, salt, and baking powder. Whisk it well until you don’t see any clumps of cocoa powder hiding anywhere. That’s your base ready to go!
Mixing and Combining the Brownie Batter
In a separate, smaller bowl, take your two large eggs and beat them gently with a fork. Add in the vegetable oil and the vanilla extract, stirring until it looks smooth and combined. Now, pour those wet ingredients right into your bowl of dry ingredients. Mix them together with a spatula, but here’s the critical part: Stop mixing as soon as you see the last streak of flour disappear. Seriously, don’t overmix, or you’ll lose that fudgy texture! Once it’s just combined, take about a quarter cup of that thick batter and set it aside—we need that later for the top layer.
Creating the Orange Cream Cheese Layer
Time for the filling! Make sure that 8 ounces of cream cheese is nice and soft—if it’s stiff, microwave it for about ten seconds, no more. In a clean bowl, beat the cream cheese, the quarter cup of sugar, the remaining egg, and the vanilla until it is perfectly creamy and totally lump-free. Once it’s smooth, add a few drops of orange food coloring. Keep adding drops until you get that bright, vibrant color that really pops against the dark chocolate. Give it a good stir until it’s uniform.
Assembling and Creating the Marbled cream cheese swirl brownies
Pour the main batch of brownie batter into your prepared 8×8 dish and use your spatula to spread it out evenly across the bottom. Next, dollop spoonfuls of that beautiful orange cream cheese mixture all over the top of the batter. Don’t worry about neatness here! Then, take the small amount of brownie batter you reserved earlier and drop those spoonfuls randomly over the top of the cream cheese layer. Now for the artistry: take a butter knife and gently swirl the layers together. You want a nice marbled look, so just drag the knife through the layers in an S-pattern a few times. Don’t over-swirl, or the colors will muddy together!
Baking and Cooling for Best Results
Slide the dish into your preheated oven and bake it for 30 to 35 minutes. You’re looking for the edges to start pulling away from the sides of the pan. The center should still have a tiny little jiggle when you gently shake the pan—that means it’s perfectly fudgy inside! Once they are done, pull them out, but resist the urge to cut them right away. They need to cool completely before you slice them, or they’ll just turn into a gooey mess. Trust me on this one; patience is key for clean cuts! You can find more baking inspiration on my Pinterest boards.
Tips for Success with Your cream cheese swirl brownies
Getting these fudgy squares just right is all about managing texture contrast. The base needs to be dense and rich, and the filling needs to be smooth as velvet. I’ve learned a few tricks over the years that make sure every batch comes out exactly how I want it—perfectly marbled and never dry. These little tips really separate a good batch from a fantastic one! If you want to see more of my recipe development process, check out my posts on Medium.
Achieving the Ideal Swirl Pattern
When you start swirling with the knife, remember that you are just introducing the two layers; you aren’t trying to mix them completely. If you drag the knife too much, the colors will blend and turn into a dull brown instead of those distinct ribbons we want. I always use a gentle S-pattern, moving slowly from one side of the pan to the other, maybe crossing over once. That’s usually plenty to create that beautiful, professional-looking marble effect.
Ensuring Creamy Filling Consistency
I can’t stress this enough: your cream cheese needs to be truly room temperature. If you try to beat cold cream cheese, you end up whipping in air pockets, which makes the filling bake up crumbly instead of smooth and decadent. If you’re in a rush, just cut the block into a few chunks and microwave it for about ten seconds. You want it soft enough for your finger to leave a dent easily when pressed.
Frequently Asked Questions About cream cheese swirl brownies
If you’re still wondering about the secrets to getting these perfect, I’ve gathered the questions I hear most often about making these chocolate and orange treats. Don’t worry if you’re new to baking; these little answers will set you up for success with your very own batch of these amazing marbled squares.
How Do I Know When My Fudgy Brownies Are Done?
This is crucial for achieving that fudgy texture! You can’t rely only on sight. When you insert a toothpick into the center—aiming for a spot that looks like pure brownie, not the cream cheese swirl—you want it to come out with moist crumbs attached. If the toothpick comes out completely clean and dry, you’ve gone too far and you’ll have cakey brownies, not the fudgy kind we love. A few moist crumbs mean they are perfect.
Can I Make These cream cheese swirl brownies Ahead of Time?
Absolutely! In fact, I think they taste even better the next day. The flavors really settle in, and they slice much cleaner once they are completely cool. You can make a full batch and store them covered at room temperature for up to three days. If you want them to last longer, you can definitely freeze them. Just make sure they are fully cooled, slice them first, and wrap the individual portions tightly in plastic wrap before popping them into the freezer.
Storing and Reheating Your cream cheese swirl brownies
These rich squares are fantastic for making ahead of time, which is perfect for busy weeks! Since they have that cream cheese layer, you need to treat them a little differently than a plain brownie. I find that the texture holds up beautifully for a few days.
For short-term storage, just keep them tightly covered at room temperature. I usually use an airtight container lined with a paper towel to absorb any extra moisture. They should stay great for about three days this way. If you need them to last longer, the fridge is your friend; they’ll keep well for up to a week.
Here’s a quick guide on how to handle them after storage:
| Serving Method | Prep Tip |
|---|---|
| Room Temperature | Let refrigerated brownies sit out for 30 minutes before serving. |
| Slightly Warm | Microwave individual squares for about 10-15 seconds max. |
Estimated Nutritional Information for cream cheese swirl brownies
Because I’m always trying to keep my eating habits balanced, I know how important it is to keep an eye on what’s going into your body, even when you’re enjoying a treat! Keep in mind that since this recipe uses rich ingredients like oil and cream cheese, it definitely leans indulgent. The numbers below are just an estimate based on cutting the batch into 9 even squares, so your exact totals might shift a bit depending on how you slice them! Check out more dessert recipes here.
Here is a quick look at the estimated breakdown for one serving:
| Nutrient | Amount (Estimate) |
|---|---|
| Calories | 320 |
| Fat | 20g |
| Carbohydrates | 32g |
| Protein | 5g |
It’s a satisfying square that gives you a good little energy boost from the carbs and a nice amount of fat to keep you full. Enjoy it guilt-free! See all my recipes.
Print
Decadent 9 cream cheese swirl brownies
- Total Time: 45 minutes
- Yield: 9 servings
Description
Cream cheese swirl brownies offer a rich, fudgy dark chocolate base perfectly marbled with a creamy, orange-tinted cheesecake swirl. This recipe delivers a decadent winter treat ready in about 45 minutes, ideal for quick dessert cravings.
Ingredients
- Brownie Layer:
- 1 cup granulated white sugar
- ½ cup all-purpose white flour
- ½ cup Hershey’s Special Dark cocoa powder
- ¼ teaspoon salt
- ¼ teaspoon baking powder
- 2 large eggs
- ⅓ cup vegetable oil
- 1 teaspoon vanilla extract
- Cream Cheese Layer:
- 8 oz cream cheese, room temperature
- ¼ cup granulated white sugar
- 1 large egg
- ½ teaspoon vanilla extract
- Orange food coloring
Instructions
- Preheat your oven to 350°F. Line an 8×8-inch baking dish with parchment paper; spray the paper with nonstick spray.
- In a medium bowl, whisk together the sugar, flour, cocoa powder, salt, and baking powder until combined.
- In a small bowl, beat the eggs, oil, and vanilla with a fork until smooth.
- Stir the wet ingredients into the dry ingredients until just mixed. Stop mixing when combined; do not overmix.
- Reserve ¼ cup of the brownie batter. Spread the remaining batter evenly into the prepared dish.
- In a separate bowl, beat the cream cheese, sugar, egg, and vanilla until the mixture is creamy and lump-free.
- Mix in the orange food coloring until you achieve a vibrant hue.
- Dollop the cream cheese mixture over the brownie batter layer; spread it gently.
- Drop the reserved brownie batter in tablespoons atop the cream cheese layer.
- Swirl gently with the tip of a knife to create a marbled pattern.
- Bake for 30 to 35 minutes. The edges should pull away from the sides, and the center should set with a slight jiggle.
- Cool the brownies completely before cutting them. Remember to wash your hands, utensils, and surfaces after handling raw eggs.
Notes
- Room-temperature cream cheese blends smoothest; microwave for 10 seconds if needed.
- Swirl lightly to avoid muddy colors; using an S-pattern with the knife works best.
- Test doneness with a toothpick; slight crumbs indicate a fudgy texture.
- Chill the brownies for 30 minutes after baking for cleaner slices.
- A double batch fits a 9×13 pan; bake for 35 to 40 minutes.
- For a milder chocolate flavor, use regular cocoa powder instead of dark.
- Swap vegetable oil with melted coconut oil for a tropical hint.
- Mix ¼ teaspoon cinnamon into the cream cheese for a warm spice variation.
- Prep Time: 15 minutes
- Cook Time: 30 minutes