If you need a showstopper appetizer that takes less time than brewing a pot of tea, you are in the right place! We are diving straight into making absolutely adorable olive penguins. Seriously, these little guys take about ten minutes, and they require zero cooking, which is a miracle when hosting during the busy winter months.
My name is Jordan Bell, and I’m based right here in Asheville, NC. I started sharing my journey on Easy Detox Recipes after losing eighty pounds, realizing that clean eating doesn’t mean giving up the rich, comforting flavors I grew up loving. I specialize in taking those classic Southern comfort dishes and making them lighter and brighter without ever losing that satisfying taste we crave.
These olive penguins are the perfect example of that philosophy: simple, fun, and ready before your guests even arrive. They bring a huge smile to everyone’s face, and trust me, they disappear first! 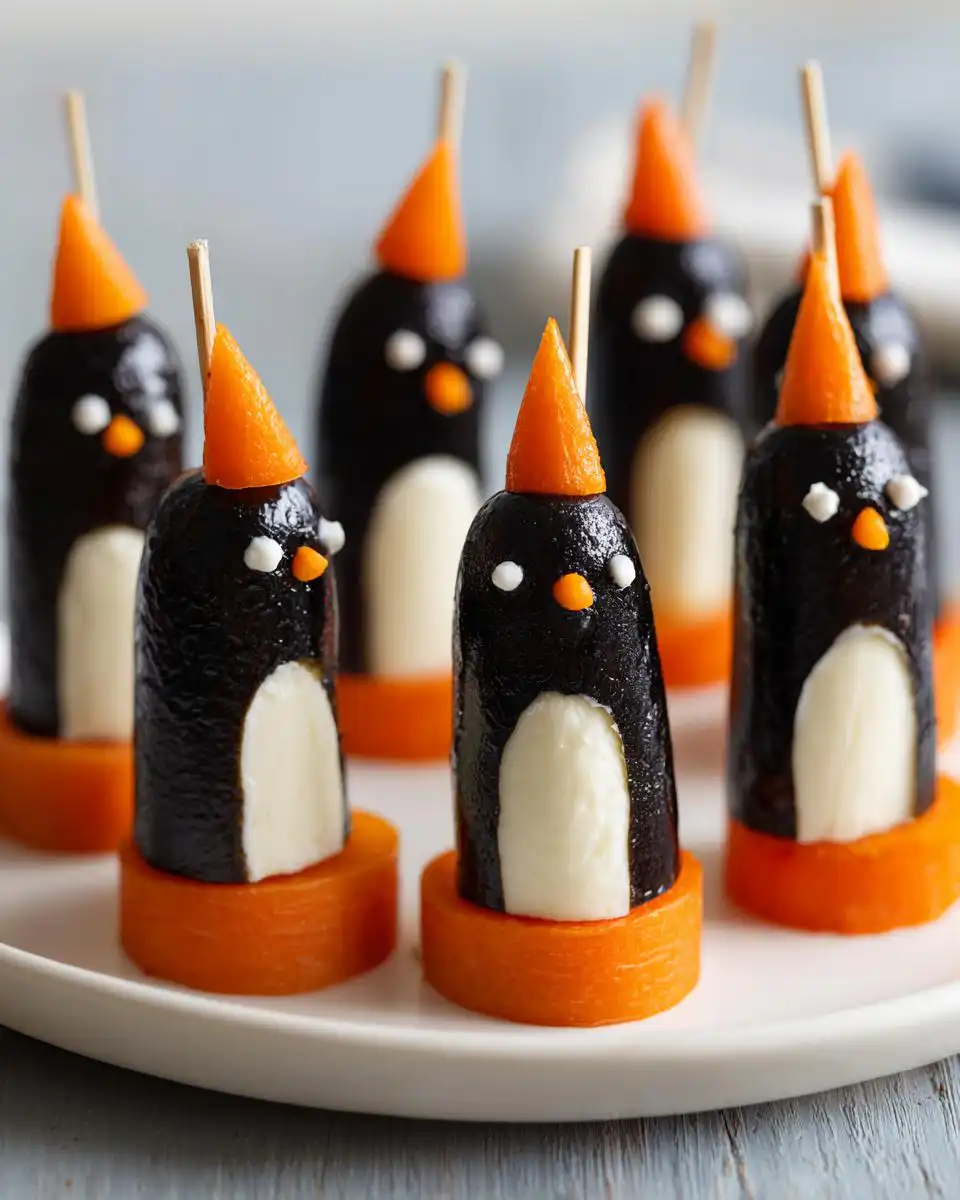
Gathering Your Ingredients for Perfect Olive Penguins
You only need five main things to get these little critters assembled, and you probably have most of them in your fridge already! Making these olive penguins is so fast because we aren’t cooking anything; we’re just stacking and assembling. It’s crucial to have all your pieces ready to go before you start putting them together, or things can get messy fast.
You’ll need good quality ingredients to make sure your penguins stand up straight and look their best. Don’t skimp on the olives—size really matters here!
Essential Components for Your Olive Penguins
- Large black olives, pitted (these form the main body)
- Small black olives, pitted (these are the cute little heads)
- Baby carrots (we need these for the feet and beaks!)
- Mozzarella balls, small (for the white belly filling)
- Toothpicks (the secret weapon for stability)
Ingredient Notes and Smart Substitutions for Olive Penguins
If you don’t have mozzarella balls on hand, don’t panic! You can absolutely use thick, soft cream cheese instead; it just pipes in a little differently. If you want to jazz up your olive penguins, try swapping the mozzarella for pepper jack cheese for a sneaky little spicy kick—though that version won’t be vegetarian anymore, so keep that in mind!
Also, feel free to use strips of pimento cut from jarred pimentos if you want bright red beaks instead of the carrot triangles. Either way, the result is always a crowd-pleaser!
Step-by-Step Assembly of Your Olive Penguins
Okay, now for the fun part! Once you have all your components ready—and I mean *all* of them—the actual building of these adorable olive penguins moves incredibly fast. We are going to move through this assembly line style. Remember, the trick here is precision in the prep work, which makes the stacking easy.
Preparing the Carrot Pieces
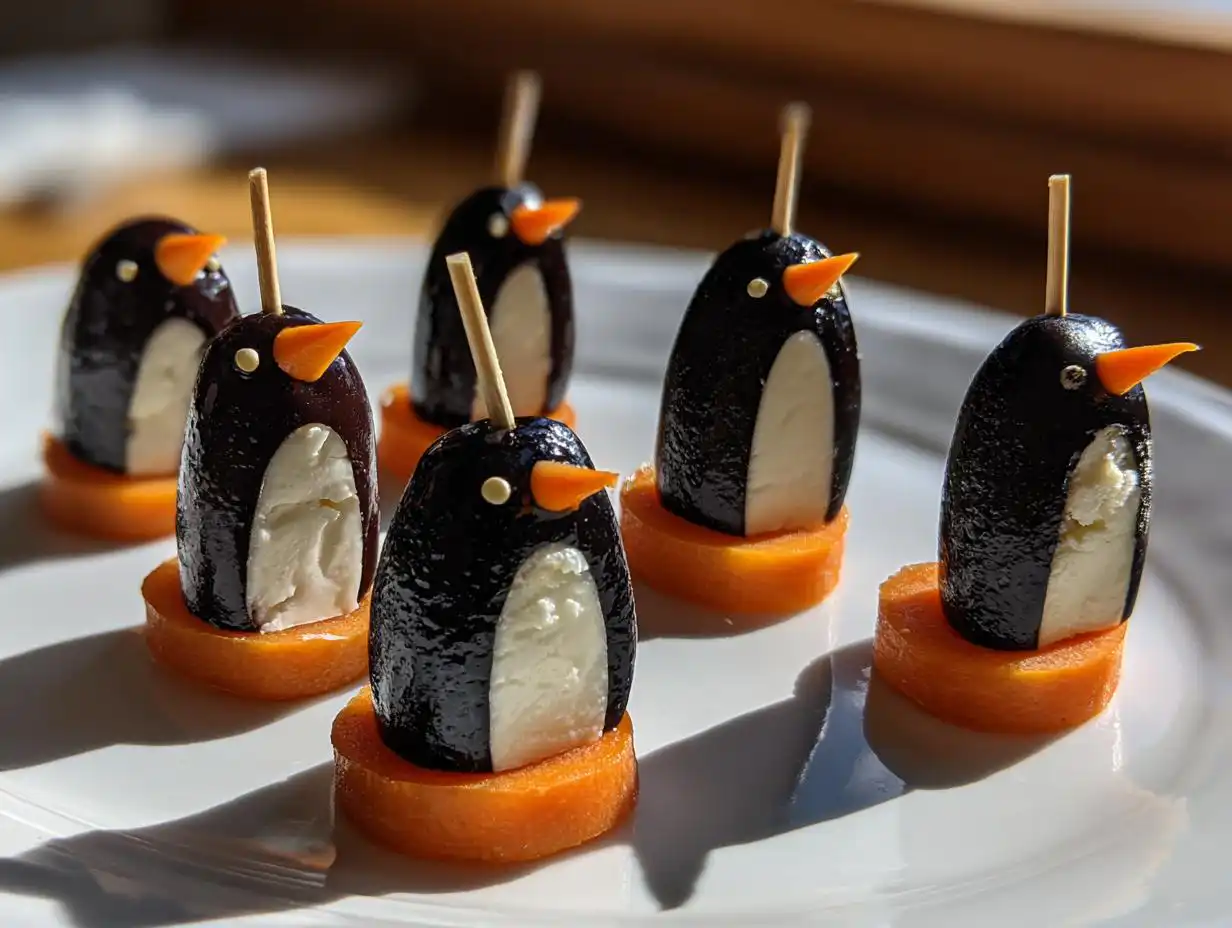
The carrots are where we get our little orange accents for the feet and the beak. Take those baby carrots and slice them into very thin disks, aiming for about an eighth of an inch thick, maybe a quarter inch at the most. If they are too thick, your penguin base will be wobbly! From those thin disks, you need to cut out two shapes: the little triangular feet and the tiny beak pieces. Try to make the beaks small and pointed so they look sharp.
Constructing the Olive Penguin Body
This is where the body and the white belly come together. Take those larger black olives and carefully slice them right down the middle, lengthwise, but don’t cut all the way through—you want a hinge! Now, take one of those mozzarella balls and slice it into four thin rounds. Gently push one of those mozzarella rounds inside the opened large olive. That mozzarella piece becomes the beautiful white front of your penguin. Make sure it sits snugly inside the olive cavity.
Final Assembly and Securing Your Olive Penguins
We are building from the ground up! First, lay down one of your thin carrot foot disks on your platter. Next, carefully place your filled large olive body right on top of that carrot base. Now, take one of the small black olives—this is the head—and set it sideways on top of the filled olive body. It should balance nicely. Take one of your tiny carrot beak triangles and gently wedge it into the small olive head. It should look like it’s peeking out! Finally, take a toothpick and carefully insert it at a slight angle, going through the head, the body, and down into the carrot foot base. This secures everything beautifully for serving your perfect olive penguins! 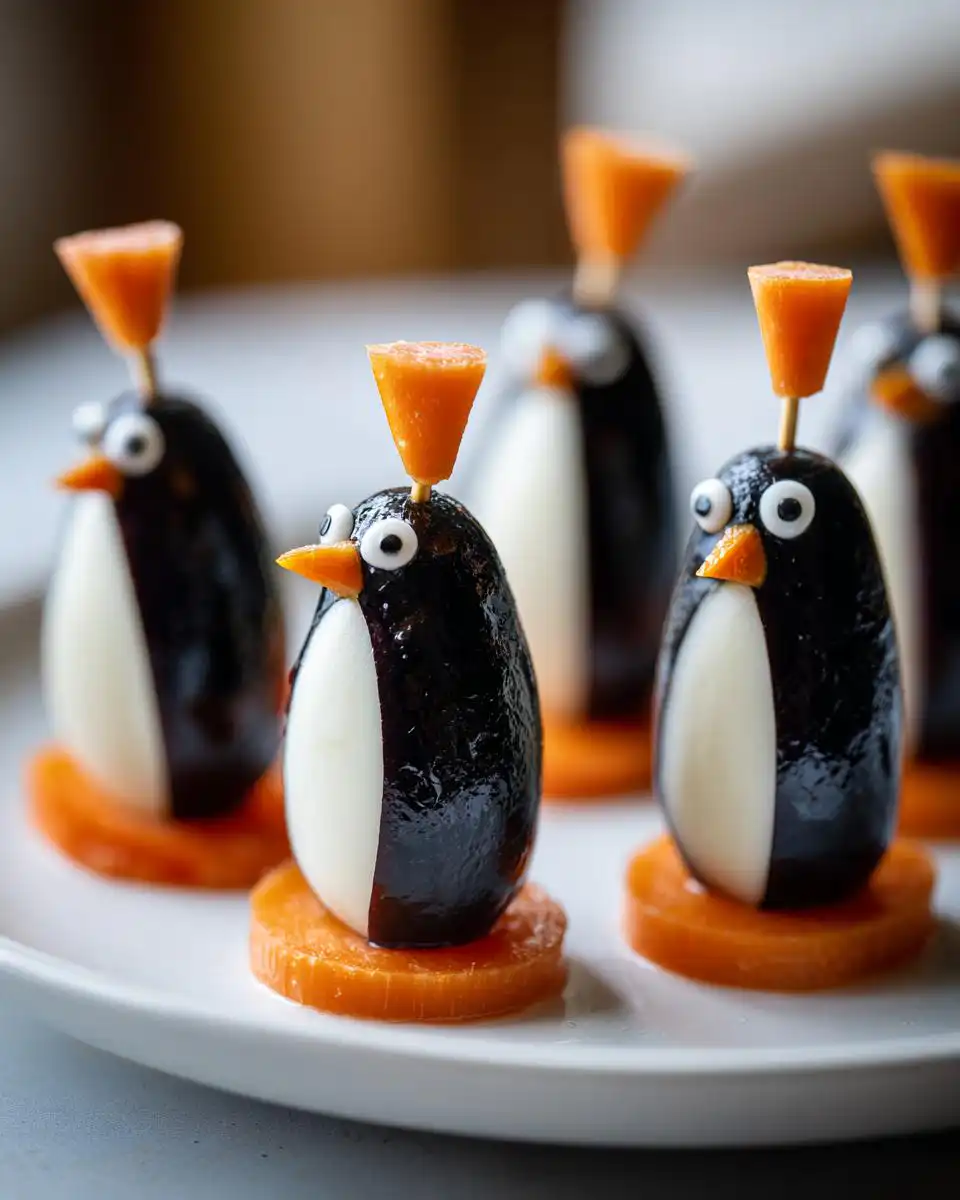
Tips for Success When Making Olive Penguins
These little appetizers look fancy, but they are all about good preparation. If you try to slice the carrots and fill the olives while you’re trying to stick the heads on, you’re going to end up with a sticky mess. Trust me, I learned this the hard way when I was trying to rush for a holiday potluck!
Prep Work Strategy for Quick Assembly
The absolute best strategy for making a big batch of these olive penguins quickly is to treat it like an assembly line. Before you even touch a toothpick, you need every single component ready and waiting on your cutting board. That means all your carrots are sliced thin, the feet and beaks are cut out, the large olives are stuffed with mozzarella, and the small heads are ready to go. Once you start stacking, it flows perfectly in about 30 seconds per penguin.
Achieving Stable Olive Penguins
Stability is everything! If your penguins tip over on the platter, they aren’t as charming. That’s why I stress cutting those carrot disks thin—too thick and the toothpick won’t anchor well into the base. When you insert that final toothpick, try to angle it slightly backward toward the body. This anchors the head and body firmly onto the foot base, ensuring your olive penguins stand proud all night long!
Serving Suggestions for Your Olive Penguins
Once you’ve finished assembling your army of little olive penguins, the real fun starts: presentation! Since these are no-cook and vegetarian, they pair wonderfully with almost anything. For a festive look, arrange them on a simple white platter dusted lightly with paprika—it looks like snow, and it adds a tiny bit of smoky flavor if you get a little on the edges.
If you’re serving them alongside other appetizers, they look great clustered near dips or crackers. They are light enough that they don’t weigh down a platter. They go perfectly with my lighter veggie dips or maybe some mini skewers of marinated artichokes. Everyone always asks right away how I made these cheerful little snacks, and I just tell them it’s my secret Asheville trick for fast, fun holiday food! You can see more fun appetizer ideas on my Pinterest page.
Storing and Reheating Your Olive Penguins
These little guys are fantastic because you can totally make them ahead of time, which is a lifesaver when you’re hosting! Since they are cold appetizers, you don’t have to worry about reheating at all—which is great because you absolutely shouldn’t try to heat up mozzarella and olives on a toothpick, trust me on that one!
The key is assembly timing. You can prep all the individual carrot pieces and slice the olives, but I find the best results come from assembling them right before the party starts, or at least chilling them shortly after they are built.
Storing Leftover Olive Penguins
If you need to make them ahead, you can store the fully assembled olive penguins covered tightly in the refrigerator for up to a full day. They hold up surprisingly well! Just make sure they are covered well so they don’t dry out or absorb any weird fridge smells. When you take them out, let them sit on the counter for about 15 minutes just to take the deep chill off before your guests arrive.
Here is a quick look at the storage options:
| Component | Storage Method | Time Frame |
|---|---|---|
| Pre-Cut Carrot Pieces | Airtight container in the fridge. | Up to 2 days |
| Assembled Olive Penguins | Covered tightly in the refrigerator. | Up to 1 day |
| Reheating | Do not reheat; serve chilled or at room temperature. | N/A |
Frequently Asked Questions About Olive Penguins
I get so many questions every time I post about these cute little snacks! They seem simple, but people always want to make sure they get the proportions right. Here are the top things folks ask when they are planning to make their own batch of olive penguins.
Q1. Are these really only 10 minutes to make?
Yes, they absolutely are, but that’s only if you follow my advice and prep everything first! If you try to slice the carrots while stuffing the olives, you’ll easily spend 20 minutes or more. Once you have your assembly line set up, they fly together quickly!
Q2. Can I make these vegan?
That’s a great question for my detox blog readers! Since the original recipe uses mozzarella, they aren’t vegan as written. However, you can easily swap the mozzarella for a firm block of vegan cream cheese or even firm tofu cut into the right size. Just make sure whatever you use is firm enough to hold its shape inside the olive body. For more on healthy swaps, check out this article on Medium.
Q3. My small olives are too big for the heads. What should I do?
If your small olives are too large, you might be using the wrong size, or you might need to use a different olive altogether. For the best-looking olive penguins, you need a distinct size difference between the large body olive and the smaller head olive. If you can’t find smaller ones, sometimes slicing the small olive in half horizontally and using just the top half can work for a slightly smaller head!
Q4. Do I need to use baby carrots, or can I use regular carrots?
You certainly can use regular carrots, but you have to be much more careful slicing them thin enough for the feet and beaks. Baby carrots are just easier because they are already small and narrow, making it simpler to cut those tiny, stable feet disks. Don’t skip the thin slicing, regardless of the carrot type! If you are interested in other quick vegetable prep, see my tips on honey glazed carrots.
Estimated Nutritional Data for Olive Penguins
I always try to keep things light, especially when serving snacks at a gathering. Since these olive penguins are no-cook and use simple, whole ingredients, they are surprisingly low in calories! Keep in mind that this nutritional breakdown is an estimate based on the standard recipe, assuming the mozzarella is used and the olives are average size.
Because we are using high-quality fats from the olives and cheese, you get a little boost of good stuff, but the calories stay low. Perfect for enjoying guilt-free! For more low-calorie ideas, check out my guide on detox drinks.
| Nutrient | Amount Per Penguin |
|---|---|
| Calories | 25 |
| Fat | 2g |
| Carbohydrates | 2g |
| Protein | 1g |
| Sodium | N/A (Estimate Varies) |
| Sugar | N/A |
Share Your Delightful Olive Penguins Creations
I absolutely love seeing your versions of these fun little snacks! If you made a batch of these super-fast olive penguins for your latest gathering, please drop a comment below and tell me how they went over with your crowd. Did you try the pepper jack substitution? I always appreciate seeing how you adapt my clean comfort food ideas!
Print
Stunning 10-Minute olive penguins Delight
- Total Time: 10 minutes
- Yield: 15 penguins
Description
Adorable olive penguins made with black olives, mozzarella, and carrots—fun 10-minute no-cook appetizer perfect for winter gatherings and busy hosts. These charming appetizers are simple to assemble.
Ingredients
- Large black olives (for bodies)
- Small black olives (for heads)
- Baby carrots
- Mozzarella balls
- Toothpicks
Instructions
- Prepare assembly station with all components.
- Slice each mozzarella ball into 4 thin pieces.
- Cut baby carrots into thin disks (1/8-1/4 inch); cut small triangle from each disk for feet base.
- Use carrot triangle cutouts to form beaks.
- Slice large black olive lengthwise; slide mozzarella piece inside to create body.
- Stack large olive body onto carrot foot disk.
- Position small black olive sideways on body for head; insert carrot beak into head.
- Secure entire penguin with toothpick through all layers.
- Repeat to make desired quantity. Arrange on platter.
Notes
- Use cream cheese instead of mozzarella for softer filling.
- Swap baby carrots for regular carrots cut thin.
- Add pimento strips from olives for colorful beaks.
- Make jumbo version with colossal olives.
- Use pepper jack cheese for spicy kick.
- Prep all pieces before assembly.
- Cut carrots thin for stable penguin base.
- Insert toothpick at slight angle for stability.
- Make ahead and chill up to 4 hours before serving.
- Store assembled penguins covered in fridge up to 1 day.
- Prep Time: 10 minutes
- Cook Time: 0 minutes