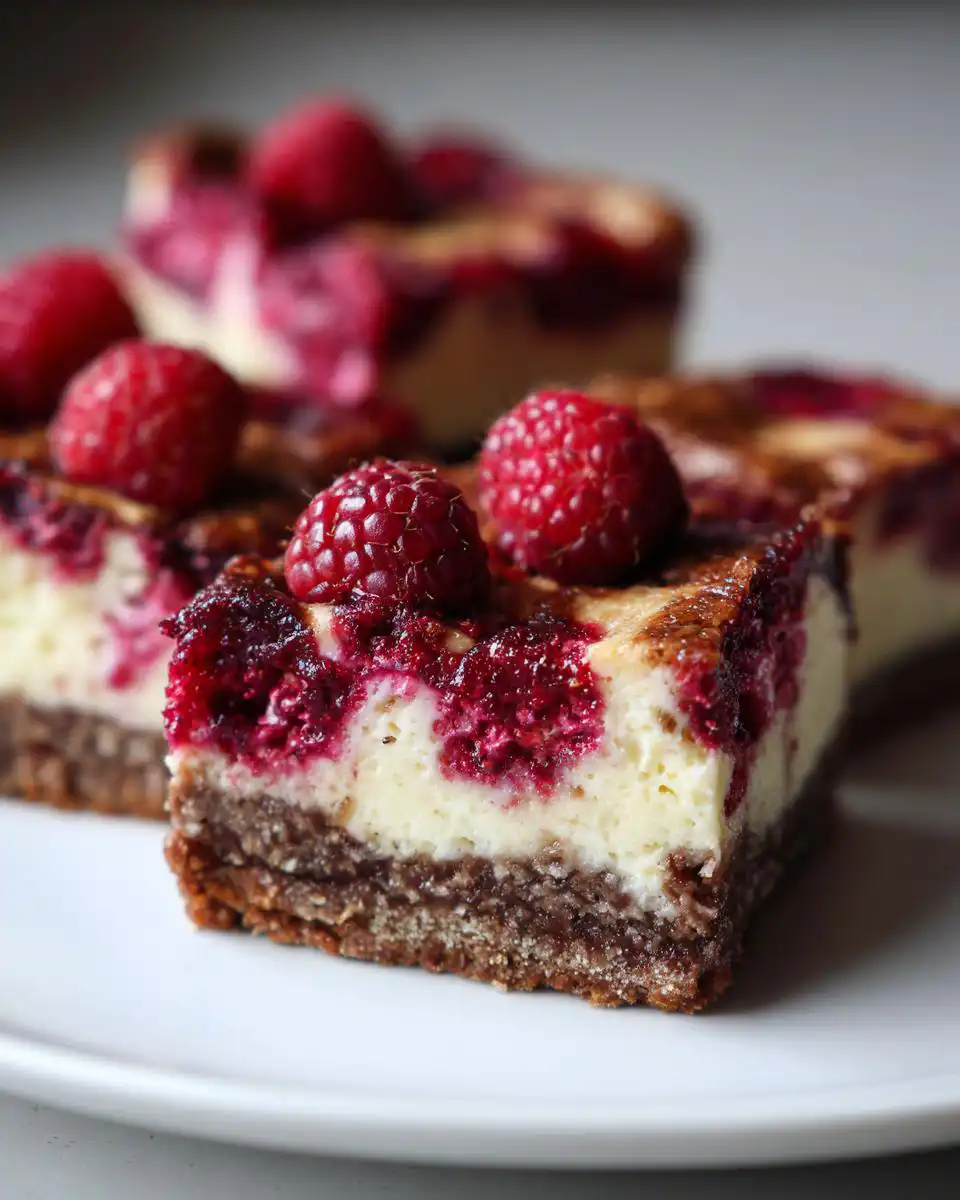
If you’re anything like me, you probably thought desserts had to be loaded with sugar and fat to taste truly amazing. Well, I’m Jordan Bell, broadcasting from Asheville, NC, and after losing nearly 80 pounds, I learned that you can absolutely keep your comfort food favorites alive—just cleaner! That journey inspired my whole blog, Easy Detox Recipes, where I take those rich Southern classics and lighten them up without sacrificing flavor. That’s why I’m so excited to share these Healthy Raspberry Cheesecake Bars with you today. Seriously, these bars are proof that you can enjoy a creamy, satisfying dessert that fits right into a low-calorie lifestyle.
Why You Will Love These Healthy Raspberry Cheesecake Bars
These aren’t just some sad, diet-friendly substitute; they are genuinely delicious. I’ve tinkered with this recipe until it was perfect for my weeknight cravings. You’ll be reaching for these bars constantly because:
- They pack a serious protein punch thanks to that Greek yogurt!
- They keep the calories surprisingly low for a cheesecake treat.
- The prep work is shockingly fast—we’re talking minimal effort for maximum reward.
- That tart raspberry swirl against the creamy base? Perfection.
- It’s a fantastic way to sneak in more protein using simple ingredients.
Gathering Your Components for Healthy Raspberry Cheesecake Bars
Okay, friend, let’s talk ingredients! When you’re aiming for something both healthy and delicious, you can’t just throw anything in the bowl. For these Healthy Raspberry Cheesecake Bars, every component plays a specific role in delivering that creamy texture without all the guilt. We are swapping out heavy cream for Greek yogurt, which gives us that amazing protein boost, but we still need quality fats and binders to make it hold together perfectly.
Don’t panic about the list; most of this is pantry staples! Just make sure you grab your light cream cheese—or full-fat if you’re feeling indulgent, I won’t tell!—and your favorite zero-calorie sweetener. This blend is what keeps these bars tasting like a decadent treat while keeping things light.
Crust Ingredients for Healthy Raspberry Cheesecake Bars
The base sets the whole stage for your Healthy Raspberry Cheesecake Bars. You need something sturdy to hold that creamy filling! I usually use digestive biscuits because they bake up beautifully, but if you’re out, just use rolled oats or even graham crackers—whatever you have on hand works. The key here is the binding agent: melted butter. It melts down and helps everything stick together when it bakes.
Don’t forget those little soy protein crisps if you have them! They sneak in a little extra staying power. If you don’t have them, just use a few more crushed biscuits or oats. Pulse it all in the food processor until it looks like wet sand, and you’re ready for the next step!
Filling Ingredients for Healthy Raspberry Cheesecake Bars
Now for the star of the show! For the filling, it is absolutely essential that your cream cheese and eggs are at room temperature. Trust me on this one! If they’re cold, you’ll end up whisking forever trying to get rid of lumps, and we definitely don’t want lumps. We want smooth sailing! Mix that with your zero-calorie sweetener (or real sugar, if you prefer), eggs, vanilla protein powder, vanilla extract, and the bright zest and juice from a lemon. That lemon cuts through the richness perfectly and makes the raspberries pop. Whisk gently until it’s just smooth, okay? We’re not trying to whip air into this!
Step-by-Step Instructions to Make Healthy Raspberry Cheesecake Bars
Alright, let’s get baking! This is where the magic happens, and honestly, it’s so straightforward you’ll wonder why you ever bought cheesecake from a store. You need to move with a little purpose here, especially when it comes to the base, but don’t rush the filling part. We want these Healthy Raspberry Cheesecake Bars to turn out flawless!
Preparing the Base for Your Healthy Raspberry Cheesecake Bars
First things first: get that oven warming up to 160 degrees Celsius, or 320 Fahrenheit. While it heats, grab your food processor. Toss in those digestive biscuits—or oats—and the soy protein crisps if you’re using them. Pulse that until you have fine crumbs, maybe 10 to 30 seconds. Don’t walk away; it goes fast!
Next, drizzle in your melted butter and give it a quick whirl until it clumps together like it’s ready to stick to itself. Line a brownie pan with parchment paper—this is non-negotiable for easy removal later! Press that sticky crumble mixture firmly and evenly across the bottom of the pan. Pop that base into the preheated oven for just 10 minutes. It just needs a little head start. When it comes out, you have to let it cool down a bit before we pour anything on top, okay? Don’t skip the cooling!
Mixing the High Protein Cheesecake Filling
This step is crucial for that smooth, crack-free top, which is vital for any good cheesecake, even these lighter bars. Remember what I said about room temperature ingredients? This is where it pays off! In a medium bowl, gently whisk together your light cream cheese, all that wonderful Greek yogurt, the two eggs, your zero-calorie sweetener, the protein powder, vanilla, lemon juice, and zest.
You only want to mix until it’s *just* smooth. Seriously, stop as soon as the streaks disappear. Over-mixing whips too much air into the batter. All those tiny air bubbles rise to the surface, bake, and then *pop*, leaving you with those awful cracks. We want the creamy texture, not the crumbly texture of a cracked top! Tap the pan firmly on the counter a couple of times after you’ve poured the filling in to knock out any sneaky air pockets.
Assembling and Baking the Cheesecake Bars
It’s time for layers! Take half of your fresh or frozen raspberries and scatter them right over that cooled crust. Now, pour about half of your beautiful, smooth cheesecake batter over the berries. Then, scatter the rest of your raspberries on top of that layer, and finish by pouring the remaining batter over everything. You can sprinkle a few extra berries right on top for decoration if you like how they look!
If you want that ultra-creamy, professional look, this is where you use the water bath trick. Set your brownie pan inside a larger roasting pan and pour hot water into the larger pan until it comes about an inch up the side of the cheesecake pan. This steams the bars gently. Bake for 30 to 40 minutes. If you like it super creamy and soft, pull it at 30 minutes. If you want it firmer, go closer to 40. It should be mostly set but still have a little wobble in the very center. Then, let them cool on the counter before they head into the fridge for the long chill! See how I use similar techniques in other baked goods!
Pro Tips for Perfect Healthy Raspberry Cheesecake Bars
Even with a great recipe, sometimes things go sideways, right? Don’t you worry! Getting these Healthy Raspberry Cheesecake Bars right is about respecting the dairy and keeping things calm during the mixing process. I’ve learned a few tricks over the years that guarantee that smooth, dreamy texture we are after, even when using lighter ingredients.
Ingredient Temperature and Mixing Technique
I cannot stress this enough: room temperature ingredients are your best friend here. If your cream cheese or eggs are cold straight from the fridge, they fight each other when you try to combine them. That results in lumps, and you end up mixing longer trying to smooth them out. Once you over-mix, you introduce air, and air leads to cracks when baking!
So, pull those out an hour before you plan to start. When you mix the filling, use a whisk or a spatula, not a high-speed electric mixer. You are just trying to *combine* everything until it looks uniform. Stop right when you can’t see streaks of white or yellow anymore. It feels like you haven’t mixed enough, but trust me, the oven will do the rest of the work!
Achieving the Best Set and Chill Time
This is where patience truly pays off for these bars. You can bake them perfectly, but if you slice them warm, they will just fall apart into a messy puddle. After they cool down on the counter for about 30 minutes, they need to go into the refrigerator.
You absolutely must let these Healthy Raspberry Cheesecake Bars chill for a minimum of five hours. Seriously. Over five hours is even better—I often leave mine overnight. That time allows the protein powder and the yogurt to fully set up and firm up the structure. If you rush the chill time, you get soft, almost runny bars instead of the clean, firm squares we want for easy grabbing! For more tips on clean eating inspiration, check out my Medium page.

Storage and Reheating Instructions for Your Dessert
One of the best things about making a big batch of these bars is that they keep so well! I always make sure to have a few stashed away for a quick snack later in the week or even month. Since they are high in protein and use yogurt, we need to keep them cool to maintain that perfect texture.
Storing Leftover Healthy Raspberry Cheesecake Bars
These bars are fantastic for meal prepping your desserts. Once they are completely chilled through—and I mean *completely* set—you can slice them up. Store the finished Healthy Raspberry Cheesecake Bars in an airtight container right in the fridge. They stay perfectly delicious and firm for about five to seven days. That’s a whole week of clean, easy desserts waiting for you! If you want to see more of my recipe ideas, follow my Pinterest boards.
Freezing and Thawing the Bars
If you know you won’t get through them in a week, the freezer is your friend! Before freezing, make sure they are fully sliced. Wrap each bar tightly—I use plastic wrap first, then a layer of foil or a freezer bag—to prevent freezer burn. They keep beautifully for up to three months. When you’re ready to enjoy one, just pull it out the night before and let it thaw slowly in the refrigerator. It comes back to life perfectly!
| Storage Location | Maximum Time | Preparation Note |
|---|---|---|
| Refrigerator | 5–7 Days | Must be stored in an airtight container. |
| Freezer | 2–3 Months | Wrap individually before freezing. |
Frequently Asked Questions About High Protein Cheesecake
I get so many questions whenever I post these lightened-up treats! People always want to know about swaps and texture, which makes sense when you’re trying to keep things healthy. Here are a few of the things I hear most often regarding this style of low-calorie cheesecake.
Q1. Can I skip the Greek yogurt and just use cream cheese?
You certainly can, but you’ll lose the texture and the protein boost! Greek yogurt is what makes this a high protein dessert and keeps the calories down. If you use all cream cheese, the bars will be much denser, richer, and higher in fat, turning it into a more traditional cheesecake experience. I highly recommend sticking with the yogurt for the intended effect.
Q2. What happens if my bars crack on top despite my best efforts?
Don’t sweat it! A crack just means the edges set faster than the middle, or maybe a little air got trapped. Since we are slicing these into bars anyway, just grab a knife and spread a little extra yogurt or a dollop of jam over the top after it chills. No one will ever know the difference!
Q3. Can I use frozen berries instead of fresh?
Absolutely, frozen raspberries are fantastic here! In fact, sometimes frozen berries work even better because they are often colder and firmer when you layer them in, which helps prevent them from sinking too much into the batter. Just don’t thaw them first; throw them in frozen!
Q4. Is the protein powder necessary, or can I use cornstarch instead?
The protein powder acts as a thickener and adds structure, which is key when you reduce the fat content. If you don’t want to use powder, cornstarch or even all-purpose flour works as a direct substitute to help it set up nicely. Just know that substituting the protein powder will reduce the final protein count. If you are interested in other high protein recipes, check out my post on high protein breakfast quesadilla.
Share Your Healthy Raspberry Cheesecake Bars Experience
Now it’s your turn! I truly hope these Healthy Raspberry Cheesecake Bars become a staple in your kitchen like they have in mine here in Asheville. I’d love to hear how they turned out for you! Did you stick to the zero-calorie sweetener, or did you try a little maple syrup? Leave a rating below and tell me your favorite way to enjoy this high protein dessert!
Print
Amazing 3-step Healthy Raspberry Cheesecake Bars
- Total Time: 5 hours 55 minutes
- Yield: 12 bars
Description
Healthy Raspberry Cheesecake Bars are an easy, high-protein dessert made with Greek yogurt and cream cheese. This recipe creates a light, creamy treat perfect for a low-calorie weeknight dessert.
Ingredients
- 8 digestive biscuits (118g) or substitute with oats or another biscuit
- 20g soy protein crisps or 1 extra biscuit or oats
- 30g light butter or normal butter or oil
- 1 tbsp milk (any kind)
- 250g light cream cheese or full fat cream cheese
- 350g Greek yogurt (vanilla or plain)
- 2 eggs
- 100g granulated zero-calorie sweetener (stevia, natvia) or white sugar
- 60g vanilla protein powder or substitute corn starch or flour
- 2 tsp vanilla extract (optional)
- Juice and zest of 1 lemon
- 150g raspberries (fresh or frozen)
Instructions
- Preheat oven to 160°C (320°F).
- In a food processor, blend biscuits and soy protein crisps for 10-30 seconds. Add melted butter and mix until sticky crumble forms.
- Press mixture evenly into a parchment-lined brownie pan. Bake 10 minutes, then cool.
- In a medium bowl, whisk cream cheese, yogurt, eggs, sweetener, protein powder, vanilla, lemon juice, and zest until smooth. Avoid over-mixing.
- Scatter half the raspberries over the base. Pour half the cheesecake batter over, then add remaining raspberries and batter. Top with extra raspberries.
- Optional: place the brownie pan in a larger pan with hot water up to an inch high for a water bath during baking.
- Bake 30-40 minutes (30 for creamy, 40 for firmer). Cool slightly, then refrigerate at least 5 hours.
- Cut into 12 bars to serve.
Notes
- Use room temperature ingredients to avoid lumps and air bubbles.
- Mix cheesecake batter just until smooth to prevent cracking.
- Tap pan before baking to release air bubbles.
- A water bath helps keep the cheesecake moist and crack-free.
- Chill for at least 5 hours for best texture or freeze briefly to speed up.
- Store bars airtight in the fridge for 5-7 days.
- Freeze tightly wrapped for up to 2-3 months. Thaw overnight in the fridge.
- Prep Time: 15 minutes
- Cook Time: 40 minutes