Okay, listen up, because I’ve cracked the code on happy hour snacking without the guilt trip! You know those times you desperately want the whole gorgeous charcuterie board vibe—the cheese, the cured meat, the crunch—but you’re trying to keep things light? Me too! That’s why I developed these amazing low-calorie charcuterie chips. Forget those boring, dusty bags of store-bought crisps. We’re making our own crunch right here using thinly sliced vegetables, and trust me, they bake up perfectly crisp.
This whole snack is built around turning humble veggies into the perfect vehicle for flavor. It’s the ultimate guilt-free charcuterie experience because you control every single topping. I usually crave something savory around 4 PM, and whipping up a batch of these low-calorie charcuterie chips takes less time than ordering takeout. They are satisfying, colorful, and genuinely feel like a treat!
Essential Ingredients for Your Low-Calorie Charcuterie Chips
When we’re aiming for something light but still want that satisfying charcuterie feel, the ingredients matter! You can’t skimp on quality here, even though we are keeping the calories way down. We need a solid base that gets super crunchy and toppings that bring the flavor punch without the heavy fat load. Getting these core components right is what separates a regular snack from truly great low-calorie charcuterie chips.
Don’t overthink it; the magic is in the simplicity. I always make sure my spices are fresh because that smoked paprika really sings once it hits the oven heat!
Selecting the Right Vegetable Base for Low-Calorie Charcuterie Chips
For the actual chip base, we rely on three superstars: zucchini, beets, and carrots. Why these three? Zucchini gives us that neutral, sturdy base. The beet is my secret weapon—it bakes up beautifully vibrant and slightly earthy, making these low-calorie charcuterie chips look incredible. And carrots? They bring just a touch of natural sweetness to balance the salt.
The absolute key here is slicing them thin—I mean paper thin! If they are chunky, they steam instead of crisping up, and then we lose the crunch factor entirely.
Choosing Lean Toppings for Flavor and Protein
For the creamy element, I lean toward part-skim ricotta or low-fat cream cheese. You get that lovely, cool tang that pairs so well with savory spices, but without all the saturated fat of regular cheese. It spreads easily and doesn’t weigh down our crisp base.
Then comes the protein: lean turkey breast. I chop mine up small so it distributes evenly across the chips. It’s lean, it’s savory, and it makes this snack feel substantial enough to hold you over until dinner. Remember, every component is chosen to keep our final low-calorie charcuterie chips light!
Required Equipment for Perfect Low-Calorie Charcuterie Chips
You don’t need a fancy kitchen for these snacks, thankfully! Efficiency is key when you’re slicing vegetables thinly. You absolutely must have a good set of baking sheets—two or three are ideal so you don’t overcrowd the veggies while baking. Parchment paper is your best friend; it saves scrubbing later!
Beyond that, you’ll need a sharp knife or, even better, a mandoline slicer if you have one. A large mixing bowl for tossing the seasoning is also necessary, and of course, measuring spoons for that perfect spice blend.
Step-by-Step Instructions for Low-Calorie Charcuterie Chips
Getting these right is all about the timing in the oven. We have to bake them until they are rock hard before we even think about adding toppings. If you rush the crisping stage, you end up with sad, wilted snacks instead of perfect low-calorie charcuterie chips. Follow these steps exactly, and you’ll get that satisfying snap every time!
Preparing and Baking the Vegetable Chips
First things first: Preheat your oven to 375°F (190°C). I line my big baking sheets with parchment paper—seriously, don’t skip this, or cleanup is a nightmare. Now, take your super-thin slices of zucchini, beet, and carrot. Toss them all together in that mixing bowl with just one teaspoon of olive oil. We aren’t deep-frying here, so use that oil sparingly!
Next, add the seasoning: a half-teaspoon of sea salt and that beautiful smoked paprika. Toss everything until every single slice has a light coat of oil and spice. Spread these slices out on your prepared sheets. They absolutely must be in a single layer; if they overlap, they steam, and we are aiming for chips, not steamed veggies! Pop them into the preheated oven for about 15 to 20 minutes.
This is where you need to monitor them closely, especially the thinner zucchini pieces! Turn them halfway through baking to ensure even browning. If you see any edges starting to look dark brown too fast, pull those pieces out immediately. We want golden and crisp, not burnt black! Once they look done, pull them out and let them cool completely on the pan. They crisp up even more as they cool down, so patience here is crucial for the best low-calorie charcuterie chips.
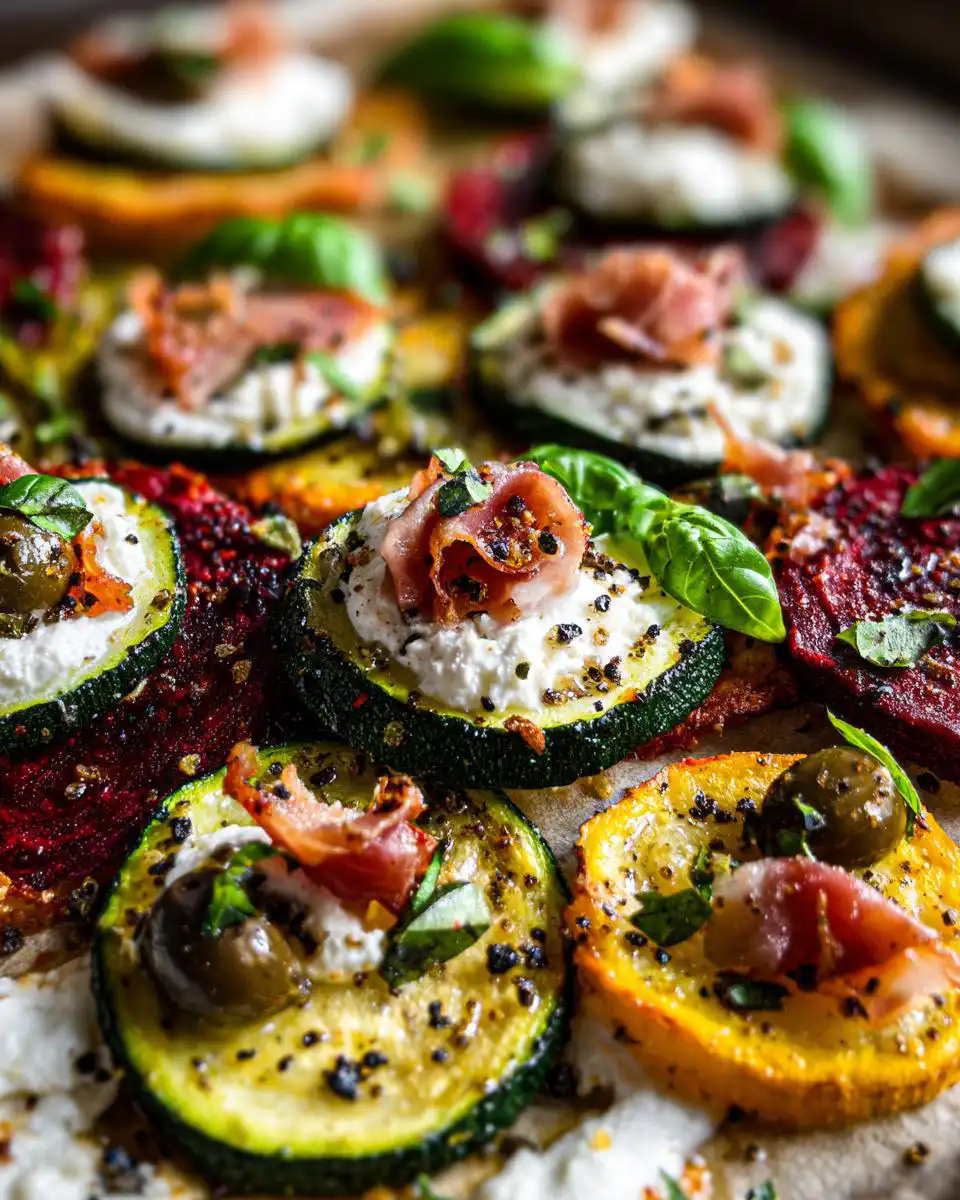
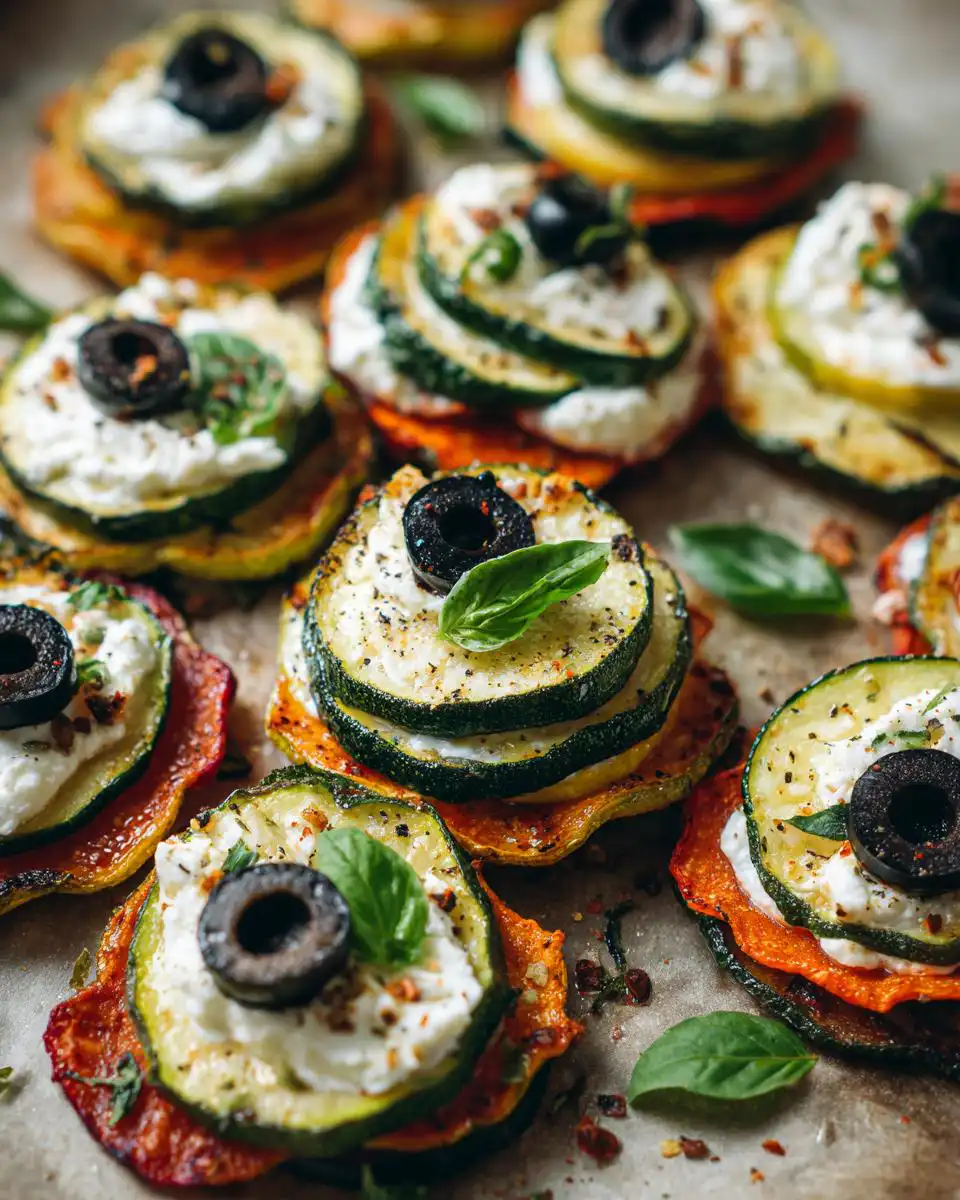
Assembling Your Topped Low-Calorie Charcuterie Chips
Once those vegetable chips are totally cool—and I mean cool to the touch—it’s time for the fun part! We need to layer correctly to keep our base from getting soggy. Start by spreading a very thin layer of your chosen creamy element—that part-skim ricotta or low-fat cream cheese—onto each chip. Don’t glob it on; just a light smear is plenty.
Next, take your chopped lean turkey breast and gently distribute small pieces over the cheese base. Follow that up with the sliced black olives. We add these toppings last because they hold moisture, and we want that crunch underneath to last as long as possible. Finish everything off with a sprinkle of fresh herbs, maybe some basil, and a dash of freshly ground black pepper for that final gourmet touch.
These assembled low-calorie charcuterie chips are best eaten right away. Seriously, don’t let them sit around! The joy is in that immediate contrast between the cool, savory topping and the warm, crisp vegetable chip underneath.
Tips for Success When Making Low-Calorie Charcuterie Chips
I’ve learned a few things the hard way over the years trying to get these right—mostly involving soggy bottoms! The success of these snacks hinges entirely on two moments: the baking phase and the assembly phase. If you rush the cooling, you waste all that hard work in the oven. Remember, these are meant to be delicate, crunchy low-calorie charcuterie chips, not soft crackers!
You must let them cool completely before you even glance at the toppings. That residual heat will melt the cheese in an unpleasant way and steam the veggies. Trust me on this; waiting an extra ten minutes while they cool on the rack is non-negotiable for the best texture!
Achieving Maximum Crispness in Your Vegetable Chips
The single most important rule for crispness is the arrangement on the pan. I cannot stress this enough: single layer only! If your zucchini slices are touching, they will steam against each other, and you will end up with soft, chewy spots. If you have a lot of veggies, use two trays instead of piling them up on one. It’s worth the extra electricity!
The cooling time is just as important as the baking time. Once they come out, leave them undisturbed on the baking sheet for at least 15 minutes until they feel cool to the touch. They harden up significantly as they settle. That final, perfect crunch is what makes these low-calorie charcuterie chips so addictive!
Ingredient Substitutions for Low-Calorie Charcuterie Chips
If you want to play around with the flavor profile of your low-calorie charcuterie chips, you absolutely can, provided you keep the fat content low. For the cheese layer, if ricotta isn’t your favorite, try a smear of plain Greek yogurt that has been strained for a few hours to remove excess water. It gives you that lovely tanginess.
When it comes to herbs, feel free to swap out the basil for dried rosemary or even a tiny pinch of dried dill. If you don’t have turkey, ultra-thin slices of baked chicken breast work great, or for a vegetarian option, try finely crumbled feta (use sparingly, as feta is saltier). The goal is always flavor density without calorie density!
Storing and Keeping Your Low-Calorie Charcuterie Chips Fresh
This is where we have to be smart, because once you add moisture from the cheese and turkey, the clock starts ticking on the crispness! You absolutely cannot store the fully assembled low-calorie charcuterie chips for later. They will turn soggy almost immediately. If you’re making a big batch of the baked vegetable chips, store those separately, plain, in an airtight container on the counter.
They stay perfectly crisp for about three days that way. If you do need to revive the plain veggie chips because they sat out too long, a quick trip back into a low oven works wonders. But the assembled ones? Those are an immediate consumption snack. You want that perfect crunch when you bite into your low-calorie charcuterie chips!
Quick Guide Table for Storage and Reheating
Here’s a quick cheat sheet so you know exactly how to handle leftovers—or plan your prep time!
| Item | Storage Location | Max Time | Reheating Notes |
|---|---|---|---|
| Baked Vegetable Chips (Un-topped) | Airtight Container, Room Temp | Up to 3 Days | Briefly at 300°F (150°C) |
| Assembled Low-Calorie Charcuterie Chips | Airtight Container, Refrigerator | 1 Day (Best immediately) | Do NOT reheat topped chips |
Common Questions About Low-Calorie Charcuterie Chips
I get so many questions once people start making these, which just tells me how popular this snack is becoming! Most of the confusion seems to center around texture and whether you can skip steps. Let’s clear up the most common things I hear about making these low-calorie charcuterie chips.
Q1. How can I guarantee the vegetable chips stay crunchy if I make them ahead of time?
This is the number one question! The secret is twofold: slicing them paper-thin, which we covered, and making sure they are 100% cool before storing. If you store them warm, the steam gets trapped, and they soften. Keep your baked vegetable chips in a container with a tight lid on the counter, not the fridge, for up to three days. They are the best healthy chips when they have that perfect snap.
Q2. Can I make these without the meat for a vegetarian snack?
Absolutely! This is why I love them—they are so adaptable. For a vegetarian version of these low-calorie charcuterie chips, skip the turkey and double up on flavorful additions. Try adding slivered almonds, sun-dried tomatoes (drained well!), or even thin slices of radish for an extra peppery bite. You still get that great texture contrast.
Q3. Is it possible to make these as single-serve portions for lunch boxes?
Yes, but you must keep the components separate! For lunch boxes, bake the vegetable chips and pack them plain in a small Ziploc bag. Then, pack a tiny container of the ricotta/cream cheese and another small container with the olives and turkey. Assemble them right before eating so you don’t ruin the crunch of your low-calorie charcuterie chips.
Q4. My beet slices burned before the zucchini was done. What went wrong?
Beets are denser and hold more sugar, so they cook faster! Next time, try to separate the beets onto their own small tray if you have room, or pull the beets off the main tray about five minutes before the zucchini and carrots are done. Even slight variations in thickness can cause uneven baking, so keep an eye on them!
Sharing Your Guilt-Free Snack Experience
Now that you’ve got your oven hot and your vegetables sliced, I really want to know how these turned out for you! Did you get that perfect crispness? Which topping combination was your favorite on these low-calorie charcuterie chips? Drop a comment below and let me know your biggest success—or if you found a new spice blend I should try next time!
Don’t forget to snap a picture of your beautiful, colorful snack board and tag me on social media. I love seeing your creations! Check out more ideas or find us on Pinterest for visual inspiration.
Print
Amazing 3-step low-calorie charcuterie chips
- Total Time: 30 minutes
- Yield: 4 servings
- Diet: Low Calorie
Description
A crunchy low-calorie charcuterie chips snack using baked vegetable chips as a base with lean protein and light cheese toppings for a guilt-free bite.
Ingredients
- 2 medium zucchini, thinly sliced
- 1 medium beet, thinly sliced
- 1 large carrot, thinly sliced
- 1 teaspoon olive oil
- 1/2 teaspoon sea salt
- 1/2 teaspoon smoked paprika
- 1/4 cup part-skim ricotta cheese or low-fat cream cheese
- 3 ounces lean turkey breast, thinly sliced or cut into small pieces
- 2 tablespoons sliced black olives
- Fresh herbs (like basil or parsley) for garnish
- Freshly ground black pepper to taste
Instructions
- Preheat oven to 375°F (190°C). Line baking sheets with parchment paper.
- Toss zucchini, beet, and carrot slices in olive oil, sea salt, and smoked paprika until evenly coated.
- Arrange the slices in a single layer on the baking sheets.
- Bake 15-20 minutes or until the chips are crisp, turning halfway through. Watch carefully to avoid burning.
- Let chips cool completely for maximum crispness.
- Spread a thin layer of ricotta or low-fat cream cheese on the chips.
- Top with lean turkey breast pieces and sliced black olives.
- Garnish with fresh herbs and a pinch of freshly ground black pepper.
- Serve immediately as a light snack.
Notes
- Slice vegetables as thinly as possible for crispier chips.
- Cool chips fully before adding toppings to prevent sogginess.
- Use parchment paper to avoid sticking and easy cleanup.
- Experiment with different spices like garlic powder or rosemary.
- Serve immediately after topping for the best texture.
- Store baked vegetable chips separately in an airtight container at room temperature for up to 3 days.
- Keep topped chips refrigerated and consume within 1 day for freshness.
- Reheat vegetable chips briefly in a low oven (300°F) to regain crispiness if needed, but do not reheat topped chips.
- Prep Time: 10 minutes
- Cook Time: 20 minutes
- Category: Snack
- Method: Baking
- Cuisine: American