Oh my goodness, if you are drowning in weeknight chaos like I am some days, you absolutely need this recipe in your life. Seriously. When I was juggling work and trying to get the kids fed something that wasn’t cereal, I swore I’d never use my oven again unless it involved zero cleanup. That’s where this sticky ginger chicken sheet pan dinner came from. It’s my absolute sanity saver!
The best part about making a sticky ginger chicken sheet pan meal is that it’s practically foolproof, and I mean that lovingly. You toss everything on one pan, bake it, and boom—you have this incredibly flavorful, deeply caramelized chicken with barely any dishes to tackle afterward. I’m talking about sticky, savory, slightly spicy goodness that tastes like you spent hours marinating it, when really, it took me about ten minutes of actual work. Trust me, this is the recipe to pull out when you’re tired but still want something genuinely delicious.
Gathering Your Ingredients for Sticky Ginger Chicken Sheet Pan
Okay, let’s talk about what you need before you even think about turning on that oven. For this sticky ginger chicken sheet pan magic, we are keeping the ingredient list short and punchy. Remember, the goal is speed and flavor, so we aren’t digging through the pantry for obscure items.
I always lay everything out first—my little mise en place—which reminds me of how quickly we can get this done. It makes assembling the final sticky ginger chicken sheet pan so smooth! I always lay everything out first—my little mise en place—which reminds me of how quickly we can get this done.
Essential Components for the Sticky Ginger Chicken Sheet Pan
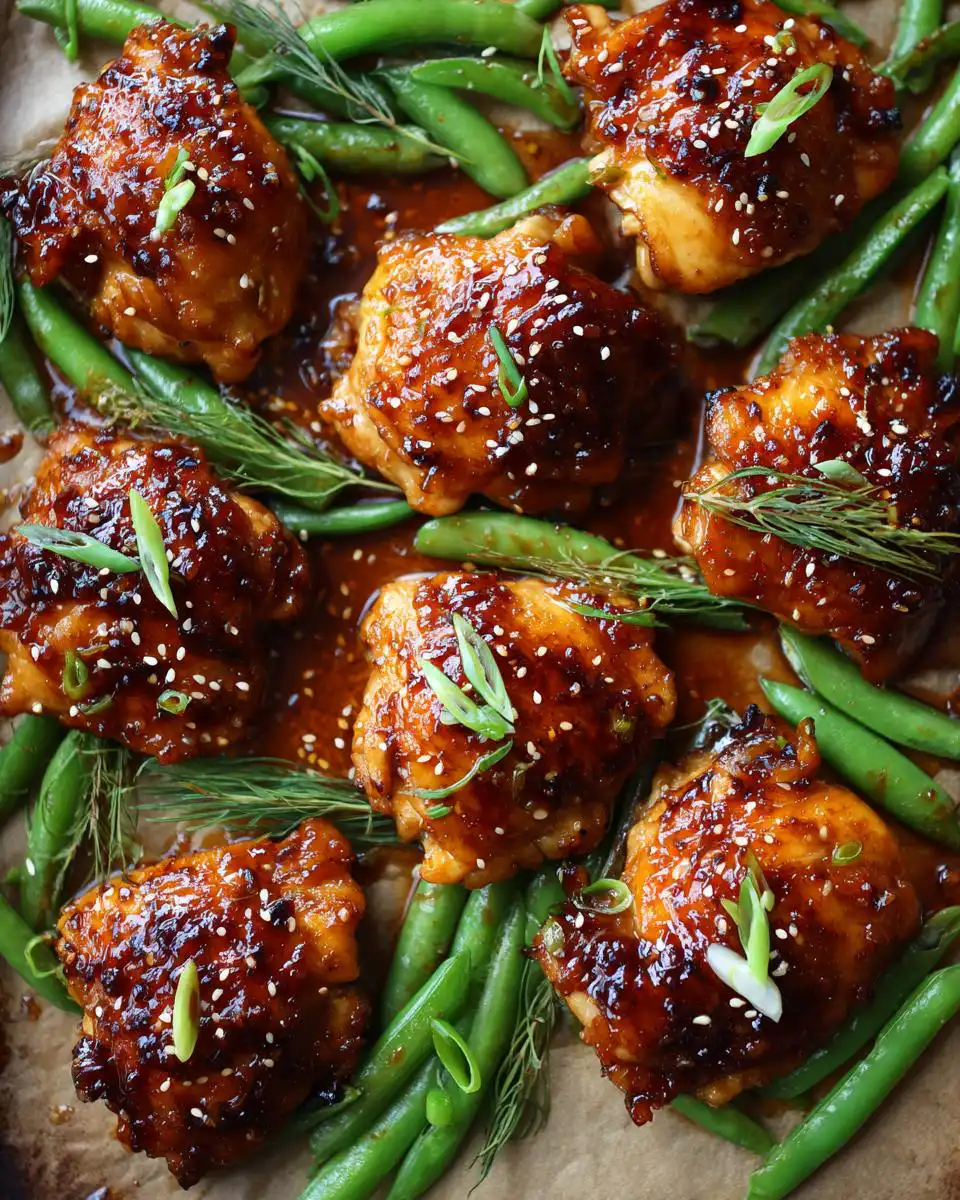
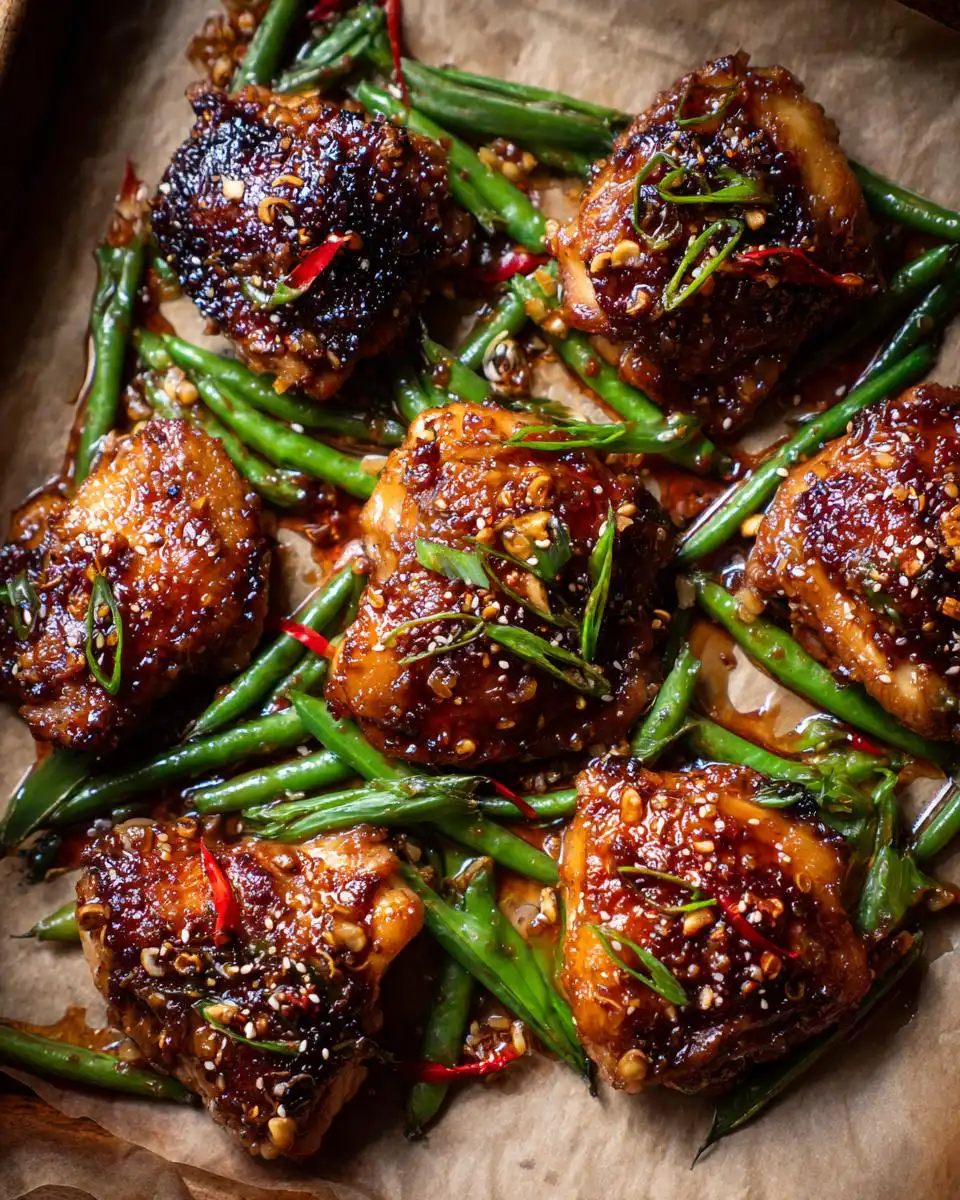
You’ll need four boneless, skinless chicken thighs for this batch, but feel free to swap them out for breasts if that’s what you have handy. For the vegetables, I swear by snap peas because they cook perfectly alongside the chicken without getting mushy. If you don’t have those, green beans are a great second choice for your sticky ginger chicken sheet pan setup.
Creating the Flavorful Ginger Glaze
This is where the real flavor bomb happens! You need fresh ginger—don’t even think about using the jarred stuff here, it won’t give you that bright punch. Mince up three cloves of garlic, too. Then, whisk together the soy sauce, honey (or maple syrup if you prefer), rice vinegar, sesame oil, and a little pinch of chili flakes if you like a tiny kick. This glaze is what makes this sticky ginger chicken sheet pan recipe so addictive! Trust me, this is the recipe to pull out when you’re tired but still want something genuinely delicious.
Equipment Needed for Your Sheet Pan Meal
You don’t need a fancy setup for this one, which is why I love it so much! Grab a sturdy, rimmed sheet pan—that’s the foundation of our whole operation. Make sure you have some parchment paper or aluminum foil to line it; this saves you scrubbing later, trust me.
You’ll also need one medium mixing bowl for the sauce and maybe a smaller bowl or plate to set your chicken on while you season it. That’s seriously it!
Step-by-Step Instructions for Your Sticky Ginger Chicken Sheet Pan
Alright, time to get cooking! This is so straightforward, you’ll be amazed at how quickly this sticky ginger chicken sheet pan comes together. We’re moving fast, but remember to keep things tidy so cleanup is a breeze later.
Preparing the Oven and Chicken
First things first: crank that oven up to 425 degrees Fahrenheit, or 220 Celsius if you use the metric system. While it’s heating, line your sheet pan with parchment paper. I can’t stress this enough—it prevents sticking and makes cleanup almost nonexistent. Now, take your chicken thighs and lay them out on the prepared pan.
Give the chicken a quick sprinkle of salt and pepper—just a light dusting. Then, drizzle them with about two tablespoons of olive oil. This helps everything brown nicely in the oven. Don’t mix the chicken around too much; we want them sitting flat on the pan for even cooking.
Mixing and Applying the Initial Ginger Sauce
Now for the star of the show, the glaze! Grab that bowl you set aside and whisk together your grated ginger, minced garlic, soy sauce, honey, vinegar, sesame oil, and chili flakes if you’re feeling spicy. Whisk it until it looks beautifully combined and glossy. I always taste a tiny bit on a clean spoon—it should be potent! I always taste a tiny bit on a clean spoon—it should be potent!
Here’s a crucial trick for the best sticky ginger chicken sheet pan: Pour about half of that glorious sauce directly over the chicken thighs on the pan. Use a spoon or brush to spread it around a bit. Make sure you keep the other half of the sauce separate; we need that for the final glaze later on. Toss your snap peas or green beans around the chicken now, giving them a little toss in any sauce that dripped off the chicken.
Baking and Glazing the Sticky Ginger Chicken Sheet Pan
Slide that pan into the hot oven and set a timer for 20 minutes. When the timer goes off, pull the pan out carefully—it’s going to be hot! Now, take the reserved half of your ginger sauce and brush it generously all over the tops of the chicken. This second basting is what builds up that incredible sticky layer we all love. Pop it back in the oven for another 10 to 15 minutes.
How do you know when it’s done? You need to check the temperature. Stick a meat thermometer right into the thickest part of the thigh; we’re looking for 165 degrees Fahrenheit. When you pull the sticky ginger chicken sheet pan out, the glaze should look dark, bubbly, and beautifully caramelized, not burnt!
Finishing Touches and Serving the Sticky Ginger Chicken Sheet Pan
Once it’s off the heat, let the chicken rest right there on the pan for about five minutes. This lets all those juices settle back in so your chicken stays tender. Right before serving, sprinkle everything liberally with sliced green onions and some sesame seeds for texture and color. I usually serve this right over a bowl of fluffy white rice, but steamed broccoli works great too if you want more veggies! I usually serve this right over a bowl of fluffy white rice, but steamed broccoli works great too if you want more veggies!
Expert Tips for Perfect Sticky Ginger Chicken Sheet Pan Results
Listen, even though this is an easy recipe, a few small steps can take your sticky ginger chicken sheet pan from ‘good’ to ‘I need to make this every Tuesday’! The most important thing I learned is to pat the chicken dry before you season it with oil and salt. Wet chicken steams; dry chicken browns. It makes a huge difference in getting that beautiful crust.
Also, always use that meat thermometer. Honestly, guessing leads to dry chicken, and nobody wants that. Checking the internal temperature ensures your chicken is perfectly cooked and safe to eat. A quick rest after it comes out of the oven locks in all those amazing ginger juices. If you follow those three things—dry chicken, thermometer check, and resting—your sticky ginger chicken sheet pan will be restaurant quality!
Ingredient Substitutions for the Sticky Ginger Chicken Sheet Pan
Don’t sweat it if you don’t have exactly what’s listed! If you’re out of honey, maple syrup works just as well, or even a big spoonful of brown sugar if that’s what you have. For veggies, broccoli florets are fantastic here, just make sure you cut them into small, even pieces so they cook in the same time as the chicken. And if you want a little citrus zing in your sticky ginger chicken sheet pan sauce, just squeeze in a splash of fresh orange juice when you mix the glaze—it brightens everything up!
Storage and Reheating Guidelines
I always make extra because leftovers are even better the next day, especially since the ginger flavor deepens overnight. Dealing with leftovers is simple, but you want to keep that sticky glaze from getting weird in the fridge.
Storing Your Leftover Sticky Ginger Chicken
When everything has cooled down completely, transfer the chicken and any veggies into an airtight container. Don’t leave it sitting out too long! You can safely store this delicious meal in the refrigerator for up to three days. I usually separate the rice if I had any, just so it doesn’t get soggy sitting next to the saucy chicken.
Warming Up the Sheet Pan Meal Safely
If you want to recapture some of that original glaze texture, the oven is your best friend. Spread the leftovers on a small, lined baking sheet and warm them at about 325 degrees until heated through—maybe 10 minutes. If you’re in a rush, the microwave works, but cover it loosely with a paper towel so the sauce doesn’t splatter everywhere.
Frequently Asked Questions About This Recipe
Can I Use Chicken Breasts Instead of Thighs
You absolutely can use chicken breasts! Since breasts are leaner, they tend to dry out faster than thighs. If you swap them out, I highly recommend cutting the breasts into slightly thicker pieces before you start. This gives them a bit more buffer against overcooking. Watch the time closely; they might be done closer to the 20-minute mark during the first bake, so start checking the temperature early!
How Can I Make This Recipe Gluten-Free
This is such an easy adjustment, honestly! The main culprit is the soy sauce, so just swap that out for tamari. Tamari is essentially gluten-free soy sauce, and it has a very similar flavor profile, so your glaze won’t miss a beat. If you can’t find tamari, coconut aminos are another great alternative for this sticky ginger chicken sheet pan meal.
Share Your Amazing Sticky Ginger Chicken Sheet Pan Experience
I really hope this recipe saves your weeknights the way it saves mine! If you make this sticky ginger chicken sheet pan dinner, please come back and let me know how it went. Drop a comment below, tell me what veggies you used, and give it a star rating so others know how much you loved it! Drop a comment below, tell me what veggies you used, and give it a star rating so others know how much you loved it!
Expert Tips for Perfect Sticky Ginger Chicken Sheet Pan Results
Listen, even though this is an easy recipe, a few small steps can take your sticky ginger chicken sheet pan from ‘good’ to ‘I need to make this every Tuesday’! The most important thing I learned is to pat the chicken dry before you season it with oil and salt. Wet chicken steams; dry chicken browns. It makes a huge difference in getting that beautiful crust.
Also, always use that meat thermometer. Honestly, guessing leads to dry chicken, and nobody wants that. Checking the internal temperature ensures your chicken is perfectly cooked and safe to eat. A quick rest after it comes out of the oven locks in all those amazing ginger juices. If you follow those three things—dry chicken, thermometer check, and resting—your sticky ginger chicken sheet pan will be restaurant quality!
Ingredient Substitutions for the Sticky Ginger Chicken Sheet Pan
Don’t sweat it if you don’t have exactly what’s listed! If you’re out of honey, maple syrup works just as well, or even a big spoonful of brown sugar if that’s what you have. For veggies, broccoli florets are fantastic here, just make sure you cut them into small, even pieces so they cook in the same time as the chicken. And if you want a little citrus zing in your sticky ginger chicken sheet pan sauce, just squeeze in a splash of fresh orange juice when you mix the glaze—it brightens everything up!
Storage and Reheating Guidelines
I always make extra because leftovers are even better the next day, especially since the ginger flavor deepens overnight. Dealing with leftovers is simple, but you want to keep that sticky glaze from getting weird in the fridge.
Storing Your Leftover Sticky Ginger Chicken
When everything has cooled down completely, transfer the chicken and any veggies into an airtight container. Don’t leave it sitting out too long! You can safely store this delicious meal in the refrigerator for up to three days. I usually separate the rice if I had any, just so it doesn’t get soggy sitting next to the saucy chicken.
Warming Up the Sheet Pan Meal Safely
If you want to recapture some of that original glaze texture, the oven is your best friend. Spread the leftovers on a small, lined baking sheet and warm them at about 325 degrees until heated through—maybe 10 minutes. If you’re in a rush, the microwave works, but cover it loosely with a paper towel so the sauce doesn’t splatter everywhere.
Frequently Asked Questions About This Recipe
I get so many questions about this recipe because people love how easy it is, but they always need a little guidance on swapping things out! Here are some of the things I hear most often when folks are planning their quick dinner night.
Can I Use Chicken Breasts Instead of Thighs
You absolutely can use chicken breasts! Since breasts are leaner, they tend to dry out faster than thighs. If you swap them out, I highly recommend cutting the breasts into slightly thicker, uniform pieces before you start. This gives them a bit more buffer against overcooking. Watch the time closely; they might be done closer to the 20-minute mark during the first bake, so start checking the temperature early!
How Can I Make This Recipe Gluten-Free
This is such an easy adjustment, honestly! The main thing you have to watch is the soy sauce, so just swap that out for tamari. Tamari is essentially gluten-free soy sauce, and it has a very similar flavor profile, so your ginger glaze won’t miss a beat. If you can’t find tamari, coconut aminos are another great alternative for this easy dinner. Just be aware that coconut aminos are slightly sweeter, so you might want to cut back a tiny bit on the honey!
Share Your Amazing Sticky Ginger Chicken Sheet Pan Experience
I really hope this recipe saves your weeknights the way it saves mine! If you make this sticky ginger chicken sheet pan dinner, please come back and let me know how it went. Drop a comment below, tell me what veggies you used, and give it a star rating so others know how much you loved it!
Print
Miracle 4-ingredient sticky ginger chicken sheet pan
- Total Time: 45 minutes
- Yield: 4 servings
- Diet: N/A
Description
Make a delicious sheet pan sticky ginger chicken with a sweet and savory glaze, perfect for a quick, healthy weeknight dinner.
Ingredients
- 4 boneless, skinless chicken thighs
- 2 tablespoons fresh ginger, grated
- 3 cloves garlic, minced
- 1/4 cup soy sauce (or tamari for gluten-free)
- 2 tablespoons honey or maple syrup
- 1 tablespoon rice vinegar
- 1 tablespoon sesame oil
- 1/2 teaspoon red chili flakes (optional)
- 2 tablespoons olive oil
- Salt and pepper to taste
- 1 cup snap peas or green beans (optional)
- 2 green onions, sliced (for garnish)
- Sesame seeds (for garnish)
Instructions
- Preheat oven to 425°F (220°C). Line a sheet pan with parchment paper or foil.
- In a bowl, whisk together grated ginger, garlic, soy sauce, honey, rice vinegar, sesame oil, and red chili flakes.
- Place chicken thighs on the sheet pan, season with salt and pepper, and drizzle with olive oil.
- Pour half of the ginger sauce over the chicken, reserving the rest for later.
- Arrange snap peas or green beans around the chicken on the pan.
- Bake for 20 minutes, then brush the chicken with the remaining sauce.
- Bake for another 10-15 minutes or until chicken reaches an internal temperature of 165°F (74°C) and the glaze is sticky and caramelized.
- Remove from oven, garnish with sliced green onions and sesame seeds.
- Serve hot with rice or steamed vegetables.
Notes
- Use chicken breasts or drumsticks instead of thighs.
- Swap honey with maple syrup or brown sugar.
- Replace snap peas with broccoli florets or asparagus.
- Use tamari or coconut aminos for a soy-free version.
- Add a splash of orange juice to the sauce for citrus notes.
- Pat chicken dry before seasoning to achieve better browning.
- Use a meat thermometer to ensure safe cooking temperature.
- Baste chicken with sauce halfway through cooking for maximum glaze.
- Let chicken rest a few minutes before serving to lock juices.
- Add extra veggies on the sheet pan for a full meal.
- Store leftovers in an airtight container in the fridge for up to 3 days.
- Reheat gently in the oven or microwave until warmed through.
- Prep Time: 10 minutes
- Cook Time: 30-35 minutes
- Category: Dinner
- Method: Baking
- Cuisine: Asian Inspired