When I first started my journey to clean up my diet—losing 80 pounds and realizing I still needed my Southern comfort food fix—I thought I’d have to give up amazing appetizers like **coconut shrimp**. Living here in Asheville, NC, I’m surrounded by incredible seafood spots, but those deep-fried versions never fit my new lifestyle. That’s why I worked so hard to master this copycat recipe. Trust me, you can absolutely get that golden, crunchy coating and juicy shrimp center without feeling weighed down!
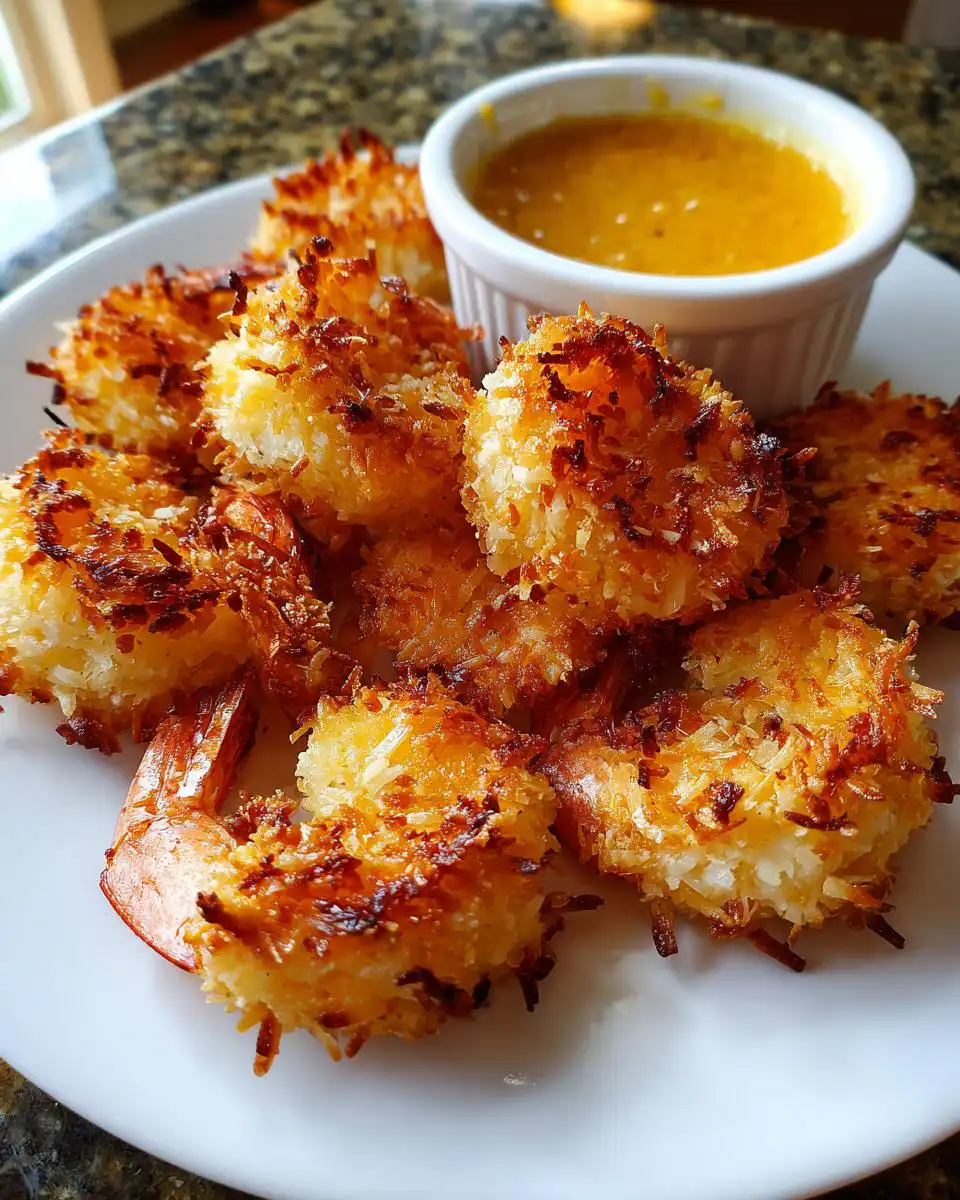
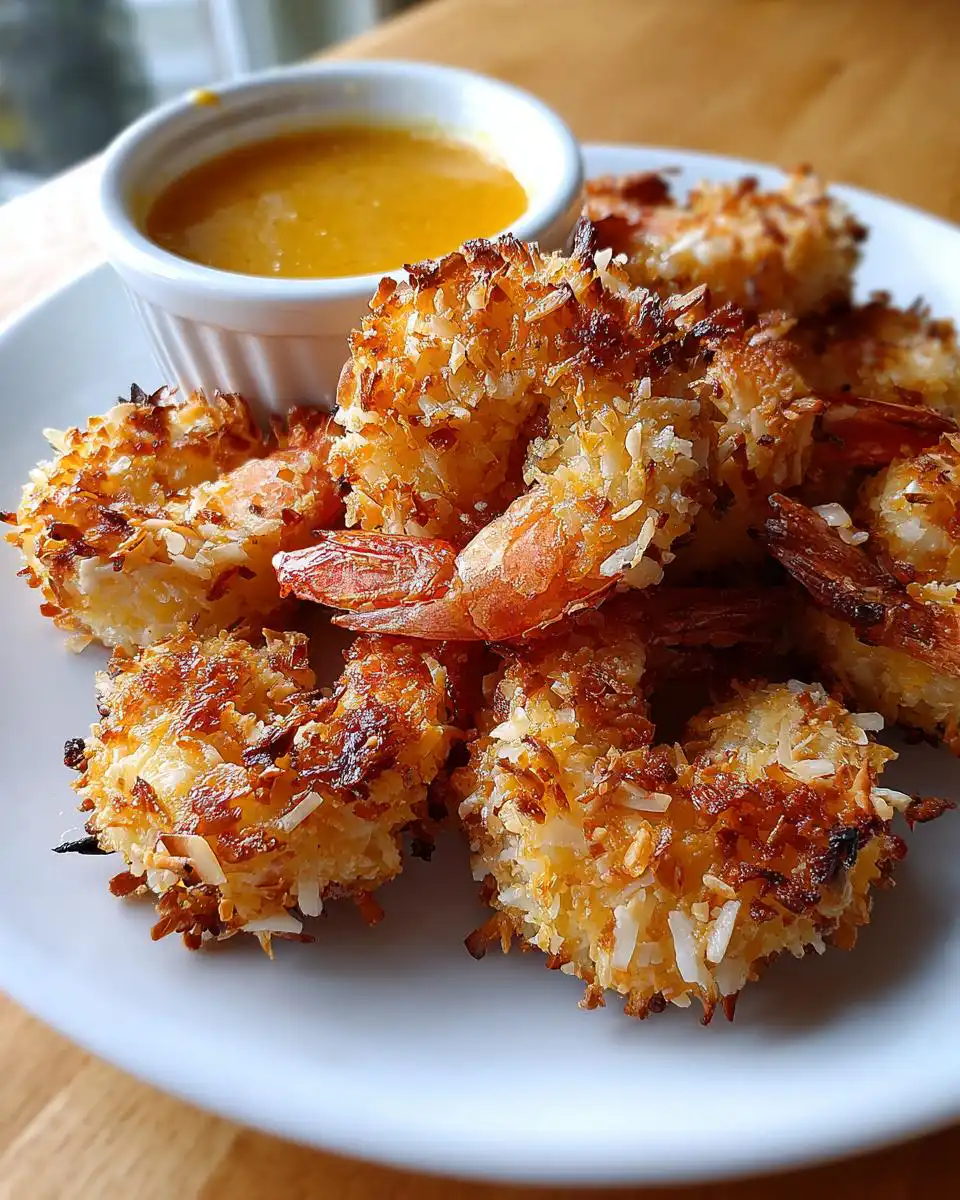
This recipe for **coconut shrimp** is my answer to restaurant indulgence made easy and clean enough for a weeknight. Forget tricky double-dredging techniques; we’re keeping the prep simple. The secret is in the balance of the coating and making sure the oil is just right. We’ll get that perfect shatteringly crisp crust and pair it with a bright citrus mustard dip that cuts through the richness perfectly. Get ready to impress everyone!
Making the Best Crispy Coconut Shrimp at Home
I’m Jordan Bell, and I run the Easy Detox Recipes blog because I believe deeply that eating clean doesn’t mean eating boring food. My roots are deep in Southern cooking, but I’ve learned how to make those comfort classics healthier. This **coconut shrimp** recipe is the perfect example. It brings that vacation flavor right to your kitchen table, and I promise, it’s faster than ordering takeout.
What makes this version restaurant-quality? It’s all about the crust adhering properly before it even hits the oil. We use a mix of panko and shredded coconut, which sounds simple, but the technique matters! You’ll get that unmistakable crunch that makes you close your eyes on the first bite. Seriously, this is the best **coconut shrimp** you’ll make outside of a tropical resort.
Essential Ingredients for Perfect Coconut Shrimp
To nail this **coconut shrimp**, you need to treat each component with respect. I learned early on that cutting corners on ingredients just results in a soggy mess, and that’s the last thing we want! We need texture, flavor, and a coating that actually stays put. It’s all about having your three dredging stations ready to go.
Don’t skimp on the shrimp size either; medium-to-large shrimp work best because they stay juicy even when fried quickly. A good quality oil for frying is crucial, too—something with a high smoke point so we can hit that perfect 350 degrees without burning everything.
Components for the Crispy Coconut Shrimp Coating
You’ll need three bowls for the magic to happen. First, the flour dredge seasoned with just salt, pepper, garlic powder, and paprika—this gives the egg something to grab onto. Then comes the egg wash, which needs a splash of water to thin it just enough. The final bowl is where the flavor really shines: a mix of panko breadcrumbs and sweetened shredded coconut.
Listen to me: use the sweetened coconut! It browns beautifully and gives that classic tropical flavor. But the panko is non-negotiable. Panko absorbs less oil than regular breadcrumbs, guaranteeing a crispier shell for your **coconut shrimp**.
Crafting the Bright Citrus Mustard Dipping Sauce
Honestly, you could eat this sauce on everything. It’s the perfect counterpoint to the sweet, rich shrimp. We need bright acidity to cut through the fried texture. The base is creamy Dijon mustard, which brings the necessary tang.
For sweetness and complexity, I use orange marmalade—it has chunks, which I love—and a drizzle of honey. A squeeze of fresh lemon juice brightens it all up. Whisk these together until they look glossy and perfectly balanced. Taste it; you might want a tiny bit more honey if your marmalade is tart, but aim for that sweet-and-sour kick!
Equipment Needed for Your Coconut Shrimp Recipe
You don’t need a deep fryer for this recipe, thankfully! We are doing shallow frying, which is much easier cleanup. Grab a sturdy, heavy-bottomed skillet or a small Dutch oven for frying; this helps maintain that steady oil temperature we need.
Your most important tools, besides mixing bowls, are tongs for turning the **coconut shrimp** and a wire rack set over a baking sheet for draining. If you have a candy or deep-fry thermometer, use it! Hitting 350°F is key to getting that golden crust without burning the coconut.
Step-by-Step Instructions for Restaurant-Quality Coconut Shrimp
Okay, this is where the magic happens. Don’t rush this part! If you follow these steps exactly, you’ll have **coconut shrimp** that tastes like it came straight from a beachside grill. We’re moving fast, but we need precision, especially with the heat.
Preparing the Shrimp and Setting Up the Dredging Stations
First things first: the shrimp must be bone dry. I mean it! Pat them down thoroughly with paper towels. Any moisture left on the shrimp will make the coating slide right off. Once dry, season them lightly all over with that initial salt and pepper. Set them aside.
Next, set up your three dredging stations in a line. Bowl one gets the seasoned flour mixture. Bowl two gets your beaten eggs mixed with the tablespoon of water—this is your glue. Bowl three is the star: the panko and shredded coconut mixture. Make sure you’ve chopped that coconut slightly, just to help it stick better.
The Art of Coating Your Coconut Shrimp
We dredge in order: Flour, Egg, Coconut. Take one shrimp, coat it lightly in the flour, shaking off any excess—we don’t want thick white clumps. Next, dip it completely into the egg wash, letting the extra drip off for just a second. Finally, press it firmly into the coconut-panko mix. Really press that coating on! You want every inch covered.
Here’s a tip I learned the hard way: once they are all coated, put them on a clean tray in a single layer and let them just chill for about five to ten minutes. This resting period is crucial! It lets that coating set up so it doesn’t fall off when it hits the hot oil. This step is what separates good **coconut shrimp** from *great* **coconut shrimp**.
Achieving Golden Perfection Through Shallow Frying
Pour about an inch and a half of vegetable or canola oil into your heavy skillet. Heat it over medium-high heat until it hits 350°F. If you don’t have a thermometer, drop a tiny pinch of the coating mix in; if it starts sizzling immediately, you’re close! Too cool, and they get greasy; too hot, and the coconut burns before the shrimp cooks.
Fry your shrimp in small batches—don’t overcrowd the pan! Overcrowding drops the oil temperature instantly, leading to soggy coatings. Cook them for about two to three minutes per side. You are looking for a deep, rich golden brown color. Once they look perfect, use tongs to pull them out and place them immediately on that wire rack over paper towels to drain off any extra oil. Keep the first few batches warm in a very low oven while you finish the rest.
Mixing the Flavorful Citrus Mustard Dipping Sauce
While the oil is heating up or while your first batch is frying, whisk together the sauce ingredients. Just put the orange marmalade, pineapple juice, Dijon mustard, honey, lemon juice, and that final pinch of salt into a small bowl. Whisk it hard until it’s totally smooth and glossy. It should be pourable but thick enough to cling to the shrimp. Taste it right there and adjust if you need more tang or more sweetness. Serve immediately with your hot, crispy **coconut shrimp**!
Pro Tips for Flawless Coconut Shrimp Every Time
You’ve got your stations set up, but let me give you a few insider secrets from my kitchen to ensure your **coconut shrimp** nails that crispy texture every single time. Temperature control is truly everything here. If your oil dips below 340°F, the coating starts soaking up fat instead of crisping up, and that’s a tragedy!
Remember that resting step after coating? Don’t skip it! If you try to fry them immediately, the coating will just slough off into the oil, leaving you with sad, naked shrimp. Letting it sit for that 5 or 10 minutes lets the egg wash truly bind the panko and coconut to the surface.
Also, when you’re patting the shrimp dry initially, really focus on the tails if you leave them on. Wet tails mean wet spots in the coating. And please, fry in small batches! I know it takes longer, but keeping the oil temperature high is the ultimate key to achieving that restaurant-quality crispness we are aiming for with this **coconut shrimp** recipe.
Variations on Your Favorite Coconut Shrimp
I know my focus here is on that perfect fried crunch, but when I’m doing a deep clean detox week, I definitely turn to lighter methods. You can absolutely make fantastic **coconut shrimp** without submerging it in oil! Baking is a great option if you want a lighter appetizer base. Air fryer chicken tenders are another great alternative for crispiness.
If you choose to bake, make sure you preheat your oven to a hot 425°F. Toss the coated shrimp lightly with a spray of oil before placing them on a wire rack set over a baking sheet—this allows air circulation underneath. They’ll need about 10 to 14 minutes, flipping halfway through. Or, if you have an air fryer, that’s even better! Set it to 380°F and cook for about 8 to 10 minutes, turning them once. Either way, you still get that lovely, crunchy **coconut shrimp** crust!
Frequently Asked Questions About Coconut Shrimp
I get so many questions about this recipe because everyone wants that perfect texture! Frying can be intimidating, but once you understand the simple rules, making amazing **coconut shrimp** becomes second nature. Here are the things I hear most often from folks trying to nail this at home. You can see more of my recipe tips on Medium.
How to Keep the Coconut Shrimp Crispy After Frying
The minute they come out of the oil, they need to breathe! Do not pile them onto a solid plate—that traps steam and makes the bottom soggy instantly. I always transfer the fried **coconut shrimp** straight onto a wire cooling rack that’s sitting over a baking sheet. If you are frying in batches, you can tuck that sheet pan into an oven set to its lowest possible temperature, like 200°F, just to keep the first batches warm while the rest finish cooking. That little bit of air circulation is everything.
Can I Make This Coconut Shrimp Recipe Ahead of Time
You absolutely can prep ahead, which I highly recommend for parties! You can fully coat the **coconut shrimp** and lay them on a baking sheet lined with parchment paper. Cover them tightly and put them in the fridge for up to 24 hours. The key is that resting period we discussed—the fridge resting helps the coating adhere even better! When you’re ready to eat, just go straight to the hot oil (350°F). Don’t try to cook them straight from frozen or ice cold, though; let them sit on the counter for 15 minutes before frying.
Adjusting the Sweetness in the Citrus Mustard Sauce for Your Coconut Shrimp
The sauce is designed to be bright and tangy to balance the sweetness of the coconut, but taste is personal! If you find your orange marmalade is extra tart that day, you might need a touch more sweetness. Just whisk in another half teaspoon of honey at a time until it tastes right to you. Conversely, if you want it sharper—maybe you’re serving it with something rich—add another small squeeze of lemon juice or a tiny dash more Dijon mustard. It’s your sauce, so make it sing!
Storing and Reheating Leftover Coconut Shrimp
It’s rare that we have leftovers, because this **coconut shrimp** disappears so fast, but if you do manage to save some, congratulations! You’ve got a treat for tomorrow. The biggest challenge with any fried food is reheating it without turning that beautiful crisp crust into a sad, soggy mess. Trust me, the microwave is your enemy here; it steams the coating.
The goal is to re-crisp the exterior quickly while gently warming the shrimp through. For the best results, you want dry heat, which is why the oven or the air fryer works wonders. It brings back that snap better than anything else. Here’s my quick guide for saving those delicious morsels for later. For more appetizer ideas, check out my Pinterest boards.
Storage and Reheating Guidelines Table
Keep your **coconut shrimp** in an airtight container in the fridge for up to three days. When you are ready to enjoy them again, use one of these methods:
| Method | Temperature & Time | Notes |
|---|---|---|
| Air Fryer | 375°F for 4-5 minutes | Best method for maximum crispness. |
| Oven/Toaster Oven | 400°F for 8-10 minutes | Place on a wire rack over a baking sheet. |
| Microwave | Not Recommended | Will result in a soggy texture. Avoid! |
Sharing Your Success with This Coconut Shrimp Recipe
I truly hope you loved making this **coconut shrimp** as much as I love eating it! It’s one of my favorite ways to bring a little taste of vacation into my clean Southern meals here in Asheville. If you tried this recipe, please let me know how it turned out for you in the comments below. A quick rating helps other readers know this one is a winner! If you are looking for other great appetizers, check out my guide on festive appetizer boards.
Print
Amazing 3-Step coconut shrimp Secret
- Total Time: 35 minutes
- Yield: 4 servings
Description
Make golden Bahama Breeze coconut shrimp at home. This recipe delivers crispy coconut crust, juicy shrimp, and a bright citrus mustard dip, perfect for easy weeknight appetizers or a light meal.
Ingredients
- 1½ pounds large shrimp, peeled and deveined, tails on
- ½ teaspoon fine sea salt
- ¼ teaspoon black pepper
- ½ cup all purpose flour
- ½ teaspoon garlic powder
- ¼ teaspoon paprika
- 2 large eggs
- 1 tablespoon water
- 1 cup sweetened shredded coconut, lightly chopped
- ¾ cup panko breadcrumbs
- ¼ cup orange marmalade
- 2 tablespoons pineapple juice
- 2 tablespoons Dijon mustard
- 1 tablespoon honey
- 1 teaspoon lemon juice
- Pinch fine sea salt (for sauce)
- 2 to 3 cups vegetable or canola oil, for shallow frying
Instructions
- Pat the shrimp very dry and season with salt and pepper. Set aside.
- Whisk flour, garlic powder, and paprika in one shallow bowl. Beat eggs and water in a second bowl. Combine coconut and panko in a third bowl.
- Dredge shrimp in flour, shake off excess. Dip in egg mixture. Press firmly into coconut panko mix to coat well.
- Place coated shrimp on a tray, single layer, and rest for 5 to 10 minutes for the crust to adhere.
- Pour oil (1½ inches deep) into a skillet. Heat over medium high until it reaches 350°F.
- Fry shrimp in batches for 2 to 3 minutes per side until deep golden and cooked through (pink and opaque). Transfer to paper towels to drain.
- While frying, whisk marmalade, pineapple juice, Dijon, honey, lemon juice, and salt until smooth for the dipping sauce.
- Serve the coconut shrimp immediately with the citrus mustard dipping sauce.
Notes
- Chop the shredded coconut slightly for more even browning and better crust adherence.
- Bread all shrimp before frying to maintain a steady oil temperature.
- Fry in small batches to keep the coating extra crisp.
- Keep initial batches warm on a wire rack over a baking sheet in a low oven.
- Adjust sauce flavor with more marmalade for sweetness or more mustard for tang.
- For a lighter version, bake at 425°F for 10 to 14 minutes, flipping once.
- Air fry at 380°F for 8 to 10 minutes, turning halfway.
- Prep Time: 20 minutes
- Cook Time: 15 minutes