If you’ve been searching for an incredible miso salmon recipe that tastes like you pulled it straight from that fancy restaurant menu, stop looking right now! Seriously, you’ve found it. I’m Jordan Bell, and I run the Easy Detox Recipes blog from right here in Asheville, NC. When I was losing my 80 pounds, I had to figure out how to keep eating things that tasted like the rich, satisfying Southern comfort food I grew up on, but cleaner.
And that’s exactly what this recipe is! You might think that deep, savory, sticky glaze takes hours of simmering, but trust me, this baked salmon comes together in under 40 minutes. That’s right—a restaurant-quality, unbelievably flavorful, sweet and sticky glaze coating perfectly tender fish, ready before you even finish setting the table. It’s the easiest seafood dinner you’ll make all year, and you won’t believe how simple the pantry ingredients are!
Gather Your Ingredients for Perfect Miso Salmon
Getting that perfect sticky texture everyone raves about starts right here, with measuring things out precisely. Don’t just eyeball the glaze ingredients; the balance between salty miso and sweet brown sugar is what makes this magic happen! I always lay everything out before I even turn the oven on. It keeps me calm and organized, especially when I’m rushing on a Tuesday night.
We’re making a beautiful, complex glaze that coats the fish perfectly, and then we’re roasting simple veggies right alongside it. Having everything ready means we can get this delicious baked salmon into the oven fast!
| Ingredient | Amount | Purpose |
|---|---|---|
| Red or White Miso Paste | ¼ cup | Savory base |
| Light Brown Sugar | ¼ cup, packed | Sweetness and caramelization |
| Low Sodium Soy Sauce | 3 tablespoons | Salt and umami depth |
| Honey | 2 tablespoons | Extra stickiness |
| Rice Vinegar | 2 tablespoons | Tang and brightness |
| Sesame Oil | 1 tablespoon | Nutty aroma |
| Hot Water | 1 tablespoon | To help dissolve the paste |
| Fresh Ginger & Garlic | 1 tsp grated, 1 clove minced | Aromatic punch |
| Salmon Fillets (6 oz each) | 4 | The star of the show! |
| Salt & Pepper | To taste | Basic seasoning |
| Olive Oil | 1 tablespoon | For the pan and veggies |
Essential Components for the Miso Salmon Glaze
The heart of this recipe is that glaze! You need the miso paste—I prefer white miso for a milder flavor, but red works too if you like it bolder. Mix that with the brown sugar, soy sauce, honey, and rice vinegar. That combination is what creates that signature sticky pull when it bakes. Don’t forget the ginger and garlic; they cut through the richness perfectly. Whisk it until it shines!
Selecting and Preparing the Salmon Fillets
When you buy your salmon, try to grab fillets that are roughly the same thickness so they cook evenly. This is crucial for an easy seafood dinner! Once you have them, the most important thing you can do is pat them dry—I mean, really dry—with paper towels. Moisture is the enemy of a sticky glaze! After drying, just hit them quickly with a tiny bit of salt and pepper before brushing on that glorious miso mixture.
Why You Will Love This Miso Salmon Recipe
I know you’re busy, which is why I developed this recipe to be ridiculously easy. It hits all the right notes without demanding hours in the kitchen. Seriously, once you taste this, it’s going to become a staple for you, too!
- It’s lightning fast! You’re looking at less than 40 minutes total time from start to serving.
- The flavor is just addictive—sweet, savory, and perfectly caramelized from that sticky glaze.
- It’s a healthier option than takeout, keeping that rich flavor profile I love from Southern comfort food, but detox-friendly.
- Cleanup is a breeze since we roast the vegetables right there on the same baking sheet as the fish!
Step-by-Step Instructions for Sticky Miso Salmon
Alright, let’s get cooking! This is where the magic happens, and since we’re keeping things quick, efficiency is our best friend. We’re moving fast, but we aren’t rushing the important parts, especially that glaze mixing. Follow these steps exactly, and you’ll have the best baked salmon of your life!
| Step | Action | Notes |
|---|---|---|
| 1 | Prep Pan & Fish | Line a sheet with parchment and brush with oil. Pat salmon dry and season lightly with salt and pepper. |
| 2 | Make the Glaze | Whisk all glaze ingredients until completely smooth and glossy. Set aside about ¼ cup for basting later. |
| 3 | Glaze & Marinate | Spoon most of the glaze over the salmon fillets. Cover loosely and chill for 10 to 15 minutes while the oven heats up. |
| 4 | Prep Veggies | Toss snow peas and peppers with a little oil and salt. Spread them around the salmon on the sheet. |
| 5 | First Bake | Bake at 400°F for 10 minutes. |
| 6 | Baste & Finish | Brush with reserved glaze. Bake another 5 to 8 minutes until sticky and flaky. Check temperature if needed (165°F). |
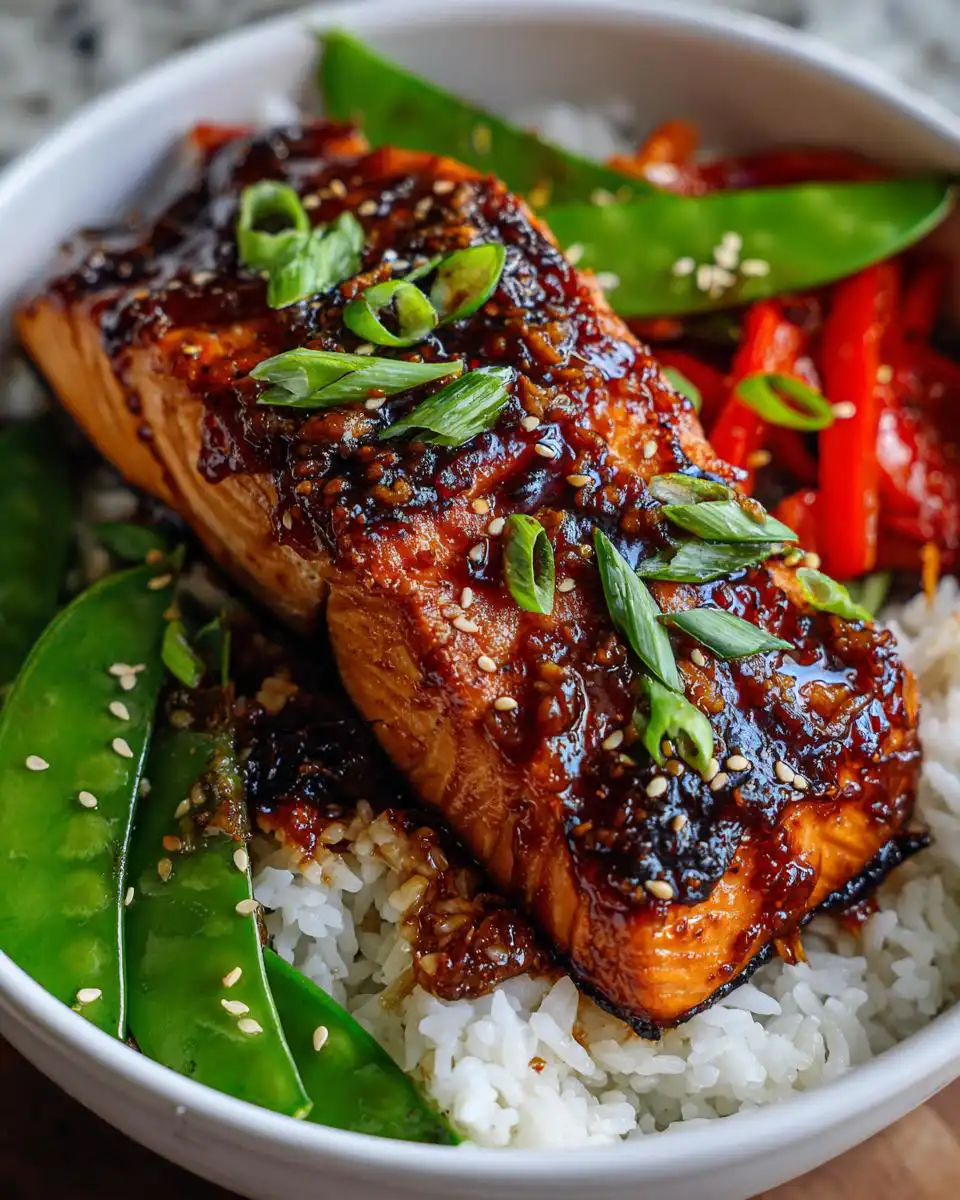
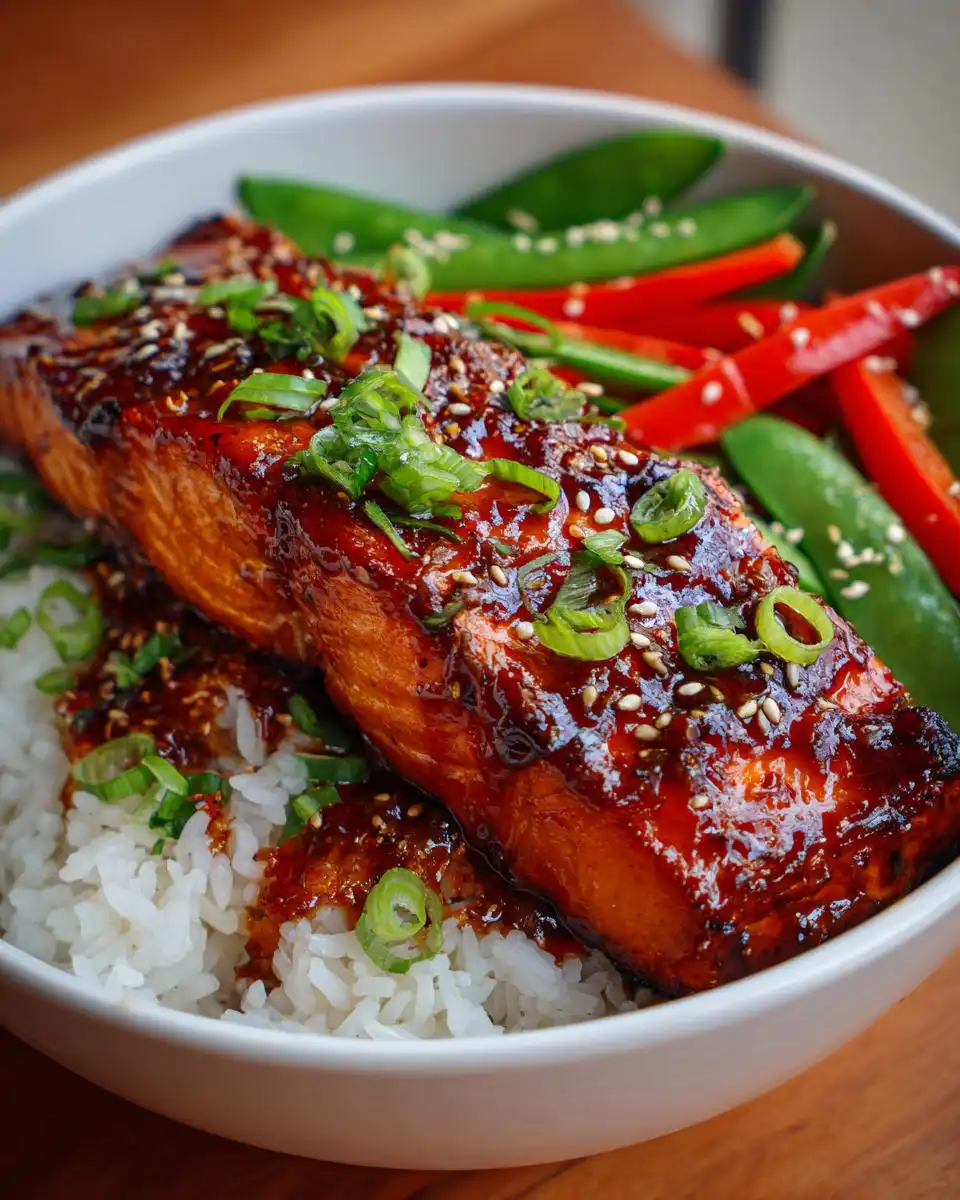
| 7 | Serve | Serve immediately over rice, drizzled with pan juices, and sprinkled with green onions and sesame seeds. |
Preparing the Flavorful Miso Glaze
Grab a medium bowl—no need for fancy gadgets here! We need everything in that glaze to emulsify nicely. Start by dropping in your miso paste, brown sugar, soy sauce, honey, rice vinegar, sesame oil, and the hot water. The hot water is sneaky, but it helps dissolve that thick miso paste faster. Now, whisk! You need to whisk this mixture until it’s completely smooth and glossy. I mean it—no lumps of sugar or miso clinging to the bottom. When you lift your whisk, the glaze should drip off in a thick, beautiful ribbon. That means it’s ready to cling perfectly to our fish!
Marinating and Baking the Miso Salmon
Once your glaze is perfect, place those dried, seasoned salmon fillets onto your parchment-lined, oiled baking sheet. Use a spatula or spoon to coat the tops and sides generously with most of that glaze. Now, here’s the trick for maximum flavor without over-marinating: cover the pan loosely and pop it in the fridge for just 10 to 15 minutes. While that’s chilling, get your oven preheated to 400°F. While that’s coming up to temp, toss your snow peas and sliced red bell pepper with a tiny bit of olive oil and salt, and spread them out around the salmon on the same pan. Less cleanup for me!
Achieving the Perfect Sticky Finish
After that short rest, everything is ready to go in. Bake the salmon for 10 minutes first. Then, pull the pan out carefully—it’ll be hot!—and brush on some of that glaze you wisely reserved earlier. This basting step is what builds up those layers of caramelized flavor. Slide it back in for another 5 to 8 minutes. You are looking for two things: the glaze should look dark, sticky, and caramelized, and the salmon itself should flake easily when you gently press it with a fork. If you’re worried, pull one out and check the internal temperature; 165°F is where we want it to be.
Tips for Achieving Expert Miso Salmon Results
Even though this recipe is super simple, a few small tricks will take your sticky miso salmon from “good” to “I can’t believe this isn’t takeout.” These little habits I picked up while cleaning up my comfort food game really make a difference, especially when dealing with fish that needs that perfect sear on top.
- Don’t skip drying the fish! I cannot stress this enough. If the surface of the salmon is wet, the glaze will steam instead of caramelizing. Pat it down until it feels almost dry to the touch.
- When you baste, do it only once, halfway through the cooking time. Basting too often can cool down the oven and prevent that sticky crust from forming properly.
- Use the reserved glaze for basting only after the initial 10-minute bake. Never pour raw glaze over already cooked fish.
- If you’re using a thick fillet, start checking for doneness right at the 15-minute mark total cook time. It cooks fast!
Secrets to a Glossy, Sticky Miso Salmon Glaze
The glossiness comes from two places: the honey and the sugar melting perfectly, and the final basting. Make sure you whisk that glaze until it’s completely uniform before you even touch the fish. Then, when you baste it during the final few minutes of baking, that high heat will instantly thicken and shine up the glaze right before your eyes. It’s pure eye candy!
Safe Handling of the Miso Salmon
Safety first, always! Because we reserve some of that beautiful glaze for basting, you have to treat it like raw meat contact once it touches the raw fish. So, make sure that reserved glaze stays in its own clean bowl until you use it for basting. Also, pull that fish out the second it flakes easily. Overbaked salmon dries out fast, and no amount of sauce can fix that!
Quick Answers About Your Miso Salmon Dinner
I get so many questions about making adjustments to this easy seafood dinner, especially from folks who are trying to fit it into busy schedules. It’s such a flexible recipe, but there are a few things you should know before you start substituting wildly. Remember, the balance of savory miso and sweet sugar is key to getting that sticky layer on your baked salmon.
Let’s clear up some of the common concerns so your dinner goes smoothly!
- What’s the best way to manage this if I’m meal prepping? You can totally mix the glaze ingredients ahead of time and keep them covered in the fridge for a couple of days. Also, you can season your salmon fillets and keep them patted dry in the fridge too. Just don’t put the glaze on the raw fish until 15 minutes before it goes into the oven!
- What is the best internal temperature for baked salmon? For safe eating, you want the thickest part of the salmon fillet to reach 165°F. If you pull it off the heat right when it starts to flake beautifully, it’ll probably be around 160°F, and the residual heat will finish it perfectly to that safe temperature while resting.
- Can I cook this in an air fryer? Yes, absolutely! It’s one of my favorite quick tricks. Just set your air fryer to 380°F and cook for about 8 to 10 minutes total. Keep an eye on it, as air fryers cook much faster!
Can I prepare this miso salmon ahead of time?
You can prep almost everything! Mix the glaze and keep it covered. You can even pat the salmon dry, season it, and keep it covered in the fridge for up to 24 hours. But I really recommend glazing it shortly before baking. If you let it sit glazed for too long, the salt in the miso starts to draw out moisture, and you might lose some of that perfect sticky texture when baking.
What is the best internal temperature for baked salmon?
The FDA recommends cooking fish to 145°F, but honestly, for the best texture—especially with a glaze that is going to continue cooking slightly outside the oven—I aim for about 160°F to 165°F when I test it with a thermometer. It ensures it’s cooked through, but still moist and flaky, not dry!
Storing and Reheating Your Delicious Miso Salmon
Even though this sticky miso salmon disappears fast around my house, sometimes we have leftovers, and I want to make sure you know how to handle them so they taste just as good the next day. The key here is gentle reheating; we don’t want to blast it in the oven and dry out that beautiful fish!
Cool any leftovers completely down to room temperature before you even think about putting them away. Store the salmon, rice, and veggies in separate, airtight containers if you can. They’ll keep nicely for about three days in the fridge. You can also freeze individual portions for up to two months, which is great for emergency lunches!
| Action | Time/Temperature | Notes |
|---|---|---|
| Cooling | Room Temperature | Cool completely before sealing containers. |
| Refrigeration | Up to 3 Days | Store components separately for best texture. |
| Reheating (Stovetop) | Low Heat | Covered skillet with a splash of water helps steam it gently. |
| Reheating (Microwave) | Medium Power | Use short bursts (30 seconds) to avoid overheating the glaze. |
Share Your Experience Making Miso Salmon
I put my heart into making sure these “detoxed” comfort foods taste amazing, and I’d love to know how this recipe worked for you! Did that glaze get perfectly sticky? Tell me everything in the comments below. Don’t forget to leave a rating so others know this is the best baked salmon they need to try this week!
If you want to see more quick, healthy dinner ideas like this, check out my dinner recipes or follow along on Medium!
Tips for Achieving Expert Miso Salmon Results
Even though this recipe is super simple, a few small tricks will take your sticky miso salmon from “good” to “I can’t believe this isn’t takeout.” These little habits I picked up while cleaning up my comfort food game really make a difference, especially when dealing with fish that needs that perfect sear on top.
- Don’t skip drying the fish! I cannot stress this enough. If the surface of the salmon is wet, the glaze will steam instead of caramelizing. Pat it down until it feels almost dry to the touch.
- When you baste, do it only once, halfway through the cooking time. Basting too often can cool down the oven and prevent that sticky crust from forming properly.
- Use the reserved glaze for basting only after the initial 10-minute bake. Never pour raw glaze over already cooked fish.
- If you’re using a thick fillet, start checking for doneness right at the 15-minute mark total cook time. It cooks fast!
Secrets to a Glossy, Sticky Miso Salmon Glaze
The glossiness comes from two places: the honey and the sugar melting perfectly, and the final basting. Make sure you whisk that glaze until it’s completely uniform before you even touch the fish. Then, when you baste it during the final few minutes of baking, that high heat will instantly thicken and shine up the glaze right before your eyes. It’s pure eye candy!
Safe Handling of the Miso Salmon
Safety first, always! Because we reserve some of that beautiful glaze for basting, you have to treat it like raw meat contact once it touches the raw fish. So, make sure that reserved glaze stays in its own clean bowl until you use it for basting. Also, pull that fish out the second it flakes easily. Overbaked salmon dries out fast, and no amount of sauce can fix that!
Quick Answers About Your Miso Salmon Dinner
I get so many questions about making adjustments to this easy seafood dinner, especially from folks who are trying to fit it into busy schedules. It’s such a flexible recipe, but there are a few things you should know before you start substituting wildly. Remember, the balance of savory miso and sweet sugar is key to getting that sticky layer on your baked salmon.
Let’s clear up some of the common concerns so your dinner goes smoothly!
- What’s the best way to manage this if I’m meal prepping? You can totally mix the glaze ingredients ahead of time and keep them covered in the fridge for a couple of days. Also, you can season your salmon fillets and keep them patted dry in the fridge too. Just don’t put the glaze on the raw fish until 15 minutes before it goes into the oven!
- What is the best internal temperature for baked salmon? For safe eating, you want the thickest part of the salmon fillet to reach 165°F. If you pull it off the heat right when it starts to flake beautifully, it’ll probably be around 160°F, and the residual heat will finish it perfectly to that safe temperature while resting.
- Can I cook this in an air fryer? Yes, absolutely! It’s one of my favorite quick tricks. Just set your air fryer to 380°F and cook for about 8 to 10 minutes total. Keep an eye on it, as air fryers cook much faster!
Can I prepare this miso salmon ahead of time?
You can prep almost everything! Mix the glaze and keep it covered. You can even pat the salmon dry, season it, and keep it covered in the fridge for up to 24 hours. But I really recommend glazing it shortly before baking. If you let it sit glazed for too long, the salt in the miso starts to draw out moisture, and you might lose some of that perfect sticky texture when baking.
What is the best internal temperature for baked salmon?
The FDA recommends cooking fish to 145°F, but honestly, for the best texture—especially with a glaze that is going to continue cooking slightly outside the oven—I aim for about 160°F to 165°F when I test it with a thermometer. It ensures it’s cooked through, but still moist and flaky, not dry!
Storing and Reheating Your Delicious Miso Salmon
Even though this sticky miso salmon disappears fast around my house, sometimes we have leftovers, and I want to make sure you know how to handle them so they taste just as good the next day. The key here is gentle reheating; we don’t want to blast it in the oven and dry out that beautiful fish!
Cool any leftovers completely down to room temperature before you even think about putting them away. Store the salmon, rice, and veggies in separate, airtight containers if you can. They’ll keep nicely for about three days in the fridge. You can also freeze individual portions for up to two months, which is great for emergency lunches!
| Action | Time/Temperature | Notes |
|---|---|---|
| Cooling | Room Temperature | Cool completely before sealing containers. |
| Refrigeration | Up to 3 Days | Store components separately for best texture. |
| Reheating (Stovetop) | Low Heat | Covered skillet with a splash of water helps steam it gently. |
| Reheating (Microwave) | Medium Power | Use short bursts (30 seconds) to avoid overheating the glaze. |
Share Your Experience Making Miso Salmon
I put my heart into making sure these “detoxed” comfort foods taste amazing, and I’d love to know how this recipe worked for you! Did that glaze get perfectly sticky? Tell me everything in the comments below. Don’t forget to leave a rating so others know this is the best baked salmon they need to try this week!
If you want to save this recipe for later, be sure to pin it on Pinterest!
Tips for Achieving Expert Miso Salmon Results
Even though this recipe is super simple, a few small tricks will take your sticky miso salmon from “good” to “I can’t believe this isn’t takeout.” These little habits I picked up while cleaning up my comfort food game really make a difference, especially when dealing with fish that needs that perfect sear on top.
- Don’t skip drying the fish! I cannot stress this enough. If the surface of the salmon is wet, the glaze will steam instead of caramelizing. Pat it down until it feels almost dry to the touch.
- When you baste, do it only once, halfway through the cooking time. Basting too often can cool down the oven and prevent that sticky crust from forming properly.
- Use the reserved glaze for basting only after the initial 10-minute bake. Never pour raw glaze over already cooked fish.
- If you’re using a thick fillet, start checking for doneness right at the 15-minute mark total cook time. It cooks fast!
Secrets to a Glossy, Sticky Miso Salmon Glaze
The glossiness comes from two places: the honey and the sugar melting perfectly, and the final basting. Make sure you whisk that glaze until it’s completely uniform before you even touch the fish. Then, when you baste it during the final few minutes of baking, that high heat will instantly thicken and shine up the glaze right before your eyes. It’s pure eye candy!
Safe Handling of the Miso Salmon
Safety first, always! Because we reserve some of that beautiful glaze for basting, you have to treat it like raw meat contact once it touches the raw fish. So, make sure that reserved glaze stays in its own clean bowl until you use it for basting. Also, pull that fish out the second it flakes easily. Overbaked salmon dries out fast, and no amount of sauce can fix that!
Quick Answers About Your Miso Salmon Dinner
I get so many questions about making adjustments to this easy seafood dinner, especially from folks who are trying to fit it into busy schedules. It’s such a flexible recipe, but there are a few things you should know before you start substituting wildly. Remember, the balance of savory miso and sweet sugar is key to getting that sticky layer on your baked salmon.
Let’s clear up some of the common concerns so your dinner goes smoothly!
- What’s the best way to manage this if I’m meal prepping? You can totally mix the glaze ingredients ahead of time and keep them covered in the fridge for a couple of days. Also, you can season your salmon fillets and keep them patted dry in the fridge too. Just don’t put the glaze on the raw fish until 15 minutes before it goes into the oven!
- What is the best internal temperature for baked salmon? For safe eating, you want the thickest part of the salmon fillet to reach 165°F. If you pull it off the heat right when it starts to flake beautifully, it’ll probably be around 160°F, and the residual heat will finish it perfectly to that safe temperature while resting.
- Can I cook this in an air fryer? Yes, absolutely! It’s one of my favorite quick tricks. Just set your air fryer to 380°F and cook for about 8 to 10 minutes total. Keep an eye on it, as air fryers cook much faster!
Can I prepare this miso salmon ahead of time?
You can prep almost everything! Mix the glaze and keep it covered. You can even pat the salmon dry, season it, and keep it covered in the fridge for up to 24 hours. But I really recommend glazing it shortly before baking. If you let it sit glazed for too long, the salt in the miso starts to draw out moisture, and you might lose some of that perfect sticky texture when baking.
What is the best internal temperature for baked salmon?
The FDA recommends cooking fish to 145°F, but honestly, for the best texture—especially with a glaze that is going to continue cooking slightly outside the oven—I aim for about 160°F to 165°F when I test it with a thermometer. It ensures it’s cooked through, but still moist and flaky, not dry!
Storing and Reheating Your Delicious Miso Salmon
Even though this sticky miso salmon disappears fast around my house, sometimes we have leftovers, and I want to make sure you know how to handle them so they taste just as good the next day. The key here is gentle reheating; we don’t want to blast it in the oven and dry out that beautiful fish!
Cool any leftovers completely down to room temperature before you even think about putting them away. Store the salmon, rice, and veggies in separate, airtight containers if you can. They’ll keep nicely for about three days in the fridge. You can also freeze individual portions for up to two months, which is great for emergency lunches!
| Action | Time/Temperature | Notes |
|---|---|---|
| Cooling | Room Temperature | Cool completely before sealing containers. |
| Refrigeration | Up to 3 Days | Store components separately for best texture. |
| Reheating (Stovetop) | Low Heat | Covered skillet with a splash of water helps steam it gently. |
| Reheating (Microwave) | Medium Power | Use short bursts (30 seconds) to avoid overheating the glaze. |
Share Your Experience Making Miso Salmon
I put my heart into making sure these “detoxed” comfort foods taste amazing, and I’d love to know how this recipe worked for you! Did that glaze get perfectly sticky? Tell me everything in the comments below. Don’t forget to leave a rating so others know this is the best baked salmon they need to try this week!
Print
Amazing 1 miso salmon in under 40 min
- Total Time: 35 minutes
- Yield: 4 servings
Description
Make sticky Cheesecake Factory miso salmon at home in under 40 minutes. This recipe features salmon fillets baked in a sweet miso glaze until tender and sticky, perfect served with rice and crisp vegetables for an easy weeknight meal.
Ingredients
- ¼ cup red or white miso paste
- ¼ cup packed light brown sugar
- 3 tablespoons low sodium soy sauce
- 2 tablespoons honey
- 2 tablespoons rice vinegar
- 1 tablespoon sesame oil
- 1 tablespoon hot water
- 1 teaspoon grated fresh ginger
- 1 garlic clove, finely minced
- 4 salmon fillets, about 6 ounces each, skin on or off
- ½ teaspoon fine sea salt
- ¼ teaspoon black pepper
- 1 tablespoon olive oil
- 2 cups cooked white rice or jasmine rice
- 2 cups fresh snow peas, trimmed
- 1 red bell pepper, thinly sliced
- 2 green onions, thinly sliced
- 1 teaspoon toasted sesame seeds
Instructions
- Line a baking sheet with parchment and lightly brush it with olive oil. Pat the salmon fillets dry and season both sides with salt and black pepper.
- In a medium bowl, whisk together the miso paste, brown sugar, soy sauce, honey, rice vinegar, sesame oil, hot water, ginger, and garlic until completely smooth and glossy to create the glaze.
- Place the salmon fillets on the prepared pan. Spoon a thick layer of miso glaze over the top and sides, reserving about ¼ cup of the glaze in a small bowl for basting.
- Cover the pan loosely and let the salmon marinate in the refrigerator for 10 to 15 minutes while you heat the oven to 400°F and prepare the vegetables.
- Toss the snow peas and sliced red bell pepper with a light drizzle of olive oil and a pinch of salt. Spread them in a single layer around the salmon on the baking sheet.
- Bake the salmon for 10 minutes. Carefully brush with some of the reserved glaze and continue baking for 5 to 8 minutes more, until the glaze looks sticky and caramelized and the salmon flakes easily.
- Check that the salmon is cooked through to 165°F (74°C) internally if needed.
- Fluff the hot cooked rice and divide it among 4 bowls. Top each bowl with roasted vegetables and a piece of sticky miso salmon.
- Drizzle any pan juices and extra glaze over the salmon and rice. Sprinkle with green onions and sesame seeds before serving.
Notes
- Use white miso instead of red miso for a milder, slightly sweeter flavor.
- Swap honey for maple syrup for a deeper sweetness in the glaze.
- Replace snow peas with broccoli florets or green beans.
- Use brown rice or quinoa instead of white rice for more fiber.
- Add a pinch of red pepper flakes to the glaze for gentle heat.
- Cook the salmon in an air fryer at 380°F for 8 to 10 minutes for quick cooking.
- Dry the salmon well so the glaze adheres and becomes sticky.
- Baste only once during baking for a shiny finish.
- Do not overbake; remove when the salmon flakes easily.
- Keep reserved glaze separate from raw fish contact for safe drizzling later.
- Let the salmon rest briefly before serving for juices to redistribute.
- Cool leftovers completely before storing in an airtight container for up to 3 days.
- Freeze individual portions for up to 2 months.
- Reheat gently in a covered skillet with a splash of water or in the microwave on medium power in short bursts.
- Prep Time: 15 minutes
- Cook Time: 20 minutes