If you’re anything like me, the thought of juggling the oven on Thanksgiving or Christmas sends a little shiver down your spine. That’s why I’m sharing my secret weapon today: make ahead mashed potatoes! Seriously, these are a game-changer for holiday cooking. You prep them up to two days early, and boom—your oven is free for the turkey or ham.
I’m Jordan Bell, by the way, based right here in Asheville, NC. After my own 80-pound weight loss journey, I started this blog to show folks that comfort food doesn’t have to be heavy or complicated. I focus on Easy Detox Recipes, but I absolutely refuse to give up my Southern roots! This recipe is the perfect bridge—it’s that creamy, dreamy comfort food you crave, but made clean enough that you feel great eating it. Trust me, these fluffy potatoes will save your sanity. 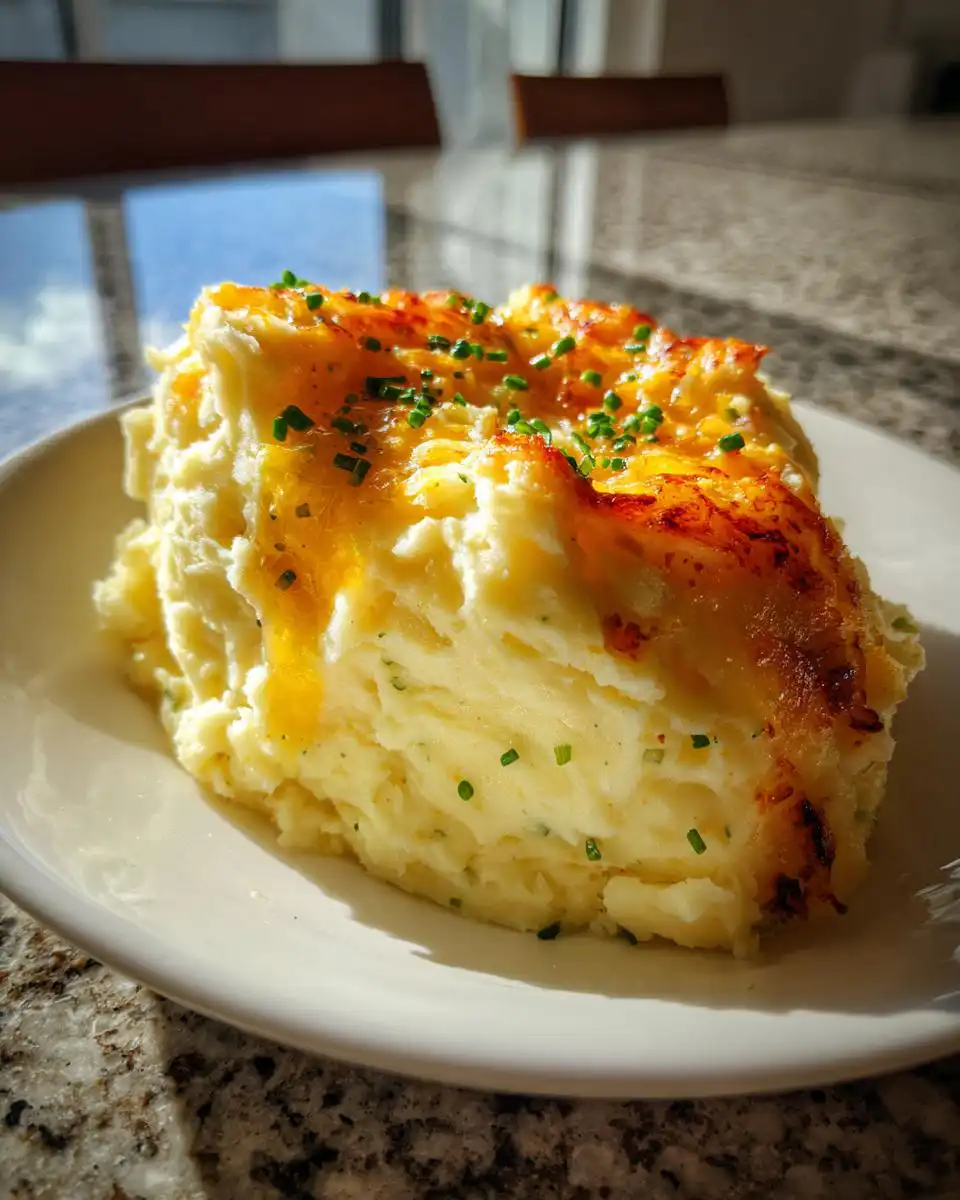
Gathering Ingredients for Perfect make ahead mashed potatoes
Okay, gathering your supplies is half the battle won when making these make ahead mashed potatoes. We want everything ready to go so we can move quickly once the potatoes are drained. Remember, even though these are freezer-friendly, the initial prep needs to be precise for that perfect creamy texture later. Using quality ingredients is key, especially when we are relying on dairy and butter for richness!
Essential Components for make ahead mashed potatoes
| Ingredient | Amount/Preparation |
|---|---|
| Yukon Gold Potatoes | 4 pounds, peeled and cut into large chunks |
| Cold Water | Enough to cover potatoes by several inches |
| Fine Sea Salt | 2 tablespoons (for cooking water) |
| Unsalted Butter | 8 tablespoons, softened and cut into pieces |
| Cream Cheese | 4 ounces, softened |
| Sour Cream | 1 cup |
| Milk or Half and Half | 0.5 to 0.75 cup, warm (more as needed) |
| Garlic Powder | 1 teaspoon |
| Onion Powder | 1 teaspoon |
| Fine Sea Salt | 1 teaspoon (for mashing) |
| Black Pepper | 0.5 teaspoon, freshly ground |
Optional Toppings for Flavor Boost
- Melted unsalted butter (2 tablespoons)
- Firm, Parmesan-style cheese (0.25 cup, finely grated)
- Fresh chives or parsley (2 tablespoons, chopped for garnish)
Why You’ll Love This make ahead mashed potatoes Recipe
These aren’t just any potatoes; they are your ticket to a calmer holiday kitchen. I developed this recipe specifically to cut down on day-of stress, and it truly delivers rich flavor without the fuss!
- Super quick active prep time means less time standing over the stove.
- Frees up precious oven space for the main event, like roasting a chicken.
- They maintain an unbelievably rich, fluffy texture even after reheating.
- You can chill them for up to two days, making them the ultimate make-ahead side dish.
Essential Equipment for Success
You don’t need a million fancy gadgets for these oven reheat potatoes, thankfully! Just a few sturdy kitchen workhorses will get you there. Having these items ready means you’re set to tackle the boiling and mashing without scrambling.
- A large pot—seriously, make sure it’s big enough for those four pounds of potatoes plus plenty of water!
- A reliable colander for draining everything quickly.
- A hand masher or a potato ricer. I prefer mashing by hand because I like to control how smooth they get, but a ricer is great if you want zero lumps.
- A 3-quart baking dish (lightly buttered, remember?).
- A whisk or spatula for stirring in the dairy and seasonings.
Step-by-Step Instructions to make ahead mashed potatoes
Now for the fun part! Don’t let the steps intimidate you; we are just taking our time to build flavor and texture so these creamy mashed potatoes are perfect when it’s showtime. Follow these steps closely, and you’ll have the best make ahead mashed potatoes your guests have ever tasted.
Cooking the Potatoes Perfectly
First things first, get those potatoes into the pot. Put your peeled chunks into a large pot, then cover them with cold water—this is important! Dropping them into already boiling water cooks the outside too fast, leaving you with unevenly cooked chunks. Add your 2 tablespoons of salt to the water; we want the potatoes seasoned from the inside out. Bring this up to a boil over medium-high heat, then immediately drop it down to a steady simmer. Let them cook until they are completely tender—you should be able to pierce them with a fork without any resistance, usually about 15 to 20 minutes. Once they are soft, drain them really well in a colander. Here’s a key trick: return the drained potatoes to the warm, empty pot for a few minutes. Let them just sit there, uncovered, so that any extra steam evaporates. This step stops your final mash from becoming watery later on. Trust me on this!
Creating the Creamy Base of make ahead mashed potatoes
With the steam gone, it’s time to add the magic! Toss in all your softened butter, the cream cheese, the sour cream, and all your seasonings—garlic powder, onion powder, salt, and pepper. Grab your masher—or ricer if you went that route—and start working everything into the hot potatoes until it’s mostly smooth. Now, slowly start pouring in your warm milk or half and half. I said warm because cold liquid shocks the starches and can make things gummy. Add it gradually, stirring gently, until you hit that perfect, fluffy texture that holds soft peaks when you lift your spoon. Never dump all the liquid in at once, or you’ll end up with soup! 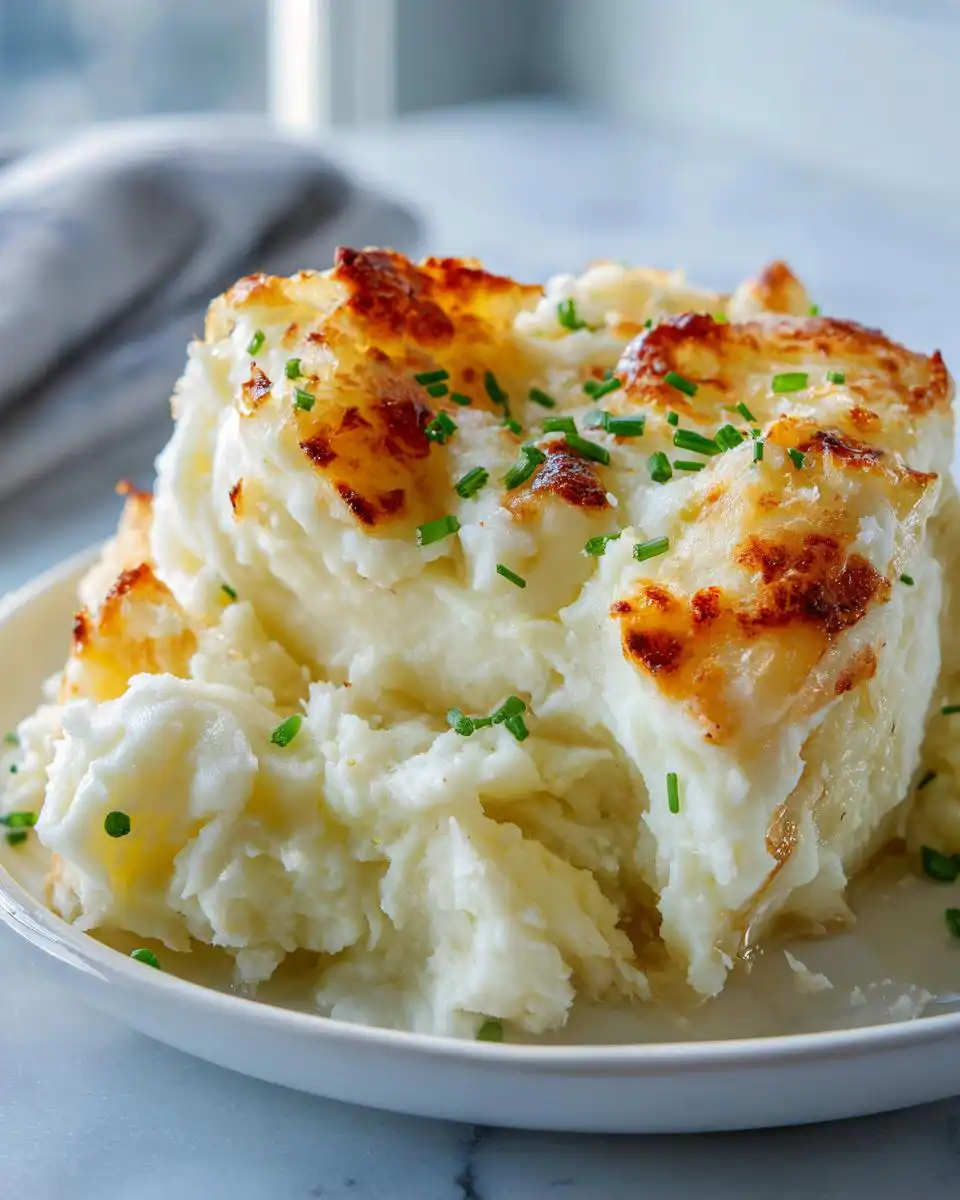
Preparing make ahead mashed potatoes for Chilling
Once you’ve tasted and adjusted the seasoning—it should taste amazing right now!—transfer the mixture into your lightly buttered 3-quart baking dish. Smooth the top out, and use the back of your spoon to create some pretty swirls; this gives us great edges for browning later. If you want that gorgeous golden crust, brush or drizzle a little melted butter over the top and sprinkle on that grated cheese now. Before you cover it, let the whole dish cool down completely to room temperature. Once cool, cover it tightly and tuck it into the fridge for up to two days. Don’t skip the room temp cool-down!
Reheating Instructions for Fluffy make ahead mashed potatoes
When it’s time to serve, pull that dish out while you preheat your oven to 350 degrees F. Cover the dish loosely with foil—we want heat trapped to warm them through, but we don’t want steam to ruin the topping just yet. Bake them for about 30 to 40 minutes. You’ll know they are ready when the edges are bubbling happily. For the final ten minutes of baking, pull that foil off completely. This lets the butter and cheese on top get golden brown and crispy. Once they come out, give them a sprinkle of fresh chives or parsley, and you’re ready to serve!
Tips for Success with Your make ahead mashed potatoes
Getting these make ahead mashed potatoes right every time is all about respecting the potato! It’s not complicated, but a few little nuances make the difference between good mash and legendary mash. We need to focus on consistency from start to finish, even after they’ve been chilling out in the fridge.
Potato Selection and Mashing Technique
I swear by Yukon Golds for this recipe; they have that perfect buttery flavor and slightly waxy texture that holds up beautifully to all that cream cheese and sour cream. If you can’t find them, try a mix of Yukon Gold and Russets for a nice balance in texture, just like I mention in my notes! When it comes time to mash, please, please mash gently. If you beat these potatoes like crazy with an electric mixer, you’ll activate too much starch, and suddenly you’ll have gluey wallpaper paste instead of creamy mashed potatoes. A hand masher or even a ricer keeps things light and airy.
Adjusting Texture and Flavor
The biggest concern people have when reheating is dryness, but we can fix that! If you pull your potatoes out of the fridge to bake and they seem stiff or a little tight, don’t panic. Just stir in a splash or two of warm milk or half and half while they are still cold, just before they go into the oven. This loosens them right up without cooking them again too fast. Also, always taste before you serve! Seasoning can dull slightly during chilling, so give them a quick check for salt and pepper right before you put them in to bake. A little fresh thyme folded in before chilling also adds a lovely depth we didn’t cover in the main steps!
Storing and Reheating make ahead mashed potatoes
One of the best parts about this recipe is how well these oven reheat potatoes keep! You can prepare them ahead of time, which is a lifesaver, especially when company is coming. For short-term storage, just make sure you cool them completely before covering them tightly with plastic wrap and foil. They stay fantastic in the refrigerator for up to four days, though I usually aim for three. If you need to keep them longer—say, after a big holiday—you can absolutely freeze them!
When freezing, make sure the dish is well-covered to prevent freezer burn. They will keep their flavor and texture nicely for one to two months this way. If you freeze them, remember to thaw them overnight in the fridge before you plan to bake them off. Here’s a quick guide to keeping them fresh:
| Storage Method | Duration | Reheating Note |
|---|---|---|
| Refrigeration | Up to 3 to 4 days | Bake at 350°F, covered, until hot. |
| Freezing | 1 to 2 months | Thaw overnight in the fridge before baking. |
Frequently Asked Questions about make ahead mashed potatoes
I get so many questions about these make ahead mashed potatoes, which tells me you all love saving time as much as I do! These creamy mashed potatoes are versatile, but people always wonder about substitutions and reheating quirks. Here are the answers to the ones I hear most often.
Can I use a different type of potato for these make ahead mashed potatoes?
You absolutely can, though I highly recommend trying Yukon Golds first for that natural buttery taste! If you can’t find them, try swapping in half Russets. Russets tend to be starchier, so they break down a bit more, which is why I suggest mixing them. Just make sure you cut all your potatoes into roughly the same size chunks so they cook evenly, no matter which kind you pick!
What is the best way to reheat these creamy mashed potatoes without drying them out?
The key to keeping these oven reheat potatoes perfectly creamy is moisture management. Always bake them covered with foil first. This traps the steam and gently reheats the dairy without burning the top. If you pull them out and they seem stiff—which can happen after chilling—just stir in a splash or two of warm milk right before they go into the oven. That brings the fluff right back!
How long can I safely keep these oven reheat potatoes in the refrigerator?
Because this recipe is loaded with butter, cream cheese, and sour cream, it keeps really well! I’ve safely stored tightly covered leftovers in the refrigerator for up to four days. Just ensure your baking dish is covered well before it goes in. If you’re worried about timing, remember that freezing is an option for up to two months!
Estimated Nutritional Snapshot of Your make ahead mashed potatoes
It’s important to remember that since we are using full-fat dairy and plenty of butter in these creamy mashed potatoes, the nutrition leans towards comfort food! This snapshot is based on the standard recipe divided into 8 generous servings. This is just an estimate, of course, but it gives you a good idea! Check out more tips on saving time in the kitchen.
| Nutrient | Amount (Estimate) |
|---|---|
| Calories | 260 |
| Fat | 12 grams |
| Carbohydrates | 32 grams |
| Protein | 6 grams |
For more visual inspiration on recipes, see my Pinterest boards.
Print
Awesome 4 make ahead mashed potatoes saved
- Total Time: About 1 hour and 15 minutes active time, plus up to 2 days chill time
- Yield: 8 generous servings
- Diet: Vegetarian
Description
Creamy make ahead mashed potatoes stay fluffy and rich when reheated, a holiday friendly side that frees oven space and your time on the big day. These potatoes can be prepared up to two days ahead.
Ingredients
- 4 pounds Yukon Gold or similar yellow potatoes, peeled and cut into large chunks
- Enough cold water to cover the potatoes by several inches in a large pot
- 2 tablespoons fine sea salt for the cooking water
- 8 tablespoons unsalted butter, softened and cut into pieces
- 4 ounces cream cheese, softened
- 1 cup sour cream
- 0.5 to 0.75 cup warm milk or half and half, more as needed for texture
- 1 teaspoon garlic powder
- 1 teaspoon onion powder
- 1 teaspoon fine sea salt, plus more to taste
- 0.5 teaspoon freshly ground black pepper
- 2 tablespoons melted unsalted butter (Optional topping)
- 0.25 cup finely grated firm cheese in a parmesan style (Optional topping)
- 2 tablespoons chopped fresh chives or parsley for garnish (Optional topping)
Instructions
- Place the peeled potato chunks in a large pot, cover with cold water by several inches, and stir in the salt so the potatoes are seasoned all the way through.
- Bring the pot to a gentle boil over medium high heat, then reduce to a steady simmer and cook until the potatoes are very tender and break apart easily when pierced with a fork, usually about 15 to 20 minutes.
- Drain the potatoes well in a colander, then return them to the warm pot and let them sit for a few minutes so excess steam evaporates, which keeps the mash from turning watery.
- Add the softened butter, cream cheese, sour cream, garlic powder, onion powder, salt, and pepper to the hot potatoes and mash by hand until mostly smooth, then slowly stir in enough warm milk or half and half to reach a fluffy, spoonable texture that holds soft peaks.
- Taste and adjust with additional salt or pepper, then transfer the potatoes to a lightly buttered 3 quart baking dish, smoothing the top and making gentle swirls with a spoon.
- For a golden top, brush or drizzle the melted butter over the surface, sprinkle with the grated firm cheese, and let the dish cool to room temperature before covering tightly and refrigerating for up to 2 days.
- When ready to serve, remove the dish from the refrigerator while you preheat the oven to 350 degrees F, then cover loosely with foil and bake for 30 to 40 minutes until the potatoes are hot all the way through and lightly bubbling at the edges.
- Remove the foil for the last 10 minutes of baking so the top can turn lightly golden, then sprinkle with chopped chives or parsley before carrying to the table.
- If you serve these potatoes alongside roasted or air fried chicken, always cook the chicken to an internal temperature of at least 165 degrees F checked with a food thermometer in the thickest part for safety.
Notes
- Cut potatoes into evenly sized chunks so they cook at the same speed.
- Start potatoes in cold water rather than dropping into boiling water for even cooking.
- Mash gently with a hand masher or ricer to avoid making them gluey.
- Warm the milk or half and half before stirring it in for a silky texture.
- If potatoes seem stiff after chilling, stir in a splash of warm milk during reheating.
- Store cooled potatoes tightly covered in the refrigerator for up to 3 to 4 days.
- Freeze cooled potatoes for up to 1 to 2 months for longer storage.
- Reheat frozen potatoes by thawing overnight in the refrigerator before baking.
- Use half Yukon style and half russet style potatoes for balanced texture.
- Swap sour cream for plain Greek yogurt for tang and extra protein.
- For a lighter version, reduce butter and replace some milk with warm vegetable broth.
- Stir in roasted garlic puree for a deeper flavor.
- Fold in fresh herbs like parsley, chives, or thyme before chilling.
- Sprinkle the top with cheese and seasoned breadcrumbs before reheating for a crisp crust.
- Prep Time: 25 minutes
- Cook Time: 50 to 60 minutes (20 boil + 30-40 reheat)
- Category: Side Dish
- Method: Boiling, Mashing, Baking
- Cuisine: American