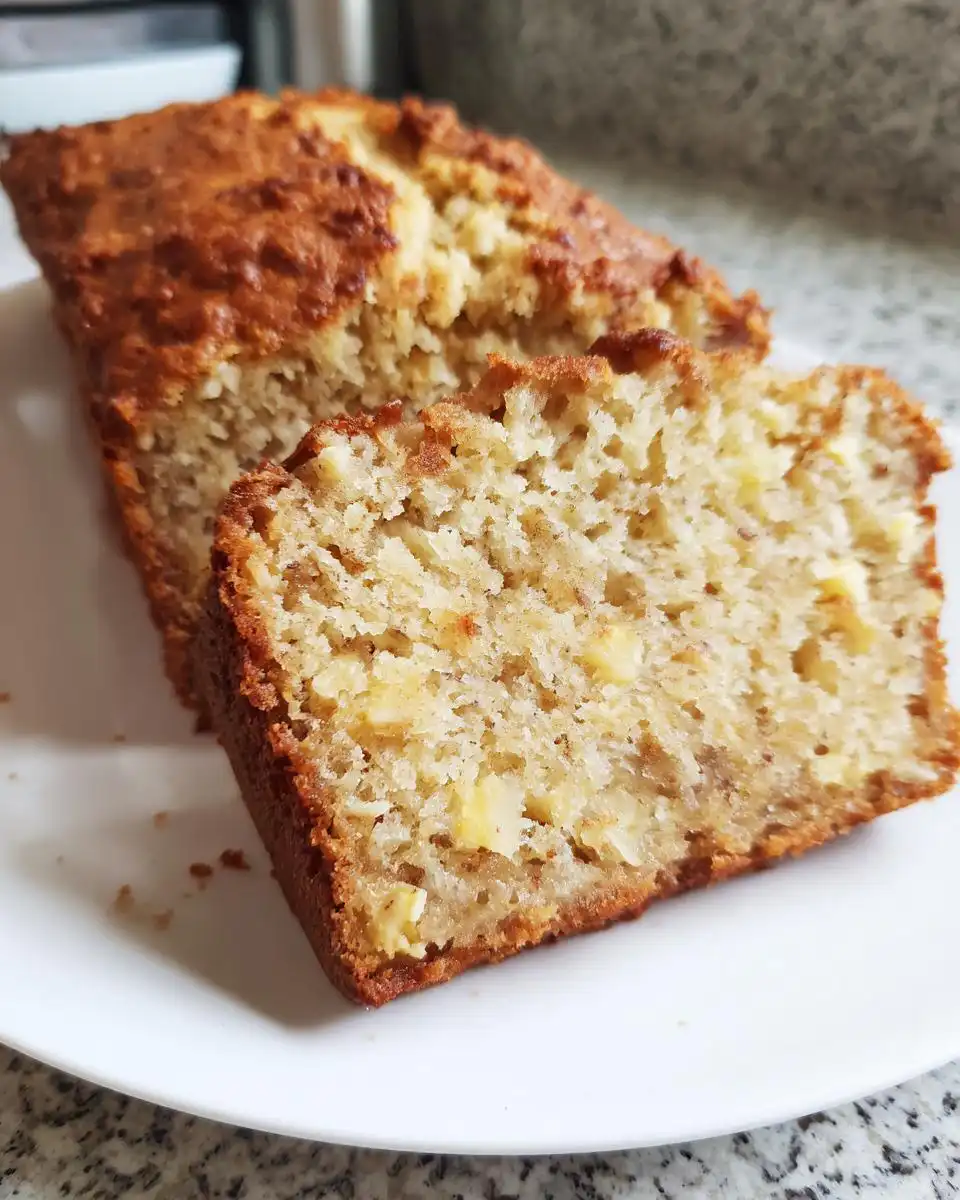
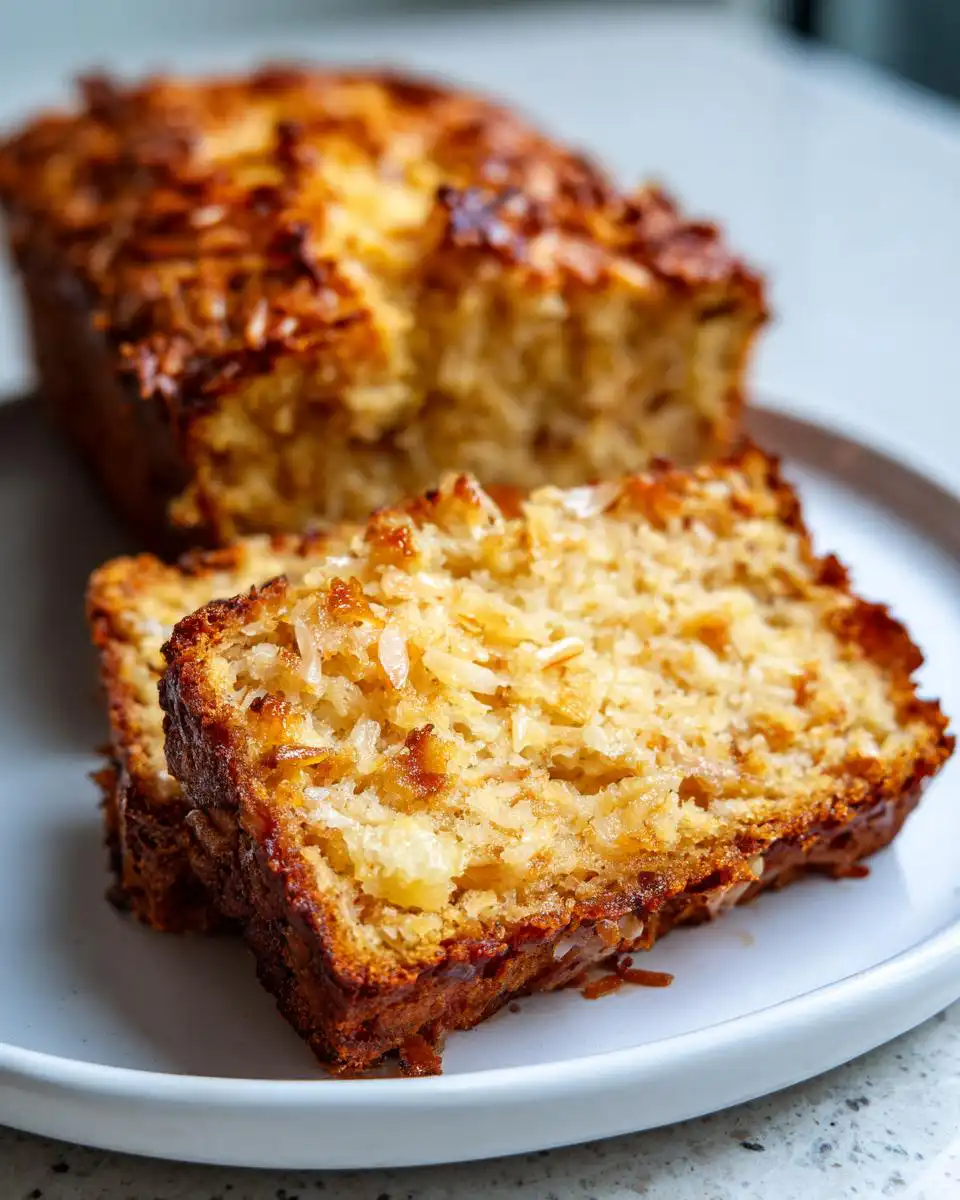
Apple Coconut Bread: A Taste of Maui Awaits! If you’re tired of heavy, complicated recipes that leave you feeling sluggish, I have something truly special for you today. My entire mission here at the Easy Detox Recipes blog, stemming from my own 80-pound weight loss journey right here in Asheville, NC, is proving that comfort food doesn’t have to weigh you down. We take those satisfying flavors you crave—the kind I grew up loving from Southern cooking—and lighten them up!
This Apple Coconut Bread: A Taste of Maui Awaits! is the perfect example of that philosophy. It’s unbelievably moist thanks to a little trick using applesauce, and the coconut instantly transports you somewhere sunny. Forget fussy yeast breads; this quick bread comes together faster than you can decide what podcast to listen to next. You get that fantastic, sweet breakfast bread texture without any guilt. Truly, this is sunshine in a loaf pan.
Gathering Your Ingredients for Apple Coconut Bread: A Taste of Maui Awaits!
When we make this incredible Apple Coconut Bread: A Taste of Maui Awaits!, I always lay everything out first. It’s my version of mise en place, but much more fun because it smells like a beach vacation already! Since this is a quick bread, measuring accurately is extra important, especially when we’re trying to keep things light and clean like I do here in Asheville. Don’t substitute the baking soda AND baking powder; they work together to give us that perfect lift without heavy fats.
Let’s break down exactly what you need so your mixing process goes smoothly. Trust me, having these components ready makes the whole baking experience a total breeze.
Dry Components
For the dry side of things, we start with two cups of all-purpose flour—nothing fancy, just standard stuff. Then we add one cup of granulated sugar. Now, while I usually swap sugar out for cleaner alternatives, for this specific recipe, the sugar really interacts perfectly with the applesauce to create that signature moist crumb. Also, make sure you grab that unsweetened shredded coconut. You want the standard shredded kind, not the sweetened flakes, because we are controlling the sugar content here!
Wet Components for Apple Coconut Bread: A Taste of Maui Awaits!
The wet ingredients are where the magic happens for this Apple Coconut Bread: A Taste of Maui Awaits!. You need exactly half a cup of unsalted butter, and it has to be melted before you begin. The real star, though, is the applesauce—a full cup! This is my secret weapon for keeping things moist after losing all that weight; it replaces so much oil. Finally, don’t skip the buttermilk; we only need half a cup, but that little bit of acid reacts beautifully with the baking soda for that lift we talked about.
Equipment Needed for Perfect Apple Coconut Bread: A Taste of Maui Awaits!
You don’t need a million fancy gadgets for this recipe, which is why I love it for busy weeknights! To make your Apple Coconut Bread: A Taste of Maui Awaits! successfully, grab a couple of mixing bowls—one large and one medium will do the trick. You’ll need a whisk for the dry stuff and maybe a rubber spatula for combining everything gently later on.
The absolute essential tool is a 9×5-inch loaf pan. Don’t forget your standard measuring cups and spoons! A simple wire cooling rack is also a must-have for getting that perfect texture once it comes out of the oven.
Step-by-Step Instructions for Apple Coconut Bread: A Taste of Maui Awaits!
Okay, now for the fun part—turning those beautiful ingredients into the most amazing tropical loaf! Remember what I always preach about my easy detox recipes? Keep it simple, keep it gentle, and you’ll have success. This whole process moves pretty quickly, maybe 15 minutes of active work before it goes into the oven.
Initial Prep Work
First things first, we need that heat! Set your oven rack to the middle position and let it preheat to 350 degrees Fahrenheit, or 175 Celsius if you’re using that setting. While it’s warming up, grab that 9×5-inch loaf pan. You need to grease it really well. I usually use a little spray oil and then dust it lightly with flour, making sure to get into all the corners. If you want extra insurance against sticking—which I often do, especially when I’m excited—you can line the bottom with a strip of parchment paper. That way, when it’s done, it practically slides right out!
Mixing the Dry and Wet Batches
Grab your largest bowl for the dry stuff. Whisk the flour, sugar, leaveners, salt, and that shredded coconut together. Whisking is important here because it acts like a gentle sifter, making sure everything is evenly distributed before we add the wet stuff. Don’t overthink it; just make sure you don’t see any big clumps of baking soda.
In a separate, smaller bowl, mix up your wet ingredients. Melt that butter first, let it cool just slightly so it doesn’t scramble the eggs, then whisk in the eggs, vanilla, buttermilk, and that glorious applesauce until it looks smooth and uniform. Now, here’s the crucial Southern baking secret I learned way back when I was trying to clean up my comfort food: Pour the wet into the dry all at once. Then, and I mean this, stir it gently with a spatula until it’s *just* combined. You want to see a few streaks of flour left. Seriously, stop mixing! Overmixing develops gluten, and that turns a tender quick bread into something tough. Nobody wants tough bread.
Baking and Cooling Your Apple Coconut Bread: A Taste of Maui Awaits!
Pour that slightly lumpy batter right into your prepared pan and use your spatula to level the top off a bit. Into the oven it goes! Set your timer for 55 minutes. Around the 50-minute mark, you need to start testing for doneness. The toothpick test is your best friend here. Insert a thin wooden skewer or toothpick right into the center. If it comes out clean, or maybe with a few *moist crumbs* clinging to it—not wet batter—it’s done. If it’s still gooey, give it 5 more minutes.
This next step is where patience comes in for making this Apple Coconut Bread: A Taste of Maui Awaits! perfect. Let the loaf rest in the pan for a solid 10 minutes. This allows the structure to set up. If you rush it and try to dump it out immediately, it might collapse! After those 10 minutes, carefully invert it onto a wire rack to cool completely. Completely is key for the best texture!
Tips for Success with Apple Coconut Bread
Quick breads are fantastic because they are so forgiving, but there are definitely a few pitfalls that can turn a tropical dream into a dense brick. My biggest piece of advice, learned the hard way when I was first trying to lighten up my family’s recipes, is to respect the mixing time. Seriously, stop stirring the moment you see the last streak of flour disappear. If you keep going, you activate too much gluten, and that’s what makes the final product chewy instead of tender.
Another thing to watch out for is your applesauce. Make sure you are using unsweetened varieties, or you’ll end up with something overly sweet and maybe a little sticky. Also, don’t try to substitute the buttermilk with regular milk alone. That little bit of acid is crucial for reacting with the baking soda. If you don’t have buttermilk on hand, you can easily make a clean substitute: just mix a half cup of regular milk with half a tablespoon of white vinegar or lemon juice, let it sit for five minutes until it curdles slightly, and then proceed!
Finally, oven temperature matters. If your oven runs hot, check it around the 50-minute mark. Browning too fast on top while the middle is still raw means you might need to tent it loosely with foil for the last ten minutes of baking time.
Serving Suggestions for Apple Coconut Bread: A Taste of Maui Awaits!
Once this beautiful Apple Coconut Bread: A Taste of Maui Awaits! has cooled down—and trust me, resisting the urge to slice it warm is hard but worth it—you have a few wonderful ways to serve it up. Since this bread is already so flavorful and moist thanks to the applesauce and coconut, it really doesn’t need much dressing up at all. It’s perfect right out of the pan for a quick breakfast!
If you are serving this for a brunch or an afternoon treat, a very light touch is all you need to enhance those tropical notes we worked so hard to bring out.
Pairing Ideas
For a simple, clean finish, just a light dusting of powdered sugar is elegant and keeps things light, just how I like my easy detox recipes. If you want a little more texture, toast a few extra flakes of unsweetened coconut and sprinkle them on top after it cools. It adds a lovely crunch!
To keep the Maui vibe going, serve slices alongside fresh, chilled pineapple chunks or some ripe mango. A tiny smear of plain Greek yogurt mixed with a drop of vanilla extract makes a fantastic, protein-packed alternative to heavy frosting. It’s bright, simple, and lets the flavor of the Apple Coconut Bread: A Taste of Maui Awaits! truly shine through.
Storing and Reheating Your Delicious Bread
We all know that the best part of baking is having leftovers, but we want to make sure this quick bread stays tender and doesn’t get stale too fast. Since this recipe is so moist thanks to the applesauce, it actually holds up really well on the counter. Just make sure it’s completely cool before you wrap it up—warm bread traps steam and gets gummy!
If you plan on eating it within three days, wrapping the loaf tightly in plastic wrap, and then maybe wrapping that in foil, works perfectly at room temperature. If you need it to last longer, the freezer is your friend! Slice it first, which makes reheating individual portions so much easier later on. You can find more tips on how I share my recipes on Medium.
Here is the quick guide for keeping this loaf perfect:
| Storage Location | Duration | Best Reheating Method |
|---|---|---|
| Countertop (Airtight) | Up to 3 days | Room temp or quick microwave |
| Freezer (Wrapped Tightly) | Up to 3 months | Thaw first, then toast briefly |
When you’re ready to eat a frozen slice, just pop it on a plate on the counter for an hour, or microwave it for about 15 seconds. It comes right back to that fresh-baked tenderness!
What Readers Ask About Apple Coconut Bread
It’s so fun seeing all the questions you all have when you try to recreate these lighter versions of comfort food! When I started this journey transforming my diet after losing 80 pounds, I had a million questions too. These are the things I hear most often about making sure this quick bread turns out perfectly every time, even when you’re missing an ingredient or two. Feel free to check out my Pinterest for more visual inspiration!
Don’t be shy about asking! Baking is chemistry, but it’s also love, and we want everyone to succeed in making great homemade bread.
Can I substitute the buttermilk in this Apple Coconut Bread?
Oh yes, you absolutely can! Buttermilk is key because its acidity helps activate the baking soda, giving us that lift without relying on heavy fats. If you don’t have any, just take regular milk—any kind works—and stir in about a tablespoon of white vinegar or lemon juice for every cup you need. Let it sit on the counter for about five minutes until it looks a little curdled. That’s your homemade buttermilk substitute, and it works like a charm in this recipe!
How do I know when the Apple Coconut Bread is fully baked?
The toothpick test is your primary indicator, but don’t rely on it solely! Stick a wooden skewer right into the very center of the loaf. If it slides out clean, that’s great. But if it comes out with just a few moist crumbs attached—and I mean *moist crumbs*, not wet batter—it’s ready. Visually, the bread should also look slightly pulled away from the sides of the loaf pan. That means the structure is set.
What is the best way to achieve a moist texture?
The secret here is twofold, but the most critical step is stopping your stirring when you mix the wet and dry ingredients! Seriously, stop stirring when you still see a tiny bit of flour. Overmixing develops gluten, which is what makes bagels chewy, but you want tender breakfast bread. Also, don’t skip the applesauce; it’s doing the heavy lifting to keep this loaf moist for days! If you enjoy quick breads, you might also love my recipe for Blueberry Banana Bread.
Approximate Nutritional Information
When we talk about enjoying comfort food made clean, we have to talk about the numbers, right? I always say, knowing what’s in your food is half the battle on your weight loss journey. These numbers are just estimates based on the ingredients listed above, so keep that in mind when you are planning your meals!
| Nutrient | Amount (Per Slice) |
|---|---|
| Calories | 250 |
| Sugar | 22g |
| Fat | 11g |
| Protein | 4g |
It’s a great balance for a sweet treat, especially considering how much flavor you get!
Print
Amazing Apple Coconut Bread: 55 Min Bliss
- Total Time: 75 minutes
- Yield: 1 loaf
Description
Apple Coconut Bread: A Taste of Maui Awaits! This recipe brings tropical flavor to your kitchen with moist, sweet bread perfect for any time of day.
Ingredients
- 2 cups all-purpose flour
- 1 cup granulated sugar
- 1 teaspoon baking powder
- 1 teaspoon baking soda
- 1/2 teaspoon salt
- 1/2 cup unsweetened shredded coconut
- 1 cup applesauce
- 1/2 cup unsalted butter, melted
- 2 large eggs
- 1 teaspoon vanilla extract
- 1/2 cup buttermilk
Instructions
- Preheat your oven to 350°F (175°C). Grease a 9×5-inch loaf pan and set aside.
- In a large mixing bowl, whisk together the flour, sugar, baking powder, baking soda, salt, and shredded coconut until well combined.
- In another bowl, mix the melted butter, eggs, vanilla extract, buttermilk, and applesauce until smooth.
- Pour the wet ingredients into the dry ingredients and stir gently until just combined. Do not overmix; a few lumps are okay.
- Pour the batter into the prepared loaf pan and smooth the top with a spatula.
- Bake for 55-60 minutes, or until a toothpick inserted into the center comes out clean.
- Let the bread cool in the pan for 10 minutes before transferring it to a wire rack to cool completely.
Notes
- Do not overmix the batter.
- Cool the bread fully on a wire rack for the best texture.
- Prep Time: 15 minutes
- Cook Time: 60 minutes