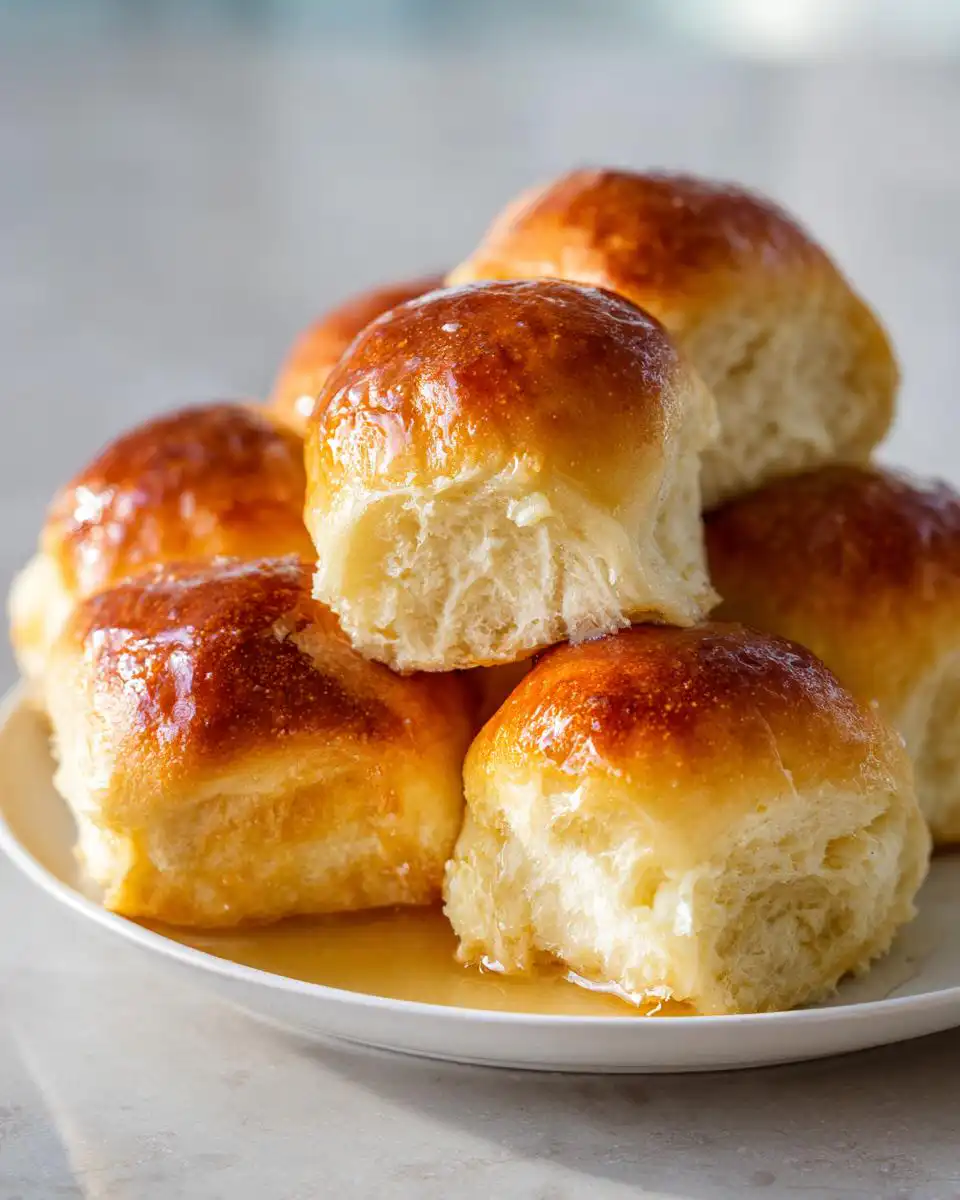
If you’re like me, Jordan Bell from Asheville, NC, some foods just scream comfort, and nothing says Southern comfort quite like those warm, impossibly soft Texas Roadhouse Rolls. I know, because when I was focused on my 80-pound weight loss journey, I needed classic favorites made cleaner—and these fluffy rolls are a staple! I’m bringing you my absolute best copycat recipe today, the one that rivals any restaurant. Trust me, making these incredible fluffy rolls from scratch is easier than you think, and the payoff is huge. We’re talking about light, airy pillows of bread, perfect for soaking up gravy or just eating plain. This recipe proves that even comfort food can fit into a healthier lifestyle when you control the ingredients.
Why You’ll Love This Texas Roadhouse Rolls Copycat Recipe
Honestly, what’s not to love? This recipe is fast enough for a weeknight dinner, and it uses simple ingredients you probably already have. The real magic happens when you handle that yeast dough just right—it creates the most tender crumb. I remember the first time I tried to get the texture right; my early attempts were little hockey pucks! But now, following these steps, I get those signature light and airy homemade rolls every single time. They come out golden and practically beg to be smothered in that sweet cinnamon butter. This is baking that feels rewarding, not stressful.
Gathering What You Need for Authentic Texas Roadhouse Rolls
Before we even think about waking up that yeast, we need to make sure our pantry is stocked. Getting the right ingredients is half the battle when aiming for that perfect Texas Roadhouse Rolls taste. I can’t stress enough how much the quality matters here, especially with something as simple as milk or butter. If you use cold ingredients, your results will be flat, and nobody wants sad, dense rolls when they’re expecting cloud-like fluffiness! So, let’s get everything measured out before we start mixing. This recipe is built on simple things done exactly right.
Ingredient List for Fluffy Rolls
When you’re measuring things out for this copycat recipe, precision is your friend. Remember that the yeast is sensitive, so the milk temperature has to be spot on—that’s critical! Also, make sure your butter is actually room temperature, not melted or straight from the fridge. I’ve laid out everything you need below, but please pay close attention to the flour measurement; we add it gradually to get that perfect soft dough.
- 1 packet active dry yeast
- 1 \u00bc cups warm milk (about 105-110 degrees F)
- \u2153 cup granulated sugar
- \u00bc cup unsalted butter (room temperature, \u00bd stick)
- 1 large egg (room temperature)
- 1 teaspoon kosher salt
- 3 \u00bd \u2013 4 cups all-purpose flour plus more for kneading
- 3 tablespoons unsalted butter melted (for brushing)
Essential Equipment for Baking Homemade Rolls
You don’t need a fancy commercial bakery setup for these, thankfully! A stand mixer makes life much easier for kneading, but you can certainly do this by hand if you have a good sturdy bowl and some elbow grease. Make sure you have a large bowl for rising and the appropriate baking sheets ready to go.
Mastering the Yeast Dough for Superior Texas Roadhouse Rolls
Okay, here’s where the magic truly starts—we’re going to wake up our yeast! This is the step that separates the truly fluffy rolls from the dense ones. If you get the temperature wrong here, the yeast won’t activate properly, and your beautiful Texas Roadhouse Rolls will be flat. We’re aiming for that sweet spot, that warm bath sensation, which is why the recipe calls for milk around 105 to 110 degrees F. It should feel warm, not hot, to your finger—if it burns even a little, dump it and start over! That sugar feeds the yeast, and watching it get foamy is your reward for getting the temperature right.
Step 1: Yeast Activation and Initial Mixing
First things first: combine that warm milk and sugar in a small bowl. Sprinkle the active dry yeast right over the top—don’t stir it yet! Let it sit for five minutes. Seriously, set a timer. When you come back, it should look creamy and bubbly, like a little head on a beer. That means your yeast is alive and ready to work! Once it’s foamy, dump that mixture into your large mixing bowl. Now, add the softened butter, the room-temperature egg, the salt, and the first two cups of flour. Beat it until it’s looking smooth and combined. We’re building the base structure here.
Step 2: Developing the Tacky Dough
Next, we start adding the rest of that flour gradually. This is where you need to use your senses! Keep adding flour a little at a time until the dough starts pulling away from the sides of the bowl and forms a rough ball. Don’t just dump in all the flour called for; stop when it looks tacky but isn’t sticking aggressively to your fingers. If it seems too wet, add flour by the tablespoon. Once it’s gathered, turn the mixer speed up and knead it for just two or three minutes. We want it tacky, not stiff! Now, grease a clean bowl, toss that dough in, turn it over so it’s coated, cover it loosely with a towel, and put it somewhere warm to double in size. Patience here is key for those light, airy results!
Shaping and Second Rise for Perfect Fluffy Rolls
Once your dough has doubled, it needs a gentle wake-up call! Don’t punch it aggressively; we want to keep those beautiful air bubbles intact. Gently deflate the dough and turn it out onto a lightly floured surface. This step is crucial for getting uniform rolls—nobody wants one giant roll and twenty tiny ones! We are aiming for consistency so that all the Texas Roadhouse Rolls bake evenly and look beautiful coming out of the oven. Remember, these are meant to be soft and pillowy, so treat the dough gently.
Rolling and Cutting the Yeast Dough Squares
Take your dough and roll it out into a nice, neat rectangle—aim for about 12 inches long by 8 inches wide, and keep it roughly half an inch thick. Think of it like rolling out a big sheet of soft playdough. Once you have your shape, grab a sharp knife or bench scraper and cut that rectangle into 24 to 30 equal squares. I usually aim for 5 rows by 5 or 6 rows, depending on how big I want them. Having them all the same size helps them rise together nicely in the pan.
Preparing for the Oven: The Final Proof
Now, place those cut squares onto your baking sheets. Make sure they have a little bit of space between them because they are going to expand again! Cover them again with that clean towel. This second rise, or proofing, is often overlooked, but it’s essential for maximum fluffiness. Let them sit for another 45 to 60 minutes until they look puffy and nearly doubled again. Don’t rush this part! If you bake them before they look light and airy, they’ll turn out dense. You’ll know they’re ready when they are visibly puffed up and soft to the touch.
Baking and Finishing Your Texas Roadhouse Rolls
We are so close to biting into those amazing, warm rolls! The key to success right now is timing. Don’t wait until the rolls are perfectly proofed to start your oven. You want the oven fully preheated and ready to go the second those rolls look perfect. If you let the dough sit around while the oven heats up, those beautiful air bubbles we worked so hard to create can start to deflate. So, about 20 minutes before you think the second rise is done, crank that oven up to 350 degrees F. This blast of heat locks in the fluffiness.
Oven Prep and Bake Time Guidance
Once the oven is screaming hot, carefully place your baking sheets inside. These rolls bake fast! We are looking for a beautiful golden brown color on top, which usually takes just 12 to 15 minutes. Keep an eye on them, though, because every oven is different. You want them baked through, but you don’t want them to dry out. When they look nicely browned and smell incredible, pull them out immediately. Remember, these are Texas Roadhouse Rolls, and we want that signature look!
The Signature Melted Butter Brush
This is the final, non-negotiable step that ties the whole experience together. The moment those rolls come out of the oven, grab your bowl of melted butter—the 3 tablespoons we set aside—and brush them generously. Don’t wait even a minute! Brushing them right away makes the crust soft, imparts that rich flavor, and helps keep the interior moist. It’s what gives them that slight sheen and incredible taste. If you wait even five minutes, the crust hardens, and the butter just sits on top instead of melting into the surface. Go heavy with that brush! You can find more great recipes like this one on our Medium profile.
Frequently Asked Questions About Texas Roadhouse Rolls
I get so many questions about these rolls because everyone wants that perfect restaurant quality at home! Don’t worry if your first batch isn’t perfect; baking yeast dough takes a little practice. I’ve gathered the most common things folks ask me about making these copycat recipe rolls so you can nail them every time. Hopefully, this clears up any confusion about achieving those light, fluffy results we’re aiming for!
Can I make the cinnamon butter topping for these homemade rolls
Oh, absolutely! While the simple melted butter brush is essential for keeping the crust soft right after baking, the sweet cinnamon butter is what takes these dinner rolls straight to heaven. You can easily whip up a batch while the rolls are doing their final rise. Just beat softened butter with powdered sugar and a good dash of cinnamon until it’s light and fluffy. It’s wonderful slathered on while the rolls are still piping hot. It’s optional, but I highly recommend it for the full experience! If you enjoy cinnamon flavors, you might also like our recipe for pumpkin banana bread with cinnamon.
Troubleshooting Common Yeast Dough Issues
If your homemade rolls come out dense, the first thing to check is your yeast activation. Was your milk too hot or too cold? If it wasn’t foamy after five minutes, the yeast was probably dead, and you’ll never get that rise. If your dough didn’t rise at all during the first proof, the temperature in your kitchen might have been too chilly. Try putting the bowl in the oven with just the light on—that creates a perfect warm spot. Dense rolls can also mean you added too much flour during kneading, making the dough too stiff.
Storing Your Freshly Baked Dinner Rolls
Part of the joy of baking a big batch of these Texas Roadhouse Rolls is knowing you have leftovers for the next day! The trick is keeping that beautiful fluffy texture intact, especially since bread tends to go stale quickly. If you plan on eating them within a couple of days, simple room temperature storage works great. But if you made a huge batch and need them to last longer, freezing is the way to go. We want to preserve that soft, pull-apart quality we worked so hard to achieve during the baking process. For more baking tips, check out our Pinterest page.
Best Practices for Storing and Reheating
For short-term storage, wrap the rolls tightly in foil or place them in an airtight container. For longer storage, I always let them cool completely first, then wrap them tightly in plastic wrap and then foil before popping them in the freezer. When it’s time to eat them, reheating is key to bringing back that fresh-from-the-oven taste! A quick blast in the oven is much better than the microwave, which can make them tough.
| Storage Duration | Method | Reheat Instructions |
|---|---|---|
| 1-2 Days | Airtight container at room temperature | Wrap loosely in foil, heat at 300°F for 5 minutes. |
| Up to 3 Months | Double-wrapped in freezer bags | Thaw completely, then wrap in foil and bake at 350°F for 8-10 minutes. |
Nutritional Profile of These Vegetarian Dinner Rolls
I know many of you are watching your intake, just like I was during my 80-pound journey, so I wanted to give you a heads-up about what’s in these amazing Texas Roadhouse Rolls. Since they are made with real butter and sugar, they are definitely a treat, but they are vegetarian and surprisingly reasonable per roll! We’re using good, whole ingredients, so you know exactly what you’re putting into your body. While they are comfort food, they fit beautifully into a balanced meal plan when you control the portion size. If you are looking for other lighter meal options, consider trying our Texas Roadhouse Style Baked Salmon.
| Nutrient | Approximate Value (Per Roll) |
|---|---|
| Calories | Approx. 150 |
| Fat | Approx. 5g |
| Carbohydrates | Approx. 23g |
| Protein | Approx. 3g |

Amazing 150 Calorie Texas Roadhouse Rolls
- Total Time: 2 hours 10 minutes
- Yield: 24-30 rolls
Description
Make perfect Texas Roadhouse Rolls at home with this copycat recipe. These fluffy yeast dough rolls are great for any dinner. Remember to brush them with melted butter right after baking.
Ingredients
- 1 packet active dry yeast
- 1 ¼ cups warm milk (about 105-110 degrees F)
- ⅓ cup granulated sugar
- ¼ cup unsalted butter (room temperature, ½ stick)
- 1 large egg (room temperature)
- 1 teaspoon kosher salt
- 3 ½ – 4 cups all-purpose flour plus more for kneading
- 3 tablespoons unsalted butter melted (for brushing)
Instructions
- In a small bowl, combine warm milk and sugar, sprinkle yeast over top, and let sit for 5 minutes until foamy.
- Add the yeast mixture to a large mixing bowl. Add softened butter, egg, salt, and 2 cups flour. Beat on medium speed until smooth.
- Gradually add remaining flour until a soft dough ball forms. Increase mixer speed and knead for 2-3 minutes until dough is tacky but not sticky, adding flour by tablespoons if needed.
- Grease a large bowl, place dough inside, turn to coat, cover with a dish towel, and let rise in a warm spot until doubled in size (about 45-60 minutes).
- Punch down the dough gently, turn onto a floured surface, and knead lightly if needed.
- Roll the dough into a 12×8 inch rectangle about ½ inch thick. Cut into 24-30 equal squares.
- Place rolls on prepared baking sheets, cover with a towel, and let rise again until nearly doubled (45-60 minutes).
- Preheat oven to 350°F about 20 minutes before rolls finish rising.
- Bake rolls for 12-15 minutes until golden brown.
- Remove from oven and brush with melted butter before serving.
Notes
- For the best flavor, use whole milk.
- Ensure your milk temperature is correct for proper yeast activation.
- Cinnamon butter is a popular topping for these rolls.
- Prep Time: 20 minutes
- Cook Time: 15 minutes